Git & Worktrees
This guide explains how to choose Local or New worktree mode, review file changes, commit and push, and bring uncommitted worktree changes back to the original project. Choose Local to edit the original project directly. Choose New worktree to try an approach independently or work on a separate task in parallel.
Choose how to work on your task
Git saves file versions. Branches separate different lines of development. A worktree provides another working directory for the same repository.
| Comparison | New local session | New worktree session |
|---|---|---|
| When to use it | Continue editing files in the original project | Try a new approach or work independently on another task |
| What is created | A new session using the original project directory | A new session and a separate working directory |
| Where changes are saved | In the original project files | In the files inside the worktree directory |
| Relationship to other sessions | Sessions using the same directory share its files | Tasks using different worktrees modify their own directories |
| How to handle the results | Commit and push from the original project | Commit and push from the worktree, or bring uncommitted changes back to Local |
A commit saves a version in the local repository. A push uploads commits to a remote repository. A merge incorporates commits from one branch into another. These are separate operations.
Before you start
- Open DeepWorks and select a local workspace.
- Make sure the directory is a Git repository with at least one commit. For an ordinary folder, initialize the repository and create its first commit in Git Review.
- If Git is unavailable, follow the on-screen instructions to install it and check again. Restart DeepWorks after installation if necessary.
- To push, first confirm that a remote is configured and that your computer has permission to access it.
Common entry points: use New session in the left sidebar to start a task, Git Review in the right toolbar to inspect changes, and Settings → Git in the account menu to adjust Git rules.
Local sessions
Create a session and run a task
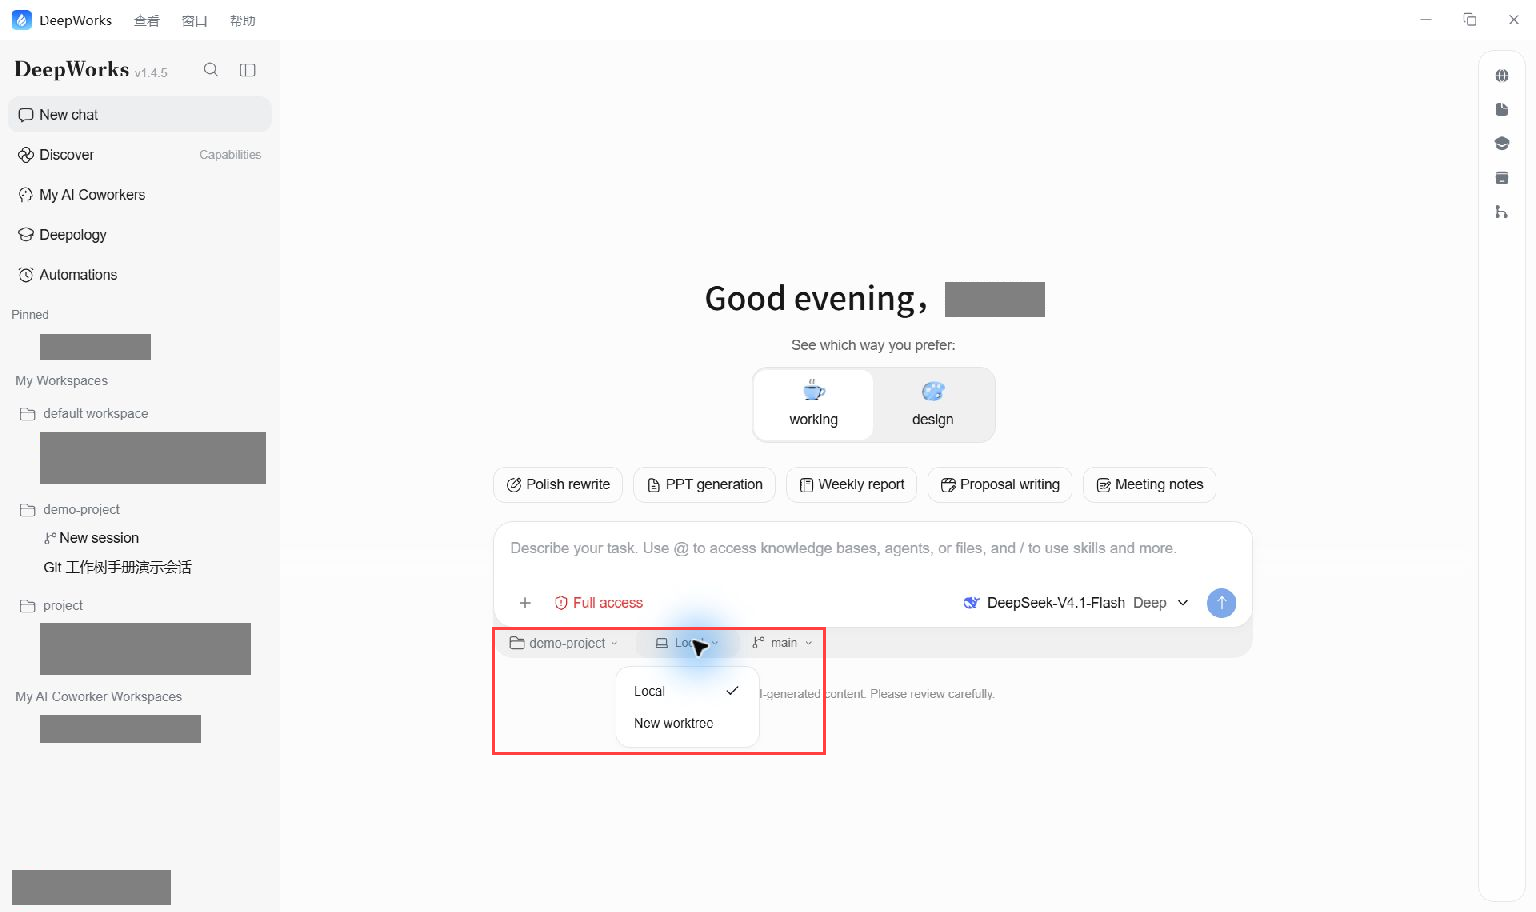
- Click New session and select a workspace in the input area.
- Select Local and the local branch you want to use.
- Enter and send a task, such as “Update the home page button text.” Changes are written directly to the original project directory.
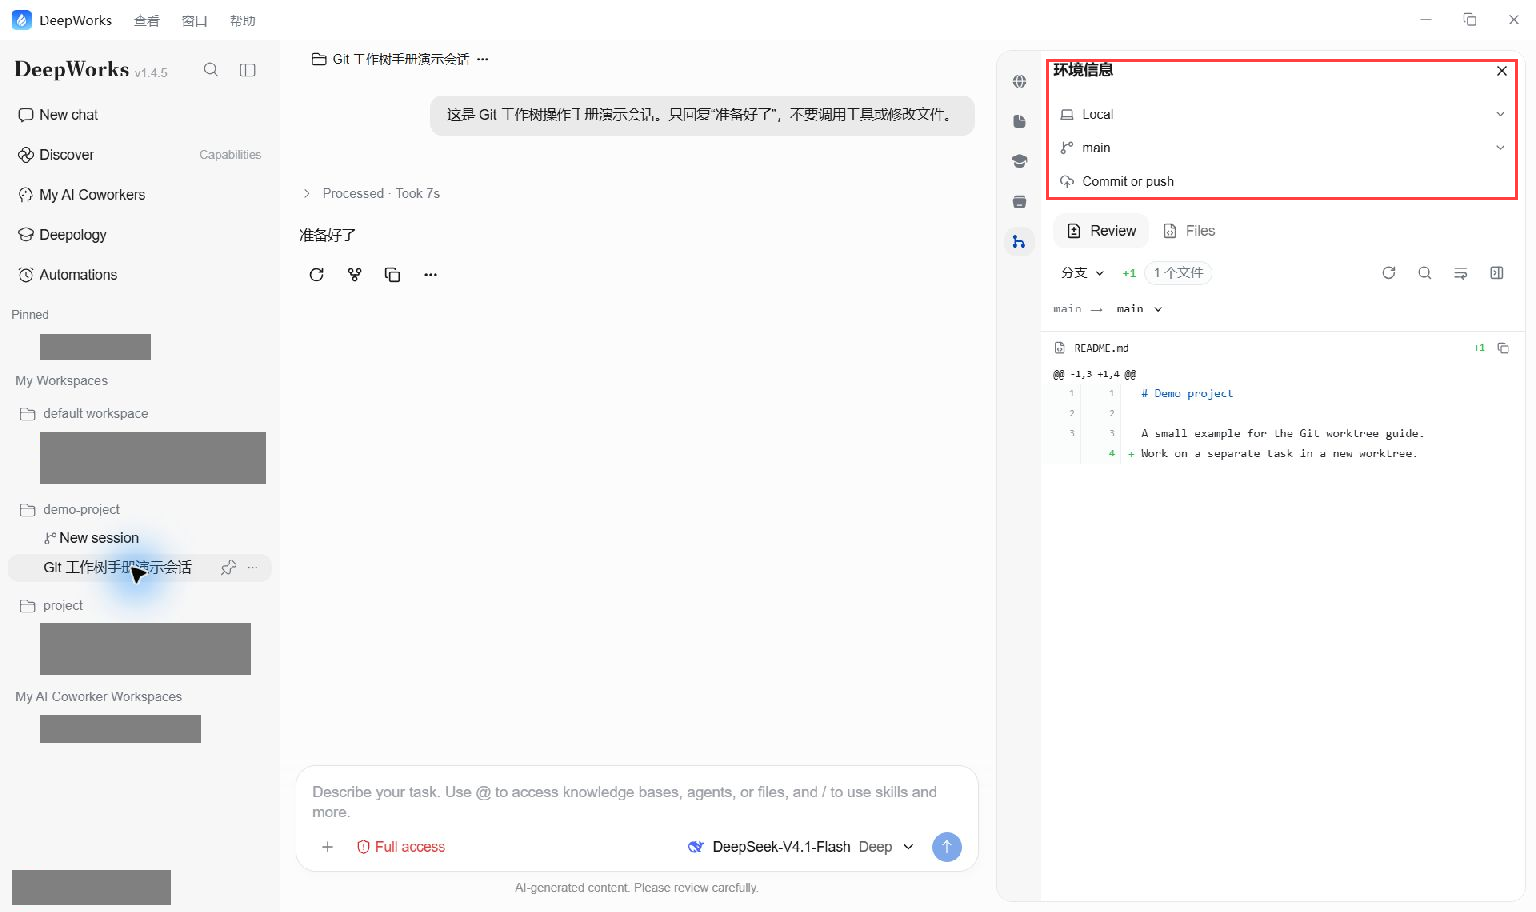
- Open Git Review. Confirm that Environment information shows Local and the correct branch, then review the file changes.
Switching a local branch switches the branch in the original project directory. If the directory contains uncommitted changes, the app asks you to commit them before switching. Switching branches does not create a separate working directory. A branch already in use by another worktree cannot be checked out directly in Local.
Commit and push
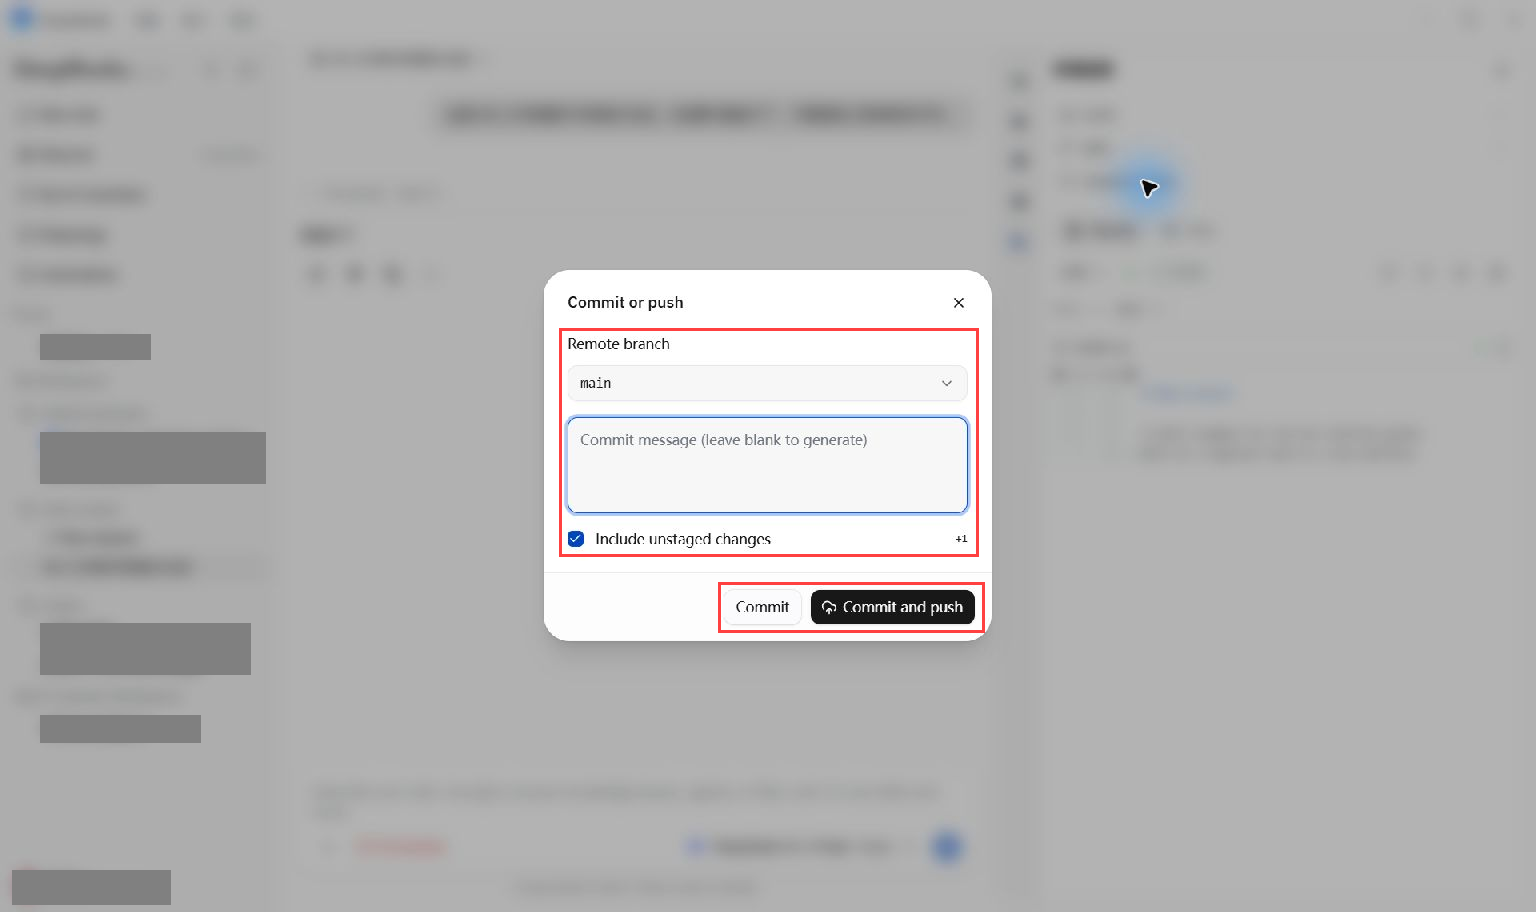
- After reviewing the changes, click Environment information → Commit or push.
- Enter a commit message. If you leave it blank, the app attempts to generate one. Check its content before committing.
- To include unstaged changes in the commit, select Include unstaged changes.
- Click Commit to save a local version, or Commit and push to upload it as well. If there are no changes to commit, use Push to upload existing commits.
You cannot push without a configured remote. After a successful push, check the branch and commit in the remote repository.
New worktree sessions
Create a separate directory
- Click New session and select a local workspace.
- Select New worktree and a starting branch, such as
main. - Enter and send your task. The system starts creating the worktree and session only when you send the first message.
- If creation takes longer, a progress indicator shows the project status check, worktree creation, session creation, and completion.
- After creation succeeds, open Git Review and confirm that Environment information shows Worktree. Subsequent messages in the session continue to use that worktree.
The worktree is created from the committed version of the selected branch. It does not include uncommitted changes in the original directory. Changes made in the worktree are not automatically synchronized back to the original project.
Create a worktree in an existing session
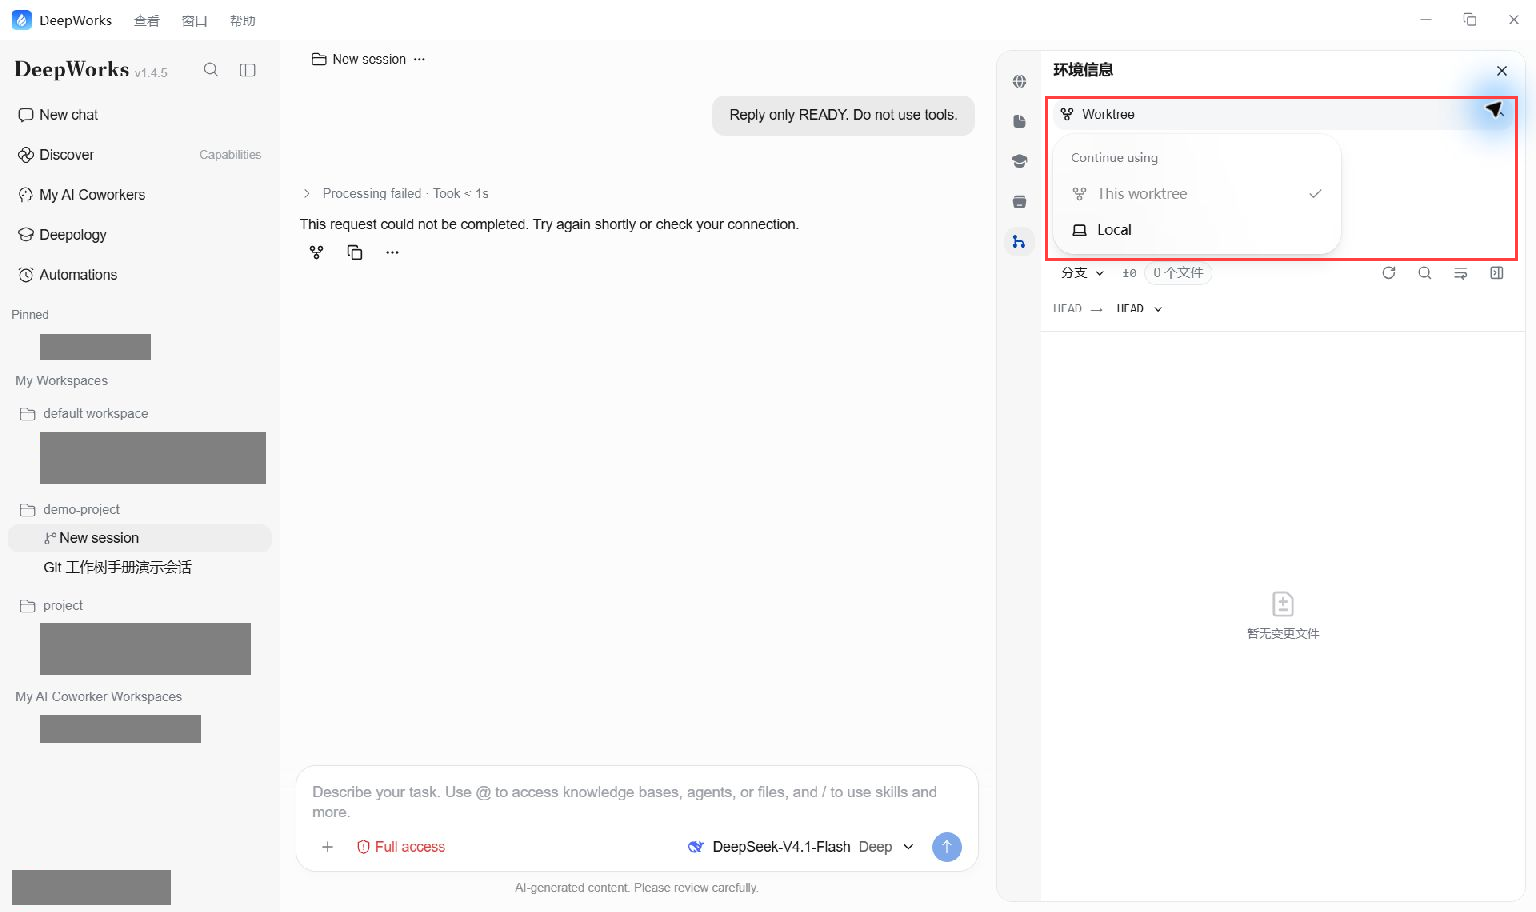
In a local session, open Git Review and click Local → New worktree. After creating a separate worktree, the system binds it to the current session. Use the progress indicator to check whether creation and binding have completed.
This entry requires an existing session and a valid branch. It may be unavailable if no session has been created or selected, or if the current checkout is in a HEAD state without a branch name. The new worktree is still based on a committed version; it does not automatically move uncommitted changes out of the original directory.
If creation fails
If worktree creation fails for a new session, the app shows the failed stage and provides an additional explanation when it can identify the cause.
| Message or symptom | What to do |
|---|---|
| No usable Git installation detected | Install Git 2.17 or later, check again, and retry |
| The selected branch does not exist locally | Select an existing local branch again |
| The worktree directory is already in use | Close the failure overlay and retry; contact support if the problem persists |
| Creation or binding failed | Check which directory the session is actually using, keep the error message, and retry |
After an error, the presence of a new directory alone does not mean the session has switched successfully. Check the session’s environment information and success message.
Review file changes
In the Review area of Git Review, select the scope you want to inspect.
| Review scope | What it shows |
|---|---|
| Unstaged | Changes not yet added to the staging area |
| Staged | Changes added to the staging area and waiting to be committed |
| Commit | Changes in the current commit |
| Branch | Differences between the current working branch and the target branch |
If a scope shows “0 files,” other scopes may still contain changes. Local sessions sharing a directory may also show changes made by other sessions using that directory.
The file list may be collapsed by default. Click Show file list in the toolbar to expand it, then select a file to view its diff. You can also use Jump to file, refresh changes, and toggle line wrapping.
Choose where to continue working
Create a branch and stay in the worktree
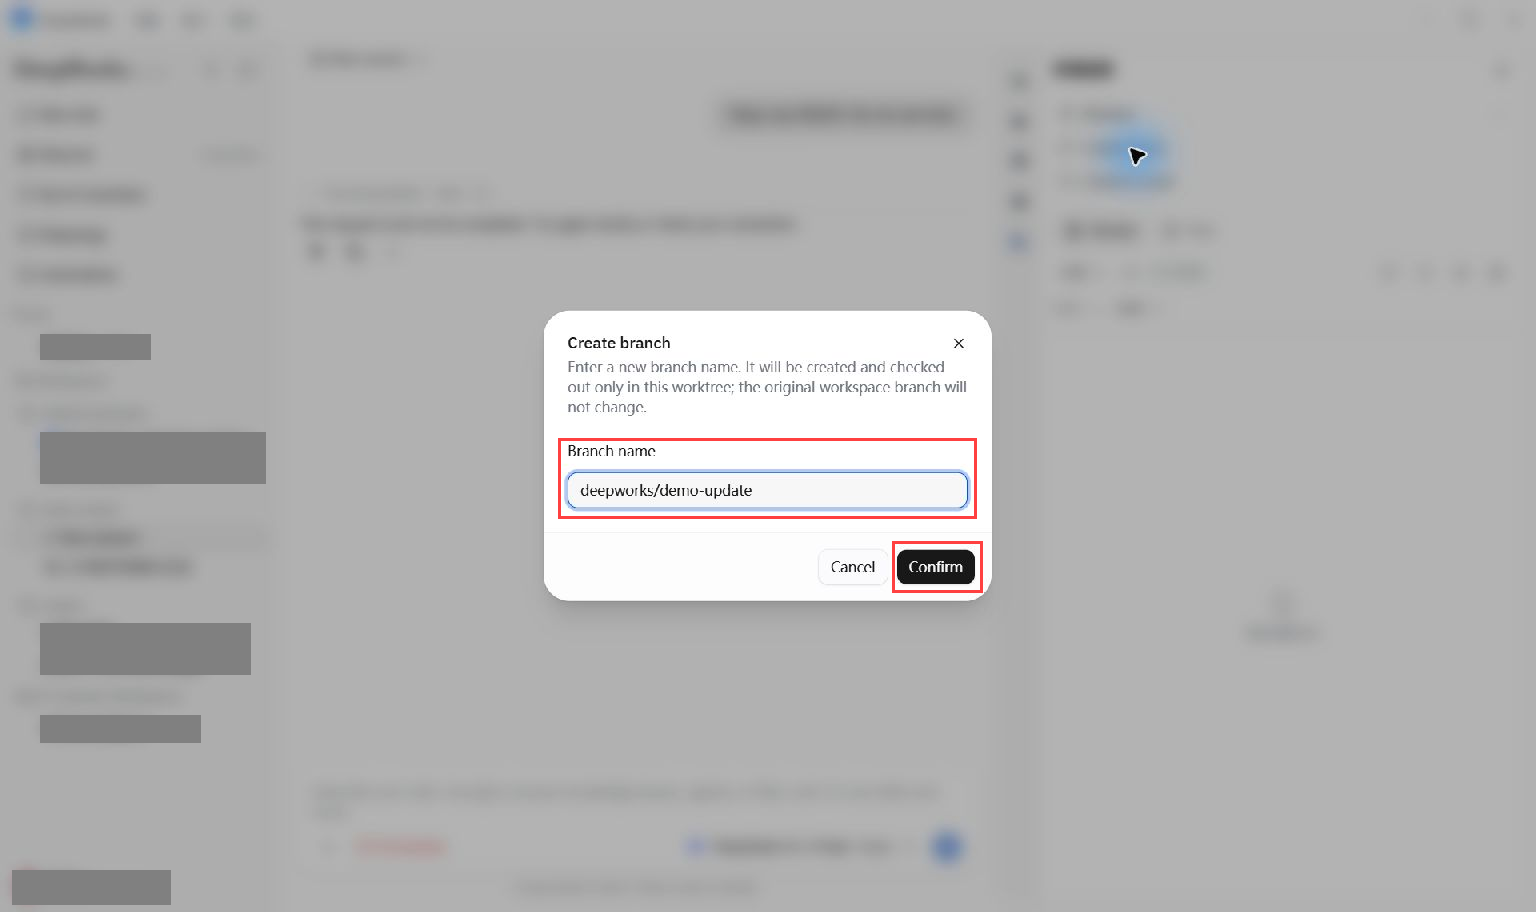
If the worktree does not have a branch yet, it may show HEAD or Create branch. Click Environment information → Create branch, enter a new branch name, and confirm.
After this succeeds, the current worktree switches to the new branch. The branch in the original project directory remains unchanged, and uncommitted changes stay in the worktree. Creating a branch does not automatically commit files. Continue your task, then commit and push as needed.
Bring uncommitted changes back to Local
- First handle any existing uncommitted changes in the original project directory to avoid overwriting work in progress.
- In the worktree session, click Worktree → Local.
- Enter a local branch name that already exists in the original workspace and is not in use by another worktree.
- Wait for the status check to finish, then check the target location and the number of changes to be carried over.
- Click Check out. After it succeeds, confirm that the environment shows Local and the target branch, then inspect the files in the original directory.
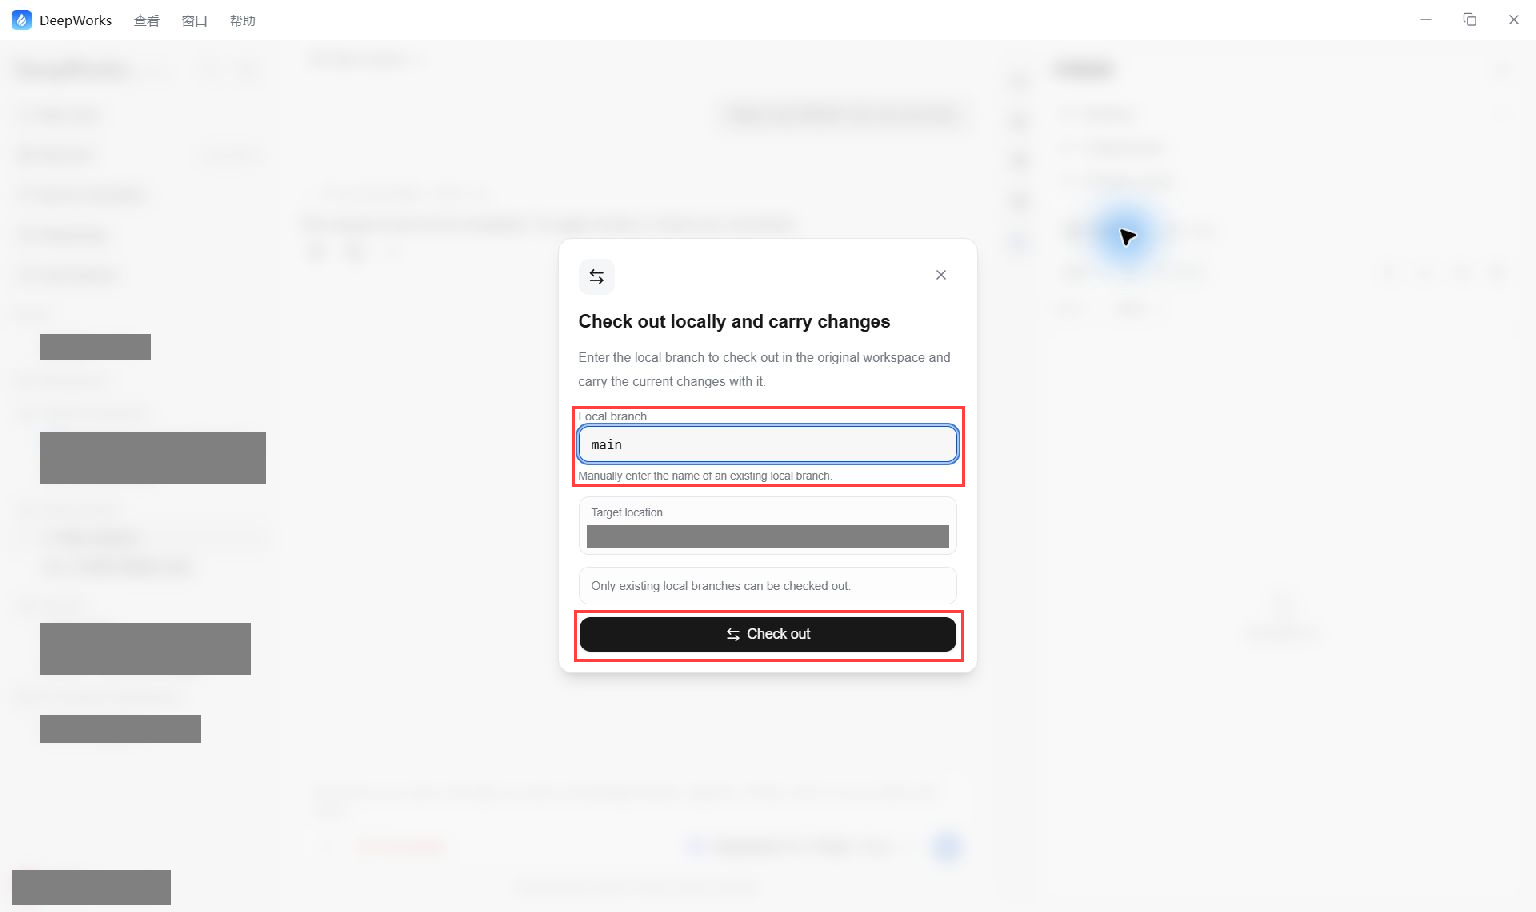
This operation carries over uncommitted changes from the current worktree. It does not automatically merge the worktree’s existing commits into the target branch. Handle committed work through Git workflows such as branch merging. Completing a checkout does not commit or push the changes.
Frequently asked questions
Why are my latest original-directory changes missing from the new worktree
The new worktree is based on the committed version of the starting branch. If you need those changes, commit them correctly on the original branch first, then create a worktree from a branch containing that commit.
Why does a local session show changes from other tasks
Multiple local sessions may share the same project directory. Create separate worktrees for tasks that need to remain independent.
Why can I not check out locally
Check whether the original directory has uncommitted changes, whether the entered local branch exists, whether another worktree is using it, and whether Git status was read successfully. Follow the on-screen instructions and retry.
How do I confirm an operation has finished
Check that the environment type, branch name, and file content match your expectations. Verify the local commit after committing, and the remote branch after pushing.