Feishu Integration Guide
This guide helps you configure a DeepWorks bot in Feishu so you can use Feishu to control DeepWorks on your computer and complete coding tasks from anywhere.
Prerequisites
Before you start, make sure you meet the following requirements:
- DeepWorks is installed on your computer and the IM Channels remote-control feature is enabled.
- To create an enterprise bot, you need a Feishu enterprise account with permission to create apps.
Create a Feishu App
Sign In to the Developer Console
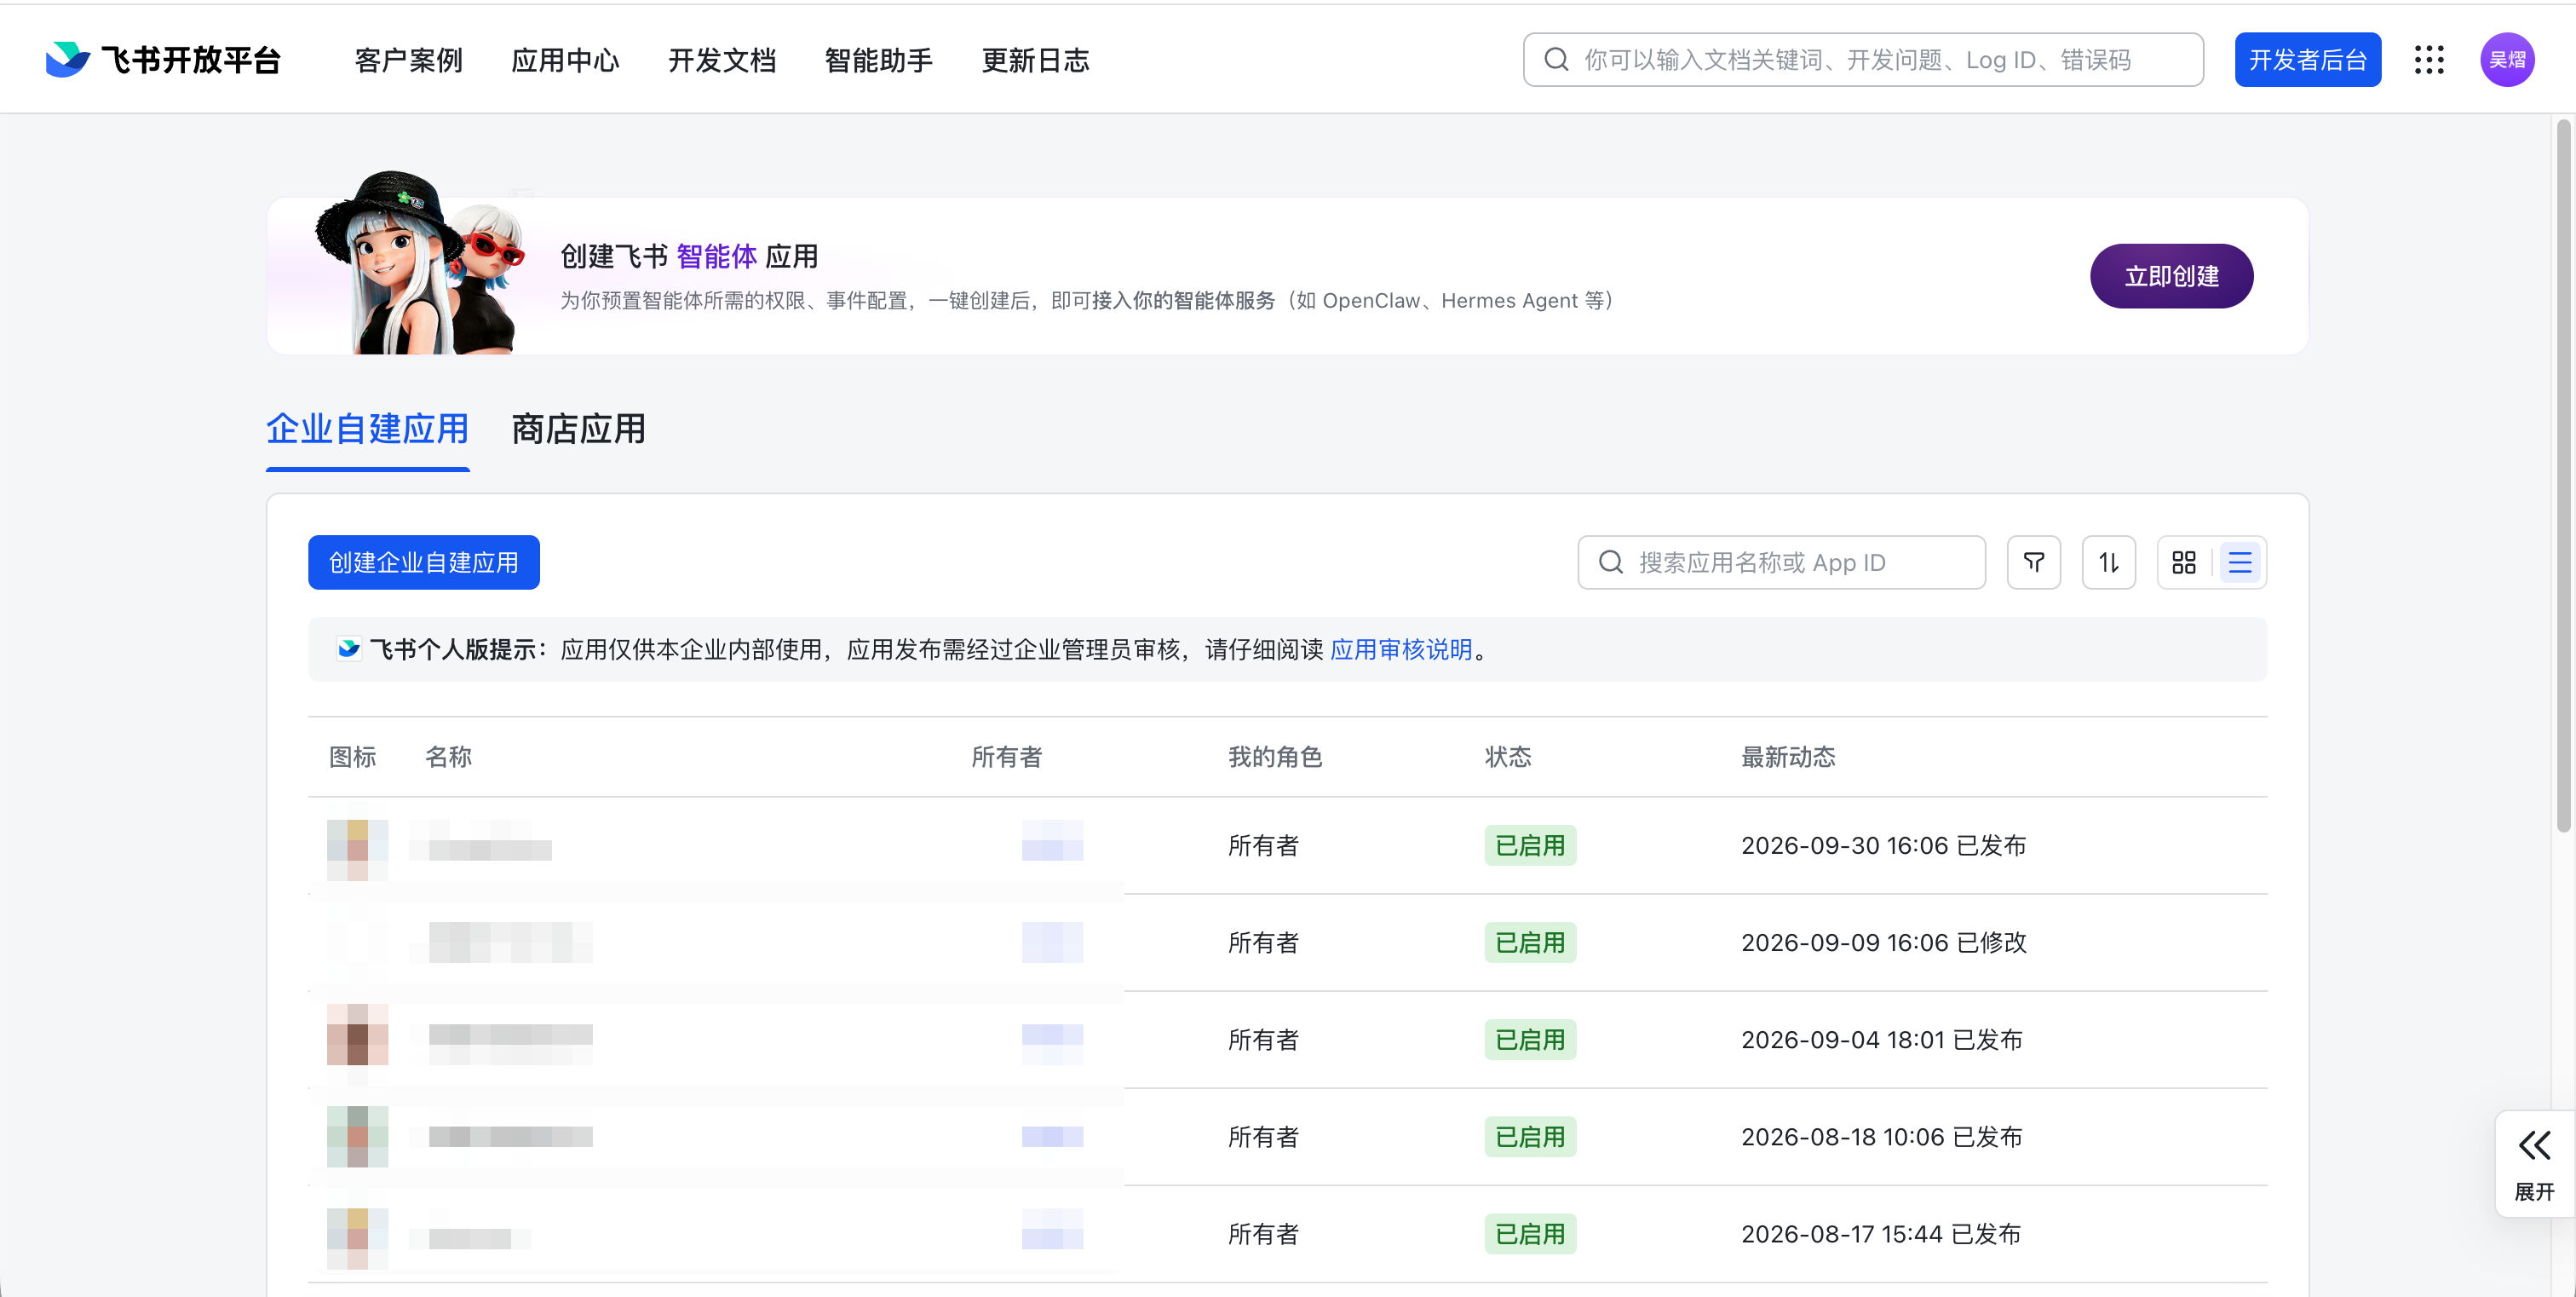
Open a browser, go to the Feishu Open Platform , sign in with your enterprise account, and click Create Enterprise Custom App.
This procedure uses an app bot that can send and receive messages. A Webhook notification bot in a group cannot replace this connection method.
Fill In App Information
In the creation dialog, fill in the following information:
| Field | Description |
|---|---|
| App name | Give the app a name, such as DeepWorks Assistant |
| App description | Briefly describe the app features |
| App icon | Upload an app icon |
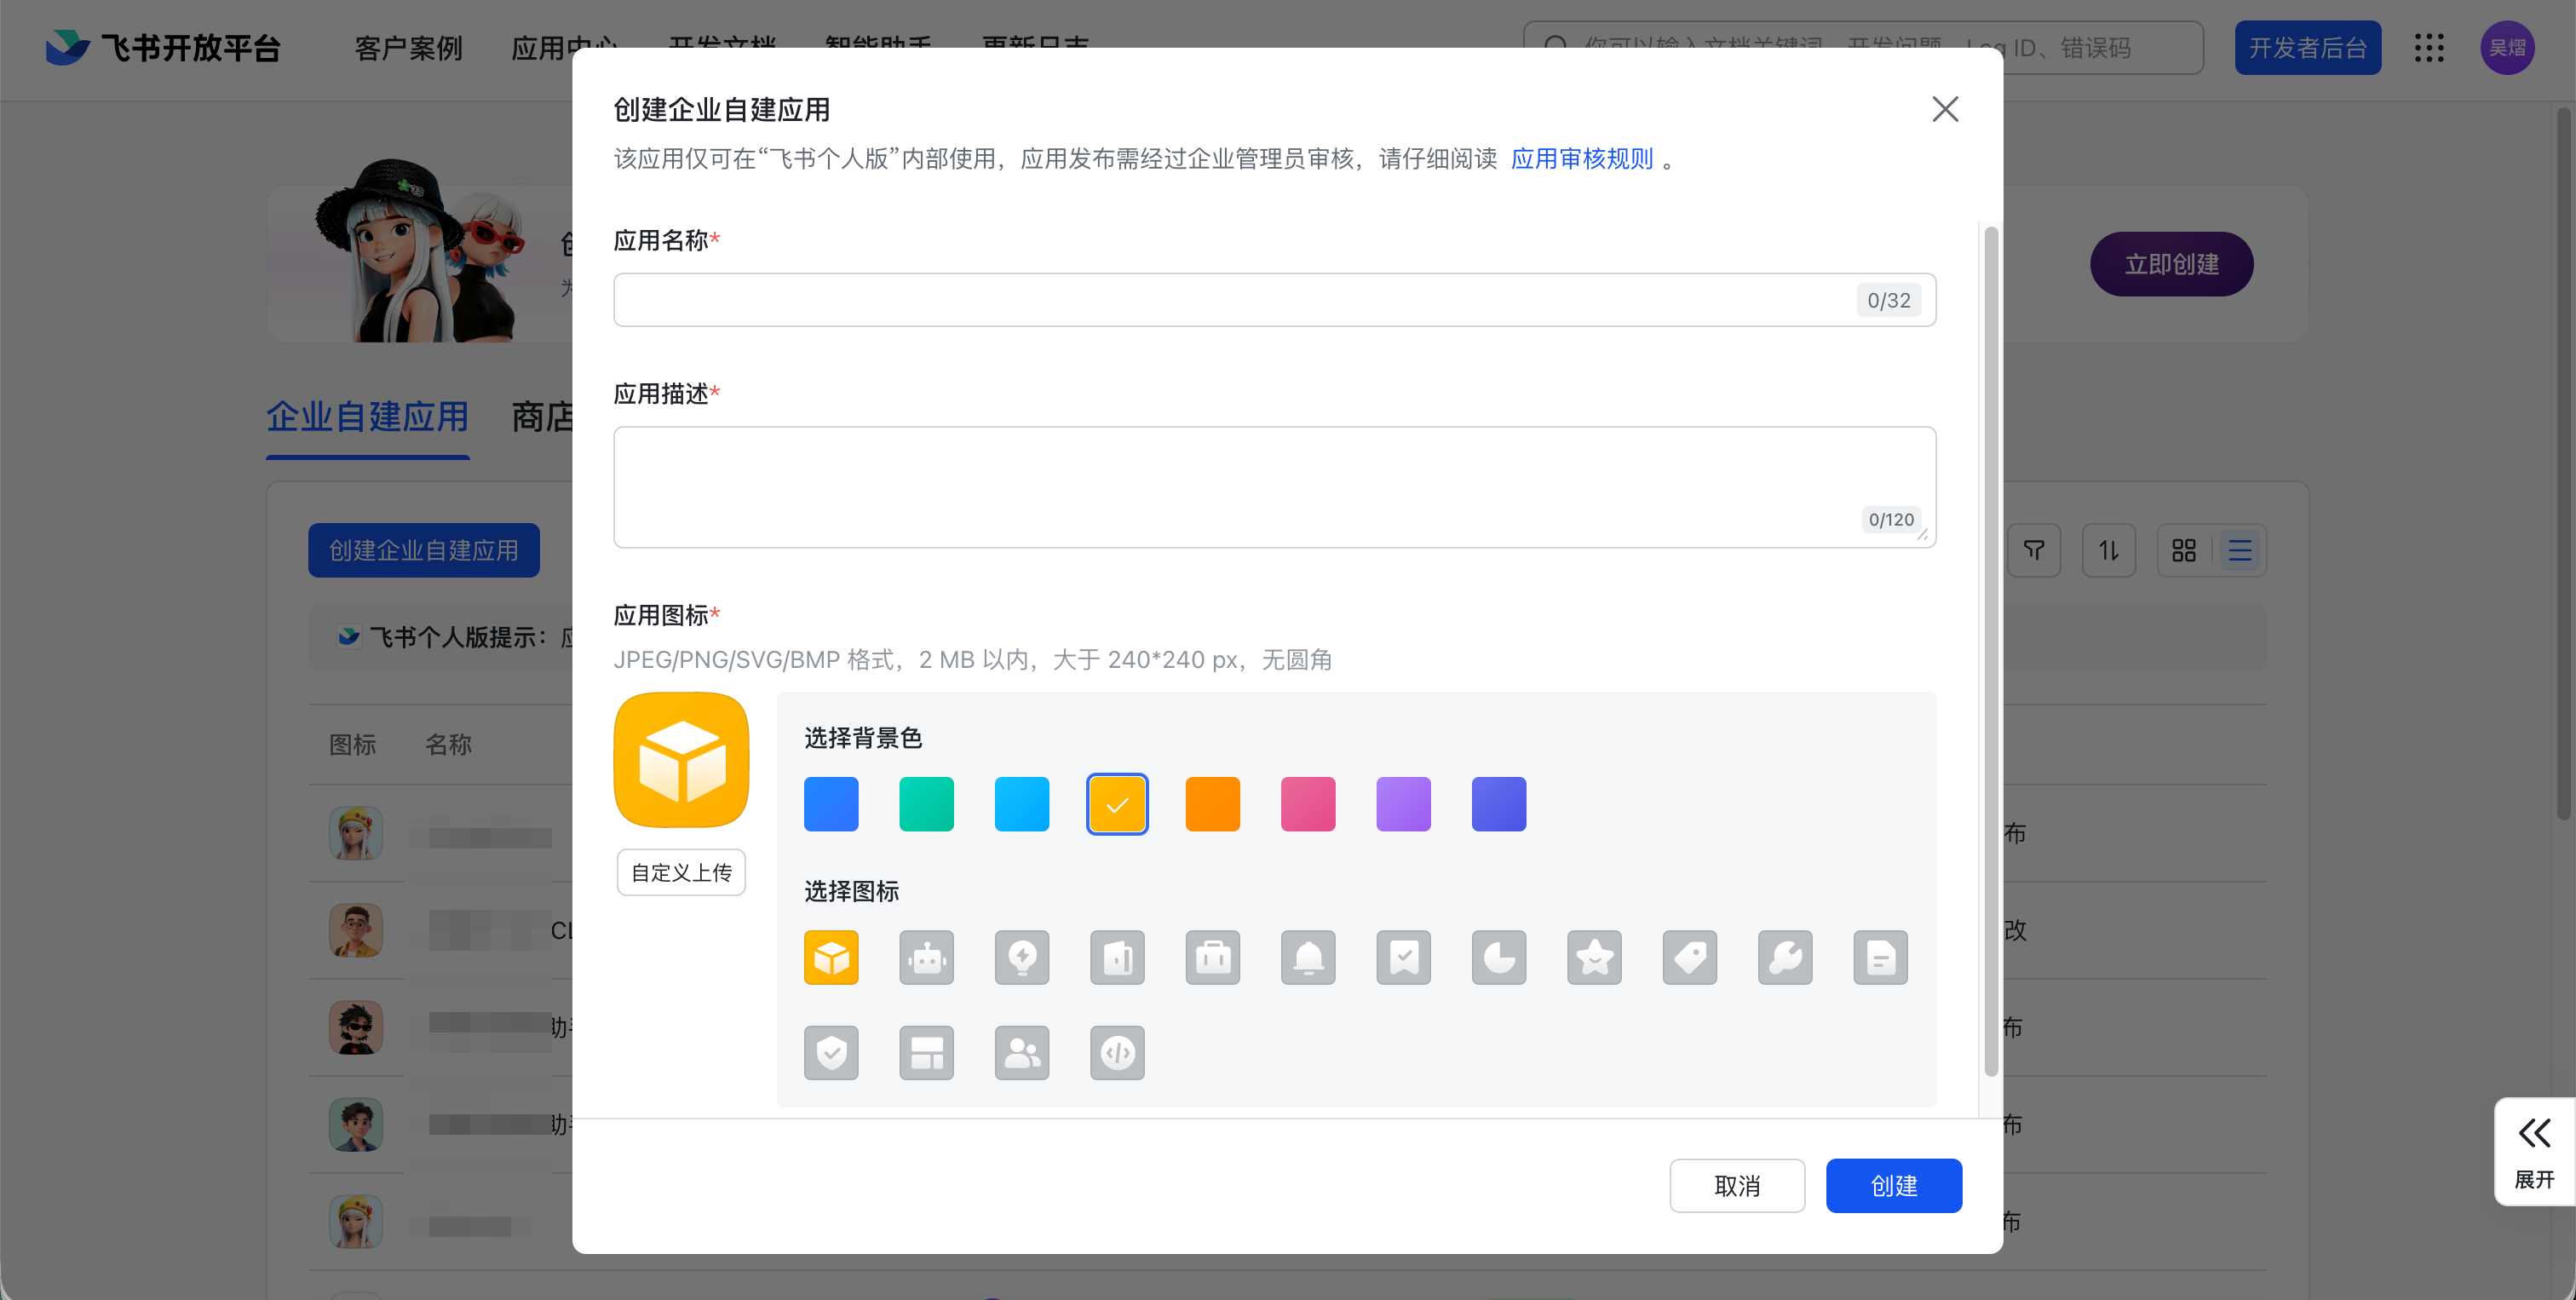
After completing the fields, click Create.
Open App Details
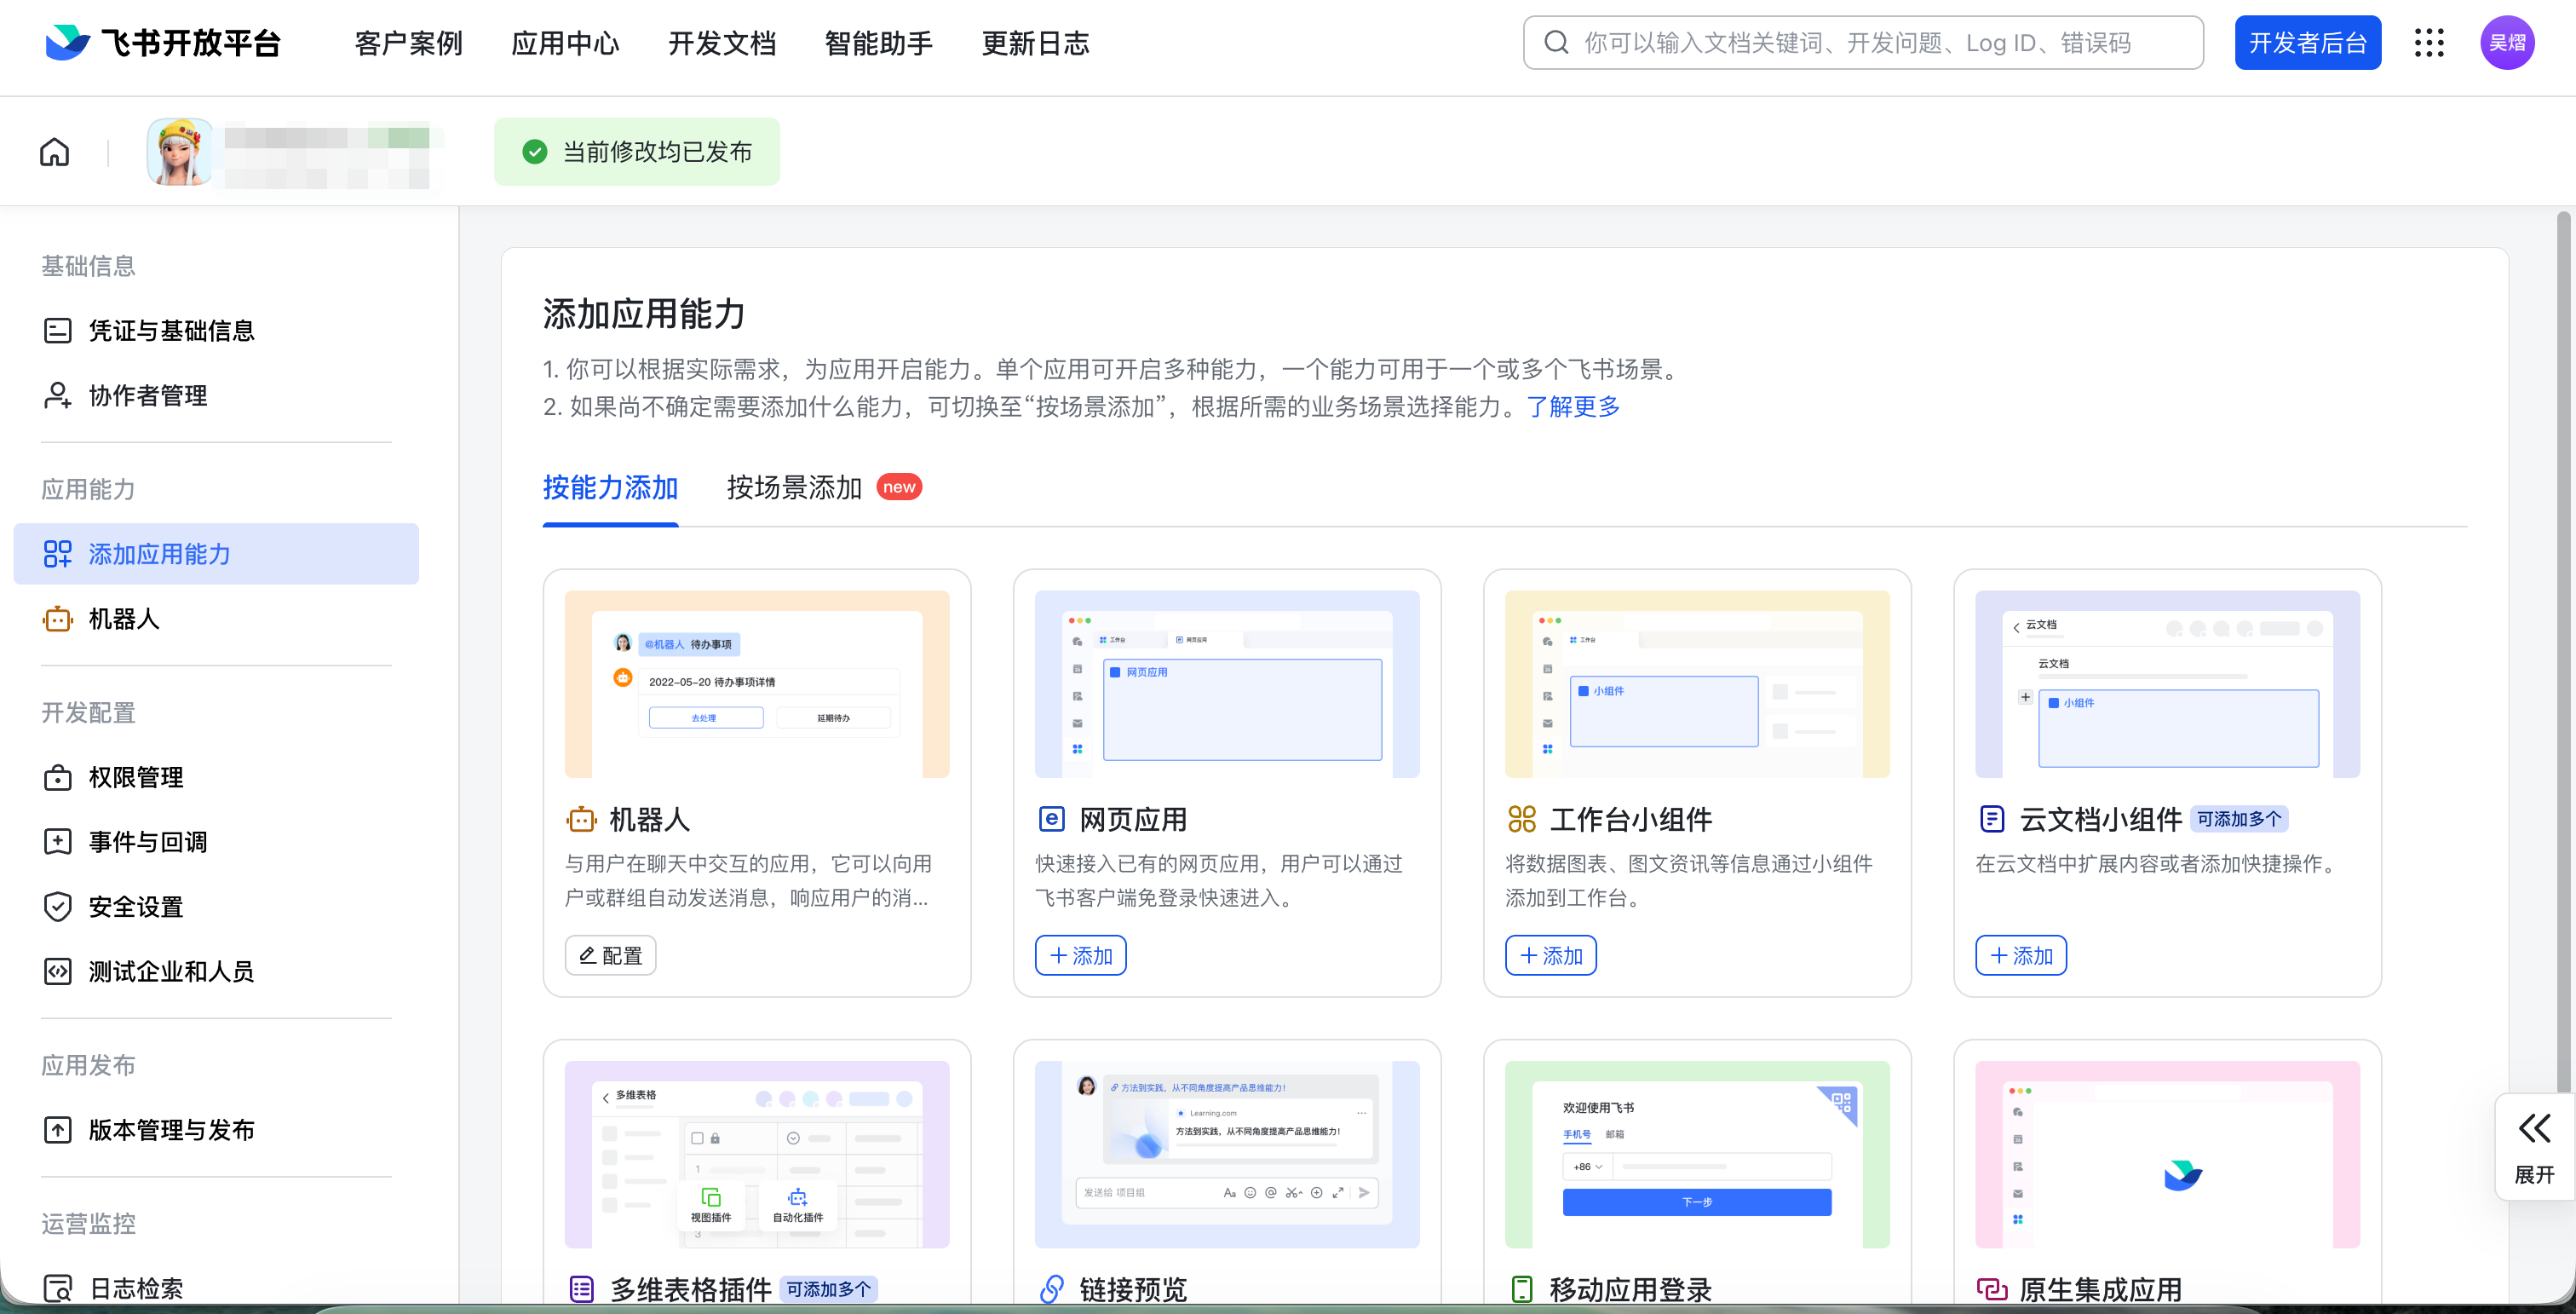
When the app is created, its details page opens automatically. Click Add App Capability, find the Bot card, and click Add.
Configure Events and Callbacks
In the left menu of the app details page, click Events and Callbacks. Configure the receiving methods for events and callbacks, then add the Receive Message event.
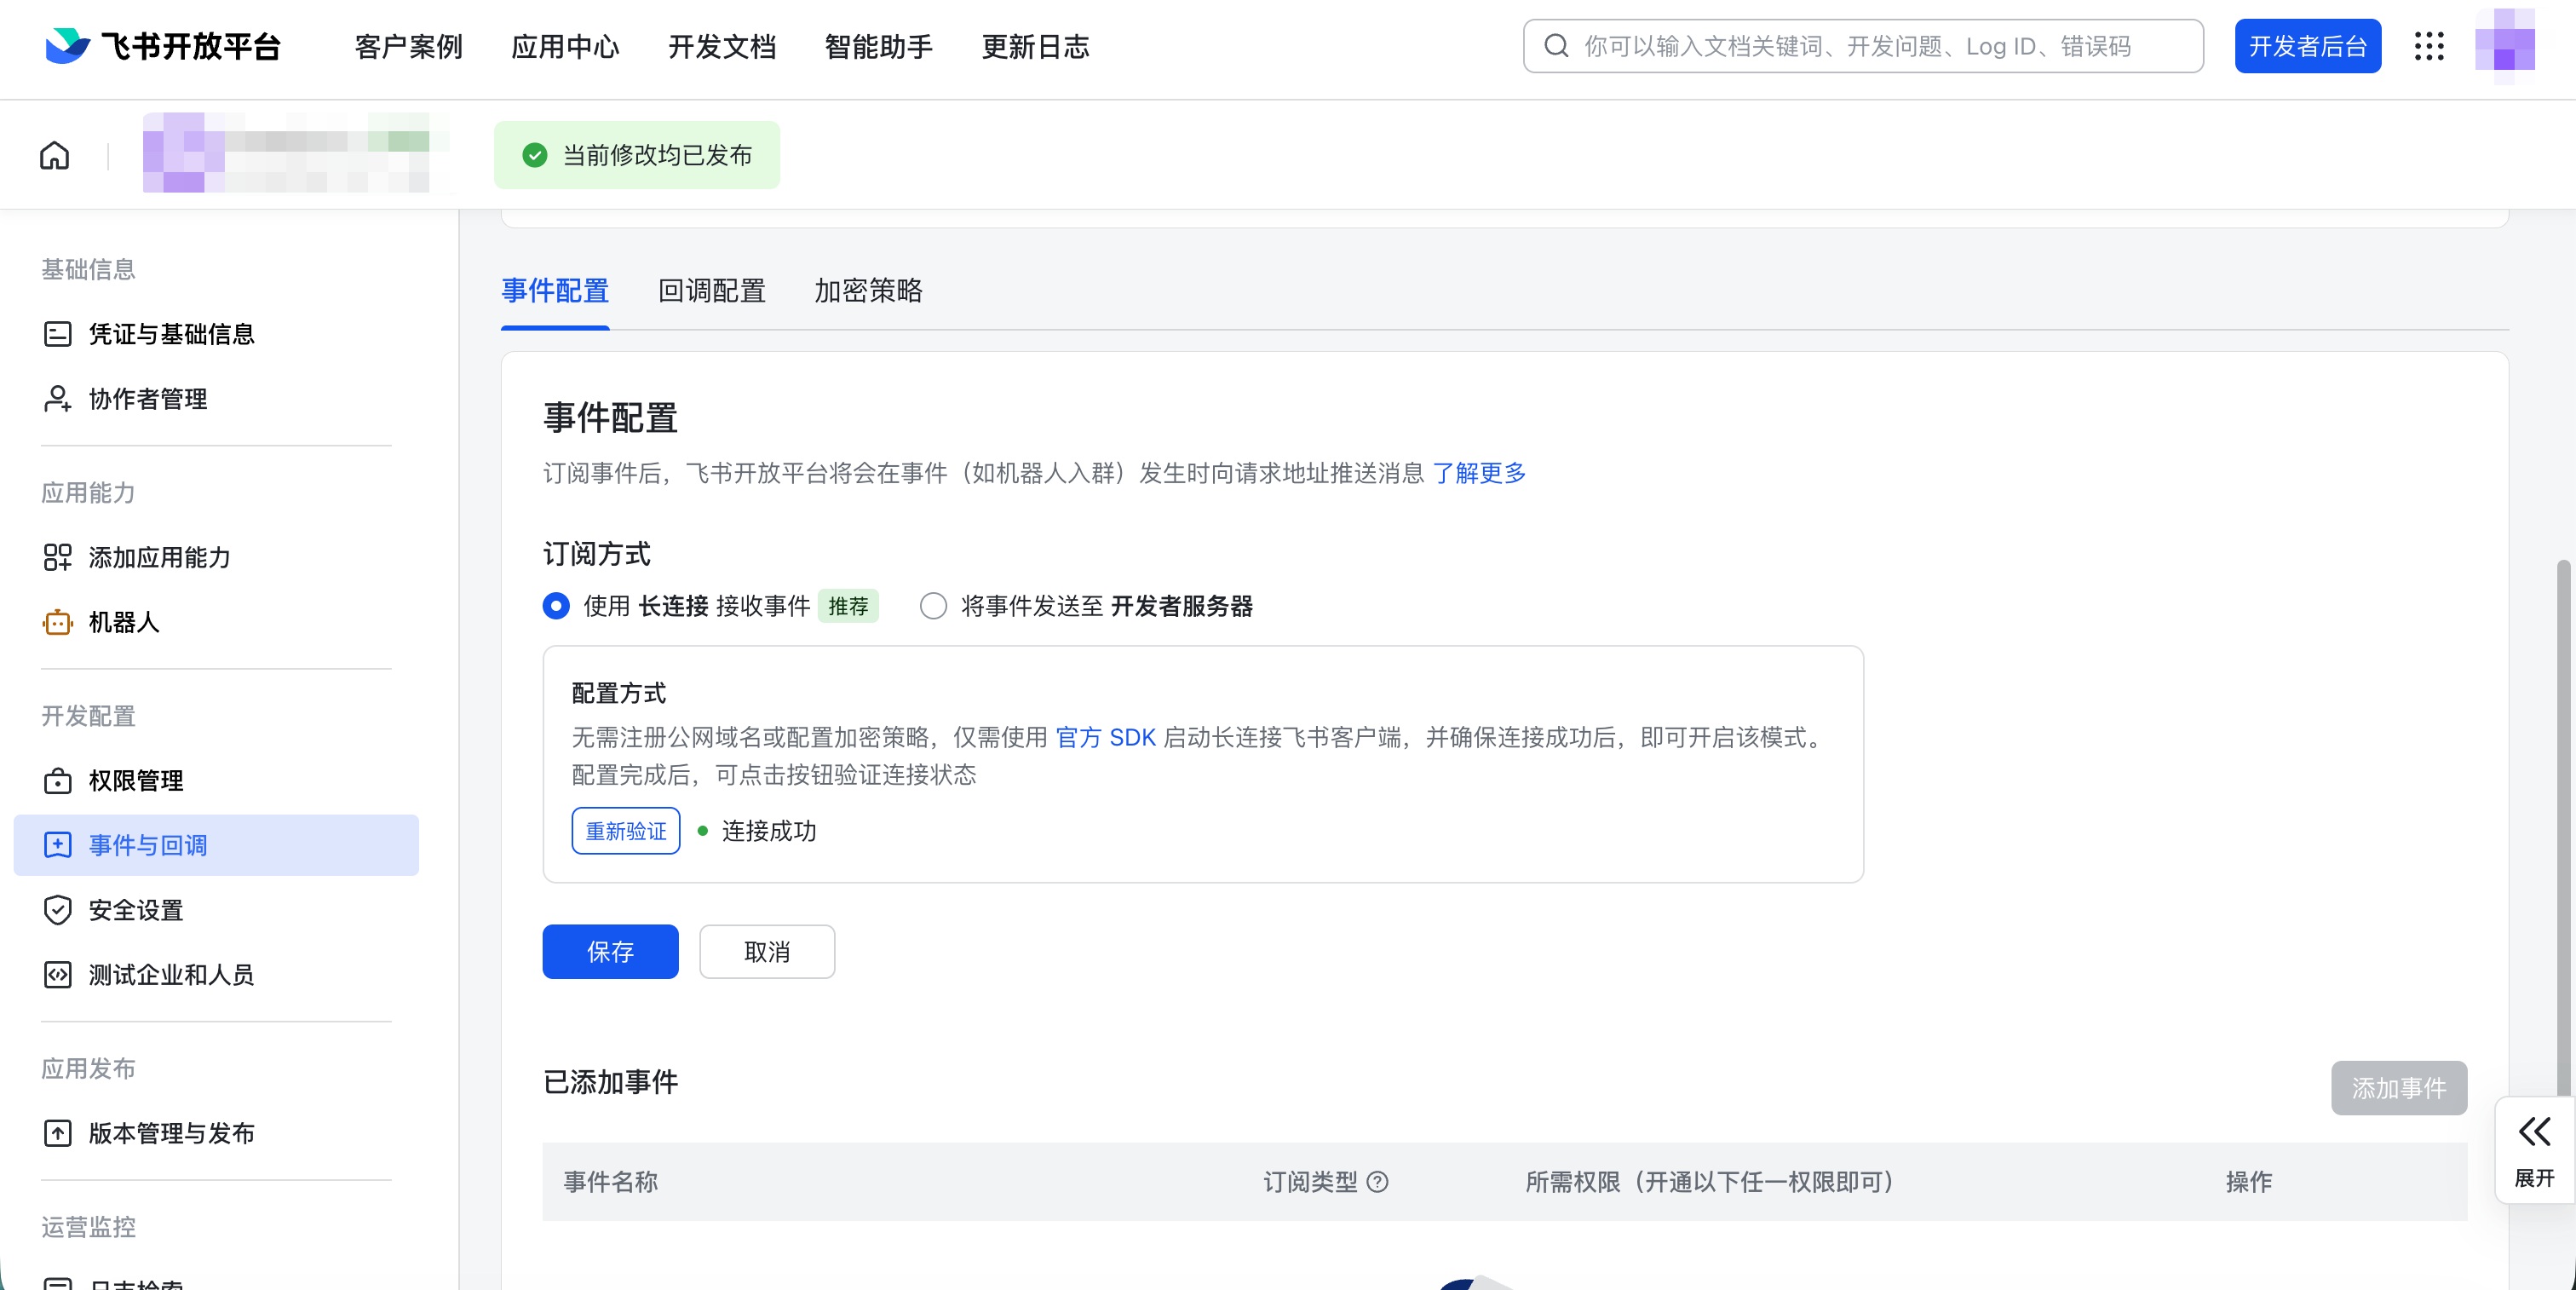
Step 1: Configure the event receiving method
- Open the
Event Configurationtab and selectUse Long Connection to Receive EventsforSubscription Method. - Confirm that
Connection successfulis displayed, then clickSave.
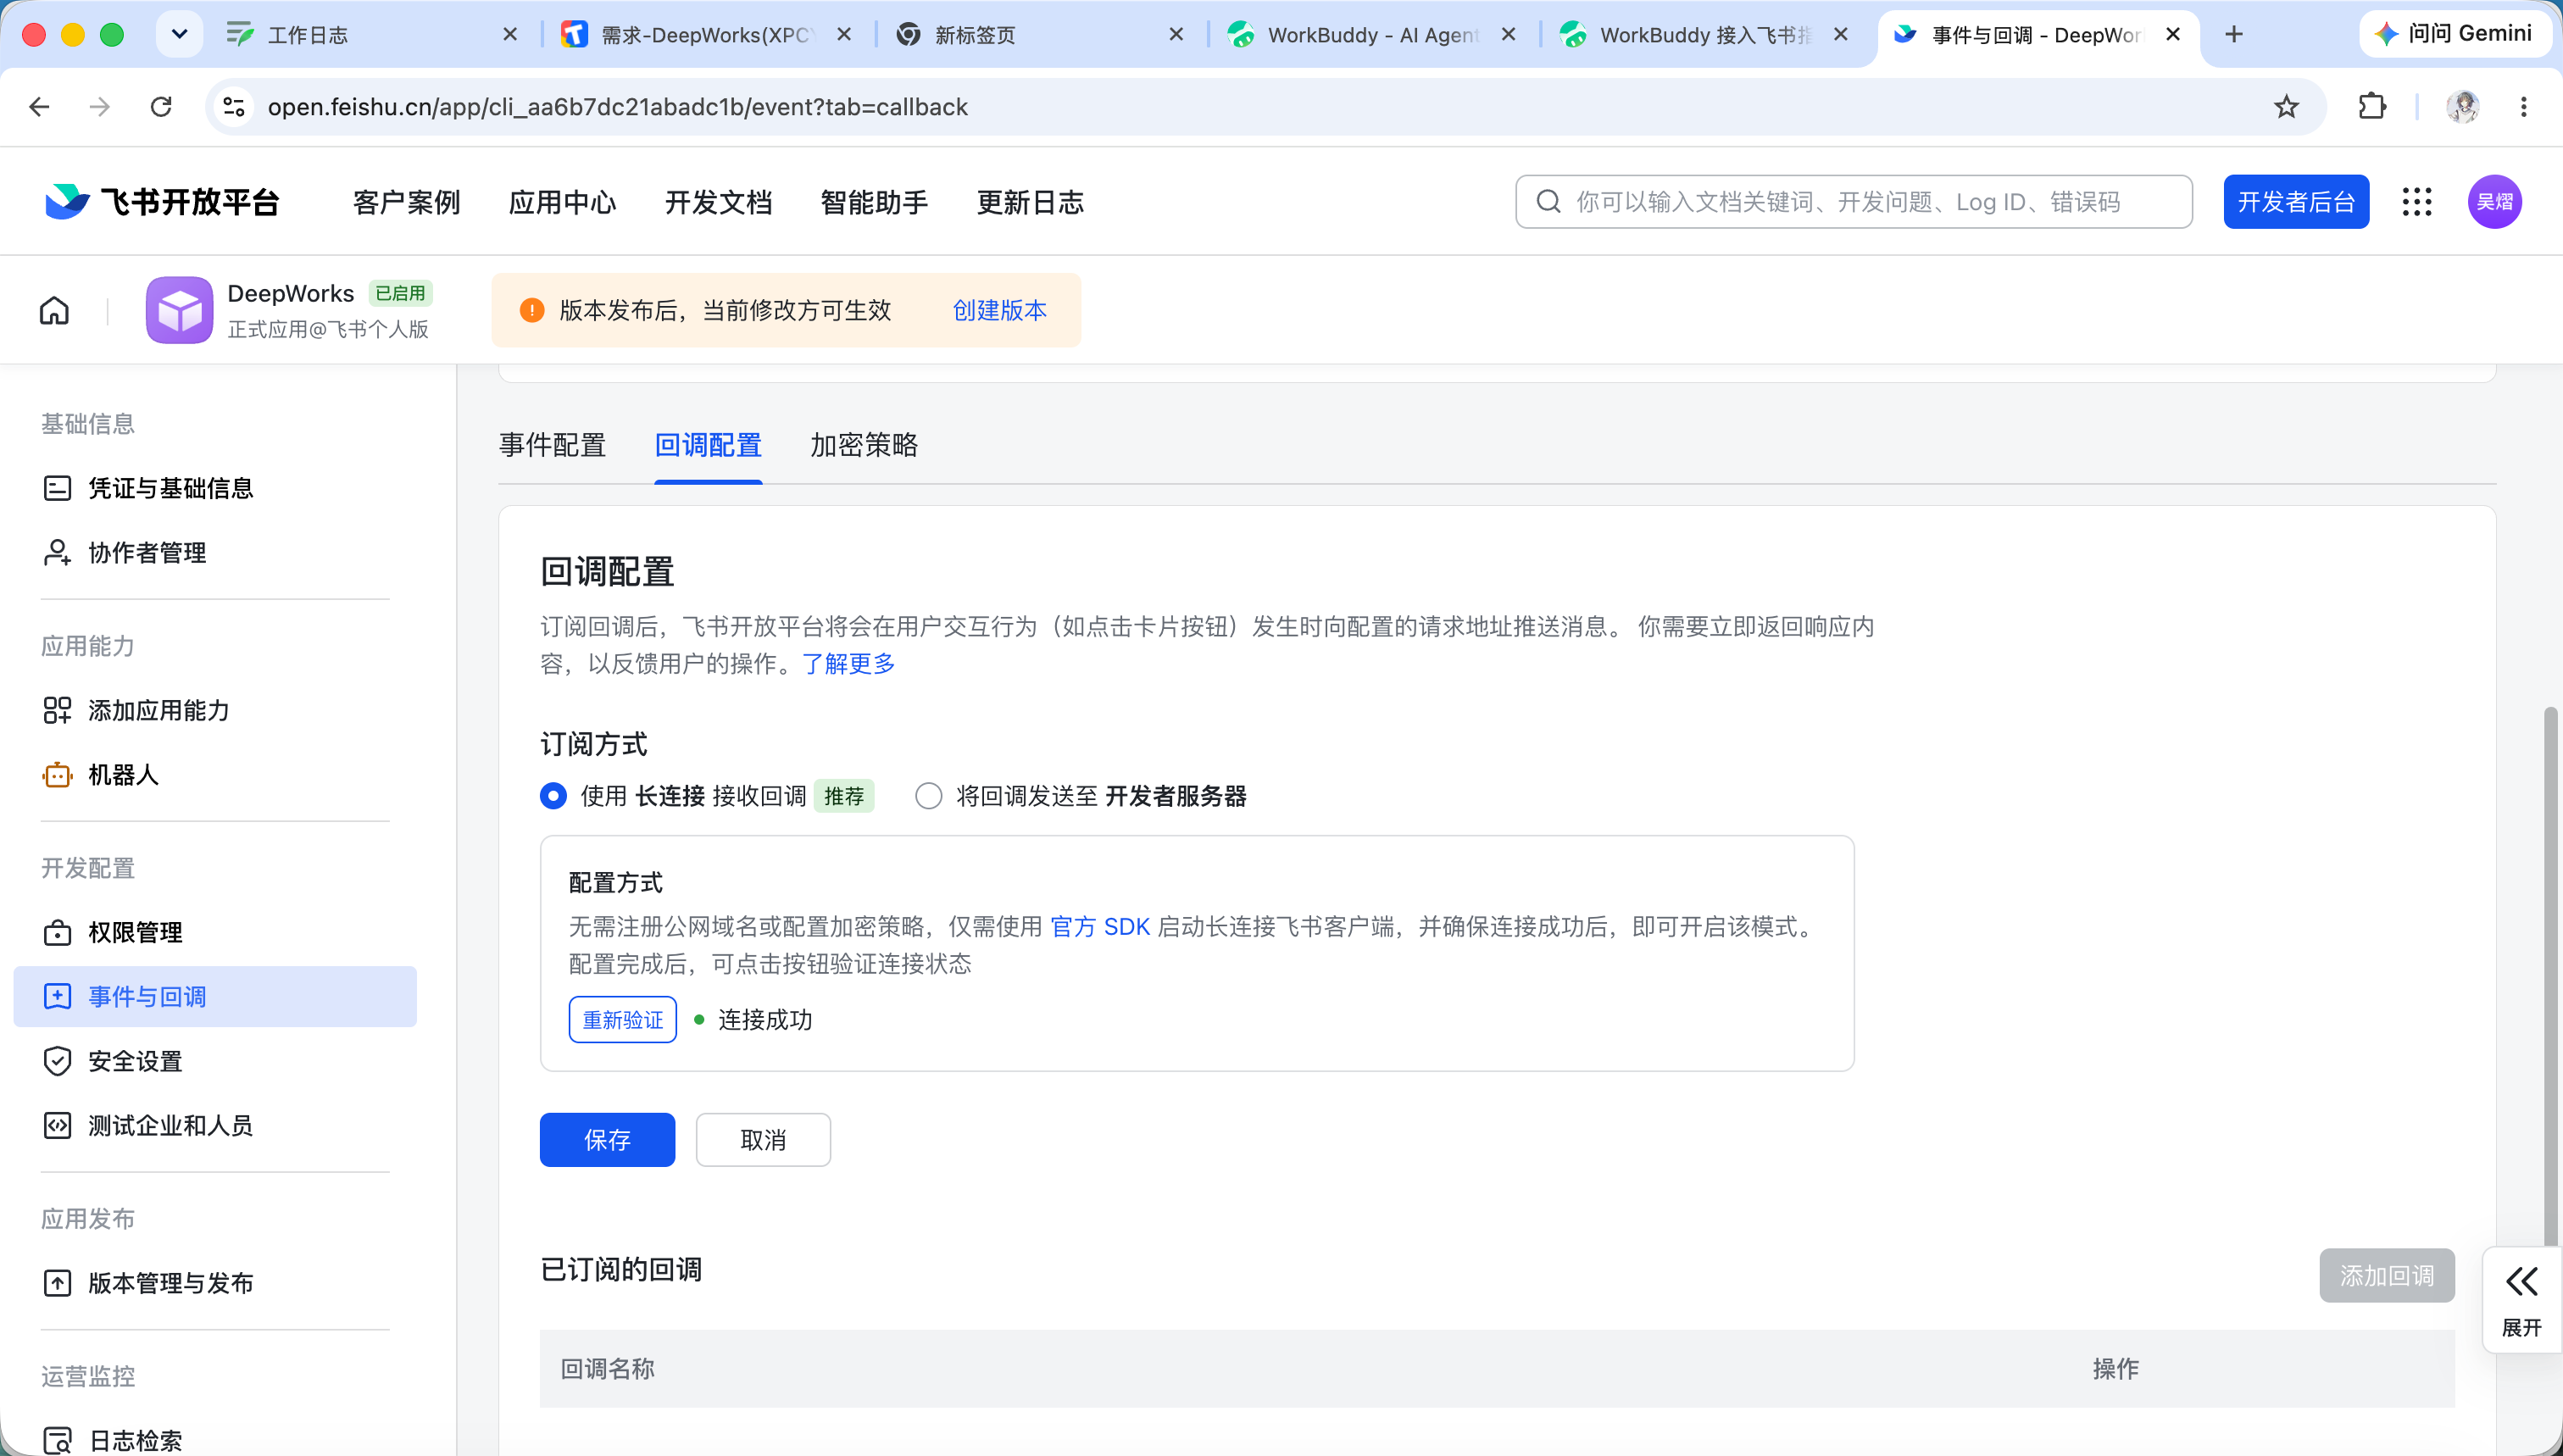
Step 2: Configure the callback receiving method
- Switch to the
Callback Configurationtab and selectUse Long Connection to Receive CallbacksforSubscription Method. - Verify the connection status, confirm that
Connection successfulis displayed, then clickSave.
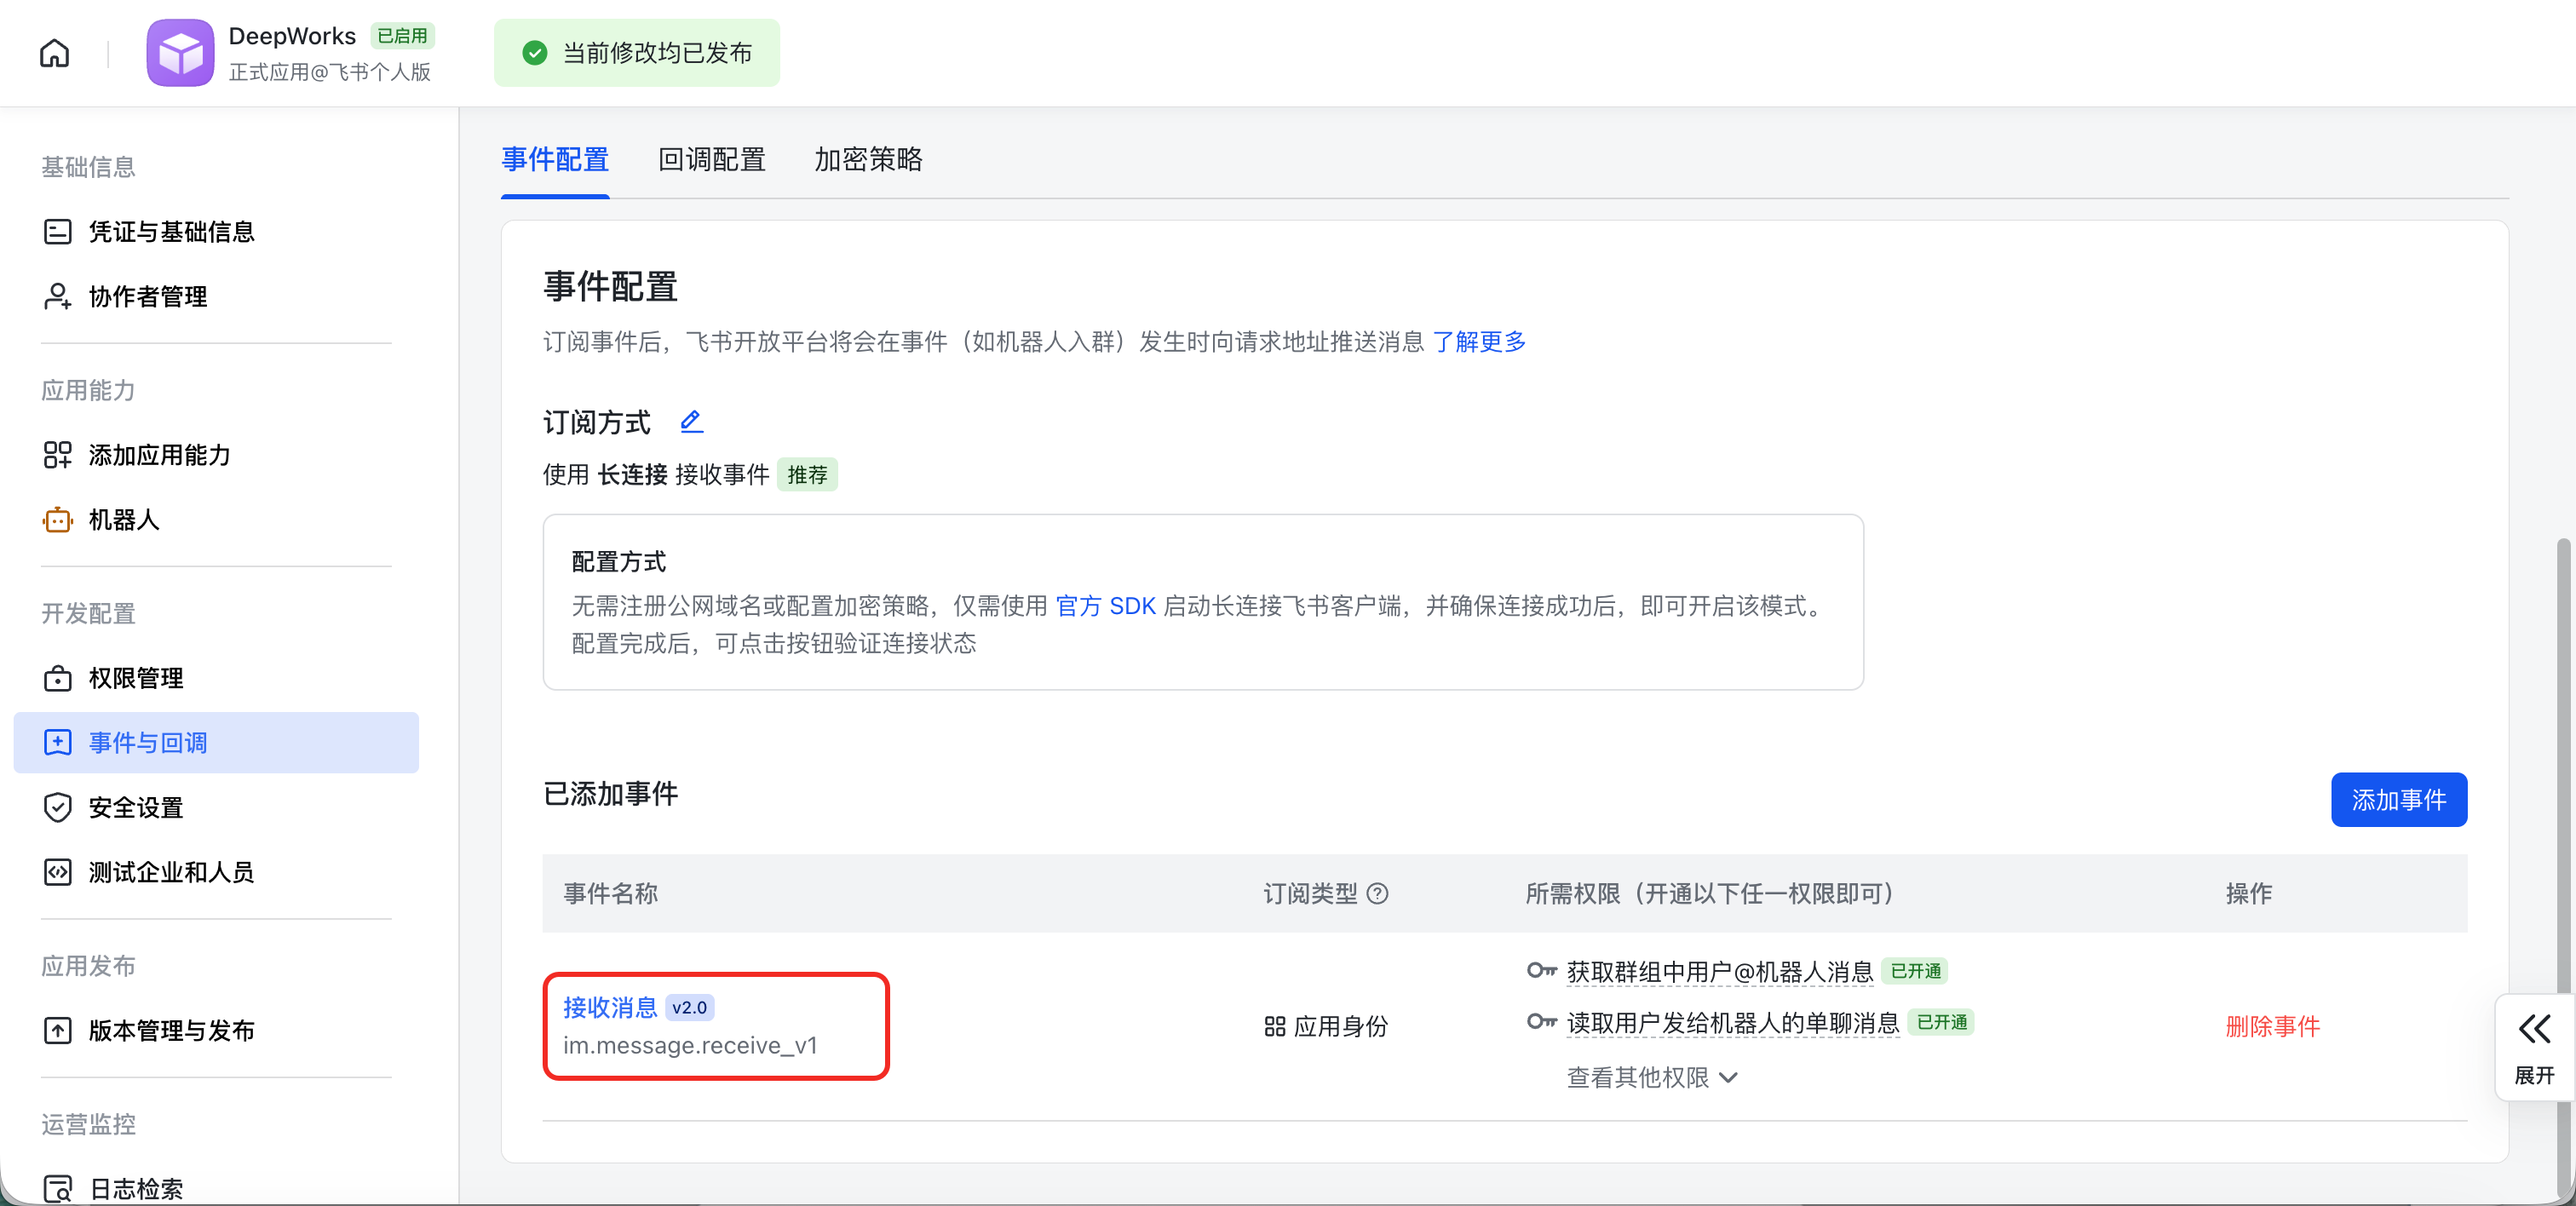
Step 3: Add the receive-message event
- Return to the
Event Configurationtab and clickAdd Eventin theAdded Eventsarea. - Select the
Receive Messageevent (im.message.receive_v1) to add it. - Confirm that the event appears in the list, then enable the permissions required for direct messages and group @mentions as described in chapter 3,
Configure App Permissions.
After the event is added, the app can receive user messages within its permission scope, including direct messages sent to the bot and @mentions in group chats.
For more information, see the official Feishu documentation for receiving events over a long connection and message events .
Configure App Permissions
To let the bot send and receive messages normally, add the required permissions to the app.
Open Permission Management
In the left menu of the app details page, click Permissions.
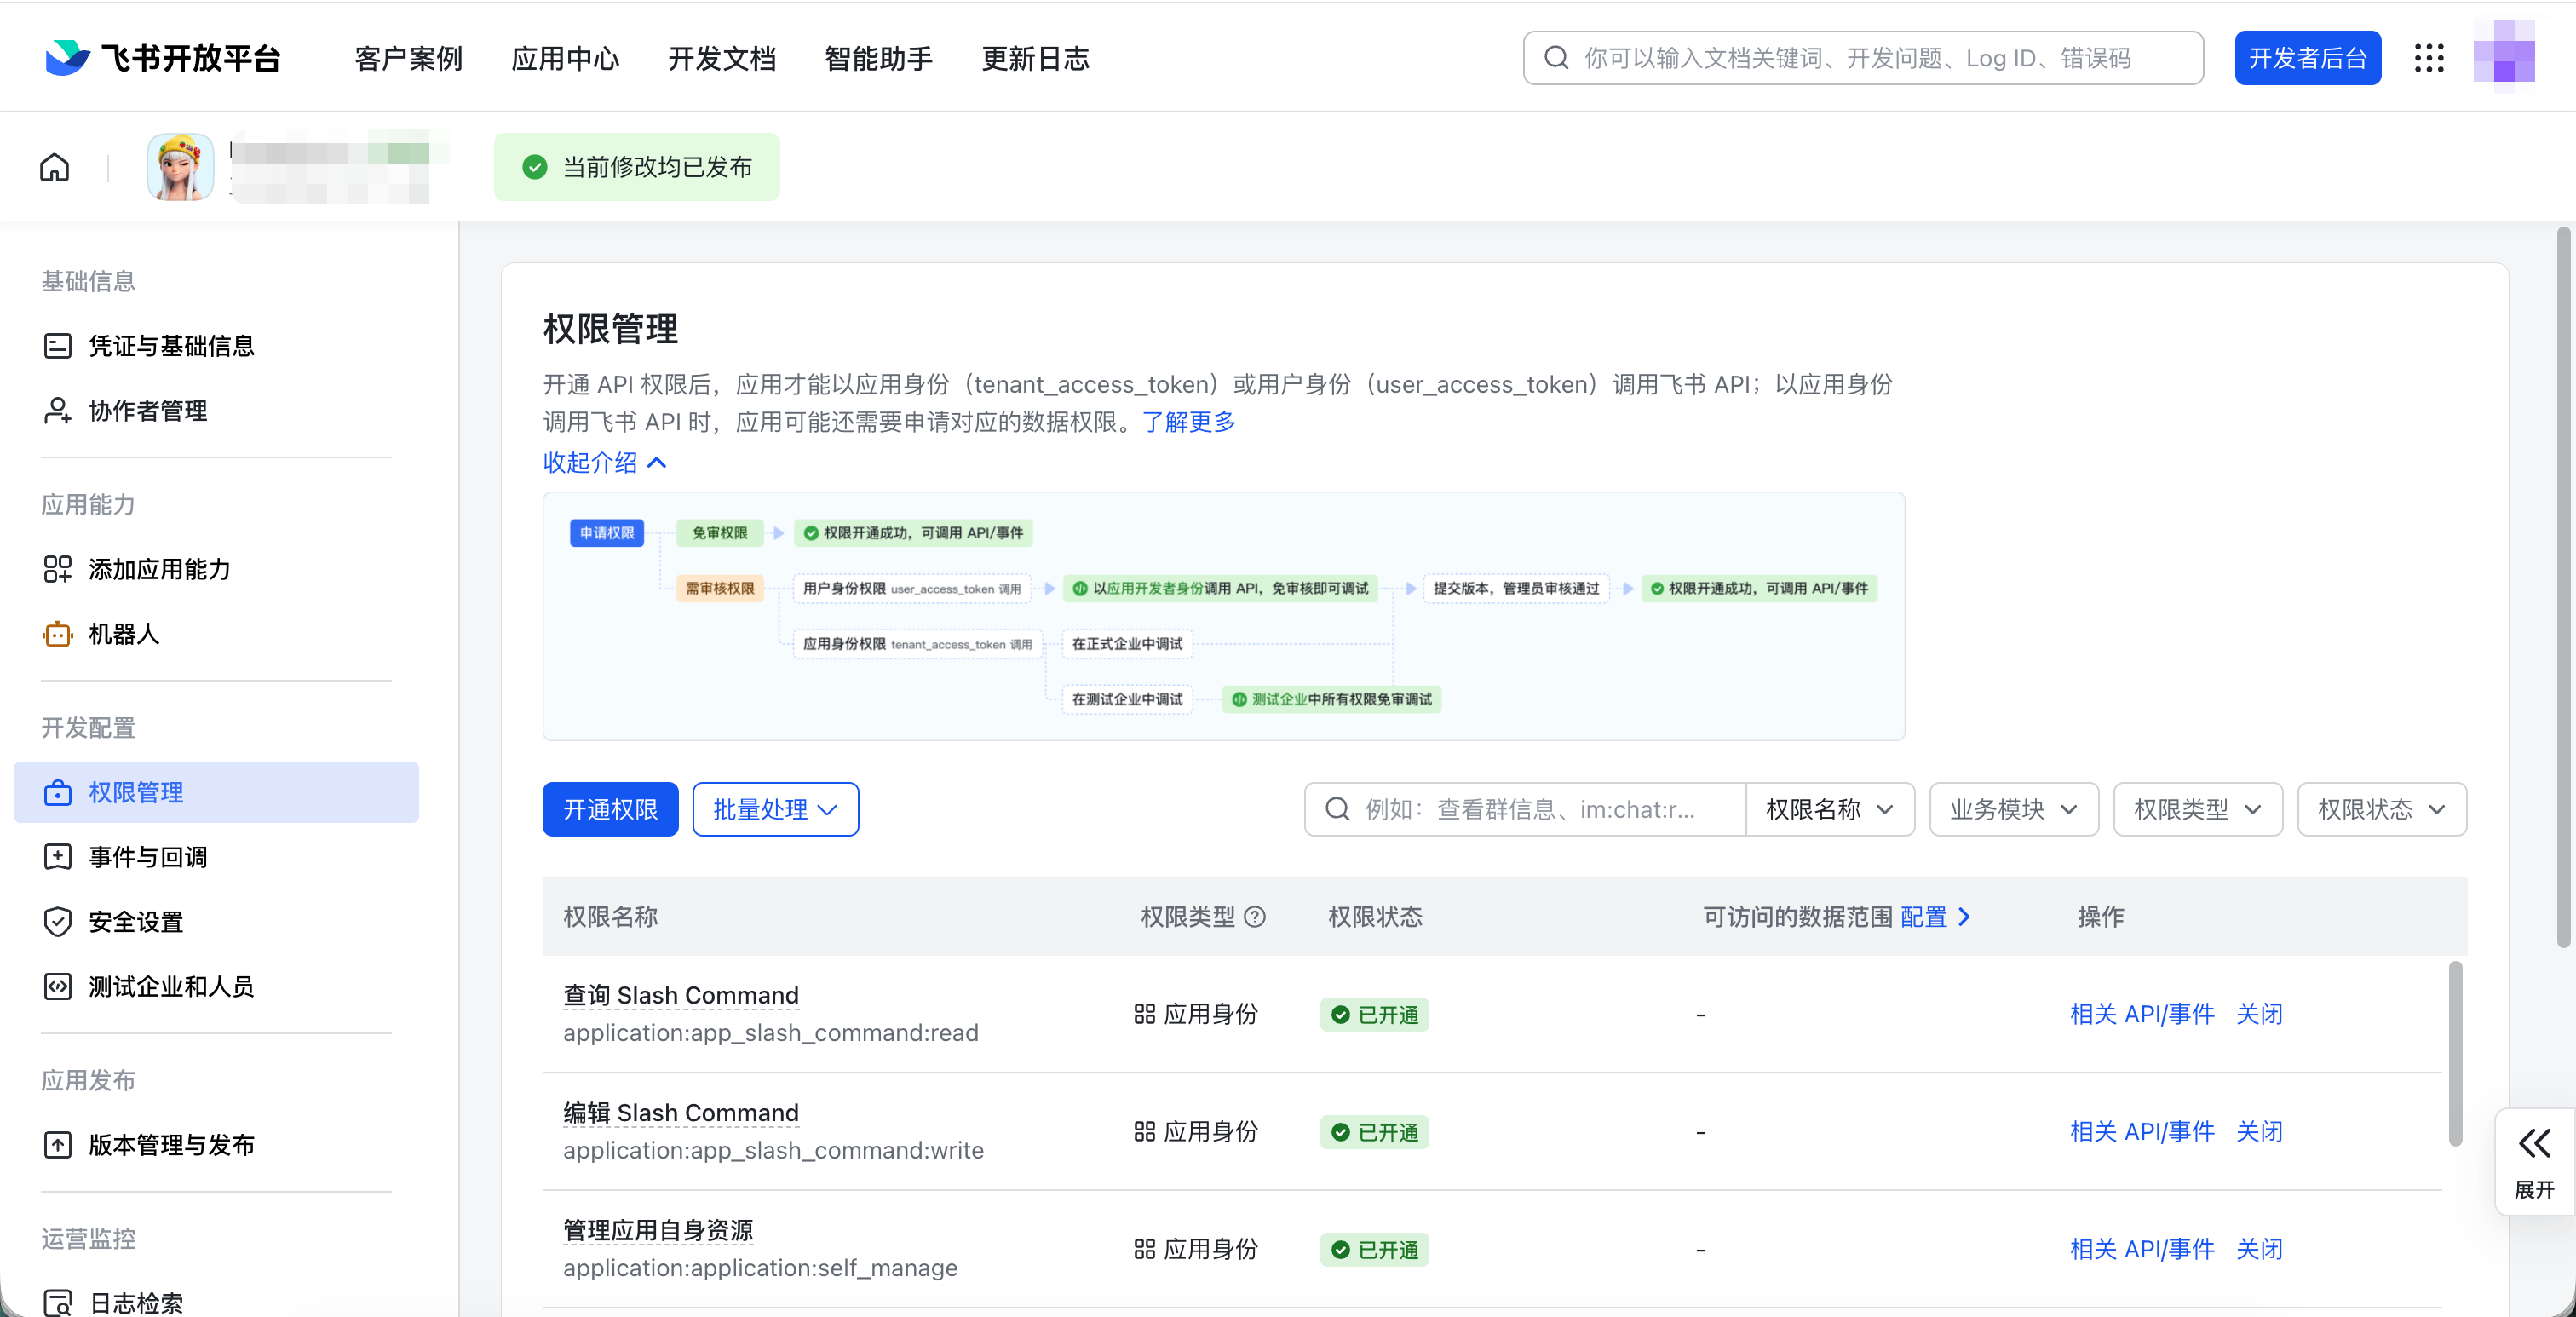
Search for and configure these permissions:
| Permission | Purpose |
|---|---|
Receive direct messages im:message.p2p_msg:readonly | Receive direct messages sent by users to the bot |
Receive group @mentions im:message.group_at_msg:readonly | Receive messages that @mention the bot in groups |
Send messages as the app im:message:send_as_bot | Reply to users or groups |
| Get basic user information | Identify users |
| Get user mobile numbers | Both mobile-number field authorization and the address-book data scope must cover users |
Get and upload resources im:resource | Handle images, files, and other resources in messages |
Create and update cards cardkit:card:write | Required for streaming cards |
After enabling permissions, follow the Feishu prompts to complete approval and version release. Check both the app availability range and the address-book data scope.
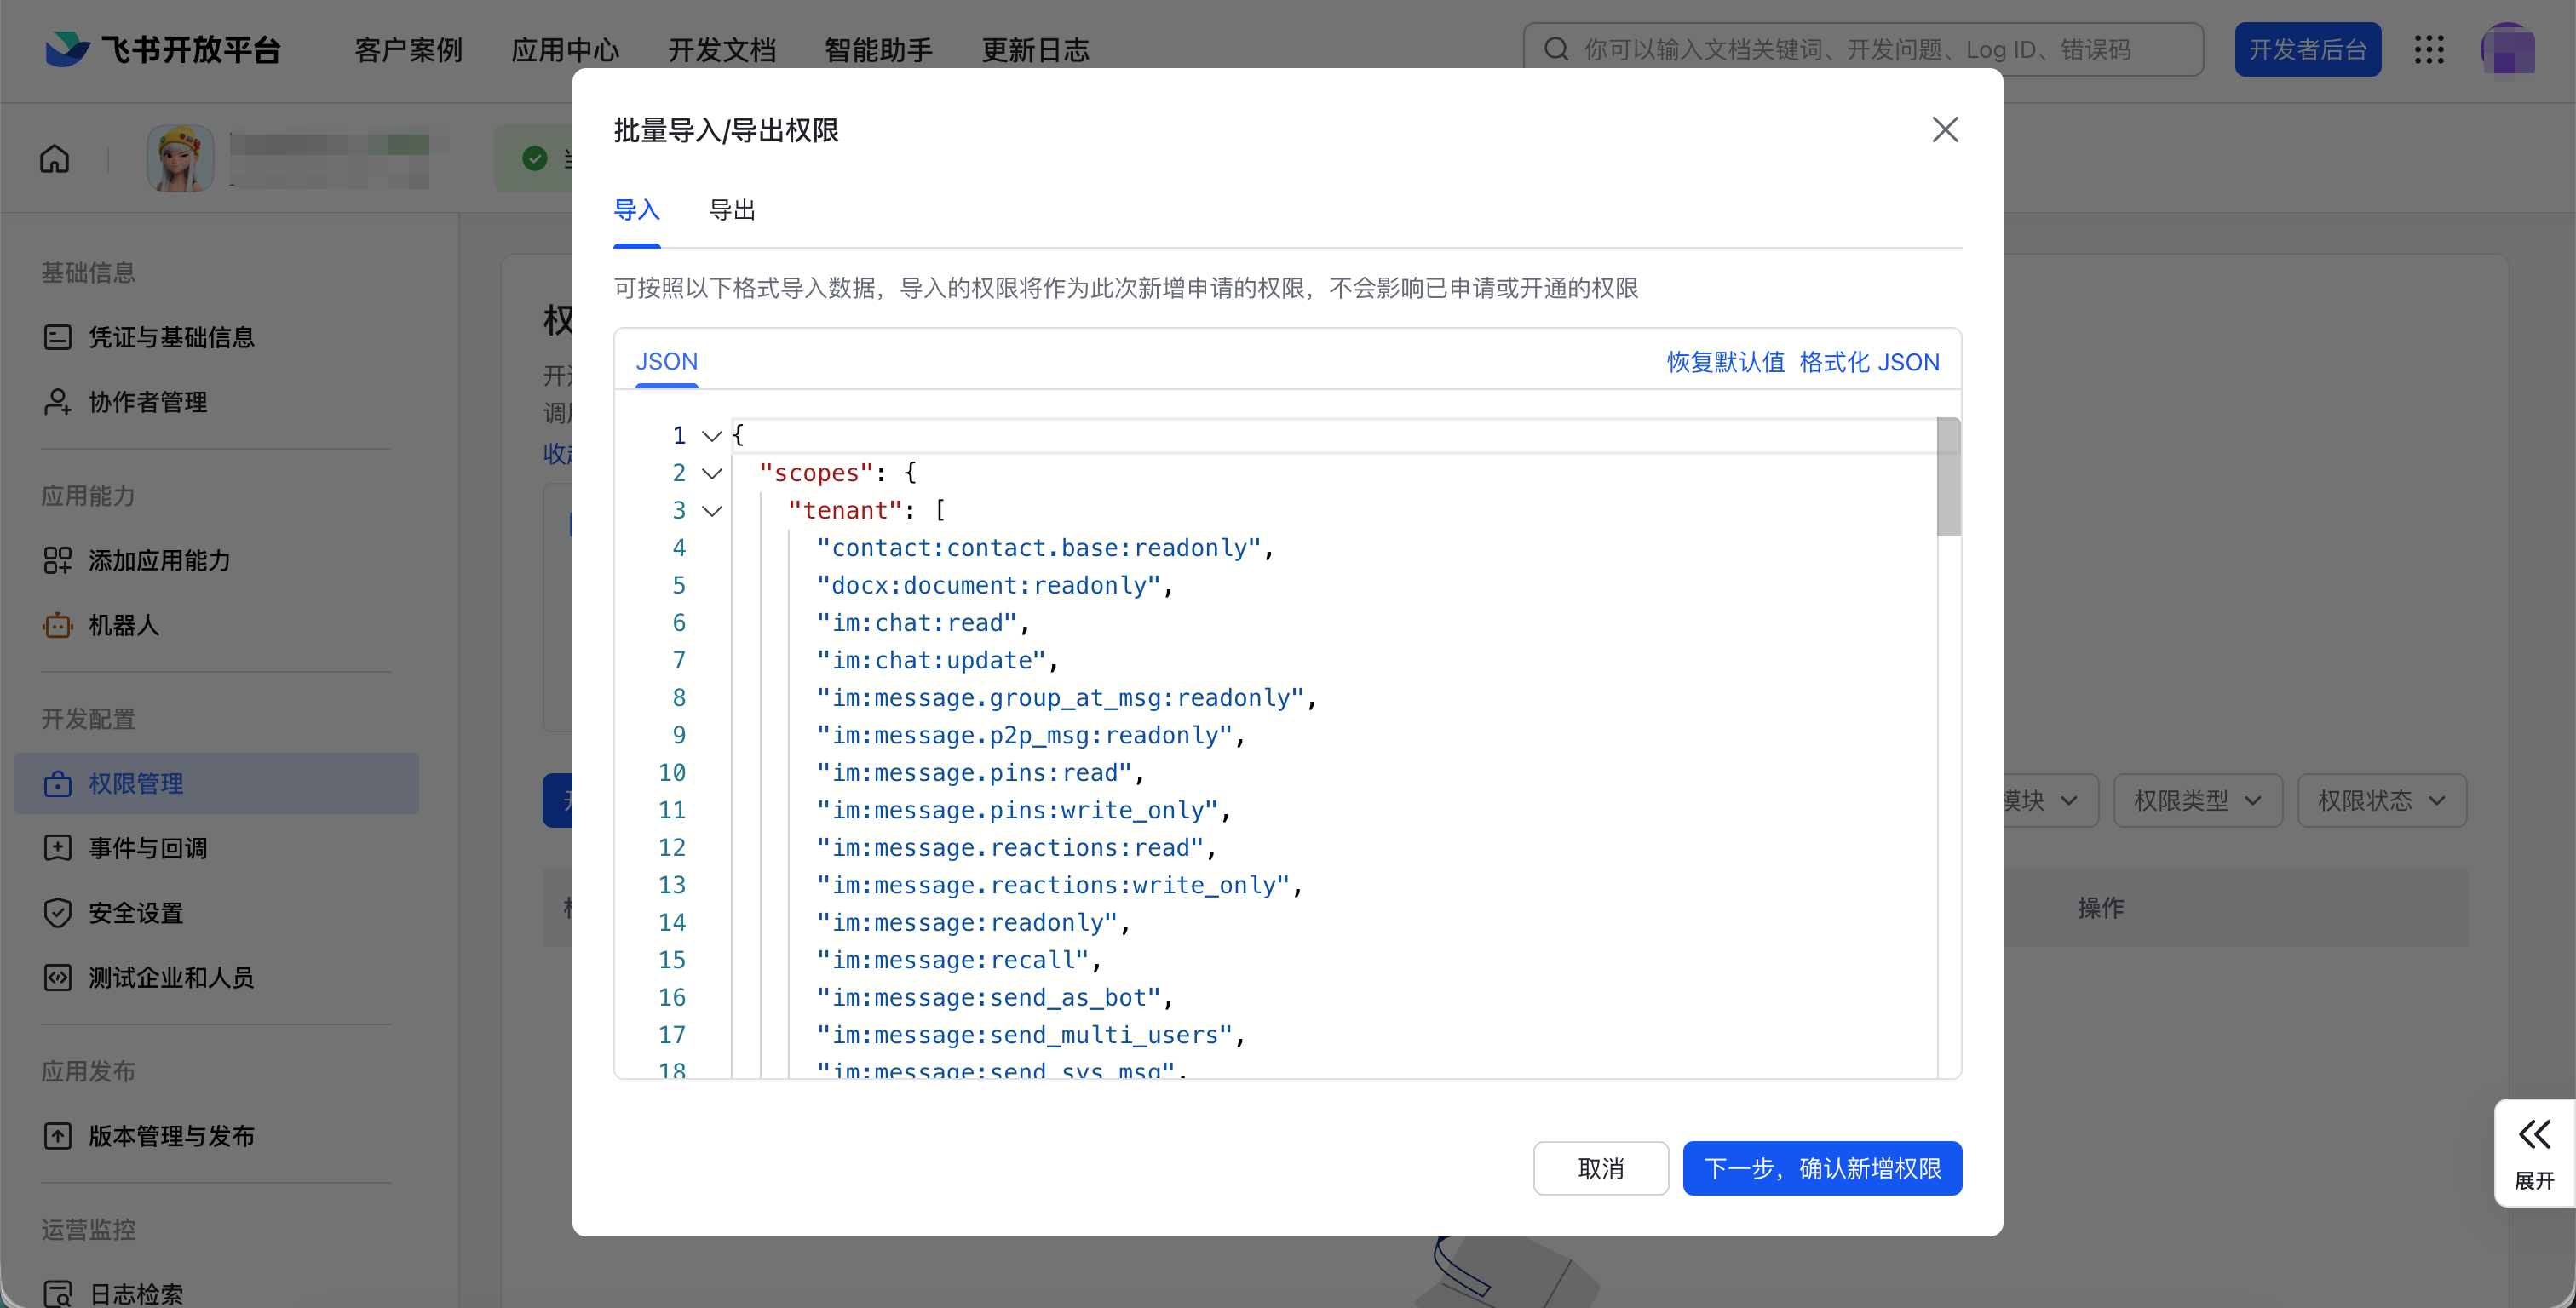
Import Permissions in Batch
For more common permissions, use the list below for batch import.
In the dialog:
- Clear everything from the input box.
- Copy the complete permission list below and paste it into the box.
- Click
Confirm to Add Permissions.
Permissions to import:
{
  "scopes": {
    "tenant": [
      "contact:contact.base:readonly",
      "docx:document:readonly",
      "im:chat:read",
      "im:chat:update",
      "im:message.group_at_msg:readonly",
      "im:message.p2p_msg:readonly",
      "im:message.pins:read",
      "im:message.pins:write_only",
      "im:message.reactions:read",
      "im:message.reactions:write_only",
      "im:message:readonly",
      "im:message:recall",
      "im:message:send_as_bot",
      "im:message:send_multi_users",
      "im:message:send_sys_msg",
      "im:message:update",
      "im:resource",
      "application:application:self_manage",
      "cardkit:card:write",
      "cardkit:card:read"
    ],
    "user": [
      "contact:user.employee_id:readonly",
      "offline_access",
      "base:app:copy",
      "base:field:create",
      "base:field:delete",
      "base:field:read",
      "base:field:update",
      "base:record:create",
      "base:record:delete",
      "base:record:retrieve",
      "base:record:update",
      "base:table:create",
      "base:table:delete",
      "base:table:read",
      "base:table:update",
      "base:view:read",
      "base:view:write_only",
      "base:app:create",
      "base:app:update",
      "base:app:read",
      "board:whiteboard:node:create",
      "board:whiteboard:node:read",
      "calendar:calendar:read",
      "calendar:calendar.event:create",
      "calendar:calendar.event:delete",
      "calendar:calendar.event:read",
      "calendar:calendar.event:reply",
      "calendar:calendar.event:update",
      "calendar:calendar.free_busy:read",
      "contact:contact.base:readonly",
      "contact:user.base:readonly",
      "contact:user:search",
      "docs:document.comment:create",
      "docs:document.comment:read",
      "docs:document.comment:update",
      "docs:document.media:download",
      "docs:document:copy",
      "docx:document:create",
      "docx:document:readonly",
      "docx:document:write_only",
      "drive:drive.metadata:readonly",
      "drive:file:download",
      "drive:file:upload",
      "im:chat.members:read",
      "im:chat:read",
      "im:message",
      "im:message.group_msg:get_as_user",
      "im:message.p2p_msg:get_as_user",
      "im:message:readonly",
      "search:docs:read",
      "search:message",
      "space:document:delete",
      "space:document:move",
      "space:document:retrieve",
      "task:comment:read",
      "task:comment:write",
      "task:task:read",
      "task:task:write",
      "task:task:writeonly",
      "task:tasklist:read",
      "task:tasklist:write",
      "wiki:node:copy",
      "wiki:node:create",
      "wiki:node:retrieve",
      "wiki:space:read",
      "wiki:space:retrieve",
      "wiki:space:write_only"
    ]
  }
}
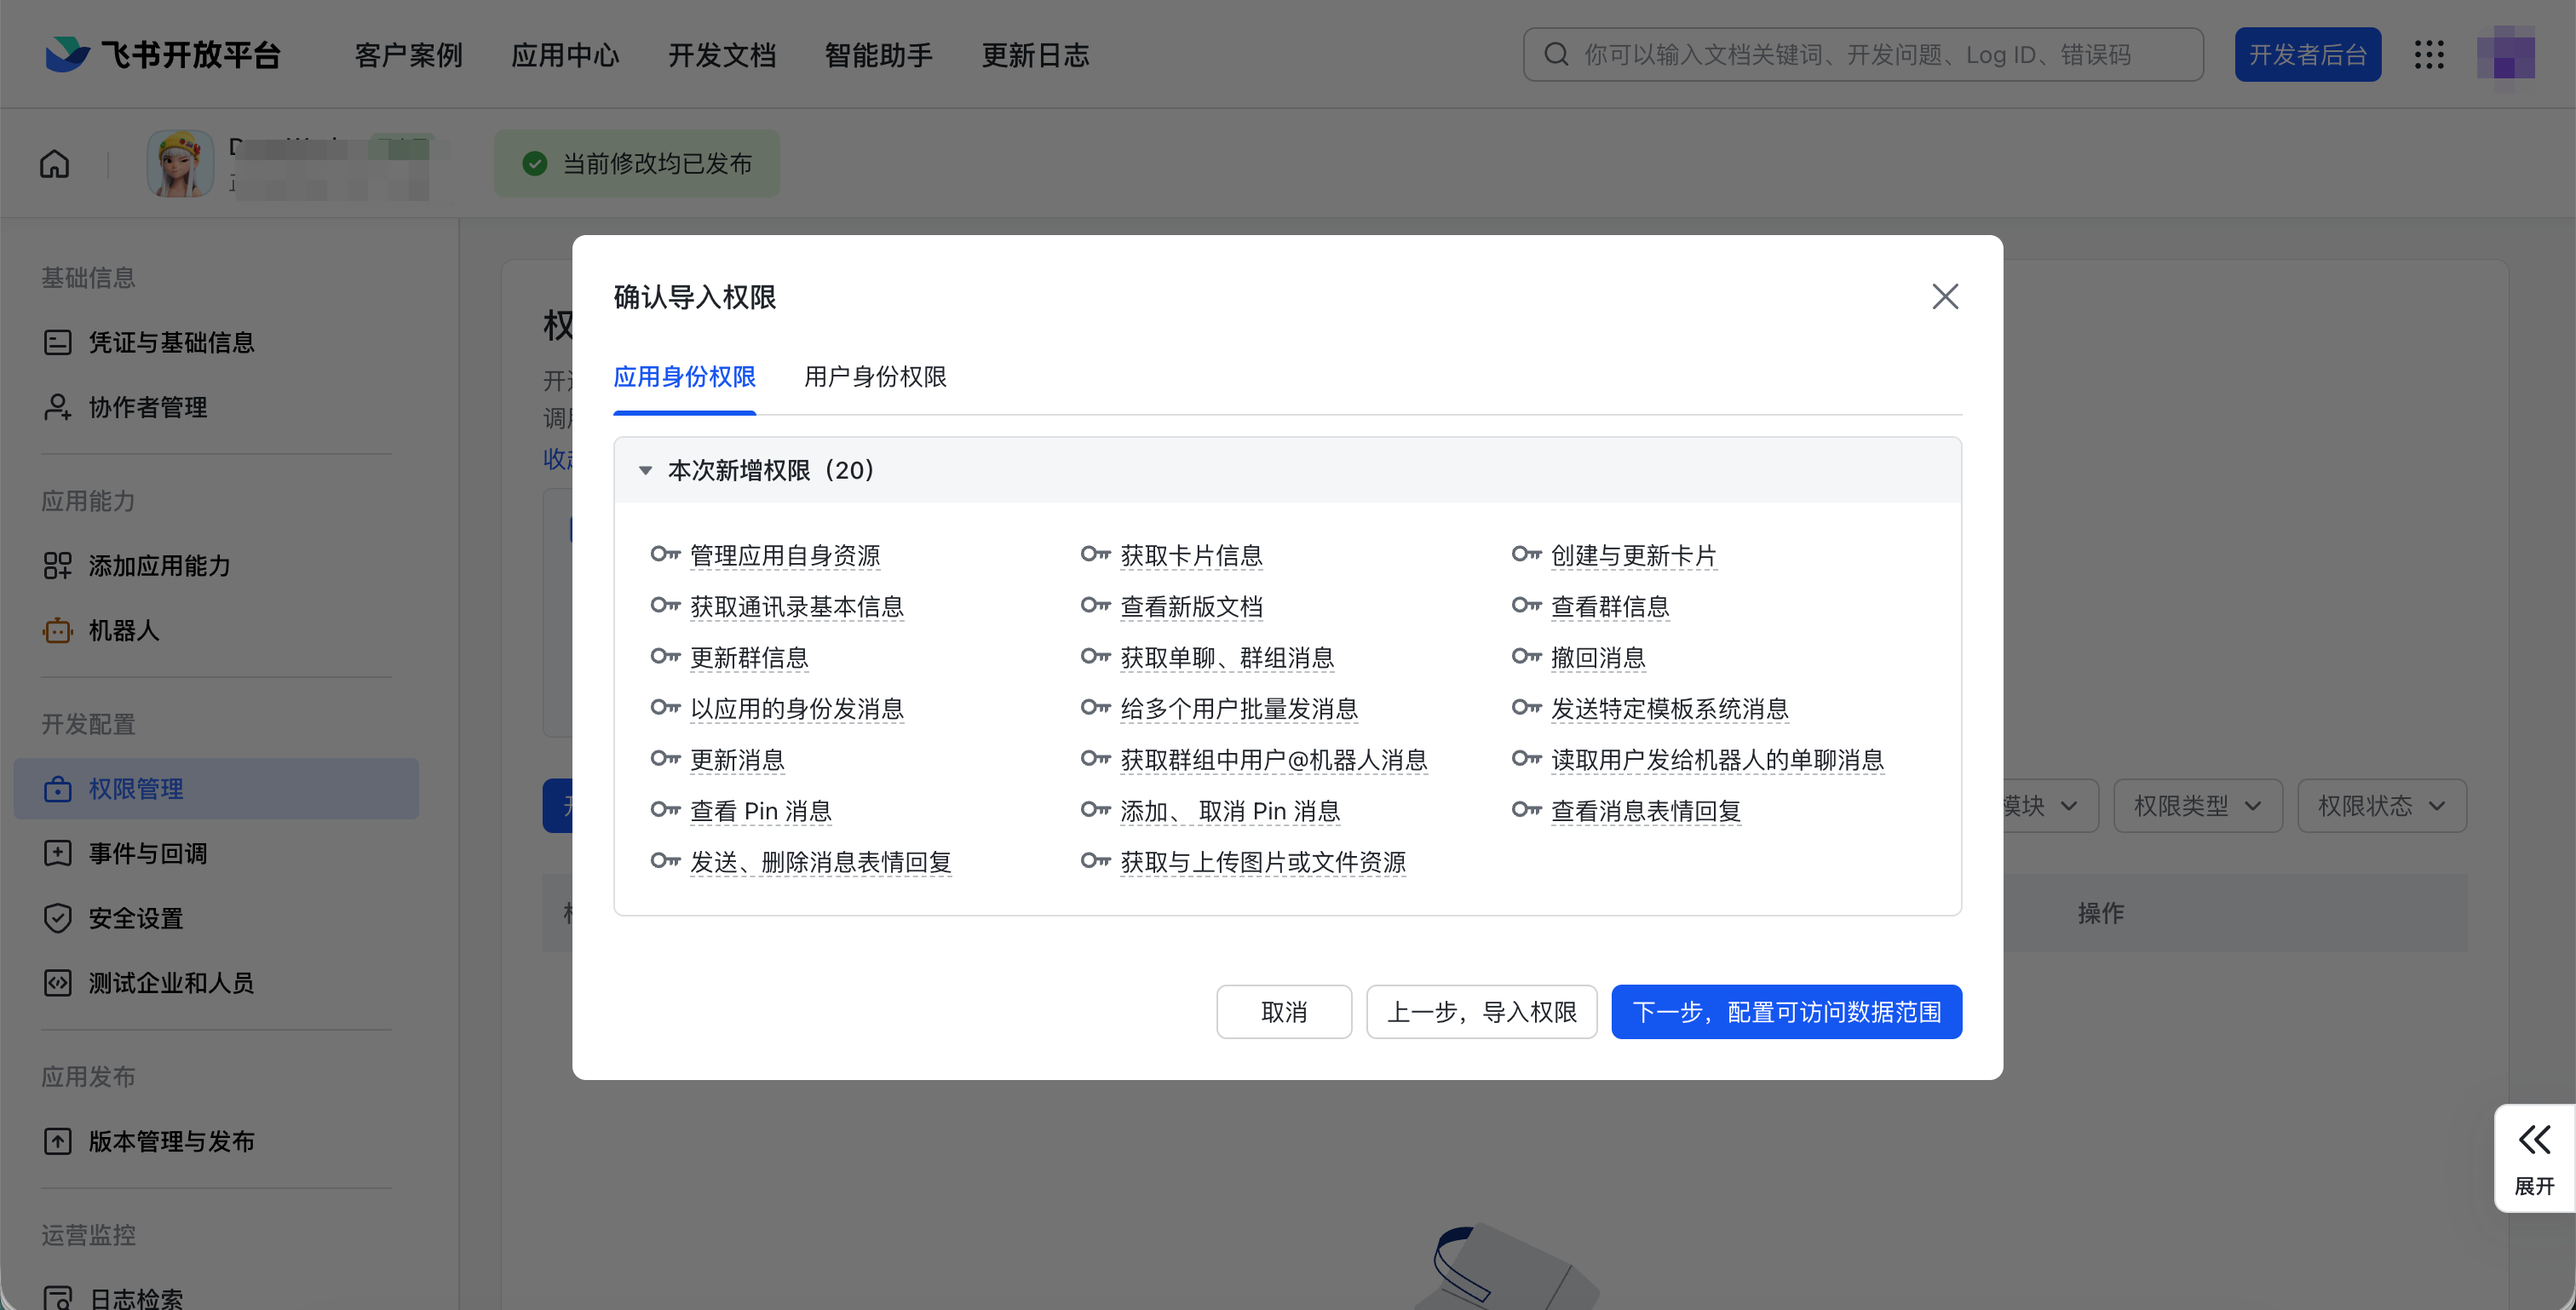
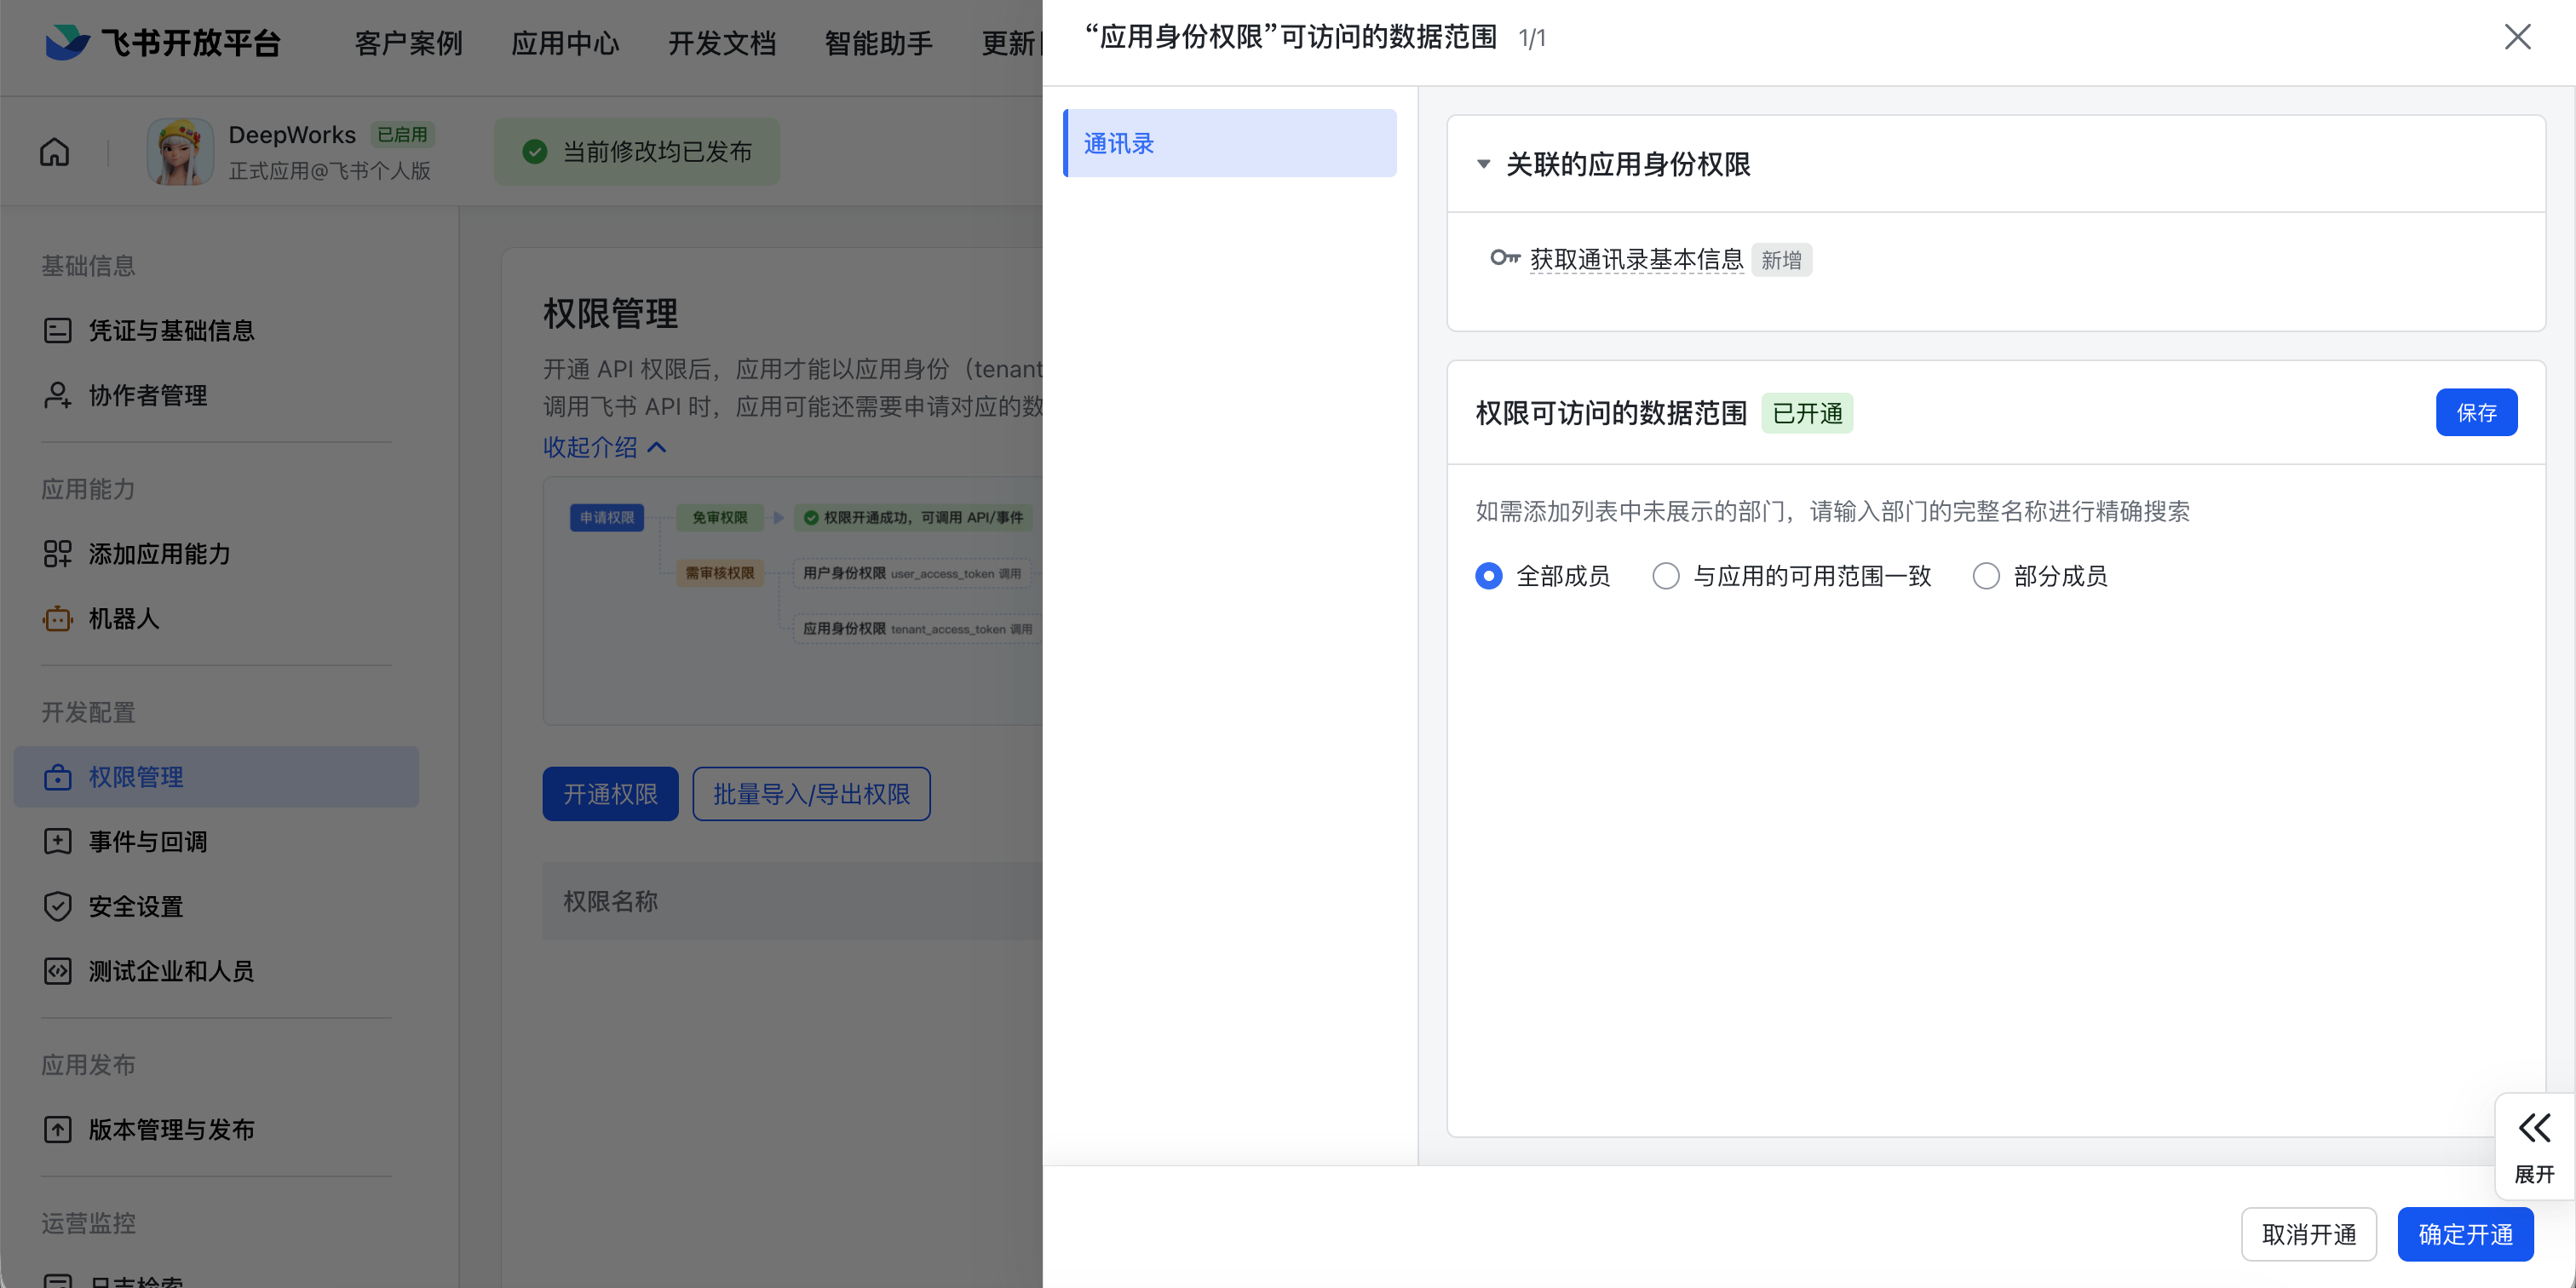
Set the permission access range according to your needs.
Publish the App
The app must be published before it can be used in Feishu.
Create a Version
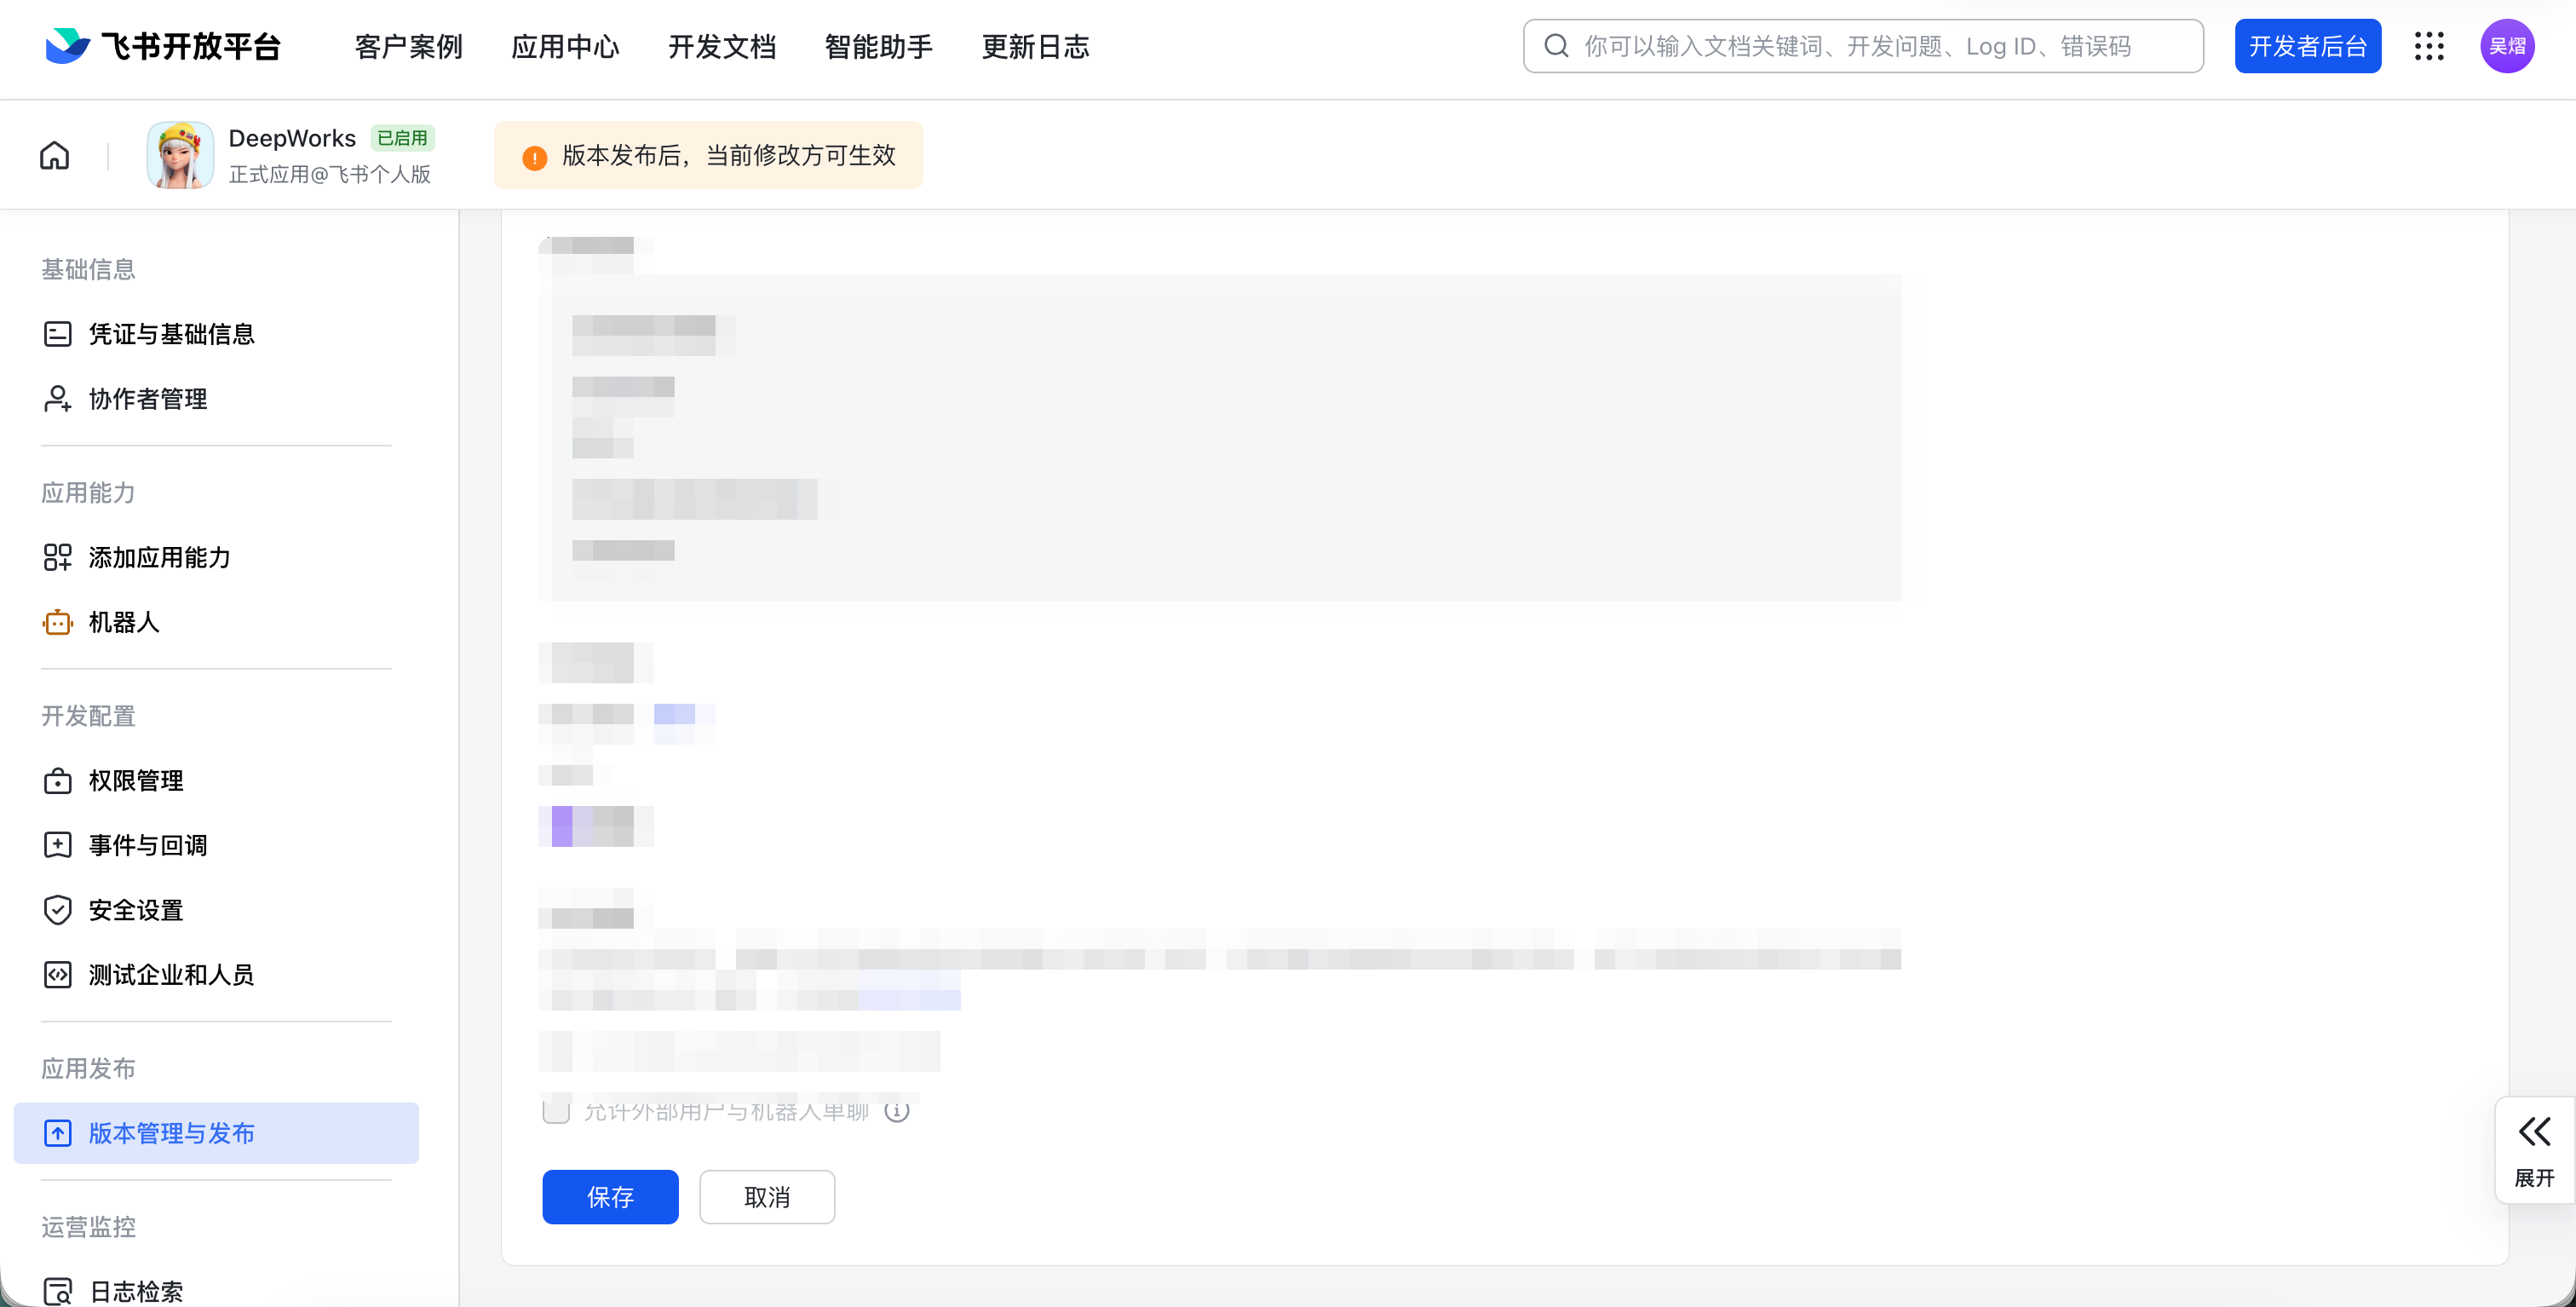
Click Create Version at the top of the page, then create or update a version on the details page.
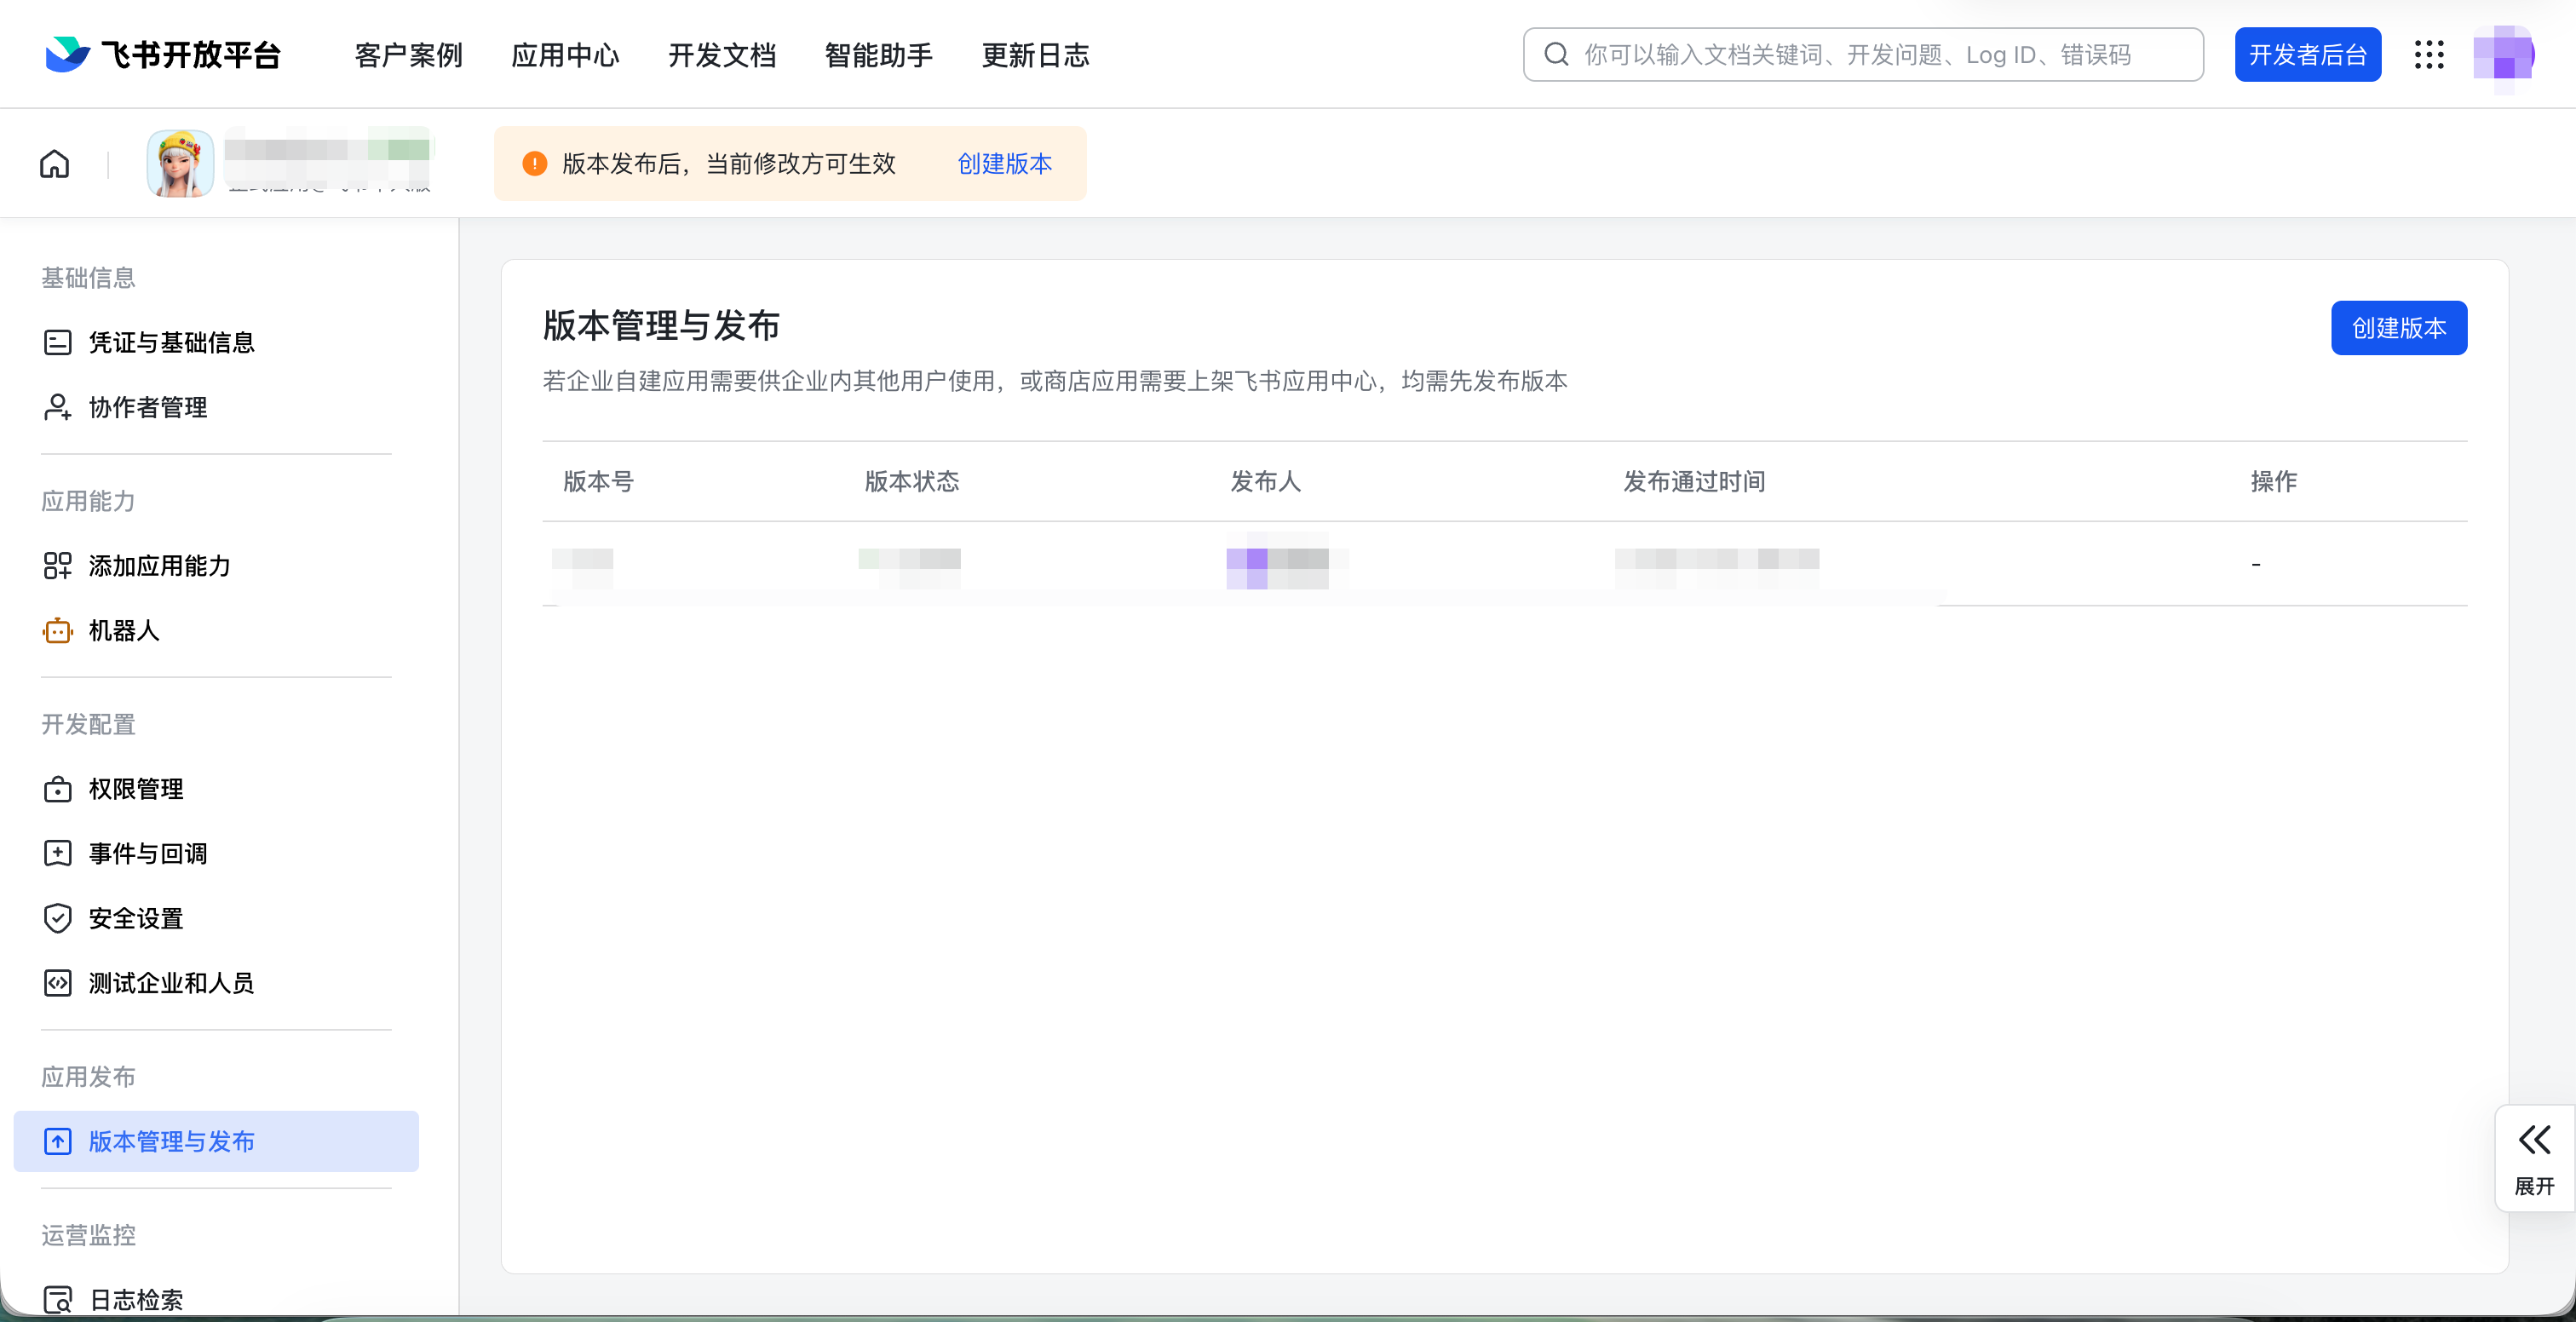
Publish the Version
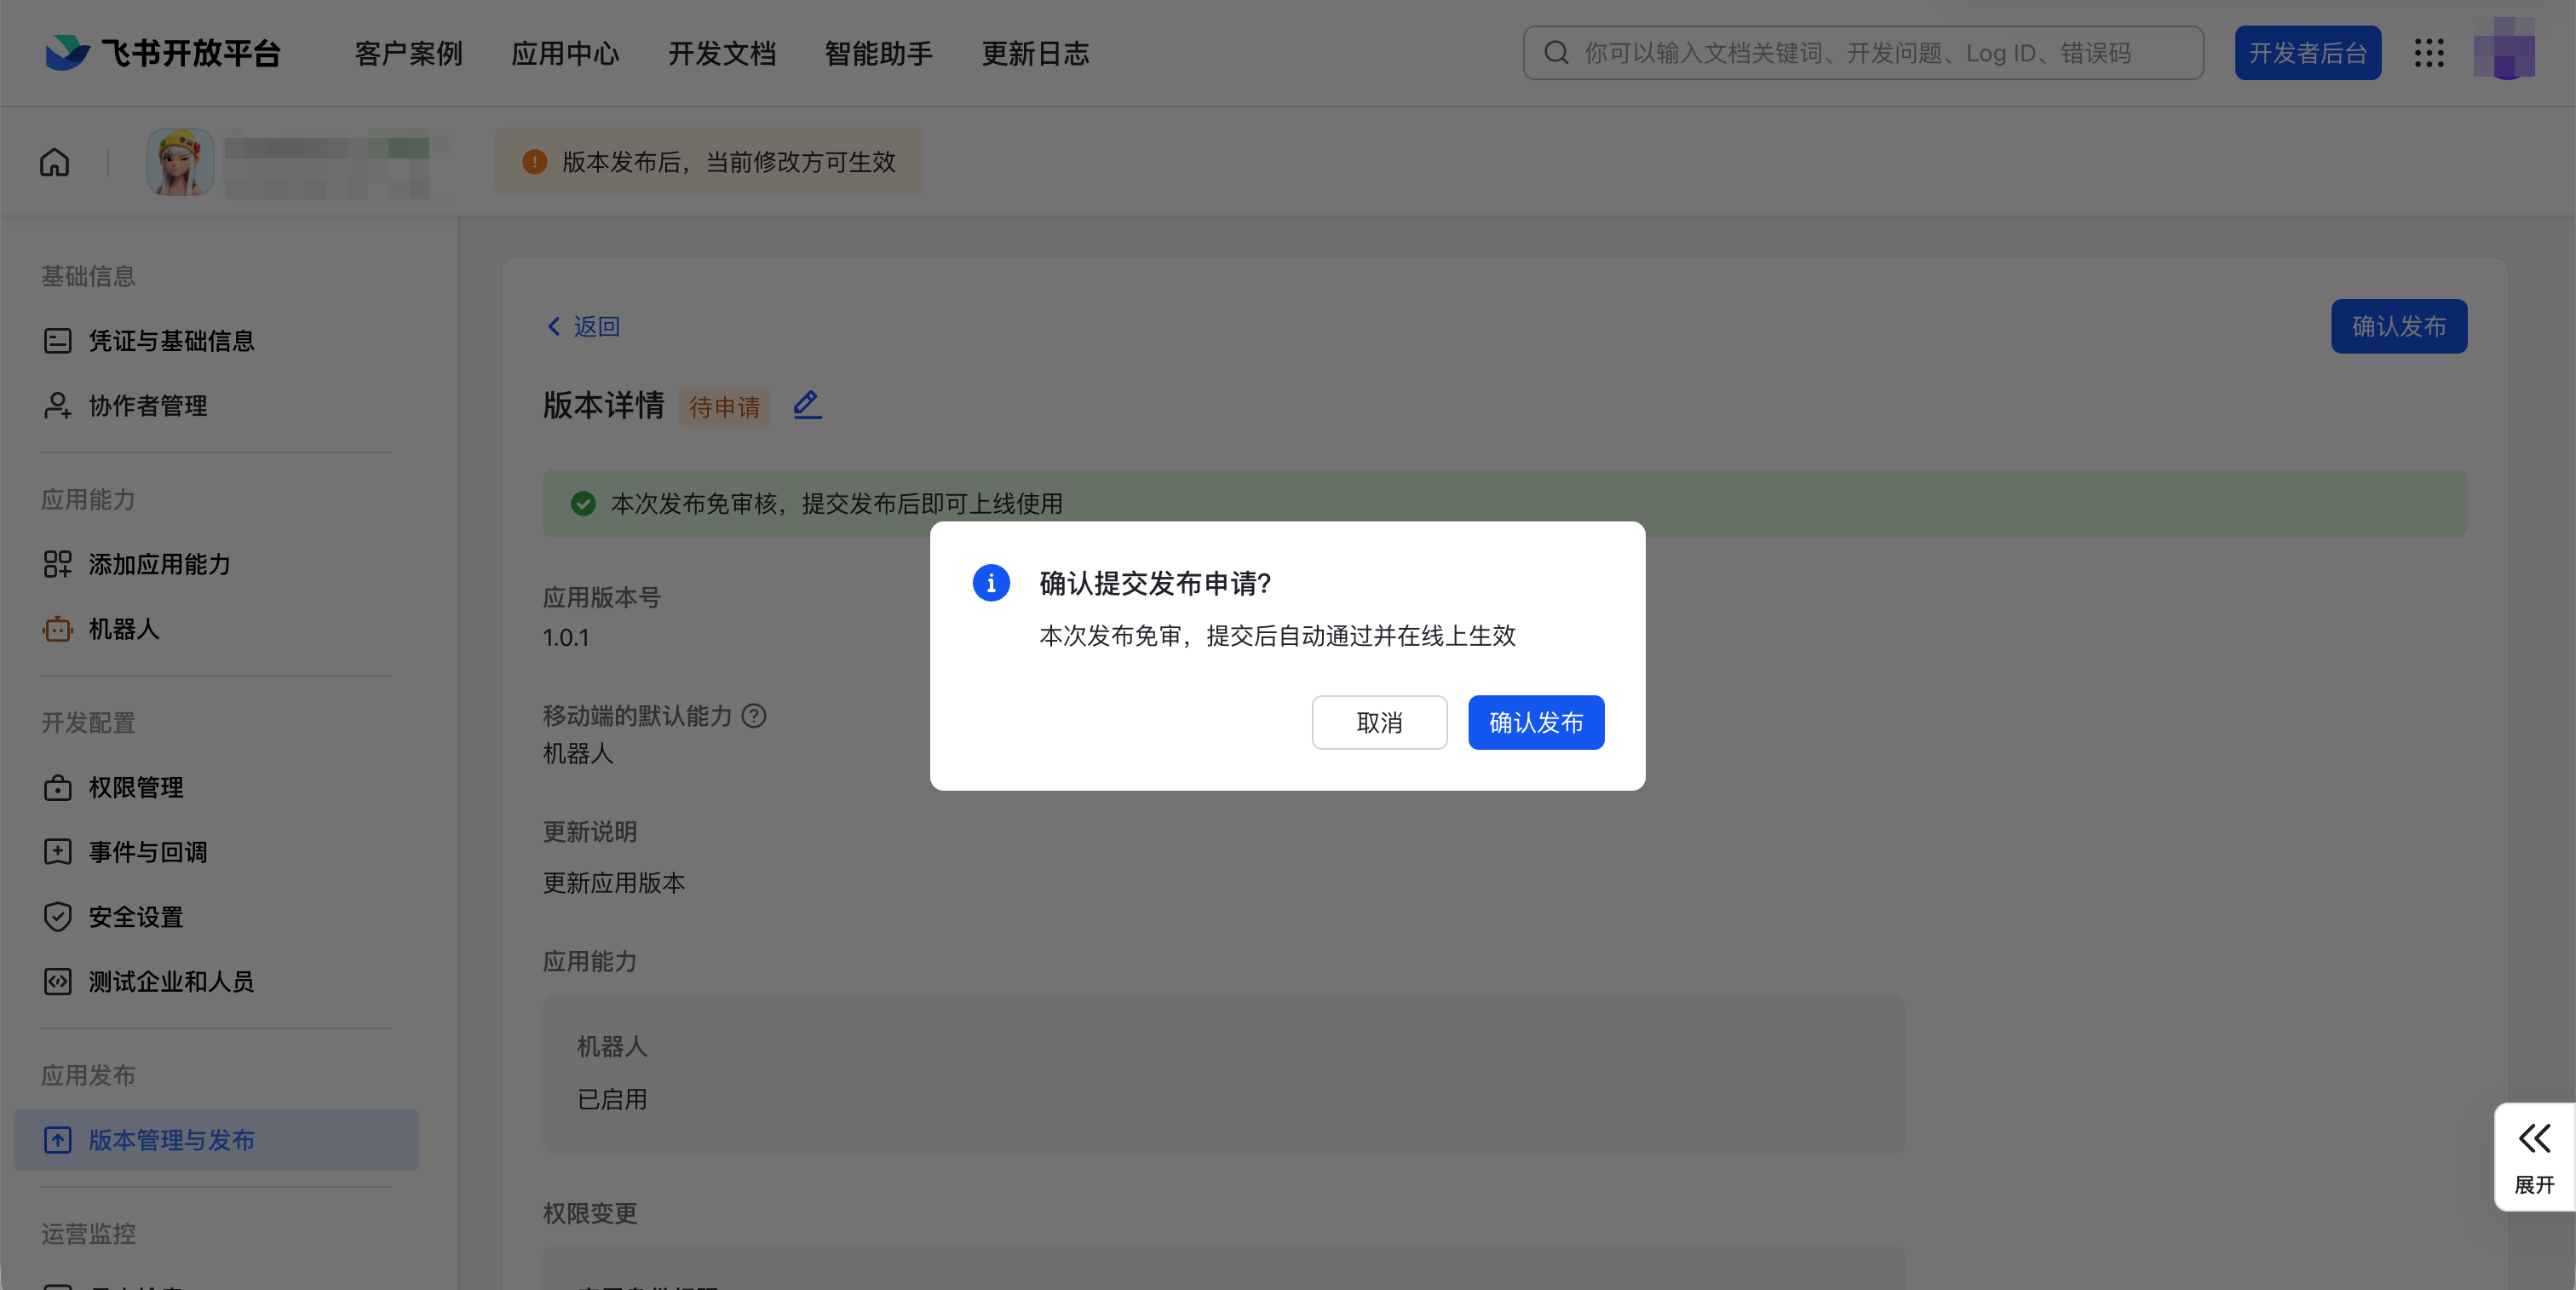
After the version is created, click Publish on its right.
If you are an enterprise administrator or created a personal app, approval is usually automatic. If approval is required, contact your enterprise administrator.
Get App Credentials
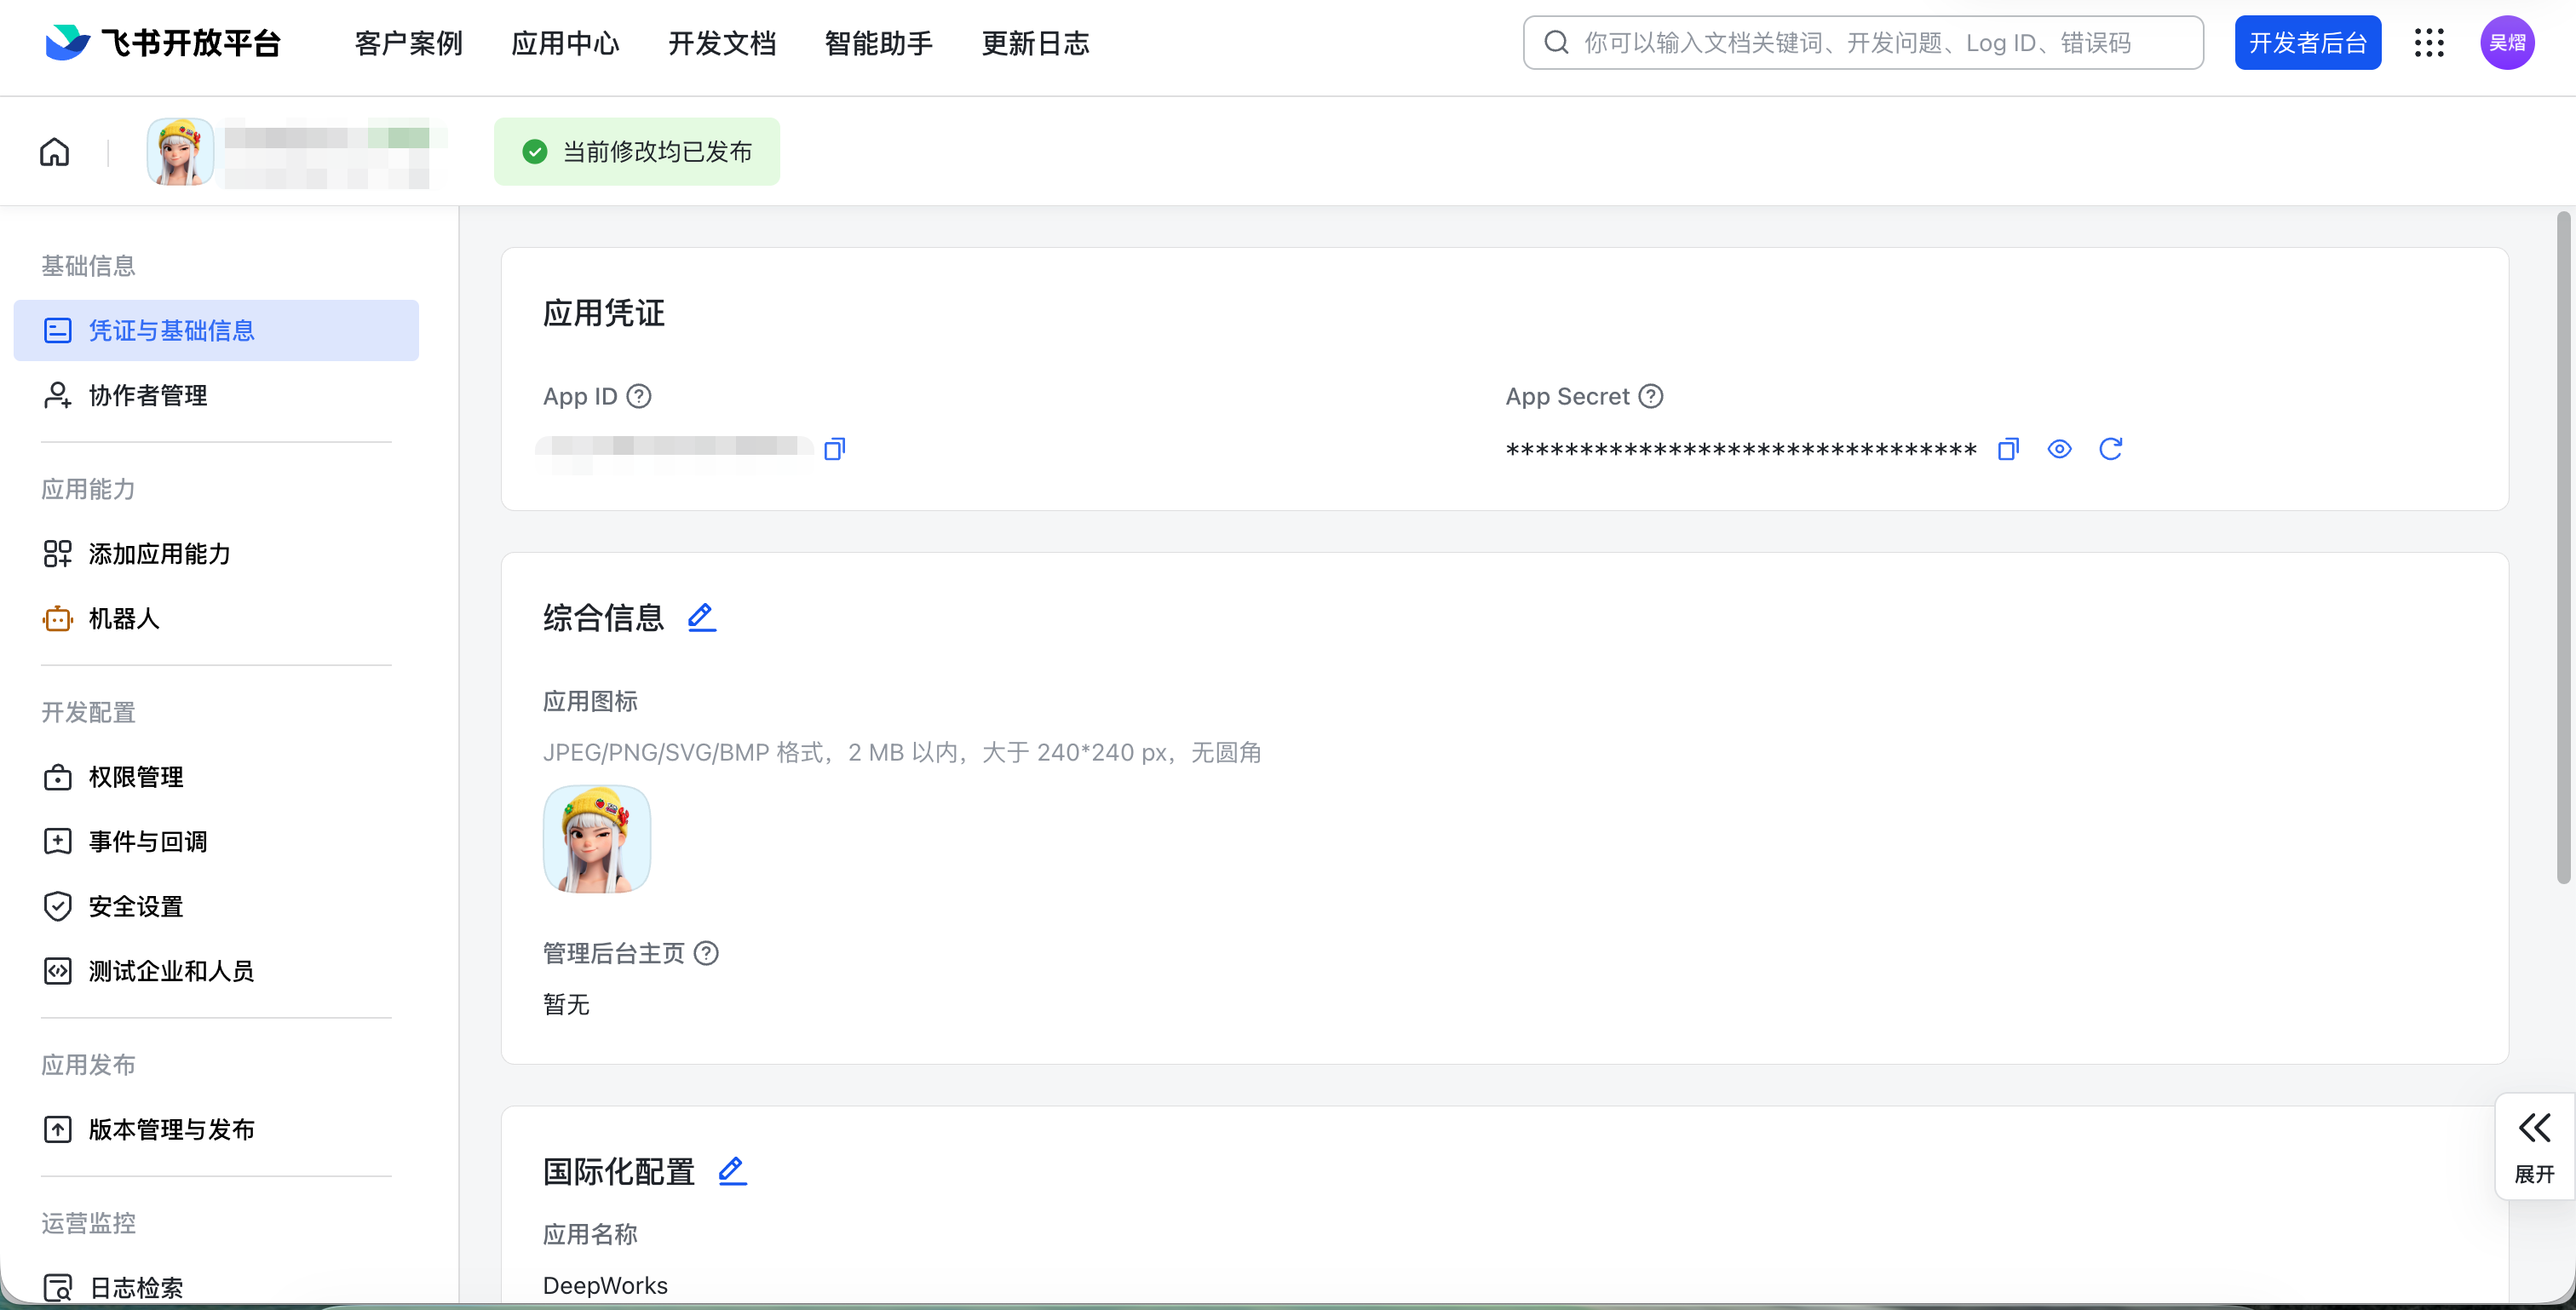
In the left menu of the app details page, click Credentials and Basic Information.
The page shows two important credentials:
- App ID: the app’s unique identifier
- App Secret: the app key (click to view)
Store App Secret securely and never disclose it to others.
Configure Feishu in DeepWorks
You can scan a QR code with your phone to create or select a Feishu app and connect it, or manually enter the credentials of an existing app.
Prerequisites: Creating an enterprise app requires the corresponding permission. Before connecting, complete the bot capability, subscription method, required permissions, and version release as described above. For enterprise bots, the app availability range, mobile-number authorization, and address-book data scope must cover all users. Check these settings again after scanning the QR code.
Open Bot Configuration
- Click your user avatar in the lower-left corner of DeepWorks, select
IM Channels, and confirm the workspace to configure. - On the
Channel Connectionstab, connect your Feishu account. See IM Channels. - Switch to the
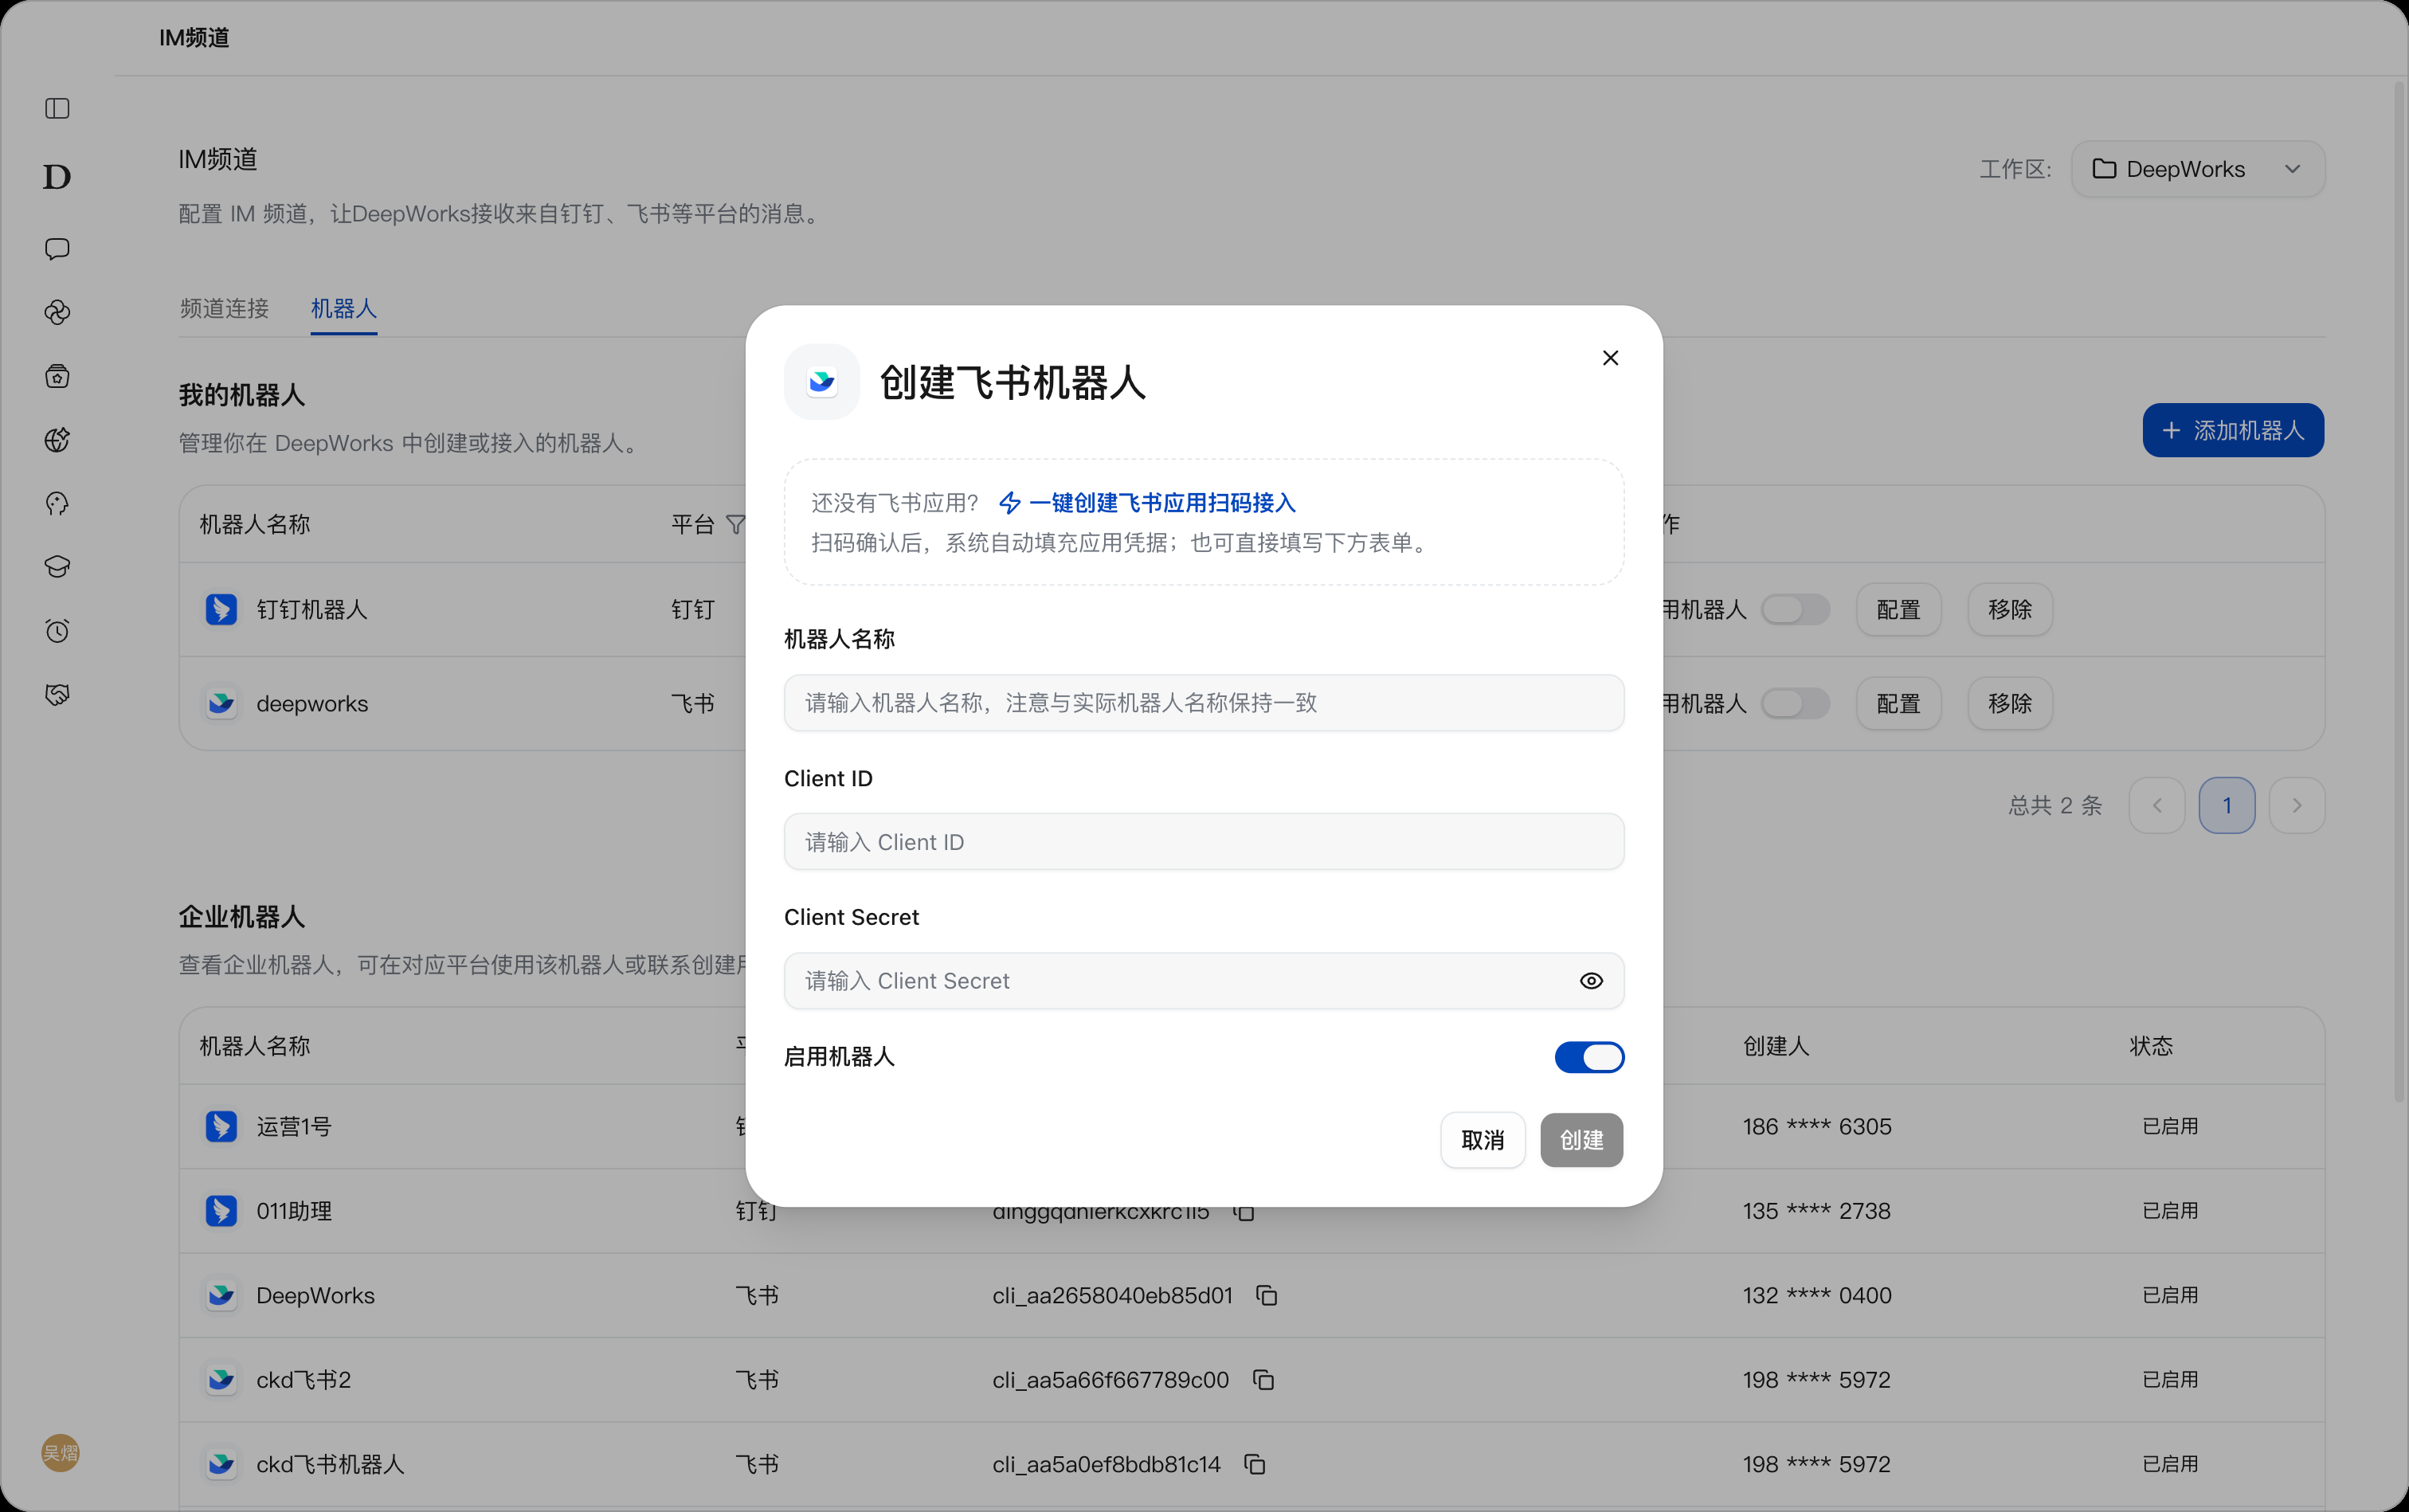
Botstab, clickAdd Bot→Feishu, and open theCreate Feishu Botdialog.
Choose a Connection Method
Method 1: Scan a QR Code
- Click
One-Click Create Feishu App by QR Code. - In the
Feishu Create or Select Bot QR Codedialog, use Feishu on your phone to scan the QR code generated on the current DeepWorks page. Follow the phone prompts to create a bot or select an existing app, then confirm. - When it finishes, the system fills in the app credentials automatically. Return to the creation dialog, check the credentials, and enter or verify
Bot Nameso it matches the actual bot name. - In the Feishu Open Platform, check the app’s bot capability, subscription method, and permissions listed in chapter 3. Complete the required version release as described in chapter 4.
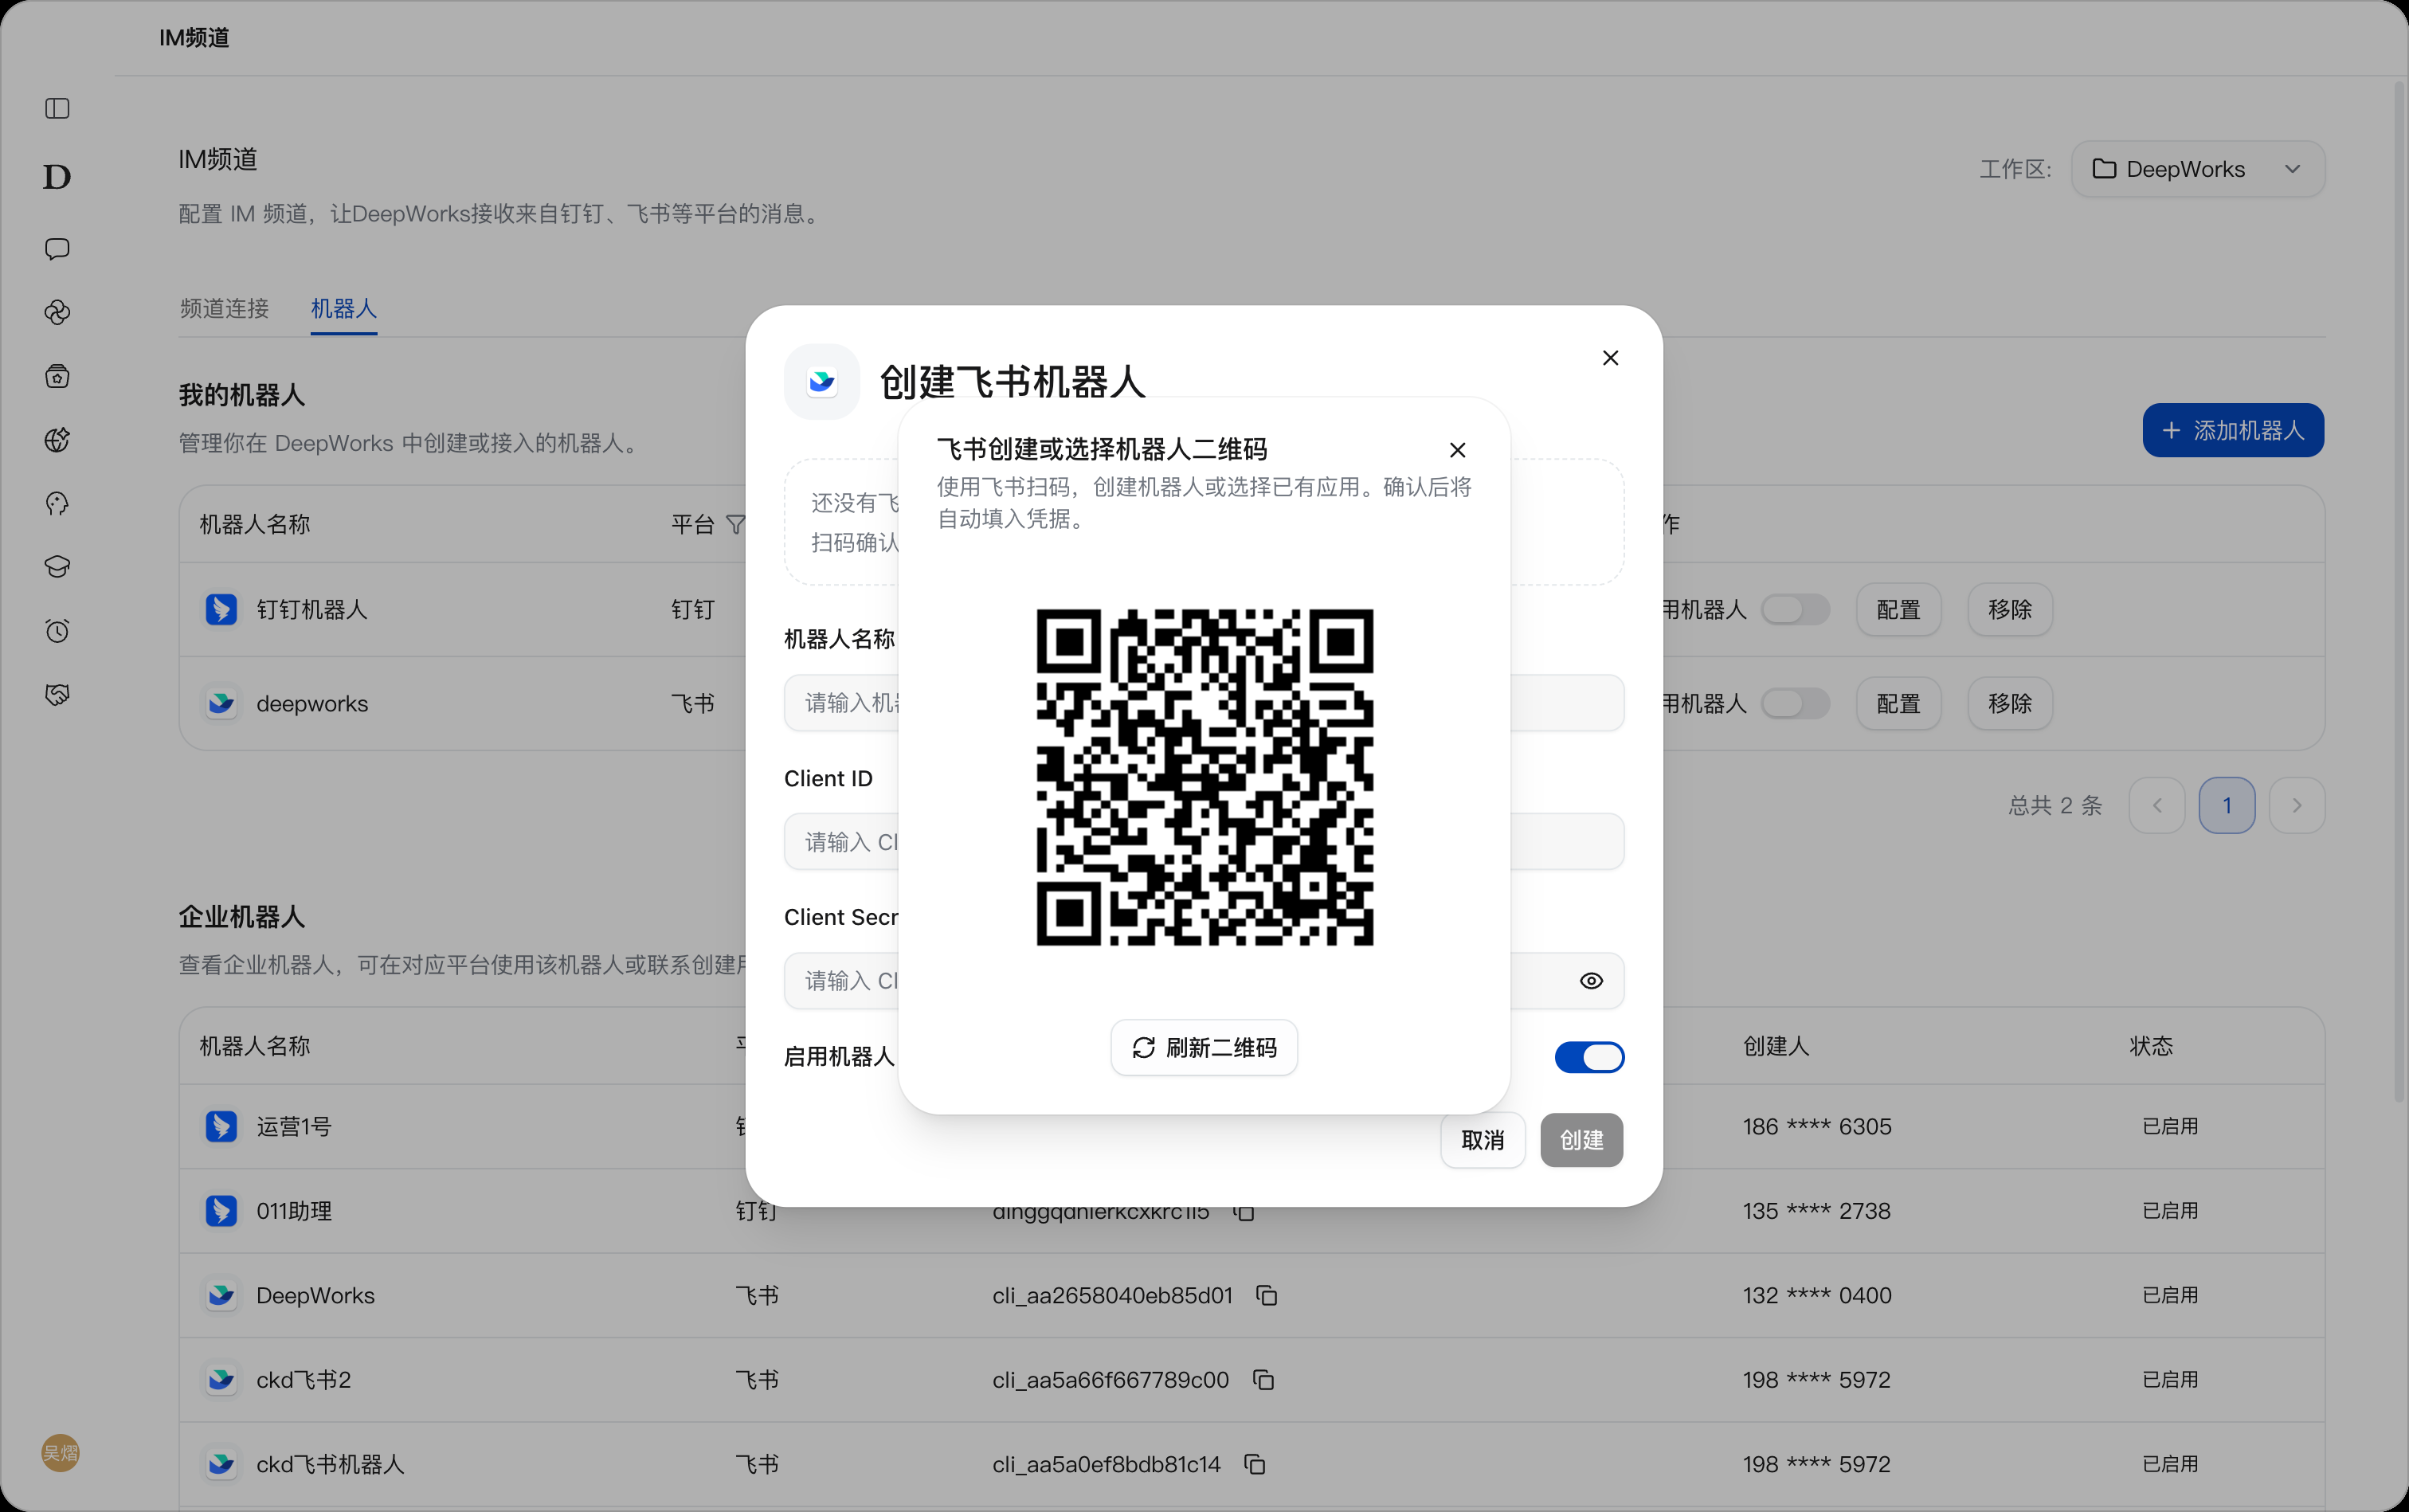
To obtain a new QR code, click Refresh QR Code. Scan the QR code generated on the actual page, not the sample image in this guide.
Method 2: Enter Credentials Manually
If you already created an app on the Feishu Open Platform, enter the following information directly:
| Field | Instruction |
|---|---|
| Bot Name | Keep it consistent with the actual bot name in Feishu. |
| Client ID | Enter the Feishu app’s App ID. |
| Client Secret | Enter the Feishu app’s App Secret. |
For how to obtain app credentials, see chapter 5, Get App Credentials. Before connecting, make sure the bot capability, subscription method, app permissions, and version release are complete.
Create and Enable the Bot
- Confirm that the bot name and app credentials are complete, turn on
Enable Bot, and clickCreate. - Return to the
My Botslist and confirm that the bot has been added and is enabled. Later, useConfigureto change its information or theEnable Botswitch to change its status. - Open the bot conversation in Feishu, send a message, and check whether you receive a reply.
After your Feishu account is connected, you can also use a bot already connected by you or someone else without creating it again. If you do not have access, open the Enterprise Bots list, find its creator, and request access.
Start Using It
Find the Bot
In the Feishu search box, search for the bot name you just created.
Start a Conversation
Click the bot to open the conversation, or click Open App to start using it and send a task.
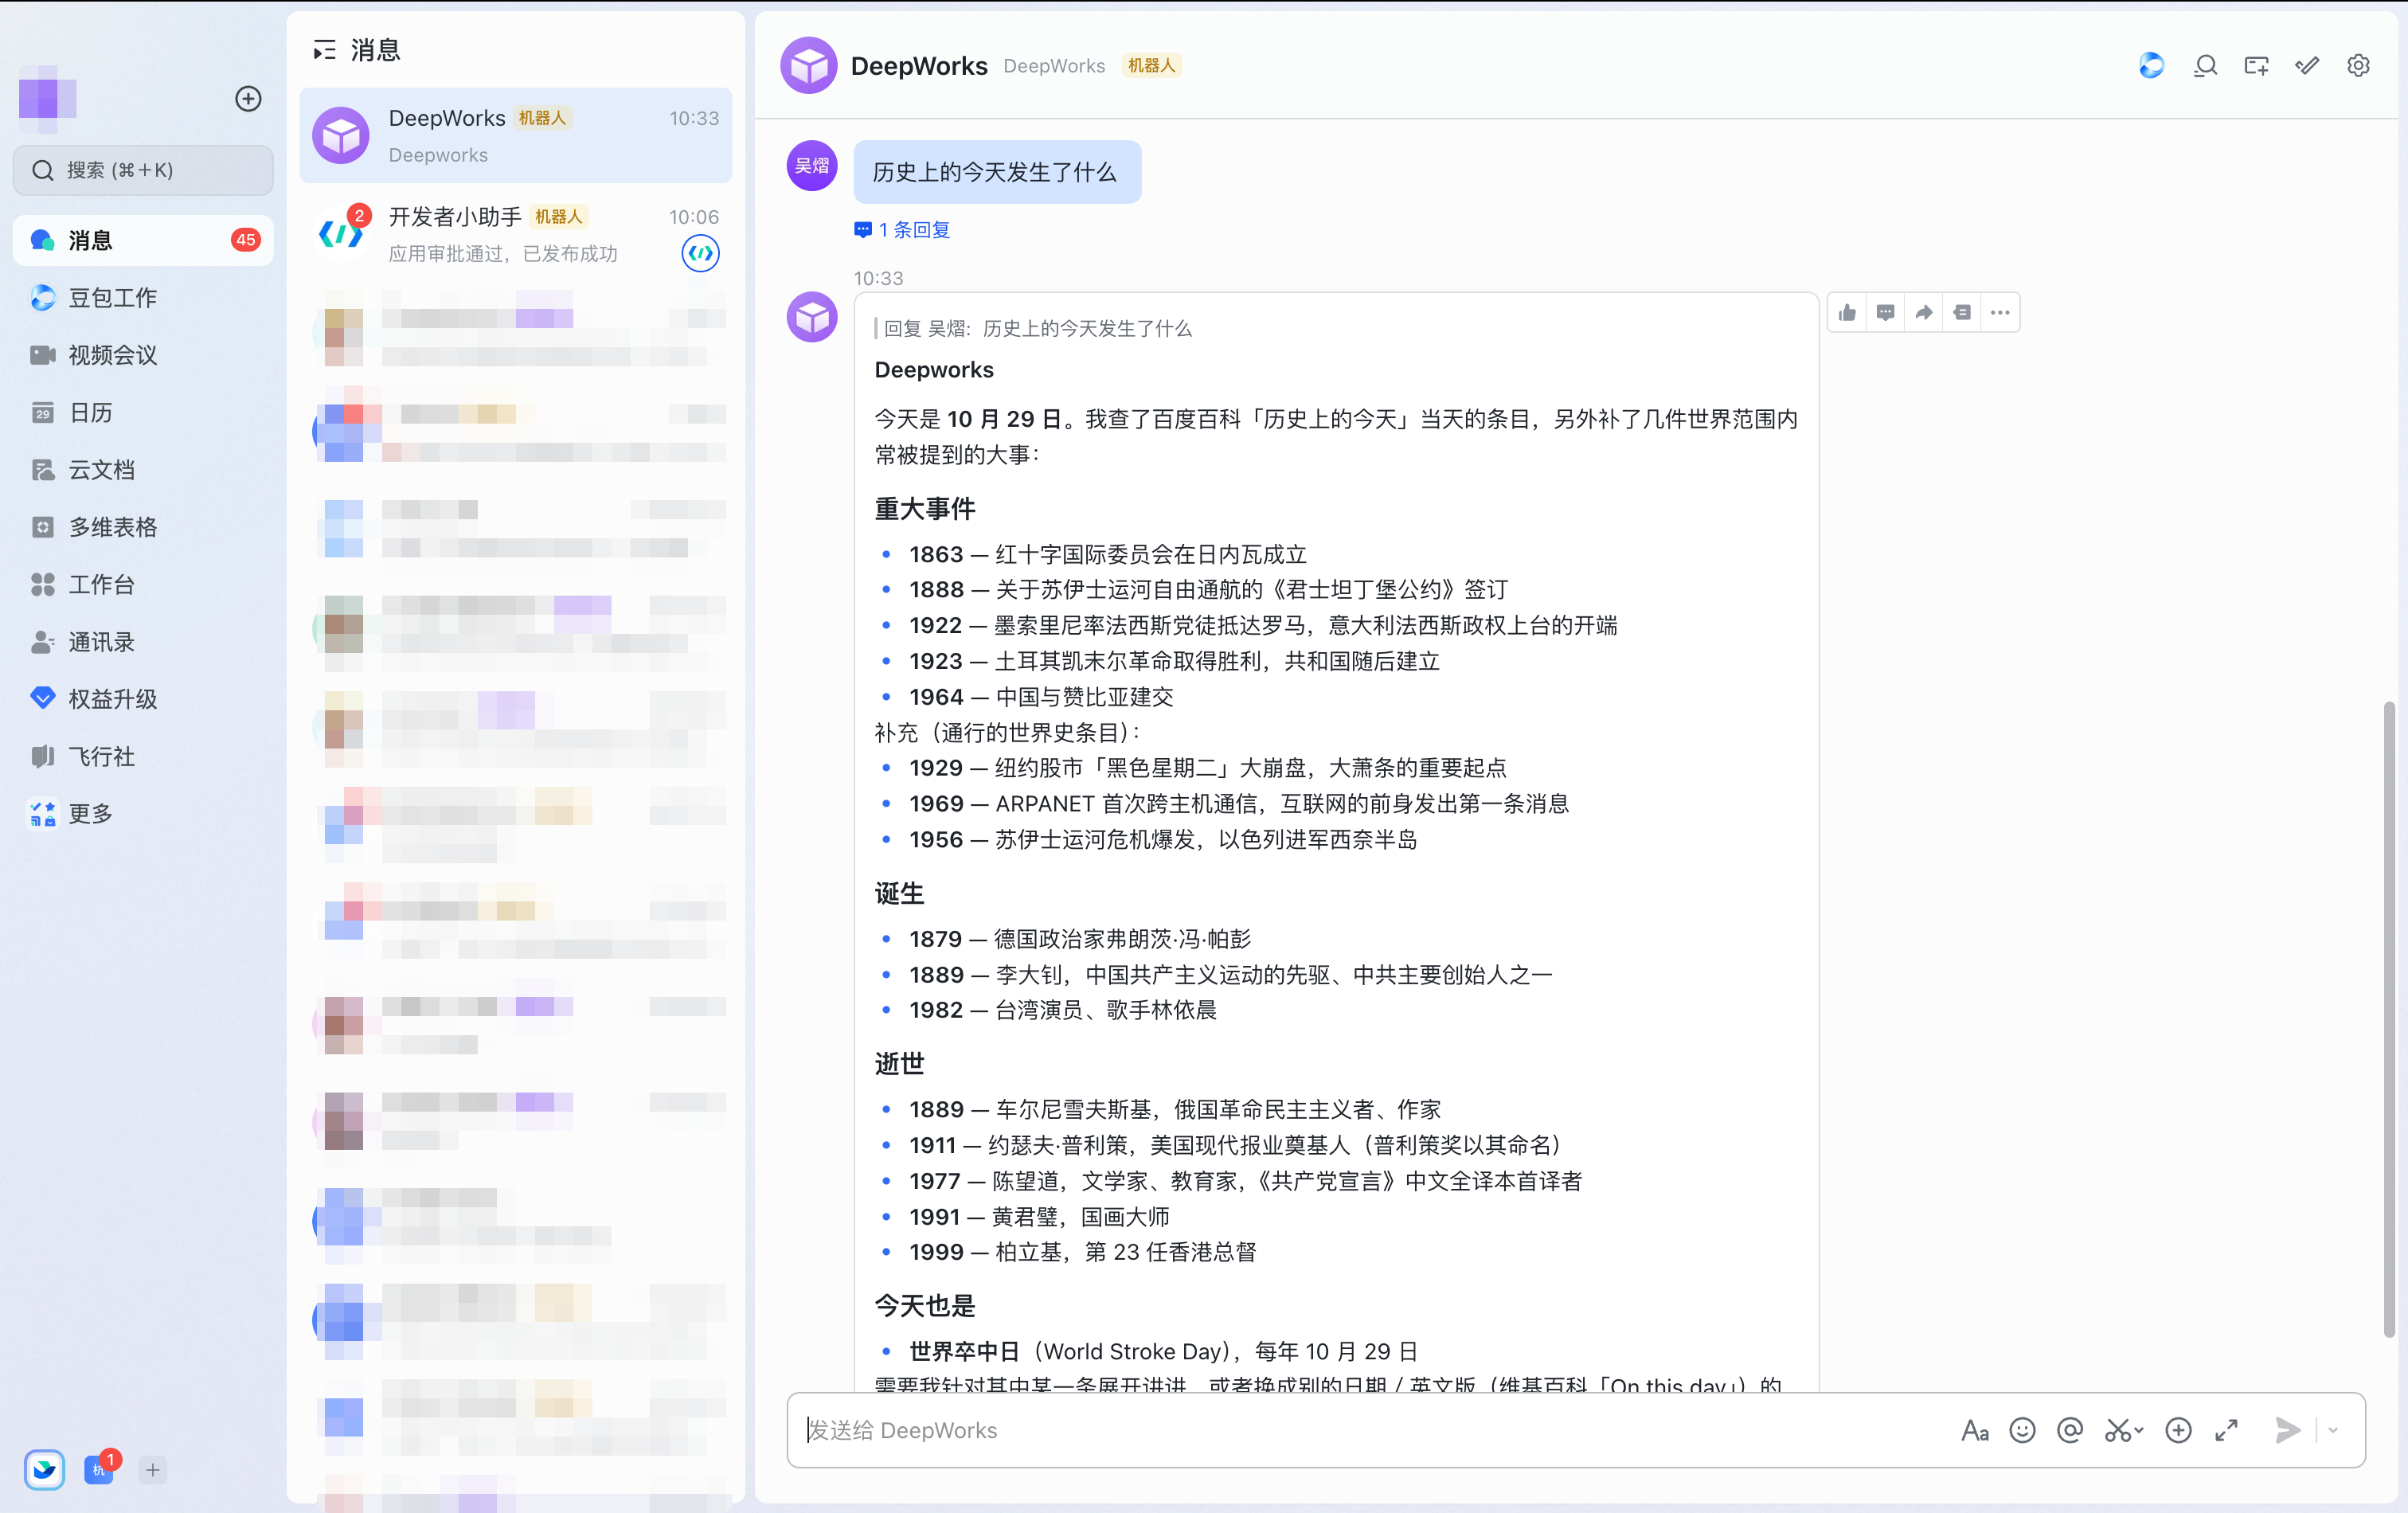
Receive the Message in DeepWorks
Switch to DeepWorks; the message is also received there.