Shared Knowledge Base
Product Overview
Product Introduction
DeepWorks Shared Knowledge Base is used to consolidate a team’s policy documents, project documents, business materials, and historical deliverables into shared knowledge assets that are searchable, maintainable, governable, and callable by Agents.
The Shared Knowledge Base uses “Project Space” as the collaboration isolation boundary and “Knowledge Base” as the knowledge asset unit. Users can create, search, and manage multiple Knowledge Bases within a Project Space, and complete resource management, Wiki knowledge governance, and Agent conversation invocation inside each Knowledge Base.
Product Value
The product’s three layers of capability build on each other, addressing three types of pain points: the first layer solves “fragmentation”—scattered materials; the second layer solves “inconsistency”—inconsistent knowledge definitions and untraceable sources; the third layer solves “dormancy”—knowledge assets that cannot be put to use. Project Space, permission control, and Data Lineage run through all three layers, ensuring that team knowledge can be both collaboratively maintained and credibly audited.
Layer 1: Knowledge Accumulation — Turning fragmented materials into systematic knowledge
Most project files produced in daily teamwork are isolated, unstructured pieces of information that are hard to organize into systematic knowledge. The Shared Knowledge Base supports batch uploading of files and folders, automatic parsing and chunking, and can compile source materials into structured Wiki entries. Fragmented materials thus accumulate into a searchable, maintainable, and reusable team knowledge system.
Layer 2: Knowledge Understanding — Enabling Agents to understand the business, not just read the text
Ordinary shared documents often only solve the problem of “storage” and cannot guarantee that knowledge is accurate, connected, and traceable. The Shared Knowledge Base supports maintaining Wiki entries, viewing Version History, understanding knowledge connections through the Wiki Graph, and using Data Lineage to check the generation relationships between resource files and Wiki pages; it also validates knowledge recall through Chunking Settings and Retrieval Test. Team knowledge is thus upgraded from loose materials into knowledge assets with unified definitions, clear lineage, and auditability.
Layer 3: Knowledge Invocation — Bringing knowledge assets out of the backend and into the workfront
If well-formed knowledge assets remain confined within the system, they can hardly integrate into daily project workflows. The Shared Knowledge Base supports invoking the knowledge workspace in conversations via @ commands; agents rely on RAG and Wiki entries to solve complex project business problems and display sources in the results. This connects the application chain from knowledge assets to intelligent Q&A, so that accumulated knowledge continuously supports project analysis and decision-making.
Applicable Roles
| Role | Main Tasks | Common Entry Points |
|---|---|---|
| Knowledge administrator | Upload materials, maintain resources, and manage Wiki knowledge | Resource Management, Wiki Knowledge |
| Business user | Search knowledge, view Wiki, invoke knowledge through Agents | Global Search, Wiki Knowledge, Agent conversations |
| Knowledge reviewer | Check data sources, Version History, lineage, and knowledge quality | Wiki Knowledge, Data Lineage, Knowledge Base Settings |
| AI task user | Explicitly select a Shared Knowledge Base in conversations and verify answer sources | @Knowledge Base in the conversation input box |
Glossary
| Term | Description |
|---|---|
| Shared Knowledge Base | Deepology’s cloud-based Knowledge Base capability for team collaboration and unified governance |
| Project Space | The collaboration isolation unit of the Shared Knowledge Base, used to host multiple Knowledge Bases and member permissions |
| Knowledge Base | The knowledge asset management unit, used to host resources, Wiki, and retrieval configurations |
| Resource Management | The workspace for managing source files, folders, parsing status, preview, and batch operations |
| Wiki Knowledge | Structured knowledge pages generated from resource content, supporting indexing, graph, lineage, and version governance |
Product Introduction
Using the Shared Knowledge Base can be summarized as three progressive steps: space accumulation, governance acceptance, and conversation invocation.
Step 1: Create a Project Space and onboard team materials
Goal: Consolidate policy documents, project documents, business materials, and historical deliverables scattered across the team into shared knowledge assets within a unified permission boundary.
- Create or select a Project Space to define knowledge boundaries by team, department, or business domain;
- Create a Knowledge Base to host materials, Wiki, and retrieval configurations;
- Upload files or folders; the system completes parsing and chunking, and generates searchable and traceable Wiki knowledge according to the configuration. Step 2: Govern and accept knowledge outcomes
Goal: Confirm that knowledge content is complete, accurate, searchable, connectable, traceable, and compliant with the team’s unified definitions.
- In Resource Management, check parsing status, correct knowledge chunks, and control whether chunks participate in retrieval;
- Configure Wiki extraction focus and chunking rules, and verify through Retrieval Test whether knowledge can be correctly recalled.
- In Wiki Knowledge, maintain entries, versions, graph, and Data Lineage to confirm that knowledge source chains are complete; Step 3: Invoke the Shared Knowledge Base in Agent conversations
After knowledge acceptance is complete, return to the DeepWorks conversation input box, type @ or click “Select Task Resources”, go to “Knowledge Foundation → Shared Knowledge Base”, and select the Project Space and Knowledge Base to use.
The agent will answer questions, analyze content, or execute tasks based on the selected Shared Knowledge Base. Users can verify knowledge sources and usage scope in the results; if knowledge gaps are found, the business conclusions, project experience, and new materials generated afterwards can be accumulated back into the Knowledge Base, forming a continuously updated team knowledge loop.
Function Module Overview
| Function Module | Description |
|---|---|
| Project Space Home | Used to manage Project Spaces, view the Knowledge Base overview, perform Global Search, and enter Project Space management |
| Resource Management | Used to manage Knowledge Base source materials, folders, uploads, previews, parsing, and batch operations |
| Wiki Knowledge | Used to manage Wiki pages, Wiki Index, Wiki Graph, Data Lineage, editing, and Version History |
| Knowledge Base Settings | Used to maintain basic Knowledge Base information, auto-compile, Wiki Settings, Chunking Settings, and Retrieval Test |
| Agent Conversation Invocation | Used to select a Shared Knowledge Base in DeepWorks conversations and invoke knowledge capabilities |
Project Space Home
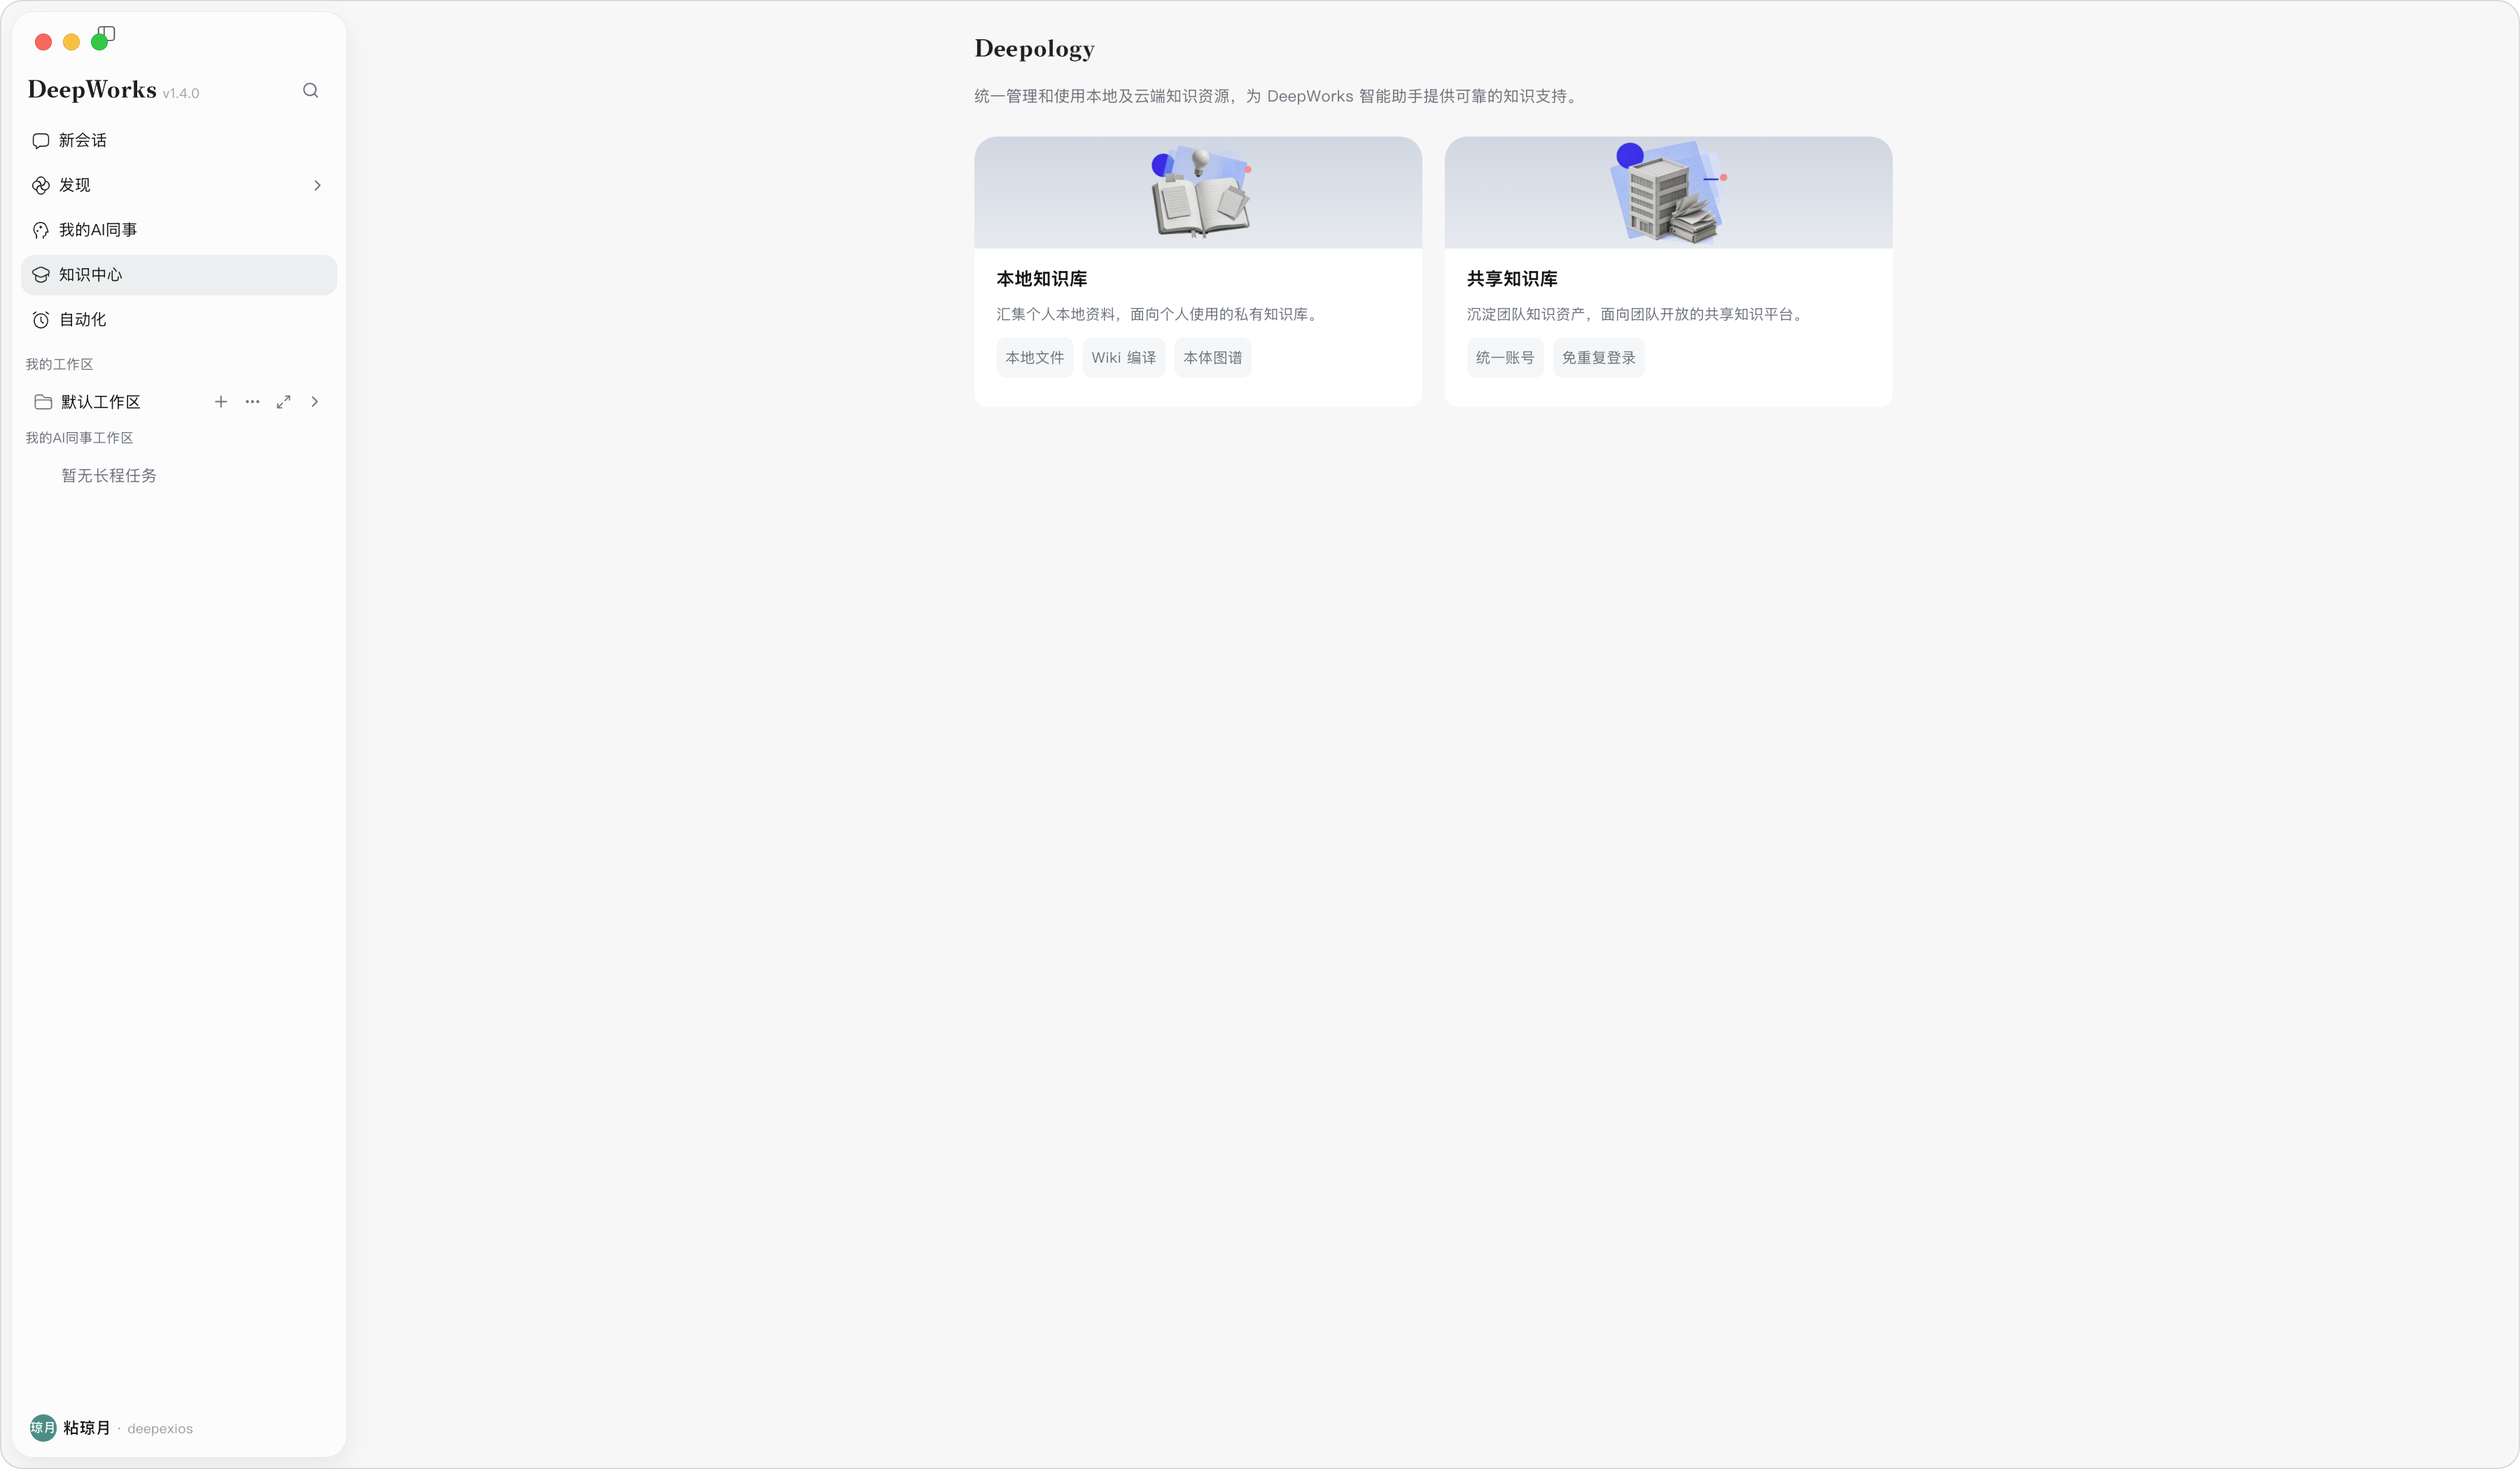
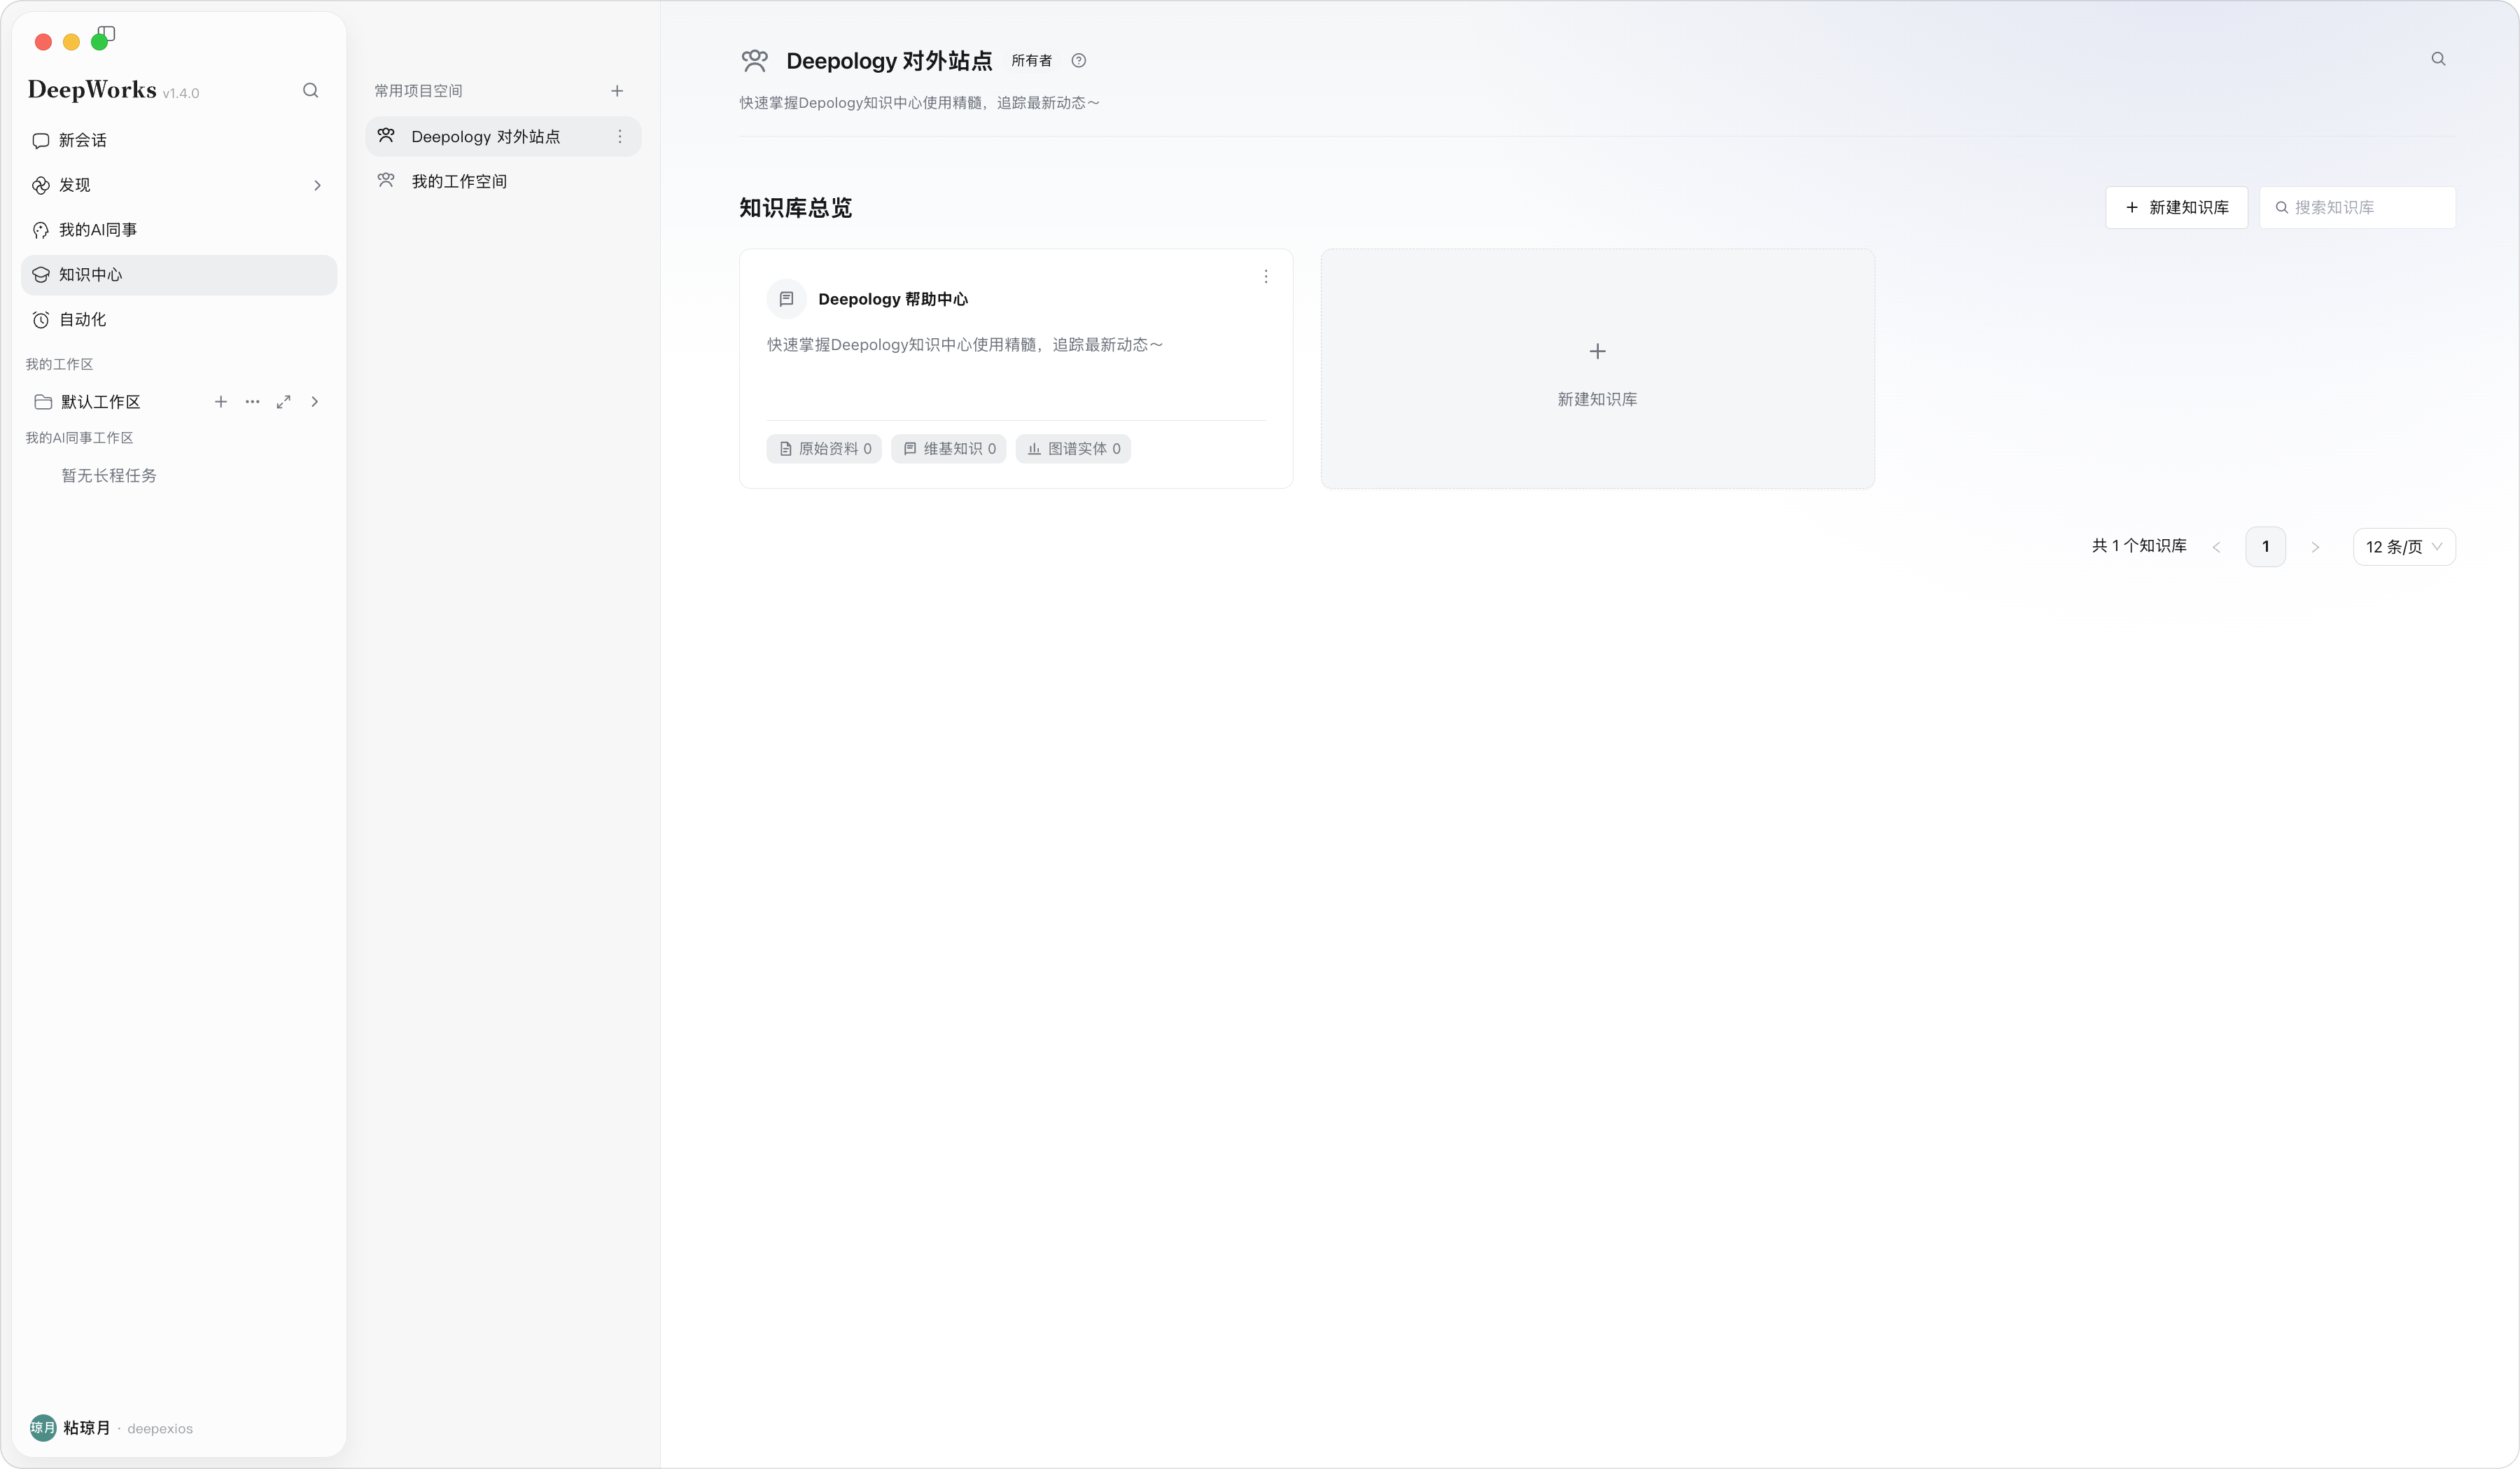
Project Space Home is the organizational entry and collaboration boundary of the Shared Knowledge Base. It does not process materials directly; it is responsible for space selection, Knowledge Base location, and basic governance.
Steps: Open DeepWorks; click “Knowledge Center” in the app sidebar; on the selection page, click the “Shared Knowledge Base” card to enter the Knowledge Base.
Result: The page displays the Project Space navigation, the Project Space Home title, the Global Search entry, the Knowledge Base overview, Knowledge Base cards, and the Create Knowledge Base button. Each Knowledge Base card shows the name, description, recently updated documents, and content statistics.
Note: Before entering the Shared Knowledge Base, you need to log in to your DeepWorks account and have access permission to the corresponding Project Space.
Enterprise Knowledge Center entry
Project Space Home Knowledge Base overview
Project Space
Create a Project Space
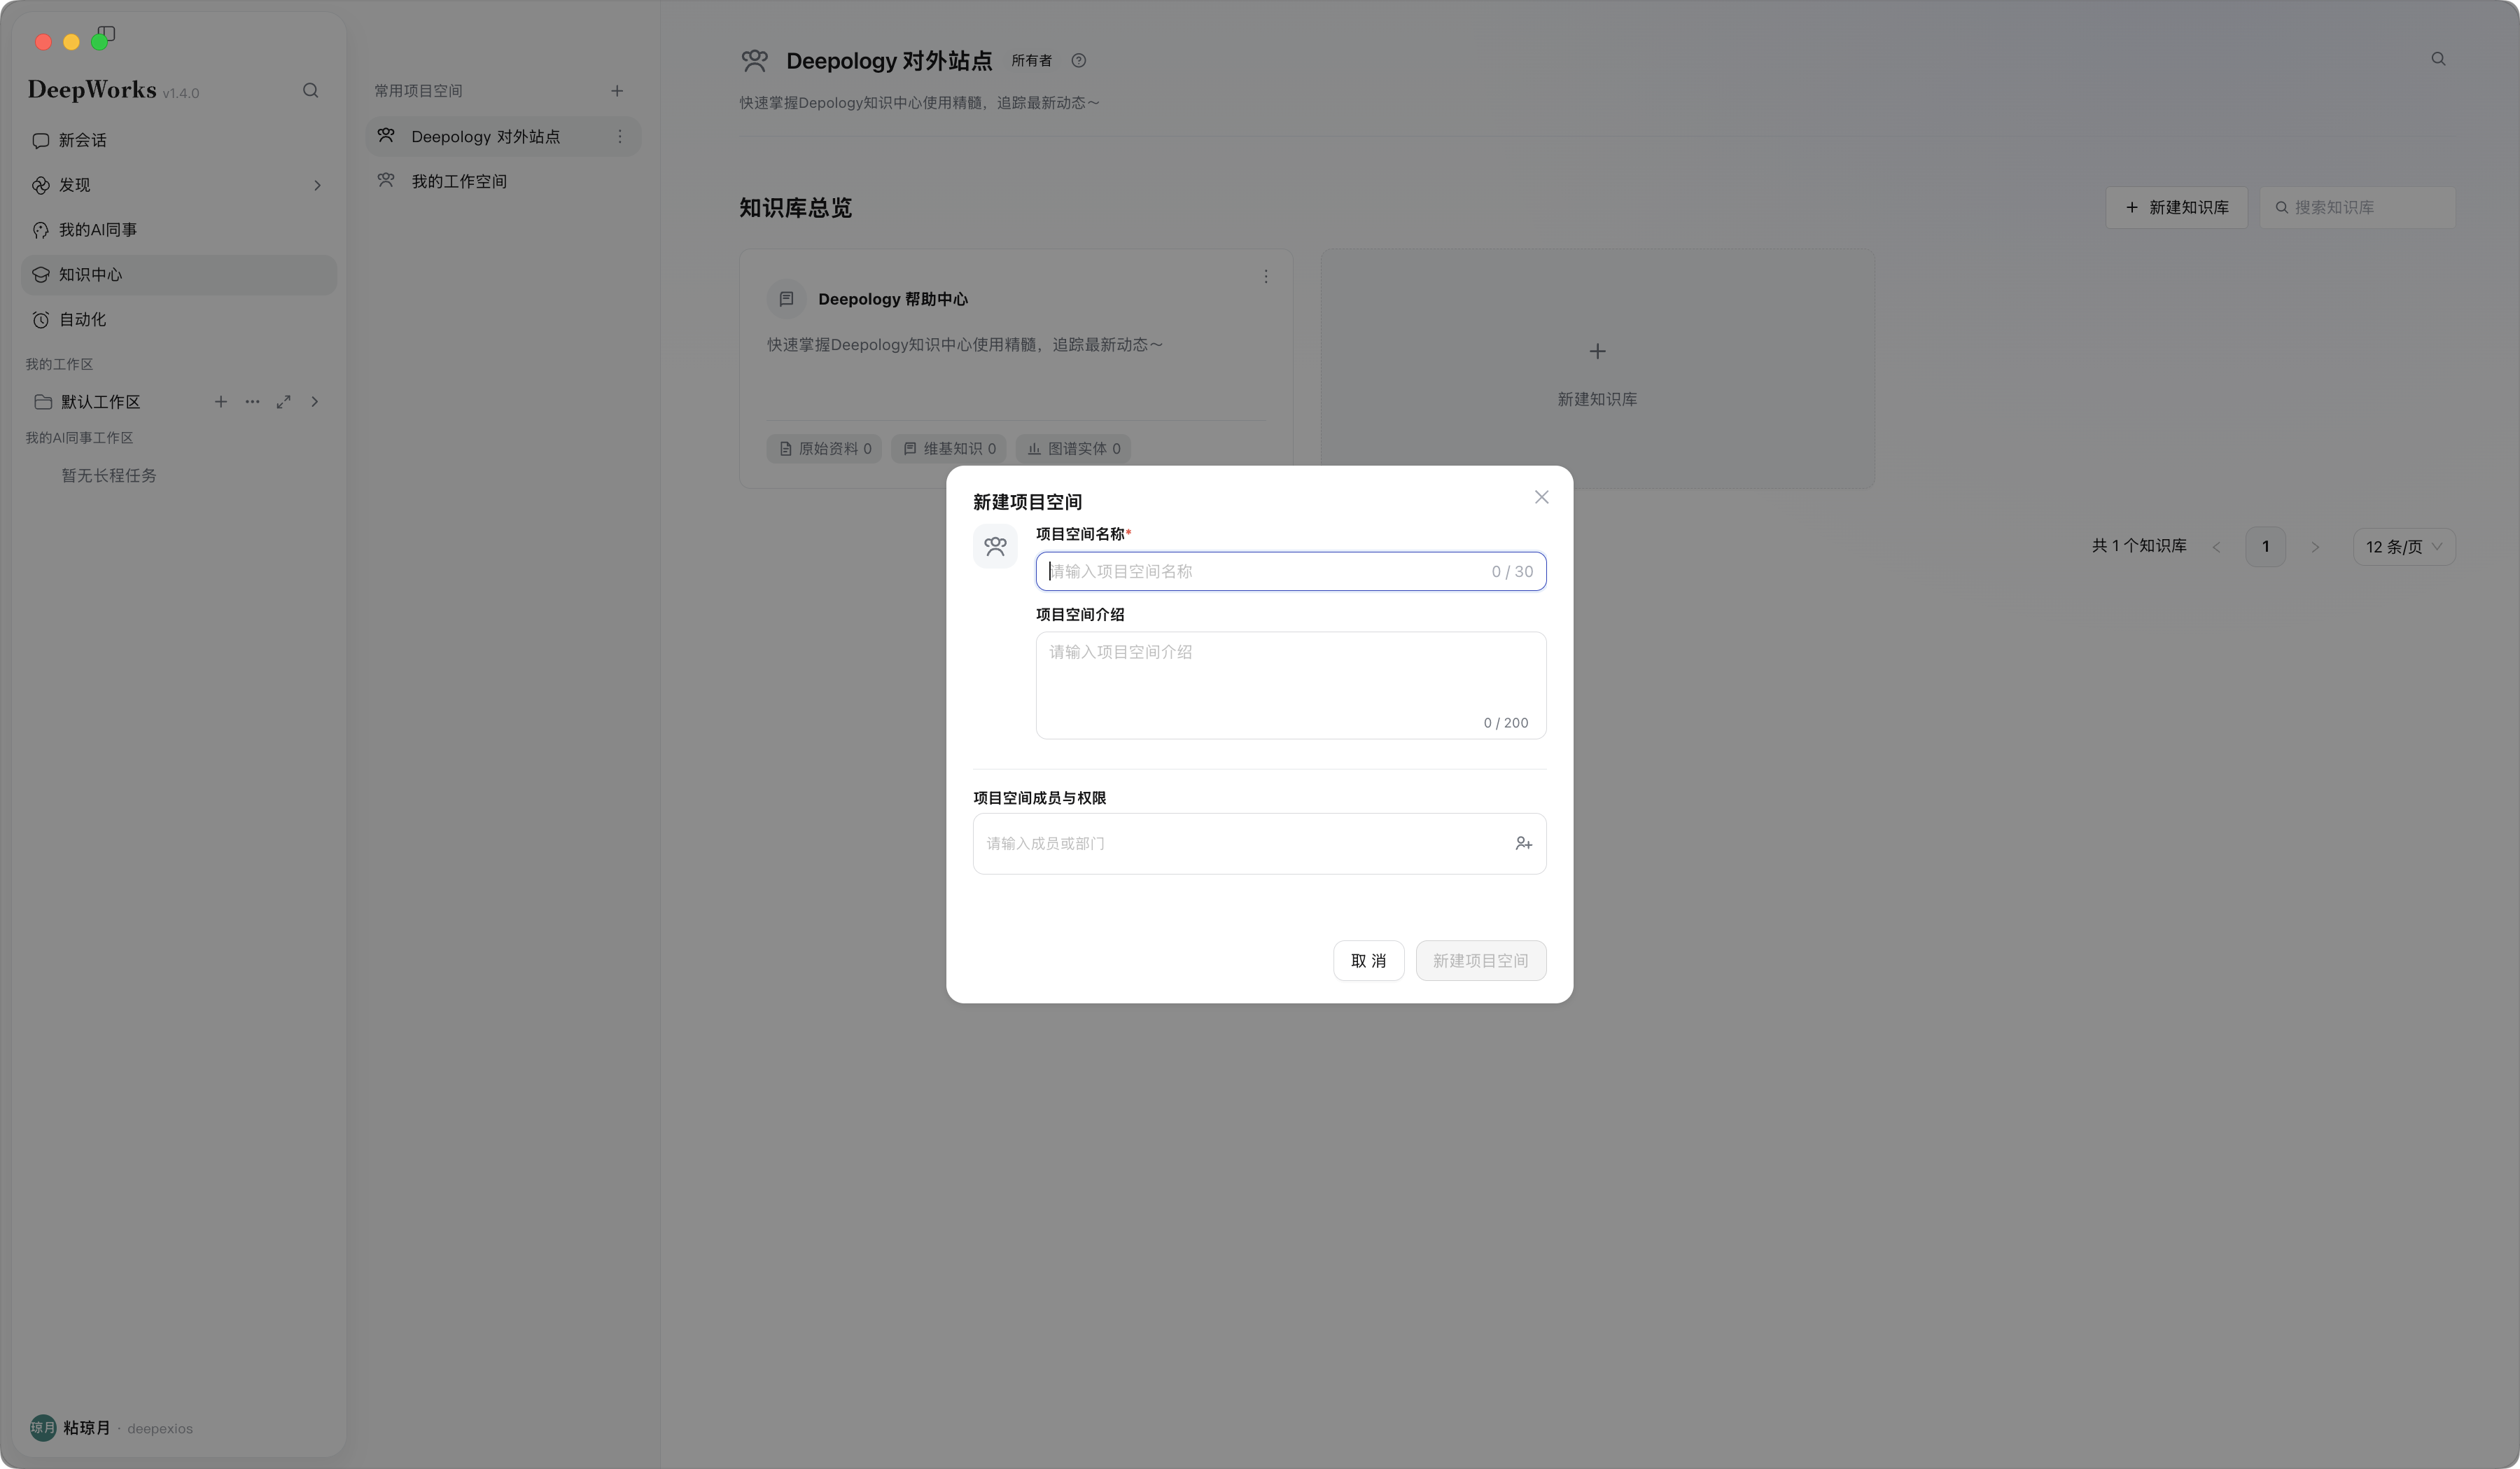
Description: Creating a Project Space establishes an independent collaboration boundary for different teams, departments, or business domains. It is suitable for project-based delivery, departmental knowledge governance, or topic-based knowledge accumulation.
Steps: Click ”+” in the left sidebar of Project Space Home to create a Project Space; fill in the required Project Space name, optionally fill in the Project Space introduction, select members or departments in “Project Space Members and Permissions”, and click “Create Project Space”.
Result: After creation, the Project Space appears in the list of frequently used Project Spaces on the left, and the main page switches to the Knowledge Base overview of that Project Space.
Note:
(1) The Project Space name is required. The name should reflect the team, business domain, or project boundary to avoid confusion with existing spaces.
(2) If adjustments are needed after creation, the owner of the Project Space can modify basic information, Member Management, and Knowledge Base management in Project Space management.
Create a Project Space
Basic Information
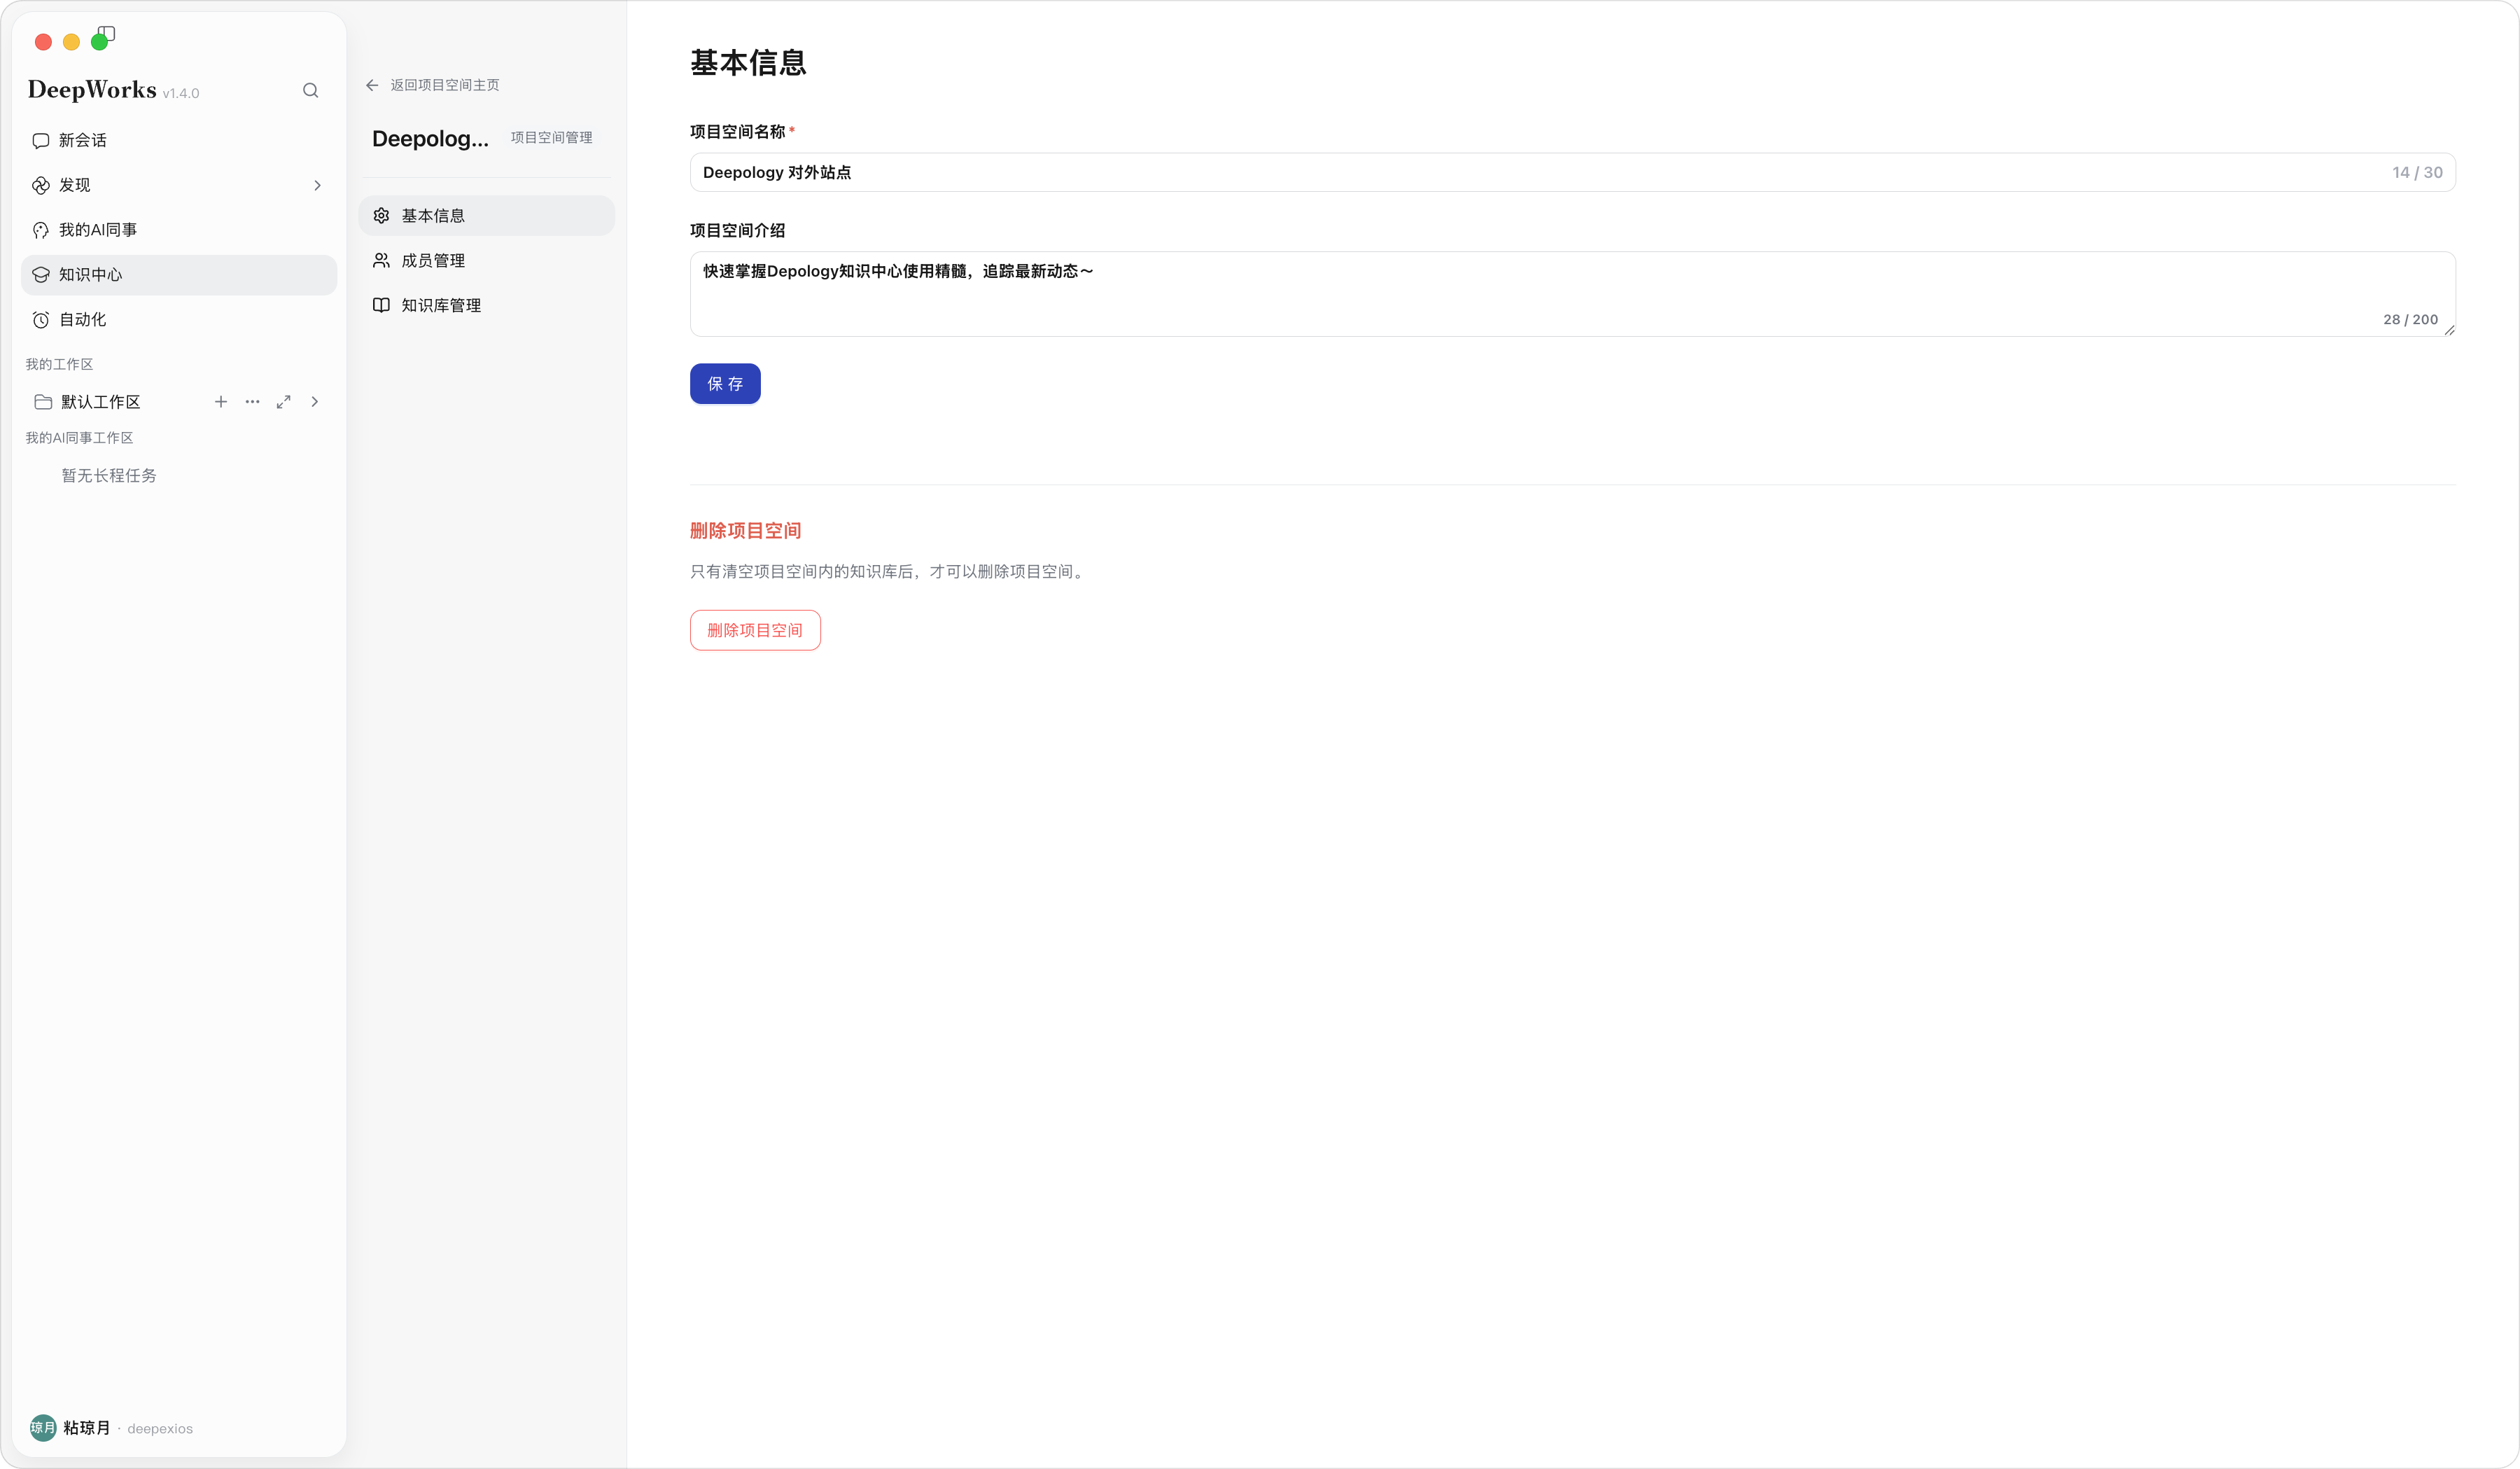
Description: Used to view and modify the Project Space name and introduction, and provides the entry for deleting the Project Space.
Steps: In Project Space management, select “Basic Information”, modify the name or introduction, and click “Save”.
Result: After saving, Project Space Home and the left navigation are updated synchronously. The entry for deleting the Project Space is displayed at the bottom of the page.
Note: Modifying basic information requires the Project Space permission: Owner. Deleting a Project Space is a high-risk operation and requires confirming that there are no Knowledge Bases in the space.
Project Space management - Basic Information
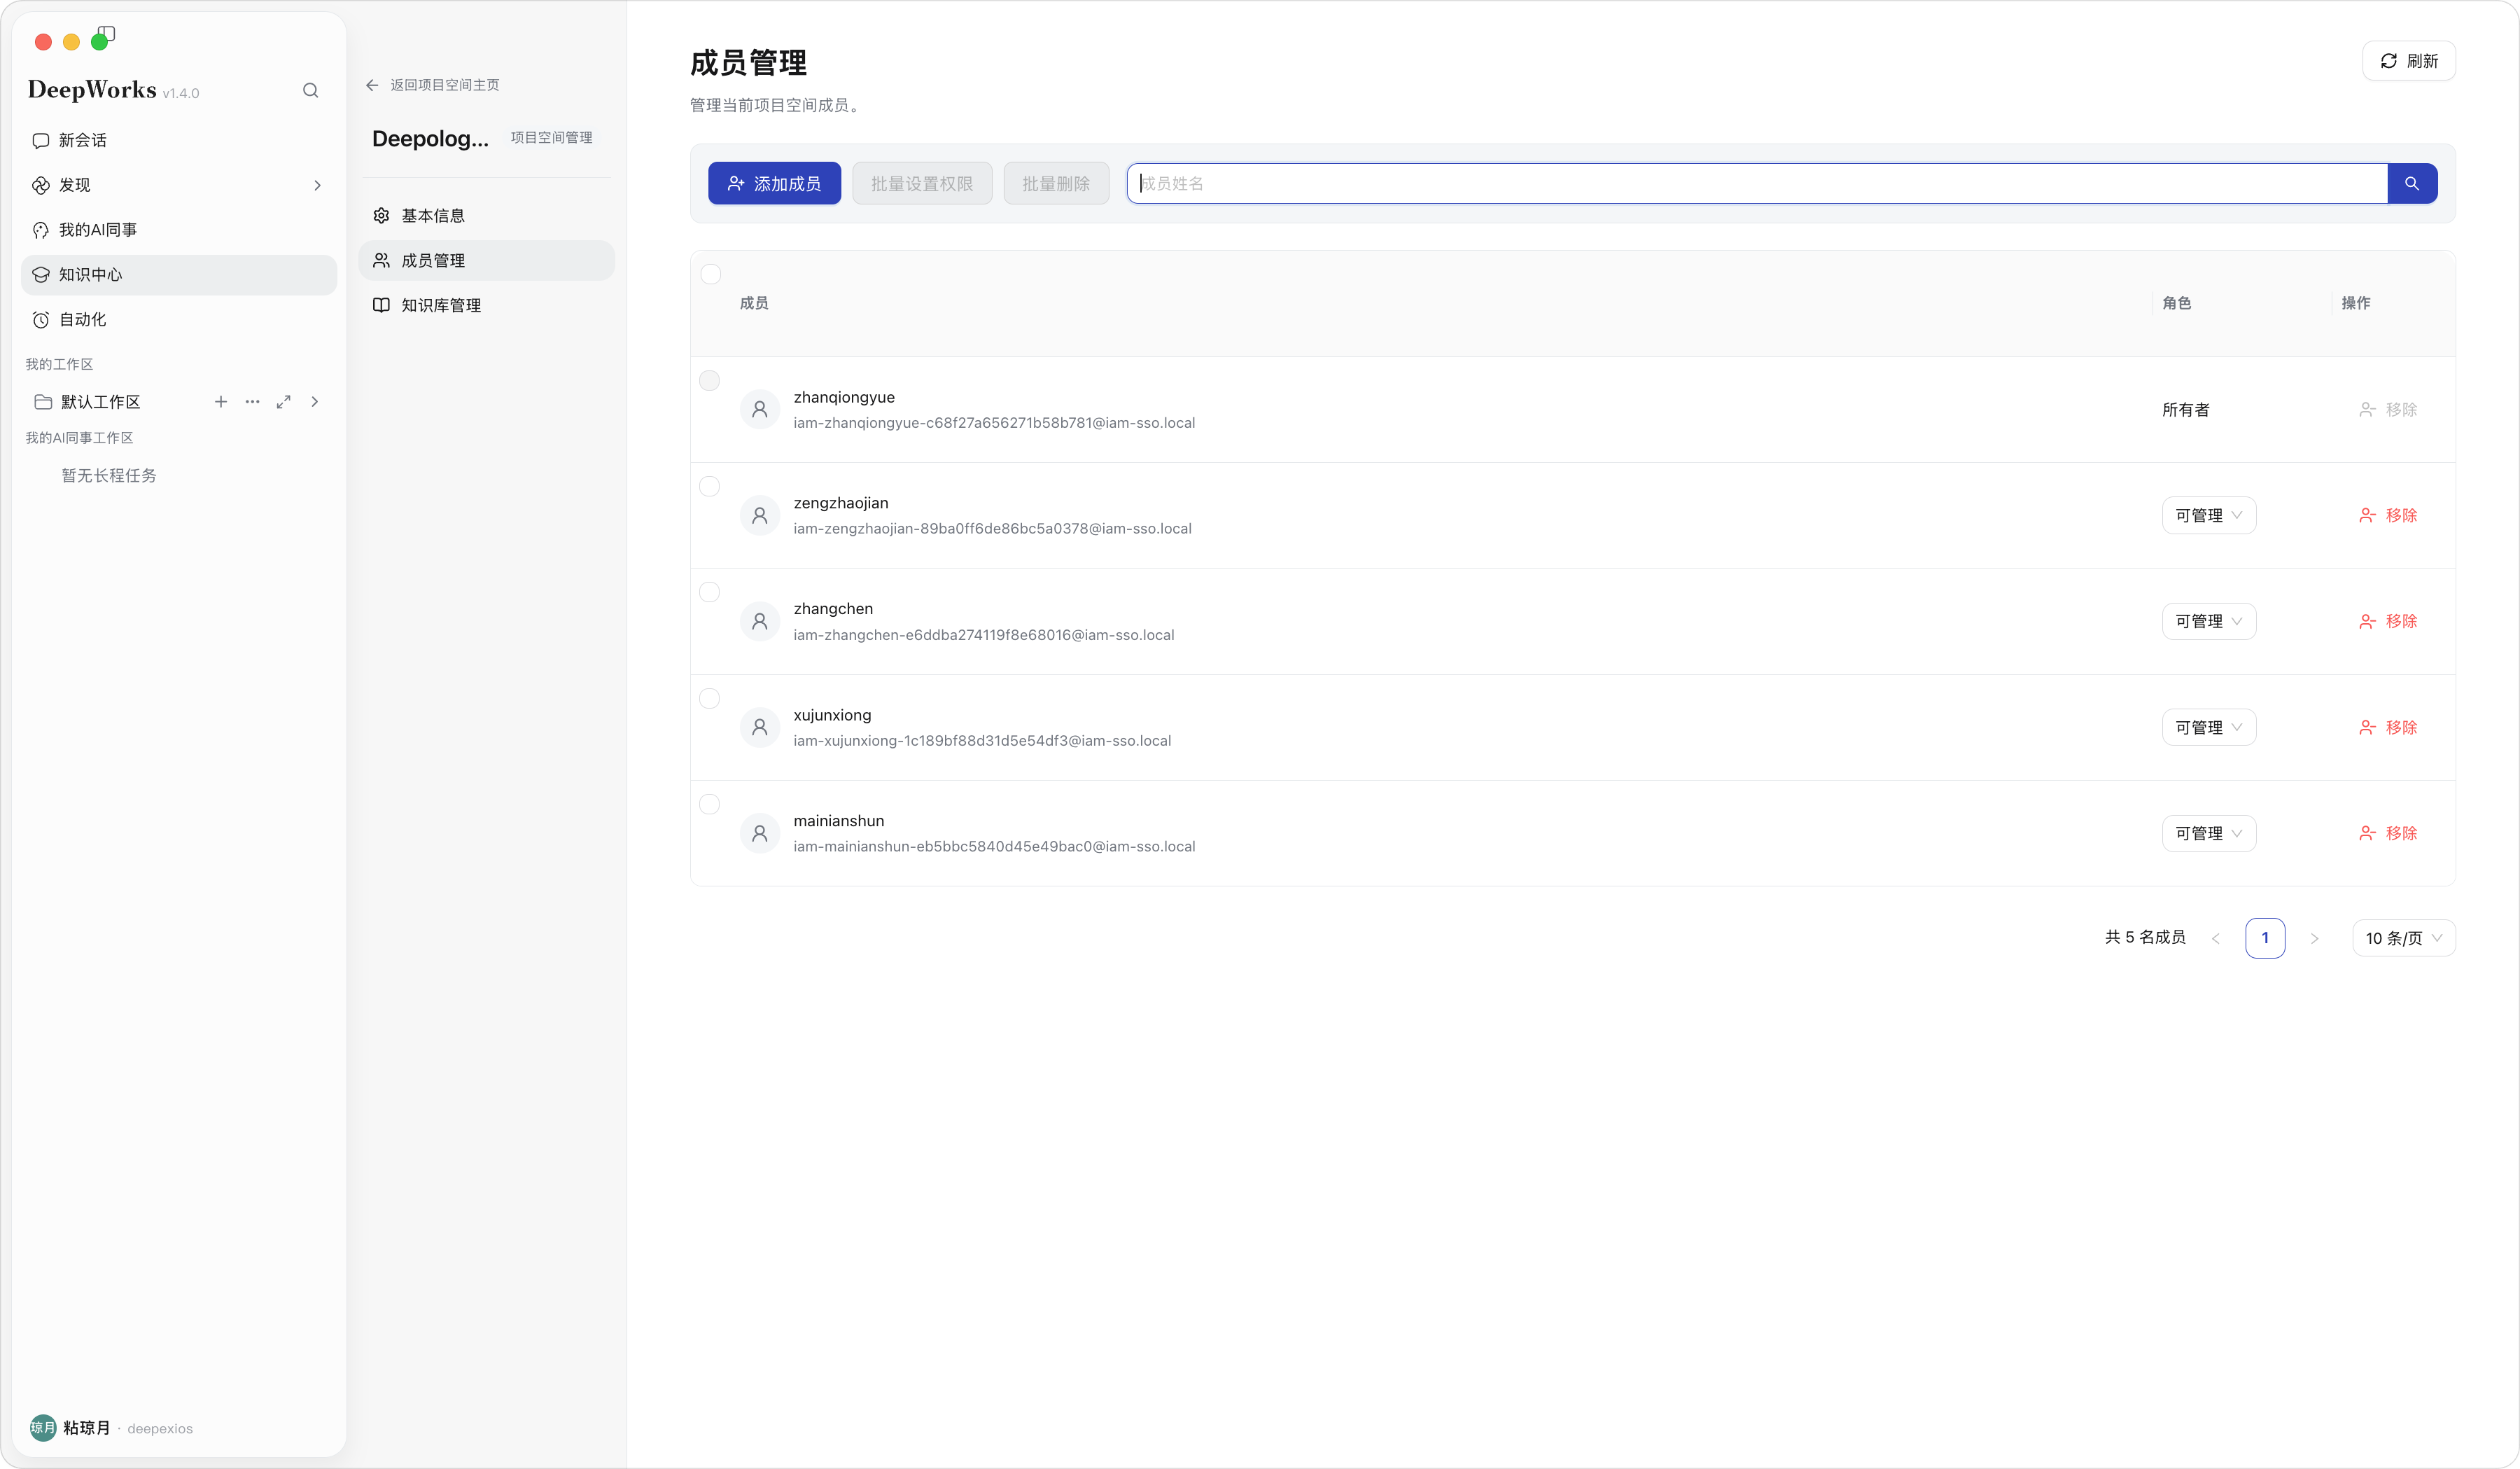
Member Management
Description: Used to view Project Space members, add members, set permissions in batches, or delete members in batches.
Steps: In Project Space management, select “Member Management” to view member names, accounts, roles, and actions; click “Add Member” to add members; after selecting members, use “Batch Set Permissions” or “Batch Delete”; click “Refresh” to reload members when necessary.
Result: The member list displays member names, accounts, roles, and action entries. After being added successfully, members appear in the list.
Note: The Project Space owner can modify member roles. Members must be selected before batch operations; otherwise, the scope of action cannot be determined.
Project Space management - Member Management
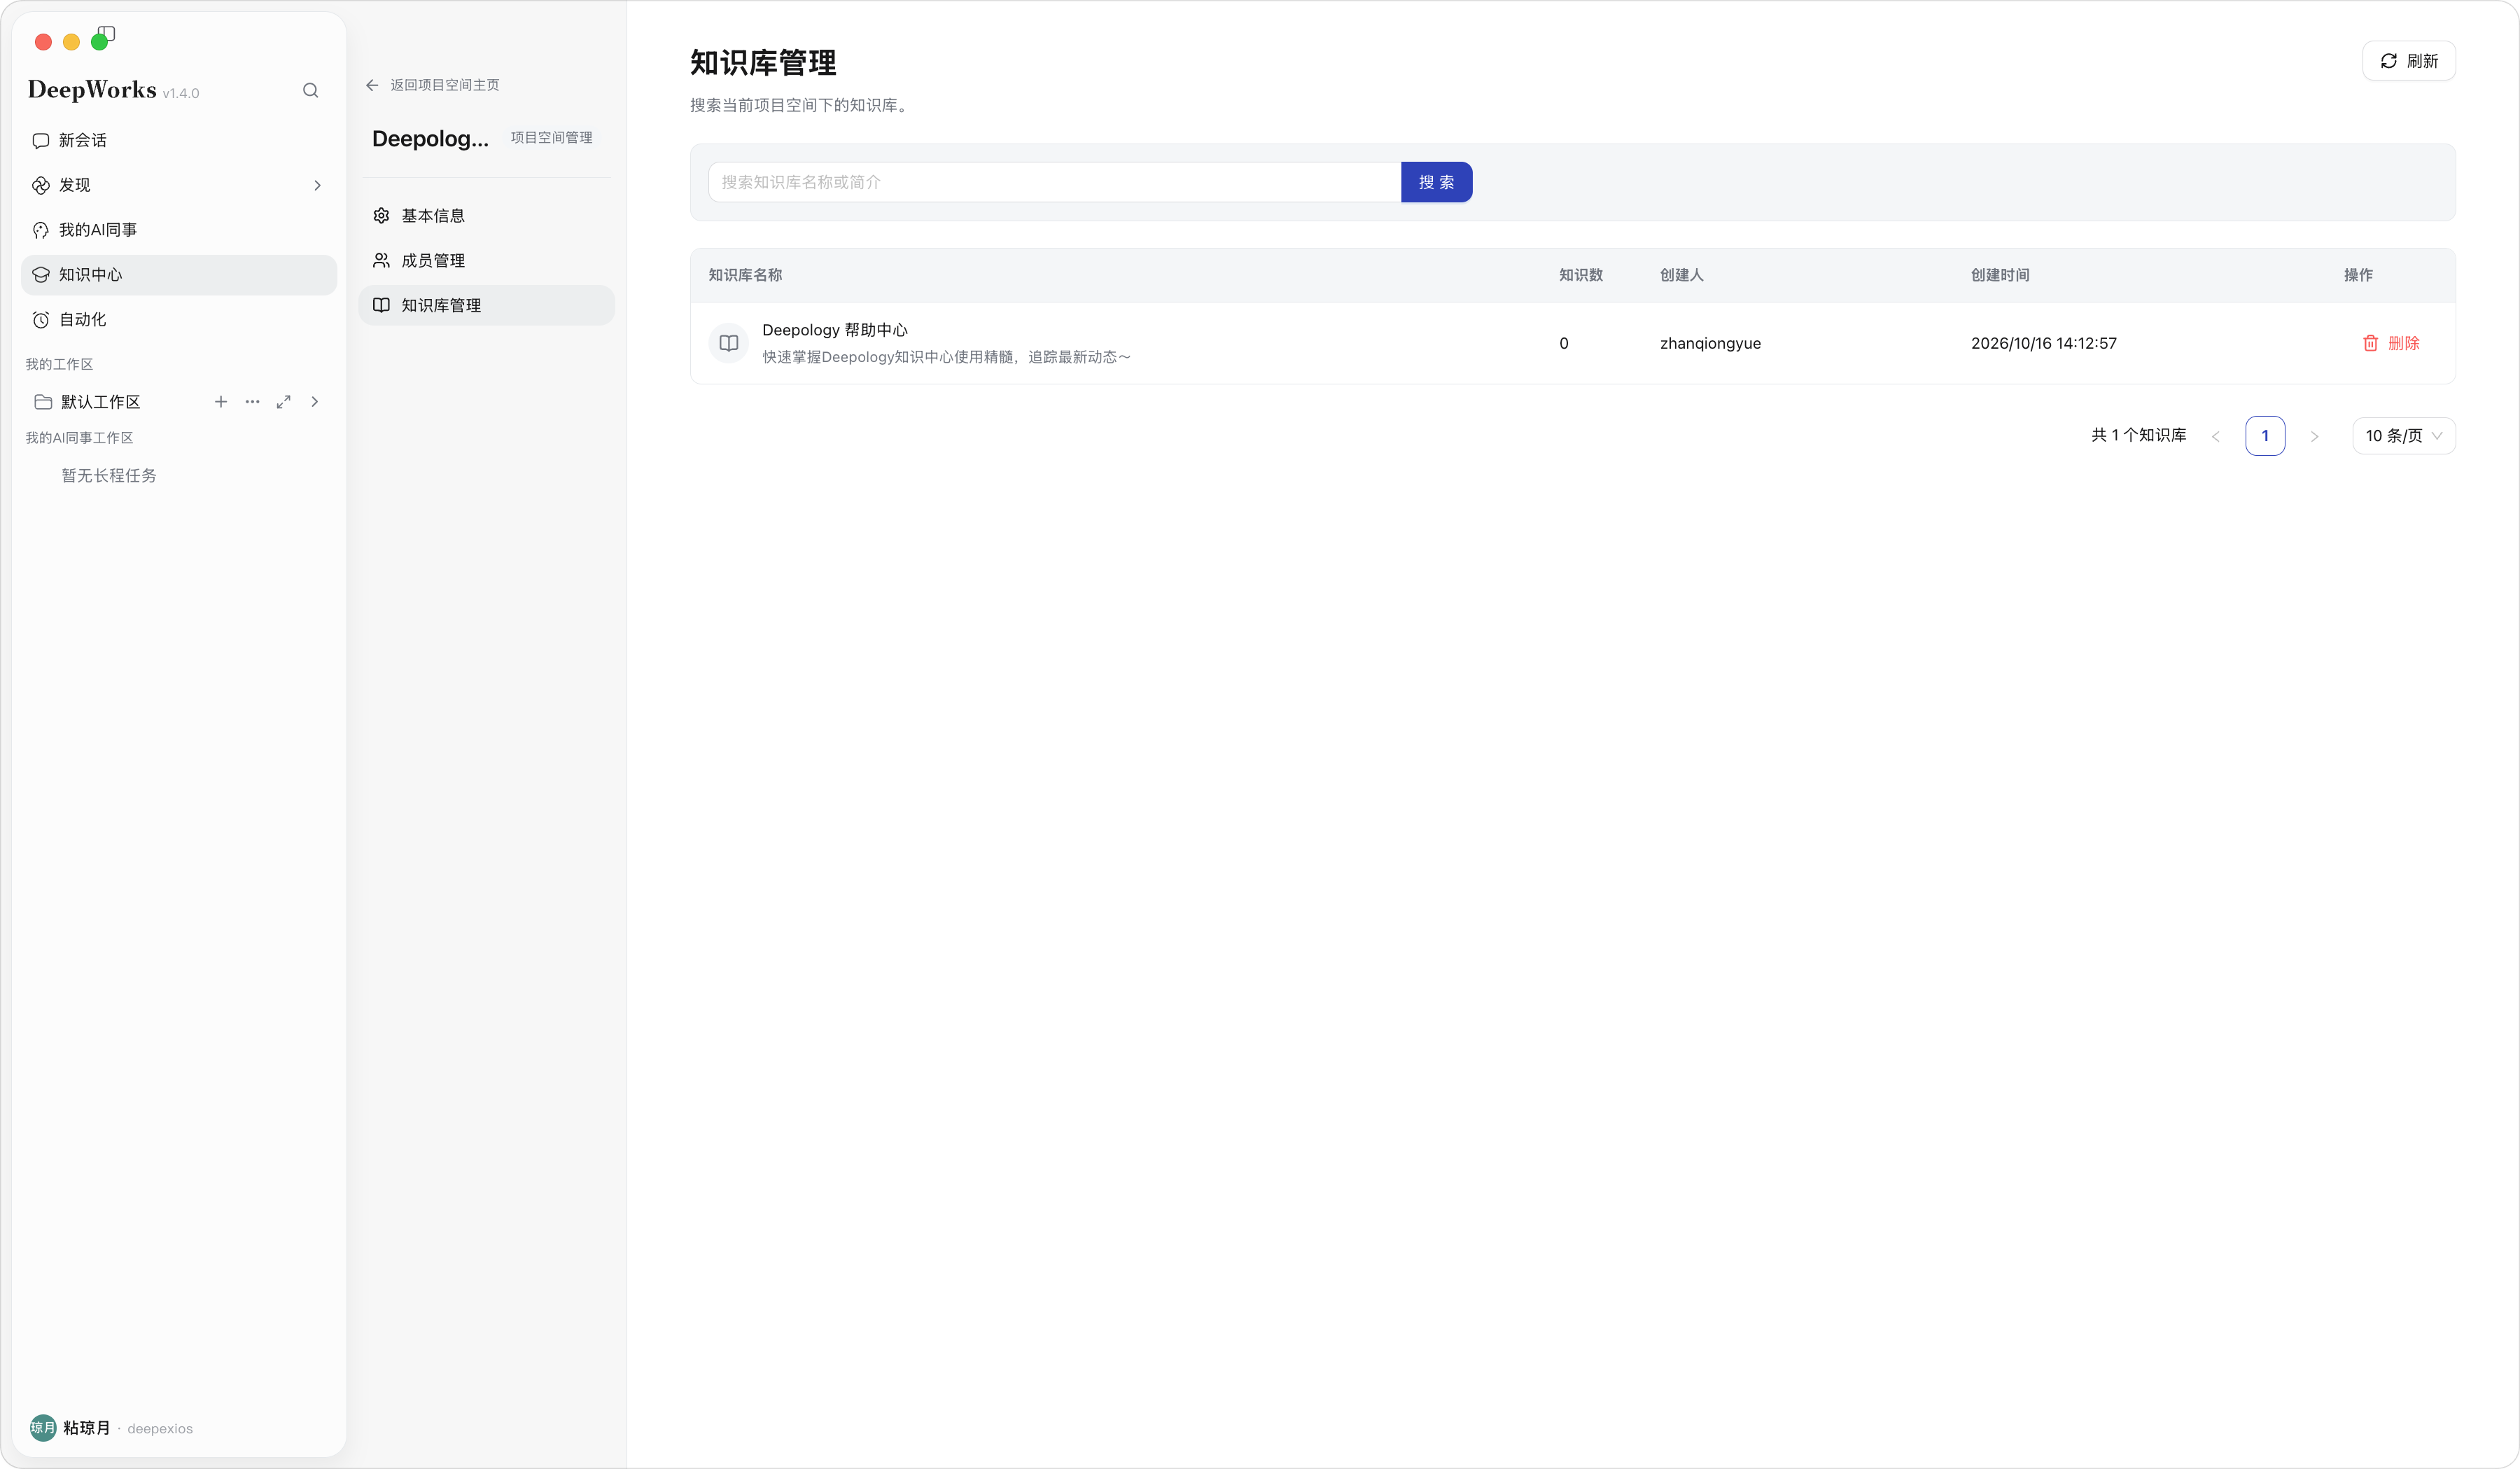
Knowledge Base Management
Description: Used to view all Knowledge Bases in the current Project Space, with support for refreshing, searching, and deleting Knowledge Bases.
Steps: In Project Space management, select “Knowledge Base Management” and enter a Knowledge Base name or description to search; to delete, click “Delete” on the right side of the corresponding Knowledge Base.
Result: The list displays Knowledge Base names, knowledge counts, creators, creation times, and action entries.
Note: Deleting a Knowledge Base also affects the resources and knowledge outcomes under it; confirm that there are no business references before proceeding. Only Knowledge Bases created by the currently logged-in user can be deleted. A Knowledge Base cannot be deleted while it has tasks in progress.
Project Space management - Knowledge Base Management
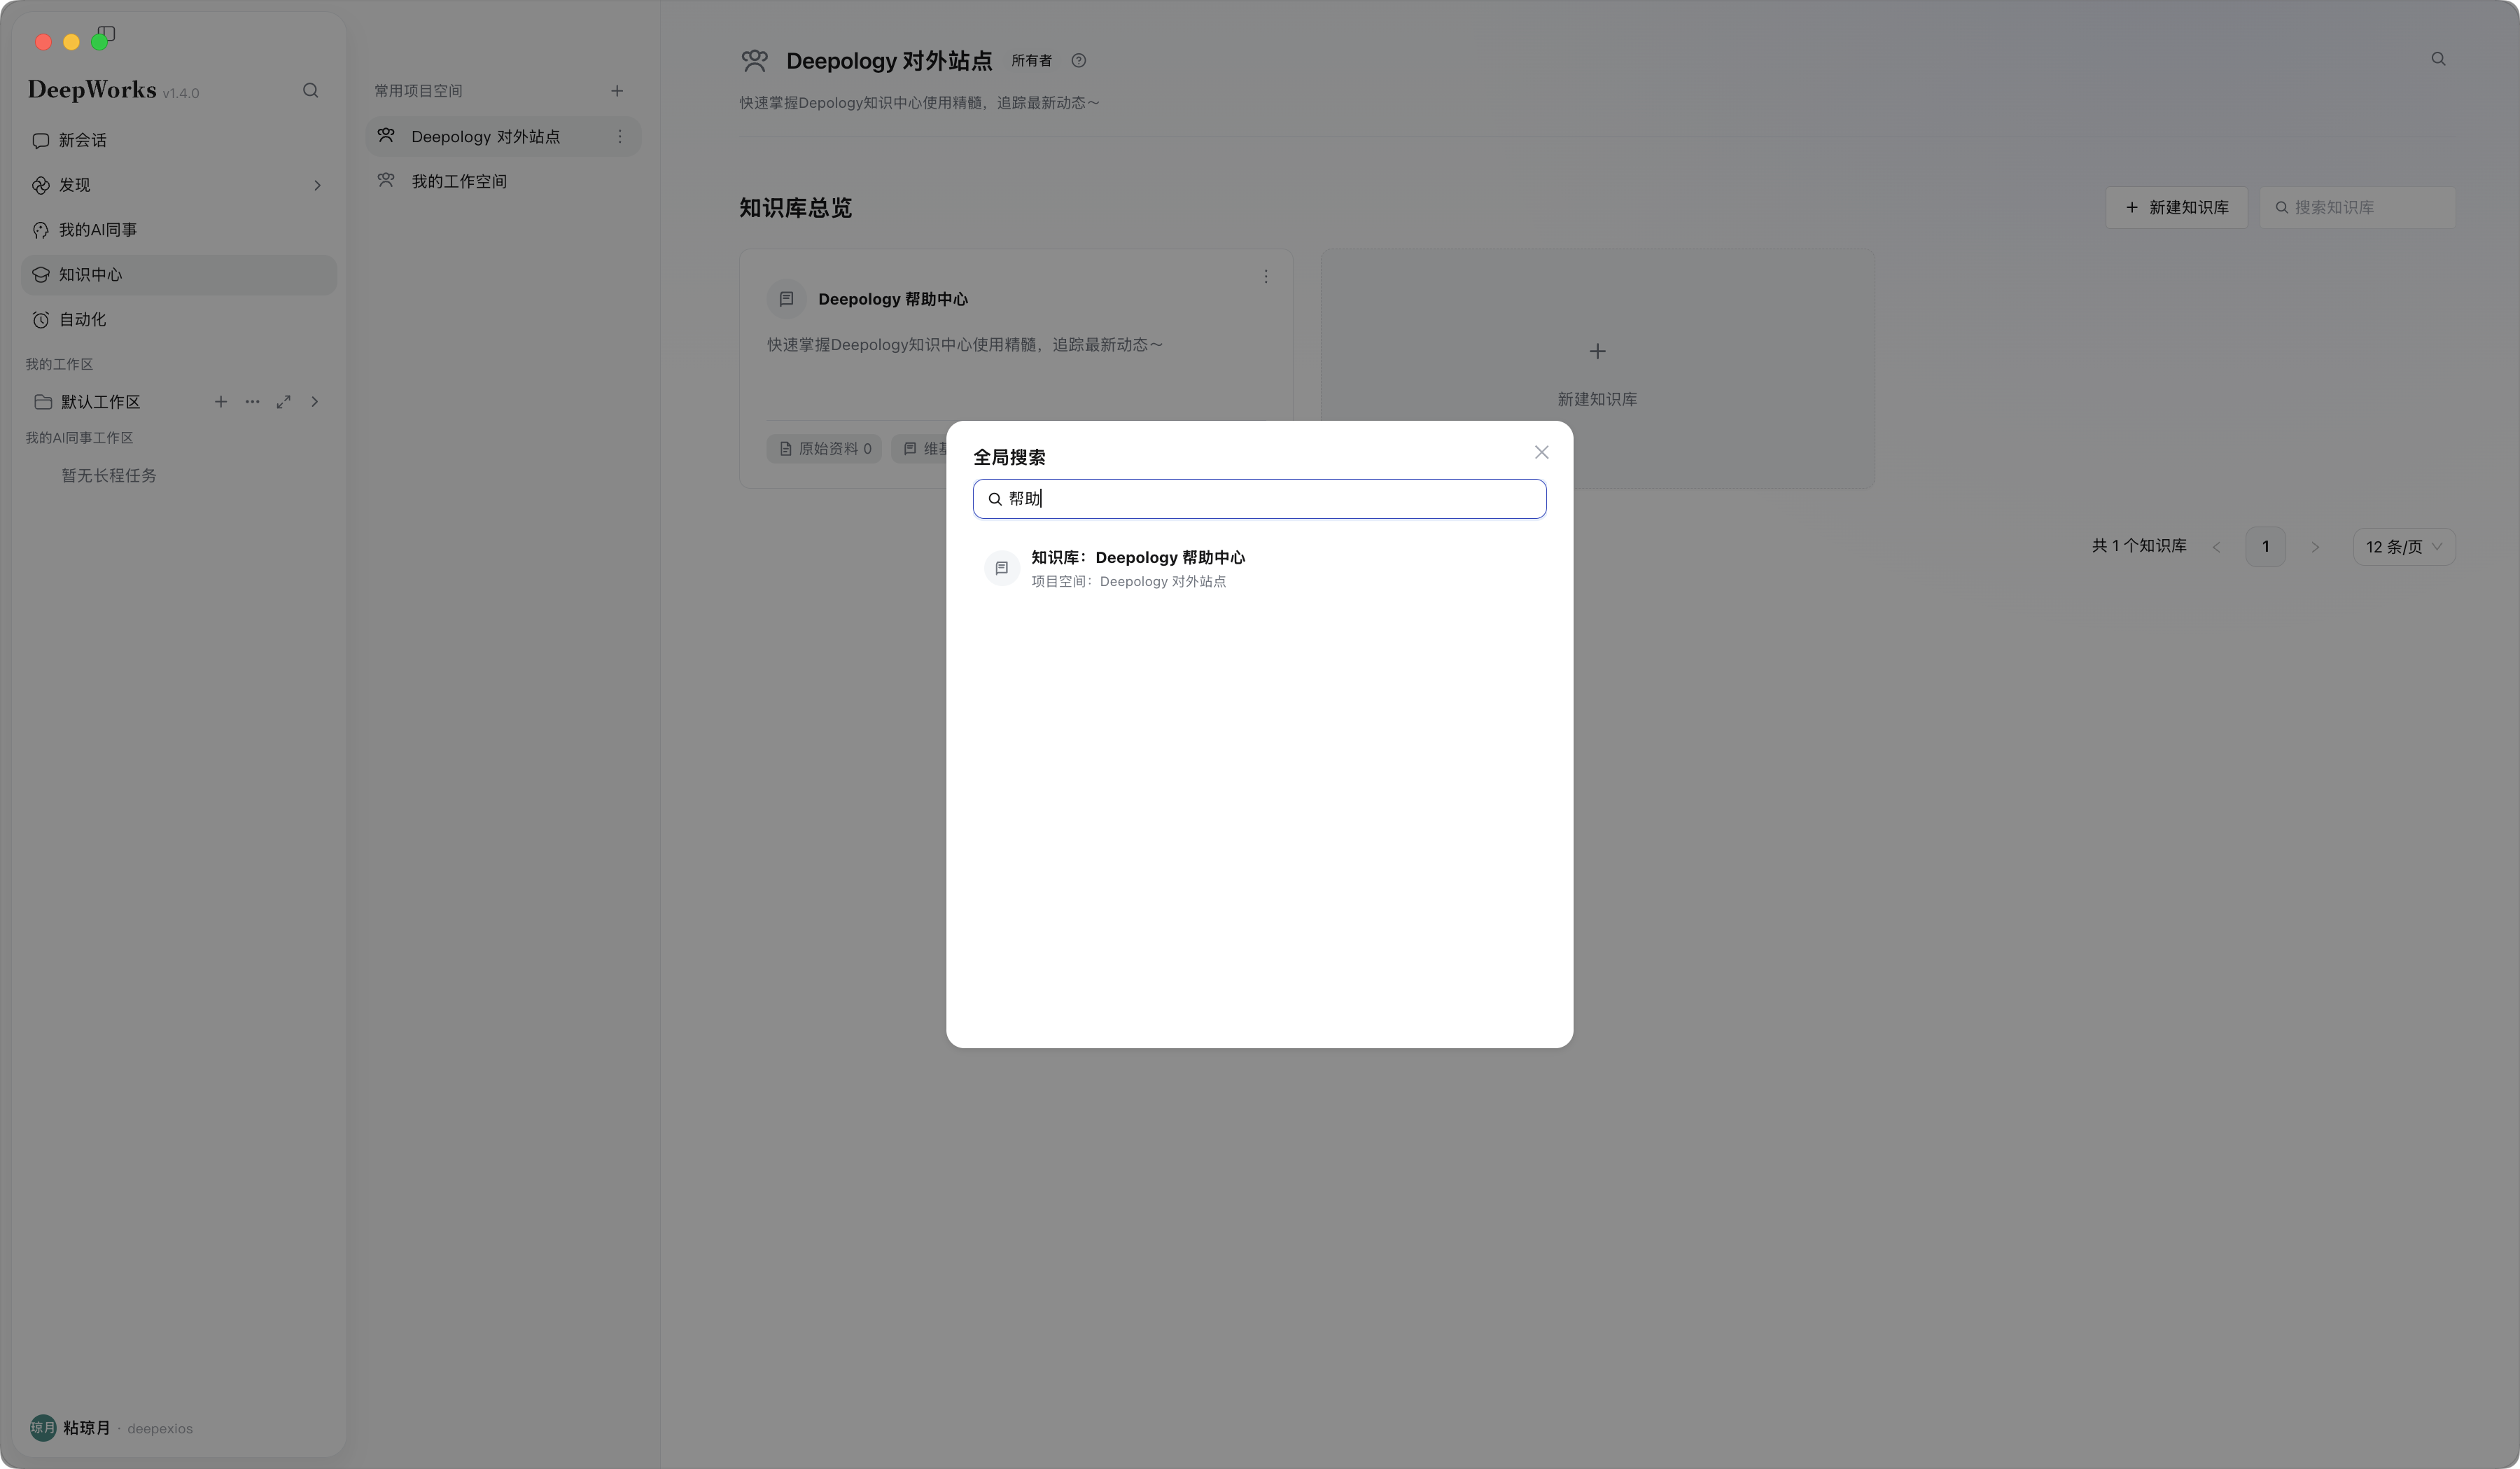
Global Search
Description: Global Search is used to find Project Spaces, Knowledge Bases, or documents across Project Spaces, suitable for quickly locating target knowledge.
Steps: Click “Global Search” in the upper-right corner of Project Space Home, enter keywords, view the search results, and click the target item to enter.
Result: Matching Project Spaces, Knowledge Bases, and documents are displayed below the search box. Each result shows the object type, name, and the Project Space it belongs to, making it easy for users to determine the source.
Note: Global Search depends on the visibility permissions of the current account. Users can only search Project Spaces and knowledge content they have permission to access.
Global Search results
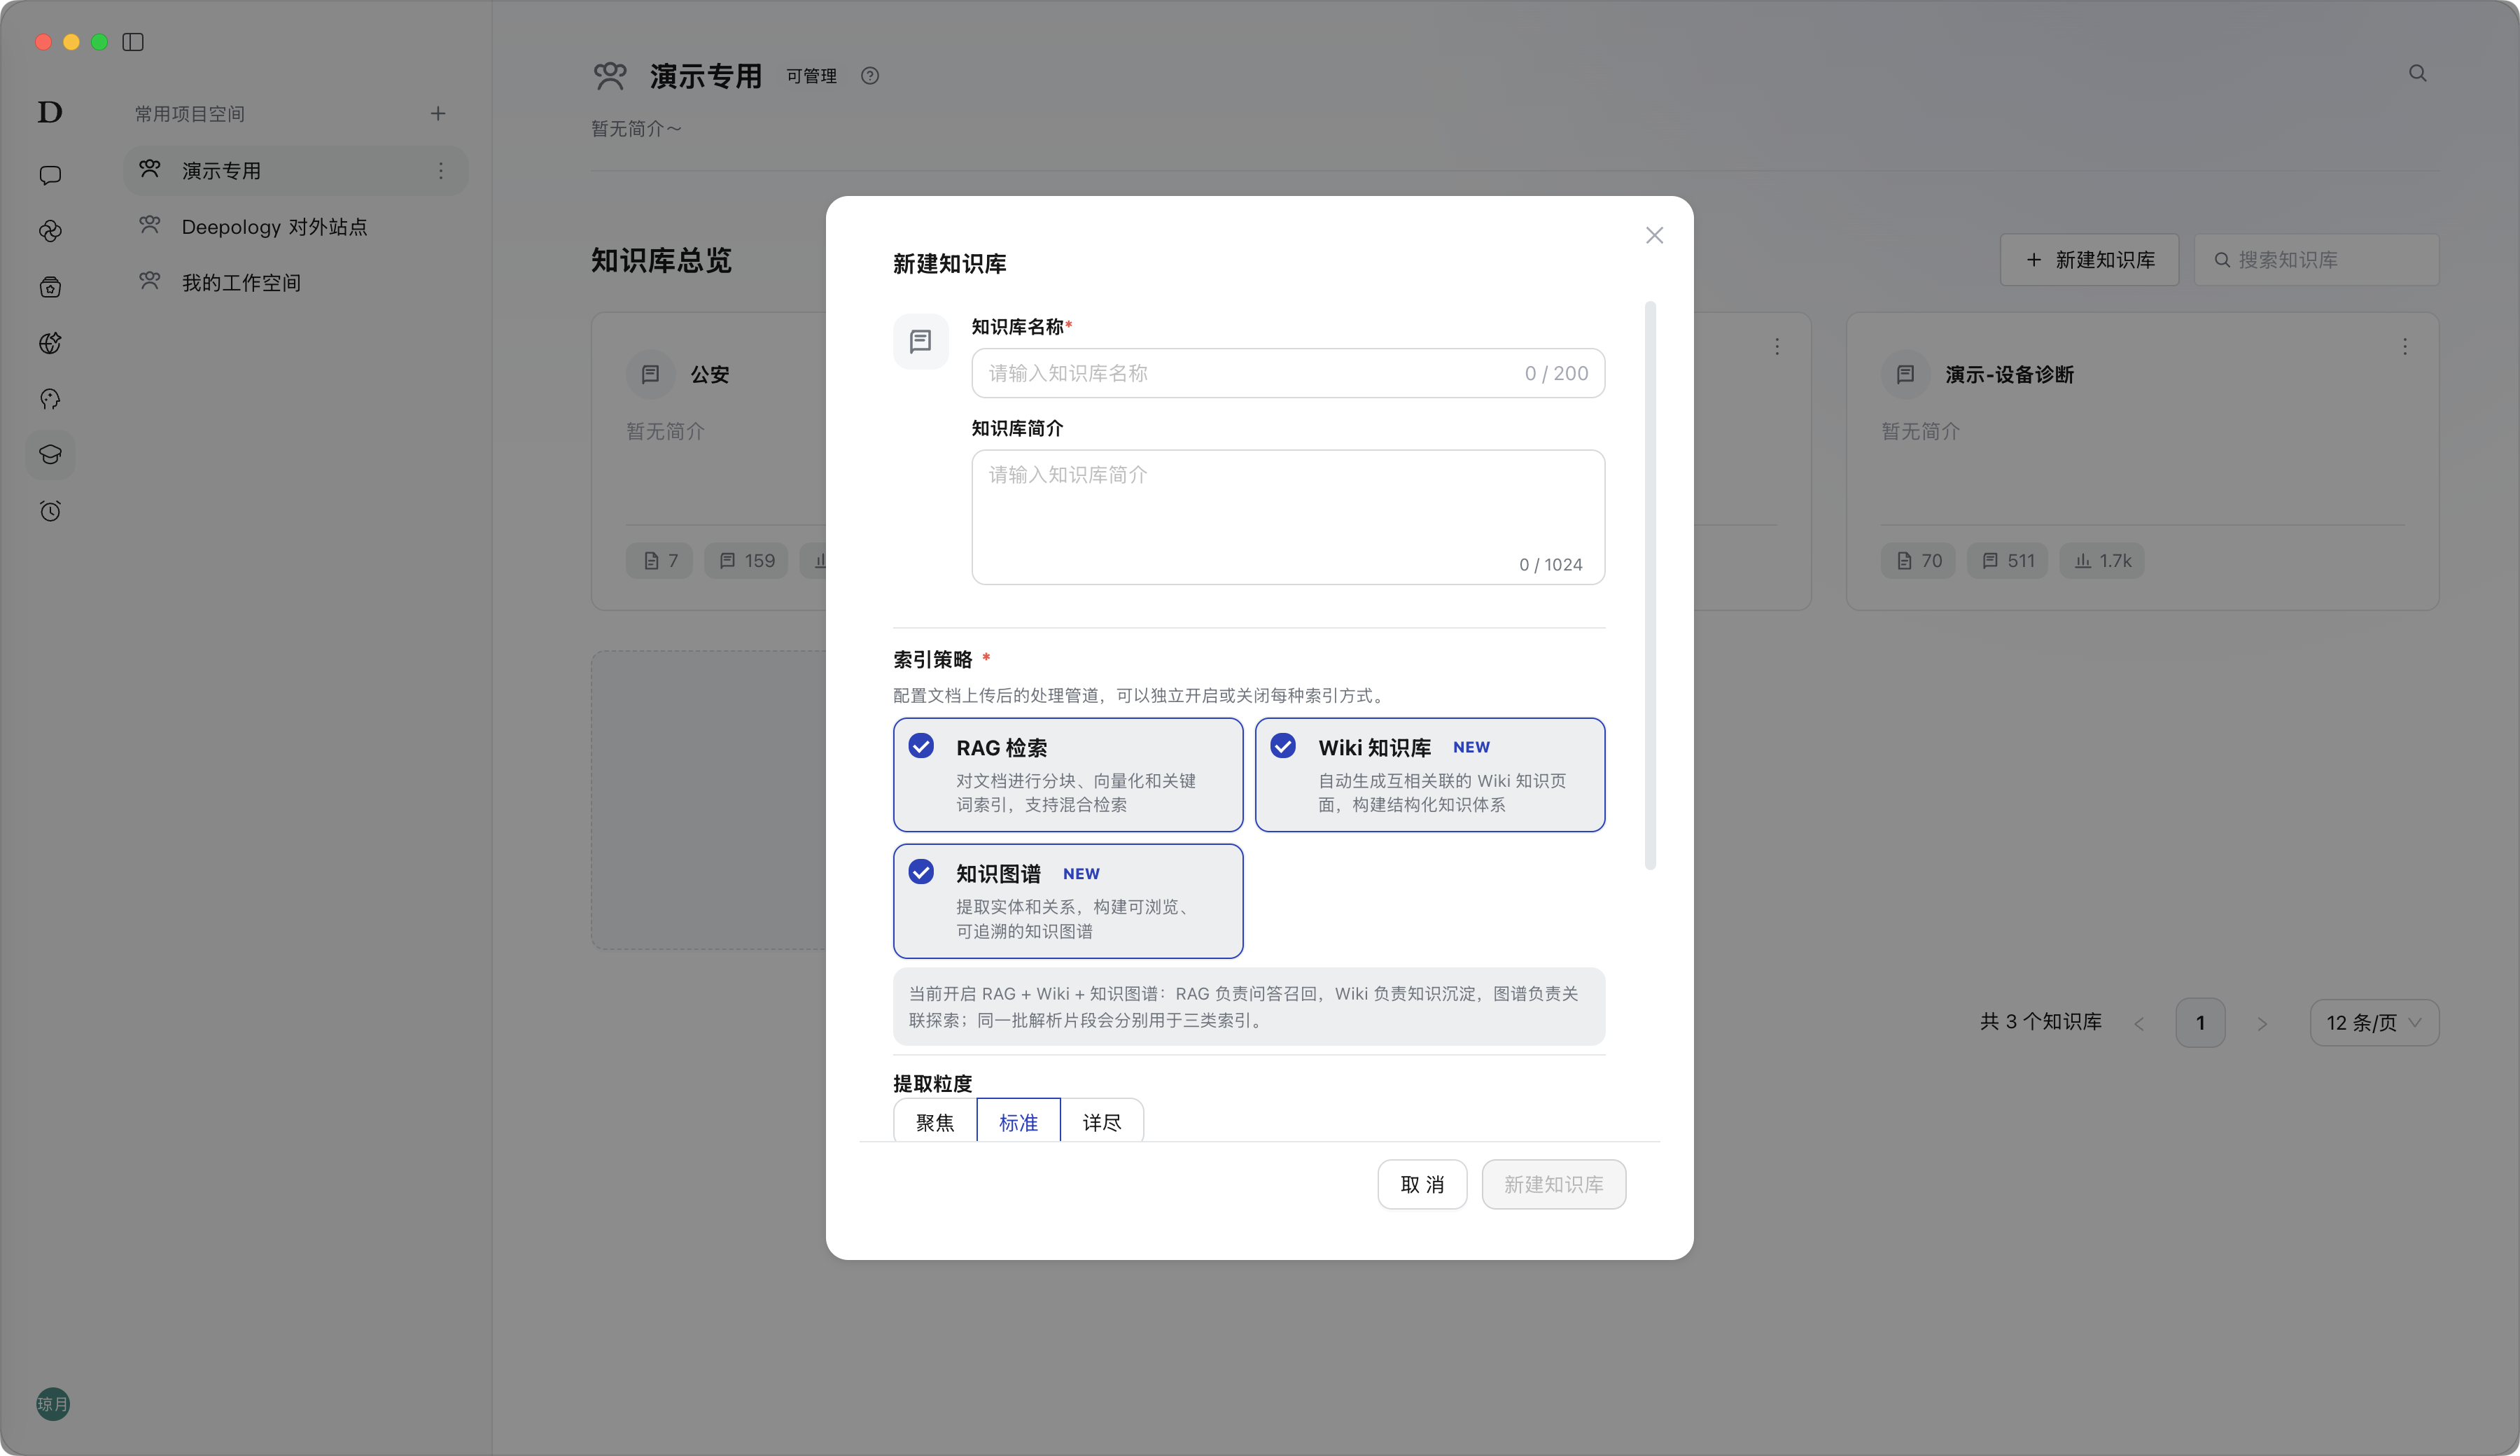
Knowledge Base Creation
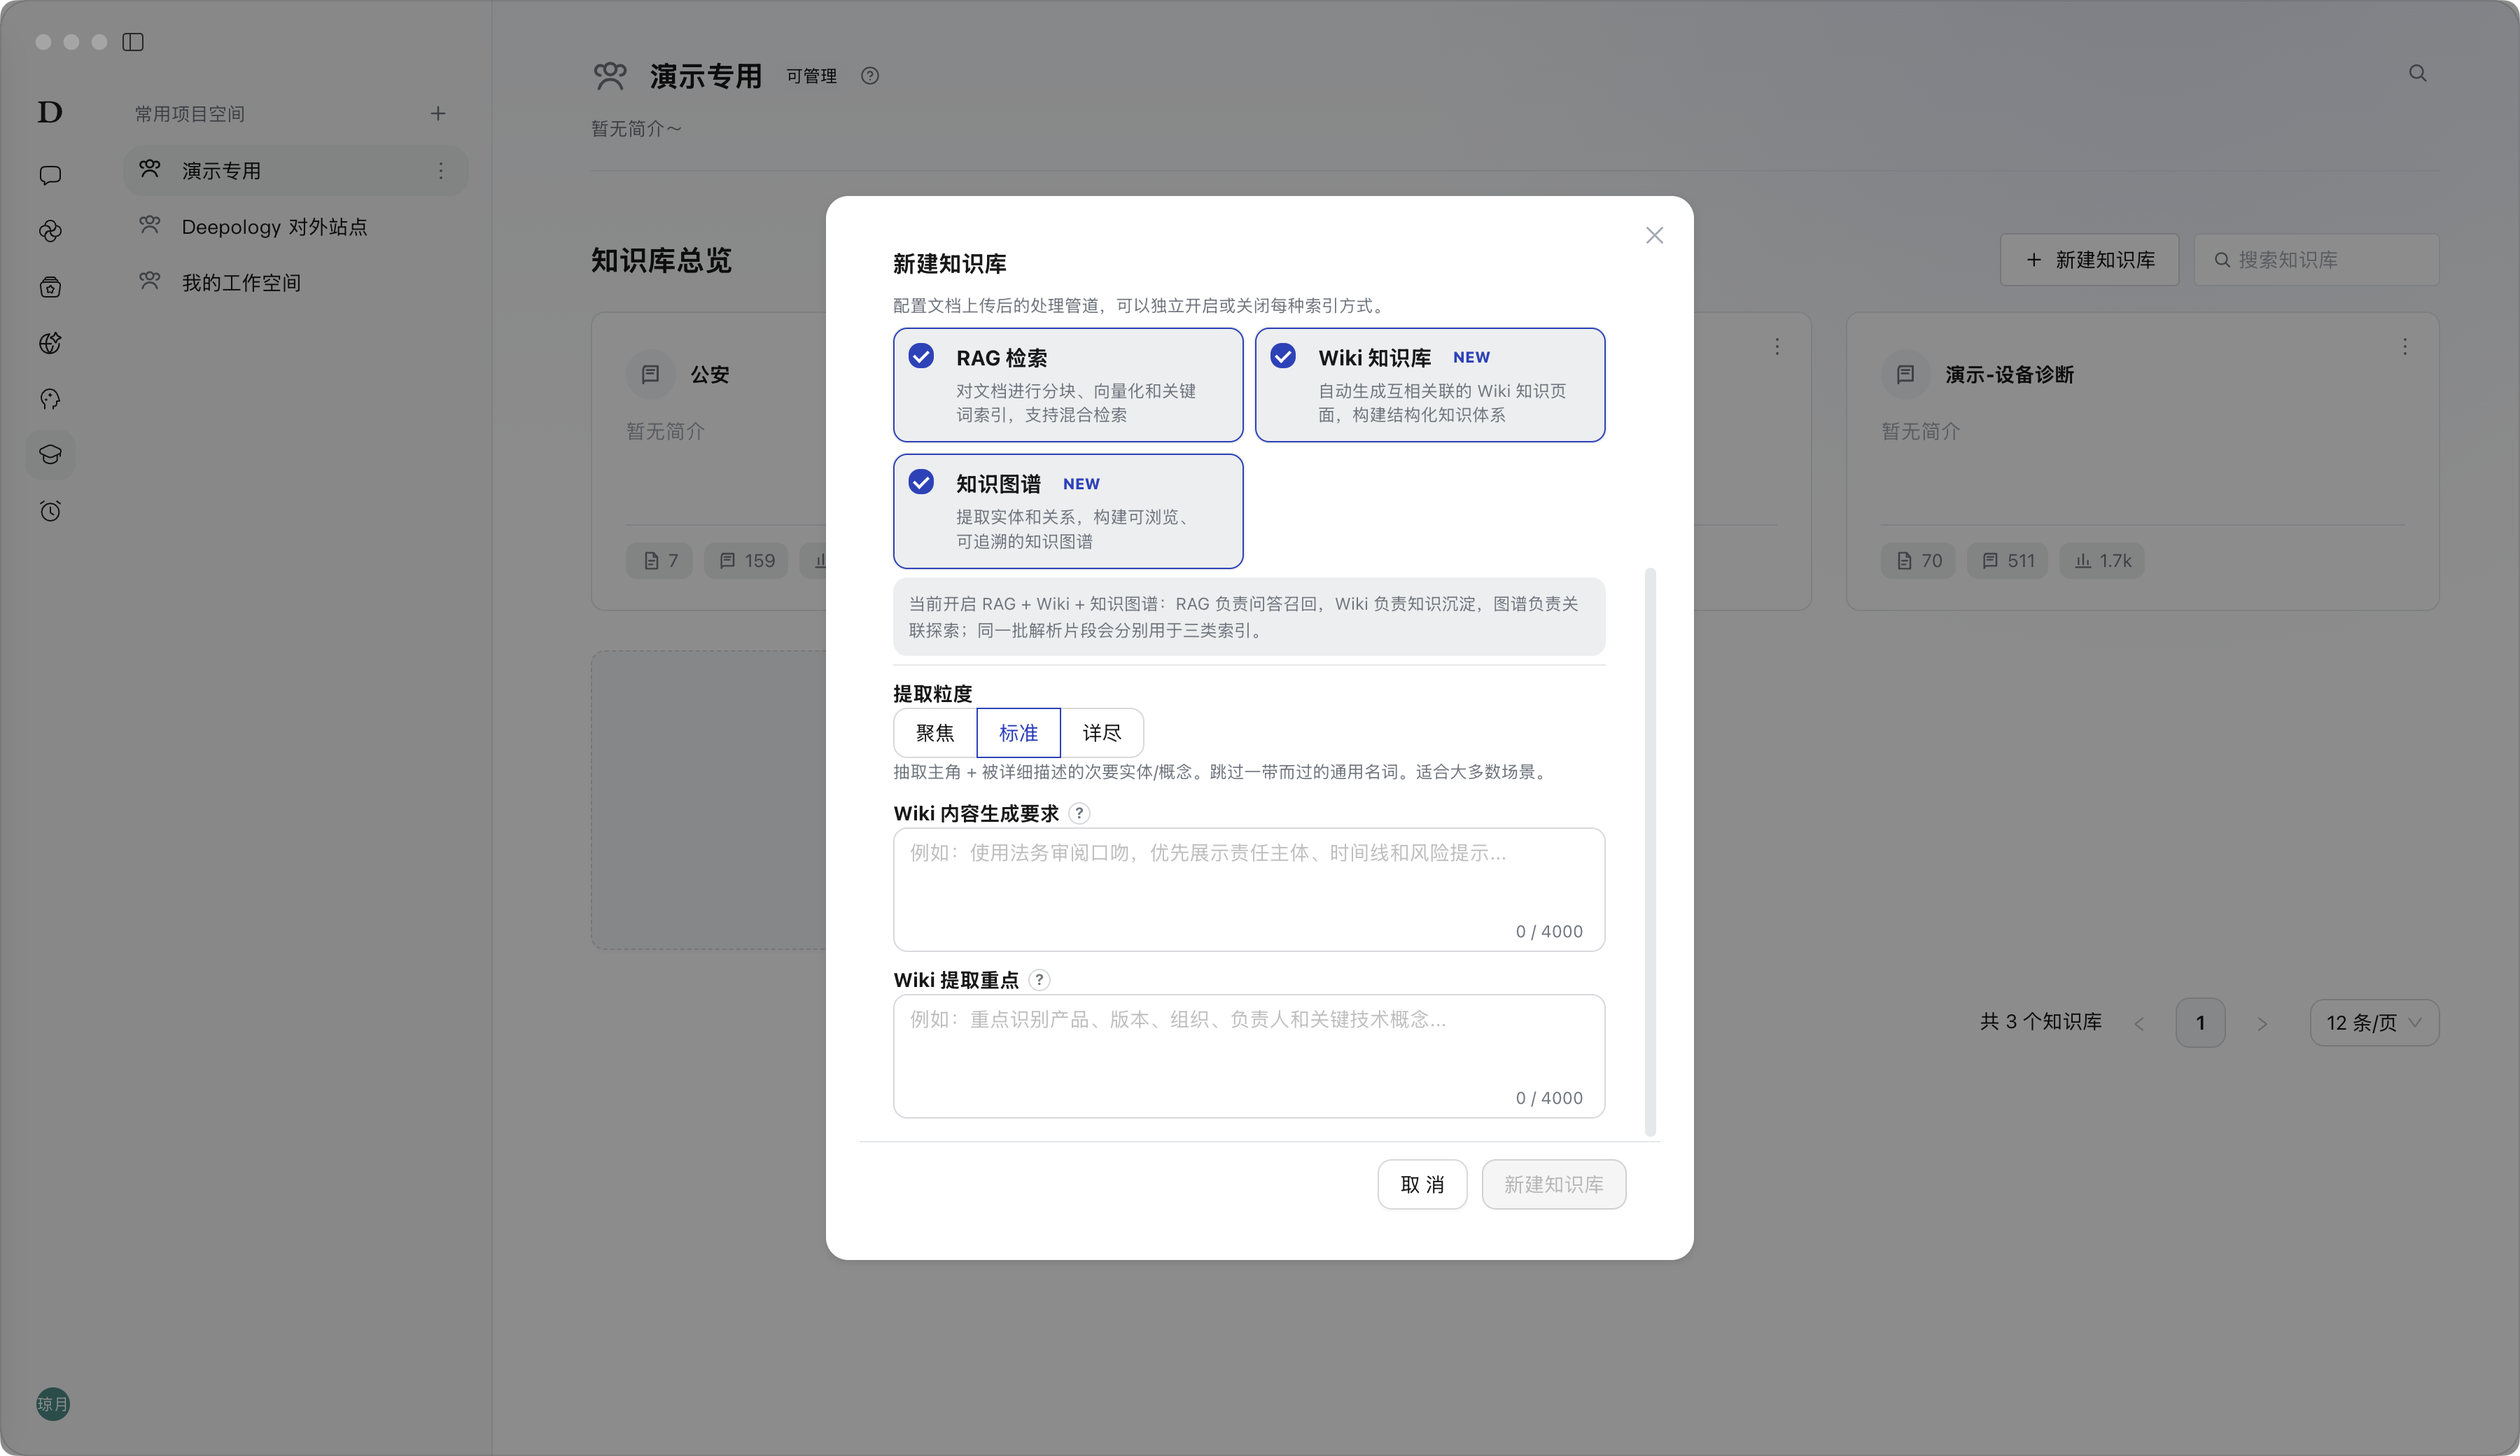
Description: Creating a Knowledge Base establishes a knowledge container within the current Project Space that can manage source materials, Wiki knowledge, RAG retrieval, and Knowledge Graph. Users can split Knowledge Bases by business topic, project phase, deliverable type, or material purpose to avoid mixing all materials in one space. The index strategy selected at creation determines the processing pipeline for subsequently parsed materials.
To avoid rework, it is recommended to go to “Knowledge Base Settings” to confirm the configuration after creating a Knowledge Base, and then start uploading materials. The configuration here only takes effect for materials uploaded or re-parsed afterwards; existing materials that have already been parsed will not be automatically reprocessed with the new configuration. To apply the new configuration to existing materials, you need to manually trigger re-parsing.
| Index Strategy | Description | Advantages | Limitations | Applicable Scenarios |
|---|---|---|---|---|
| RAG Retrieval | Chunks materials and builds vector and keyword indexes for Q&A recall. | Direct responses; answers can be based on the original text; suitable for stable Q&A. | Recalls by chunk only; weaker at cross-document relationship analysis. | Standard queries, material Q&A, troubleshooting. |
| Wiki Knowledge Base | Automatically generates interrelated Wiki pages, accumulating materials into structured knowledge. | Easy to read, edit, classify, and accumulate. | Generation quality is affected by the materials and requires manual review. | Project summaries, business knowledge, experience accumulation. |
| Knowledge Graph | Extracts entities and relationships to form a browsable, traceable association network. | Good at displaying associations, tracing sources, and discovering hidden connections. | Requires entity-relationship configuration; currently not used as a Q&A recall index (future iteration) | Risk analysis, process chains, object relationship mapping. |
Steps:
-
Select the target Project Space on the left to enter Project Space Home.
-
Click “Create Knowledge Base” in the upper-right corner of “Knowledge Base Overview”, or click the dashed “Create Knowledge Base” card in the Knowledge Base list.
-
Fill in “Knowledge Base Name”. This field is required, with a maximum of 200 characters; a name that reflects the business scope or material topic is recommended.
-
Fill in “Knowledge Base Description” as needed. This field is optional, with a maximum of 1024 characters; it is recommended to describe the topics covered by the Knowledge Base, material sources, applicable business, or usage scenarios.
-
Select at least one capability in “Index Strategy”:
- RAG Retrieval: Chunk, vectorize, and keyword-index documents for subsequent Q&A recall and hybrid retrieval.
- Wiki Knowledge Base: Automatically generate interrelated Wiki knowledge pages after upload and parsing, for knowledge accumulation and structured browsing.
- Knowledge Graph: Extract entities and relationships from materials for subsequent browsing, association exploration, and source tracing.
- If “Wiki Knowledge Base” is selected, continue to configure Wiki generation parameters:
| Configuration Item | Option | Description |
|---|---|---|
| Extraction granularity | Focused | Extracts only the most core and certain entities and concepts; suitable for low-noise, high-precision scenarios |
| Extraction granularity | Standard | Extracts main objects and secondary concepts described in detail; suitable for most business materials |
| Extraction granularity | Comprehensive | Retains as many entities, concepts, and relationship clues as possible; suitable for research, audit, or high-recall scenarios |
| Wiki content generation requirements | Custom text | Specify expression focus, writing style, and definition requirements (up to 4000 characters) |
| Wiki extraction focus | Custom text | Specify the domain objects, concepts, versions, roles, etc. that need to be identified with priority (up to 4000 characters) |
- After confirming that the information is correct, click “Create Knowledge Base”. After successful creation, it is recommended to first enter the “Knowledge Base Settings” of the new Knowledge Base, confirm Wiki Settings, Chunking Settings, and Knowledge Graph configuration according to the enabled index strategies, and then upload source materials after confirming everything is correct.
Result: After successful creation, the “Knowledge Base Overview” of the current Project Space refreshes, and a new Knowledge Base card appears. The card displays the Knowledge Base name, description, and content statistics. Users can click the card to enter the Knowledge Base and continue uploading source materials.
Note:
(1) After Wiki is selected, the extraction granularity and the two Wiki instructions appear; the instructions only affect the generation direction and cannot replace the system’s built-in citation, merging, and anti-hallucination rules.
(2) After the Knowledge Graph is enabled, you also need to confirm the entity-relationship extraction configuration in Knowledge Base Settings and upload materials.
(3) Creating a Knowledge Base itself does not immediately parse materials; you need to continue uploading or select existing materials to trigger parsing. For stable recall by Agents, it is recommended to keep RAG Retrieval.
Create Knowledge Base
Index Strategy
Knowledge Base Source Materials
Source materials are the source material layer of the Shared Knowledge Base, responsible for onboarding team files into the Knowledge Base and keeping them in a parsable and traceable state. This module manages the original files, folders, and parsed chunks themselves; Wiki knowledge generation, Knowledge Graph, and Agent invocation are completed in subsequent modules.
Knowledge Base Home
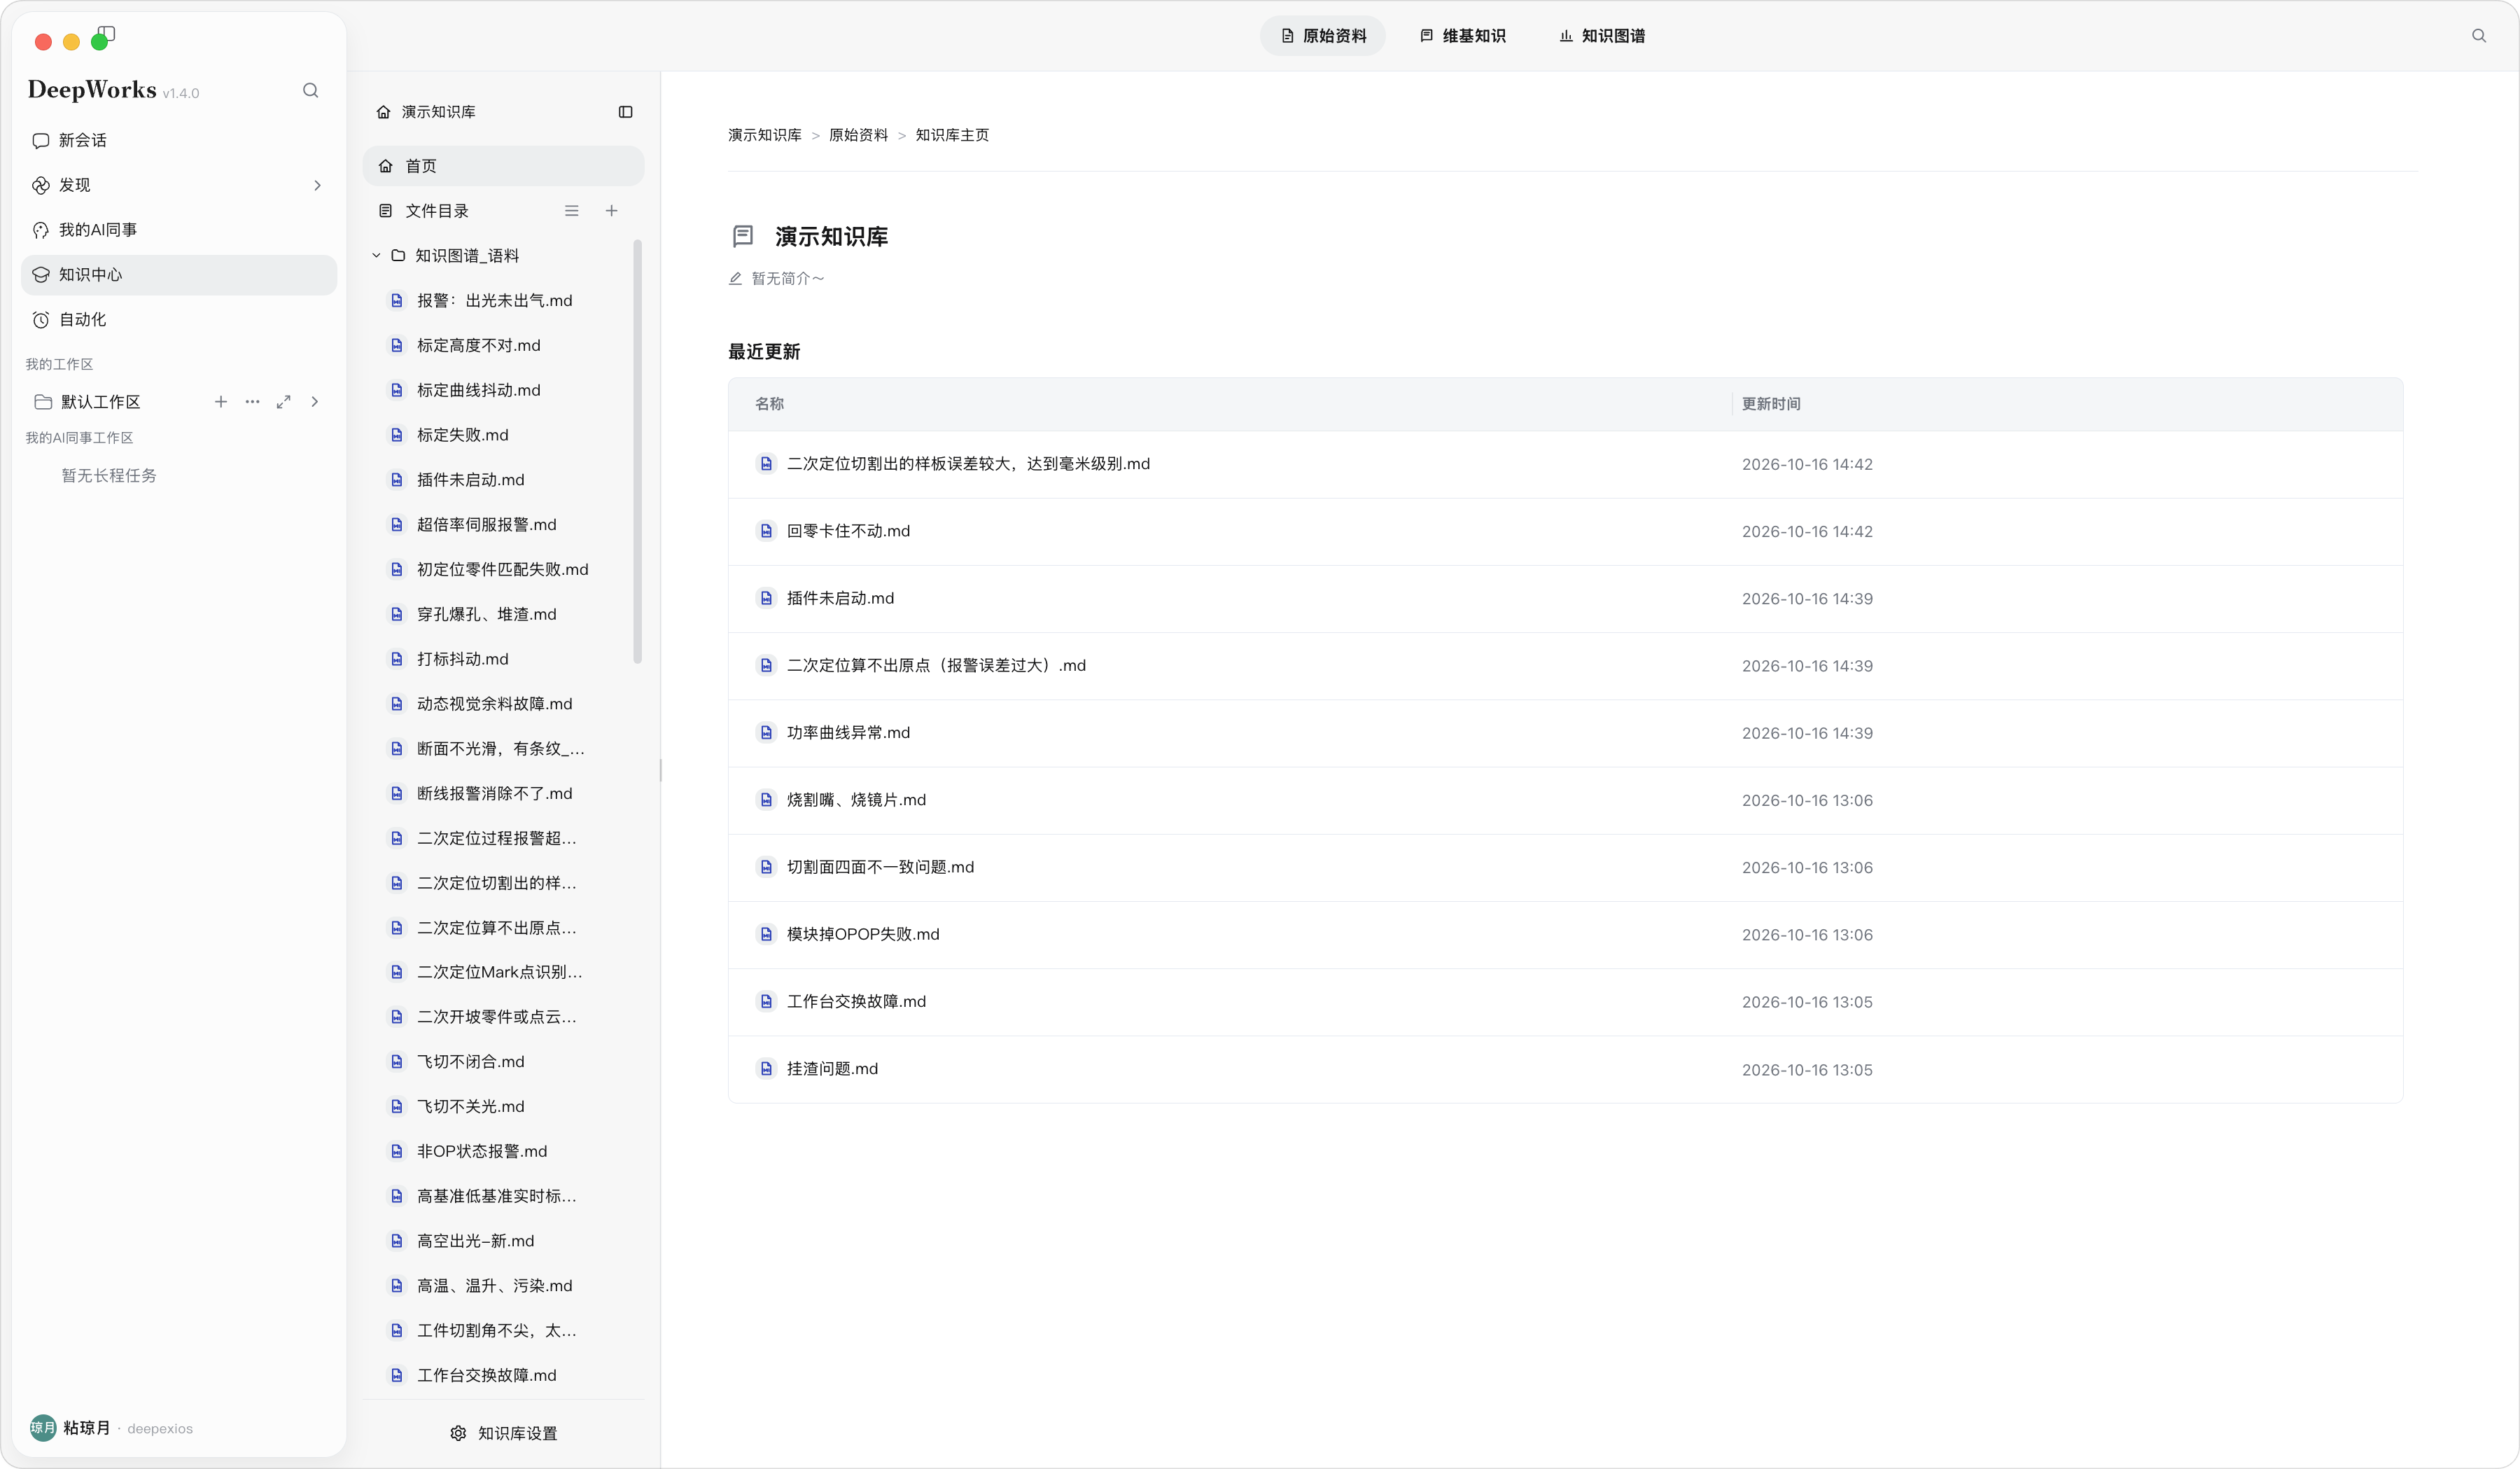
Description: The Knowledge Base home page is used to view the basic information and recently updated resources of the current Knowledge Base, helping users quickly determine whether the Knowledge Base has new content and whether further uploading or maintenance is needed.
Steps: On Project Space Home, click the target Knowledge Base card to enter the Knowledge Base home page, and click “Home”.
Result: The page displays the Knowledge Base name, description, and recent updates list; when there is content, file names and update times are shown; when there is no content, “No knowledge content yet” is displayed.
Note: The Knowledge Base home page only shows a summary of recent updates and does not include all resource operations. To manage files, click “File Directory” or the corresponding folder.
Knowledge Base Home
File Directory
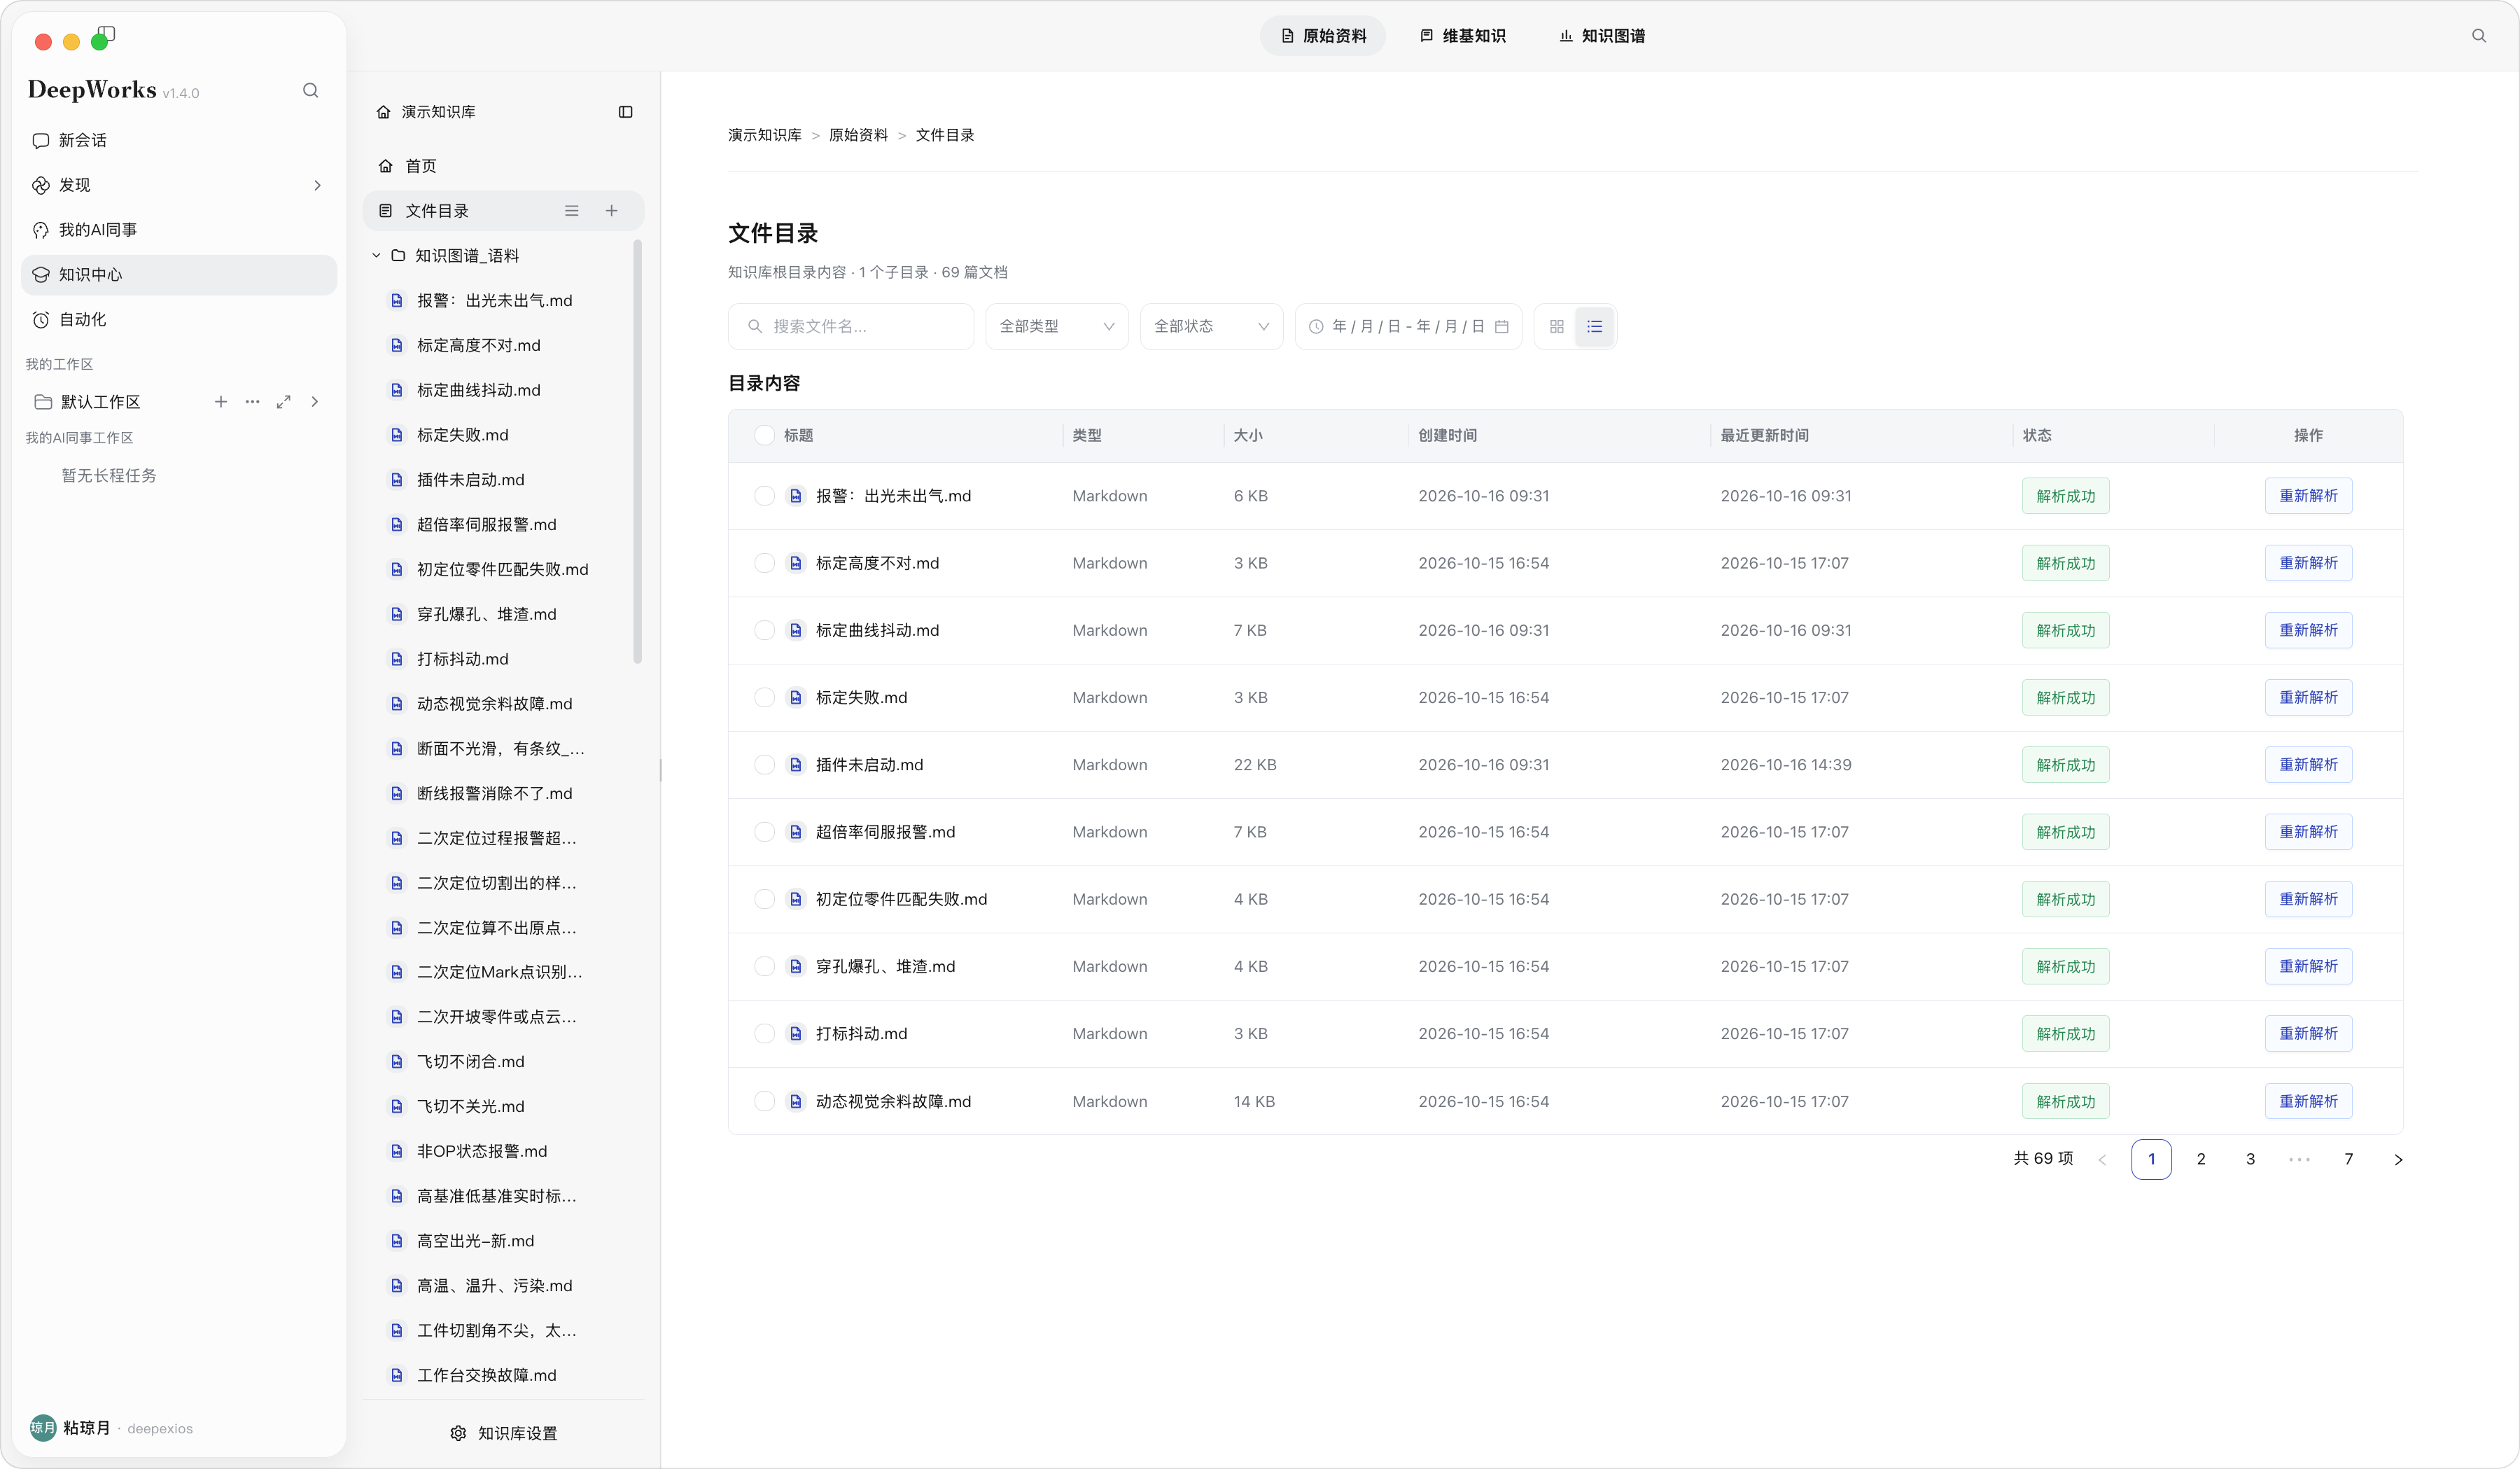
Description: File Directory is used to centrally manage source materials in the Knowledge Base, supporting search, filtering, view switching, status viewing, and re-parsing.
Steps: After entering the Knowledge Base, click “File Directory” on the left, enter a file name to search, or filter by type, status, creation time, and last update time; click “Re-parse” when reprocessing is needed.
Result: The directory list displays file titles, types, sizes, creation times, last update times, statuses, and action entries. Files parsed successfully display “Parse Successful”.
Note: Uploading a file alone does not make the knowledge retrievable; the file must be parsed before it can be used for subsequent retrieval, Wiki generation, and Agent invocation.
| Status | Description |
|---|---|
| Queued | The file has entered the processing queue, but the parsing task has not started yet |
| Parsing | The system is parsing the file content and generating retrievable chunks |
| Compiling | Parsing succeeded, but the compilation process has not completed yet |
| Parse Successful | The file has been parsed and can enter preview, retrieval, and the subsequent knowledge processing pipeline |
| Parse Failed / Compile Failed | Parsing or compilation did not succeed; the file cannot be used as stable, usable knowledge. Click to view the failure reason |
| Canceled | The processing task has been canceled, and the file has not been parsed |
| Pending Parsing | The material is still within the pending boundary |
Note: Re-parsing resubmits the processing task and is suitable for use when parsing results are abnormal.
Source Materials - File Directory
Source Materials - File Directory - Multi-select function
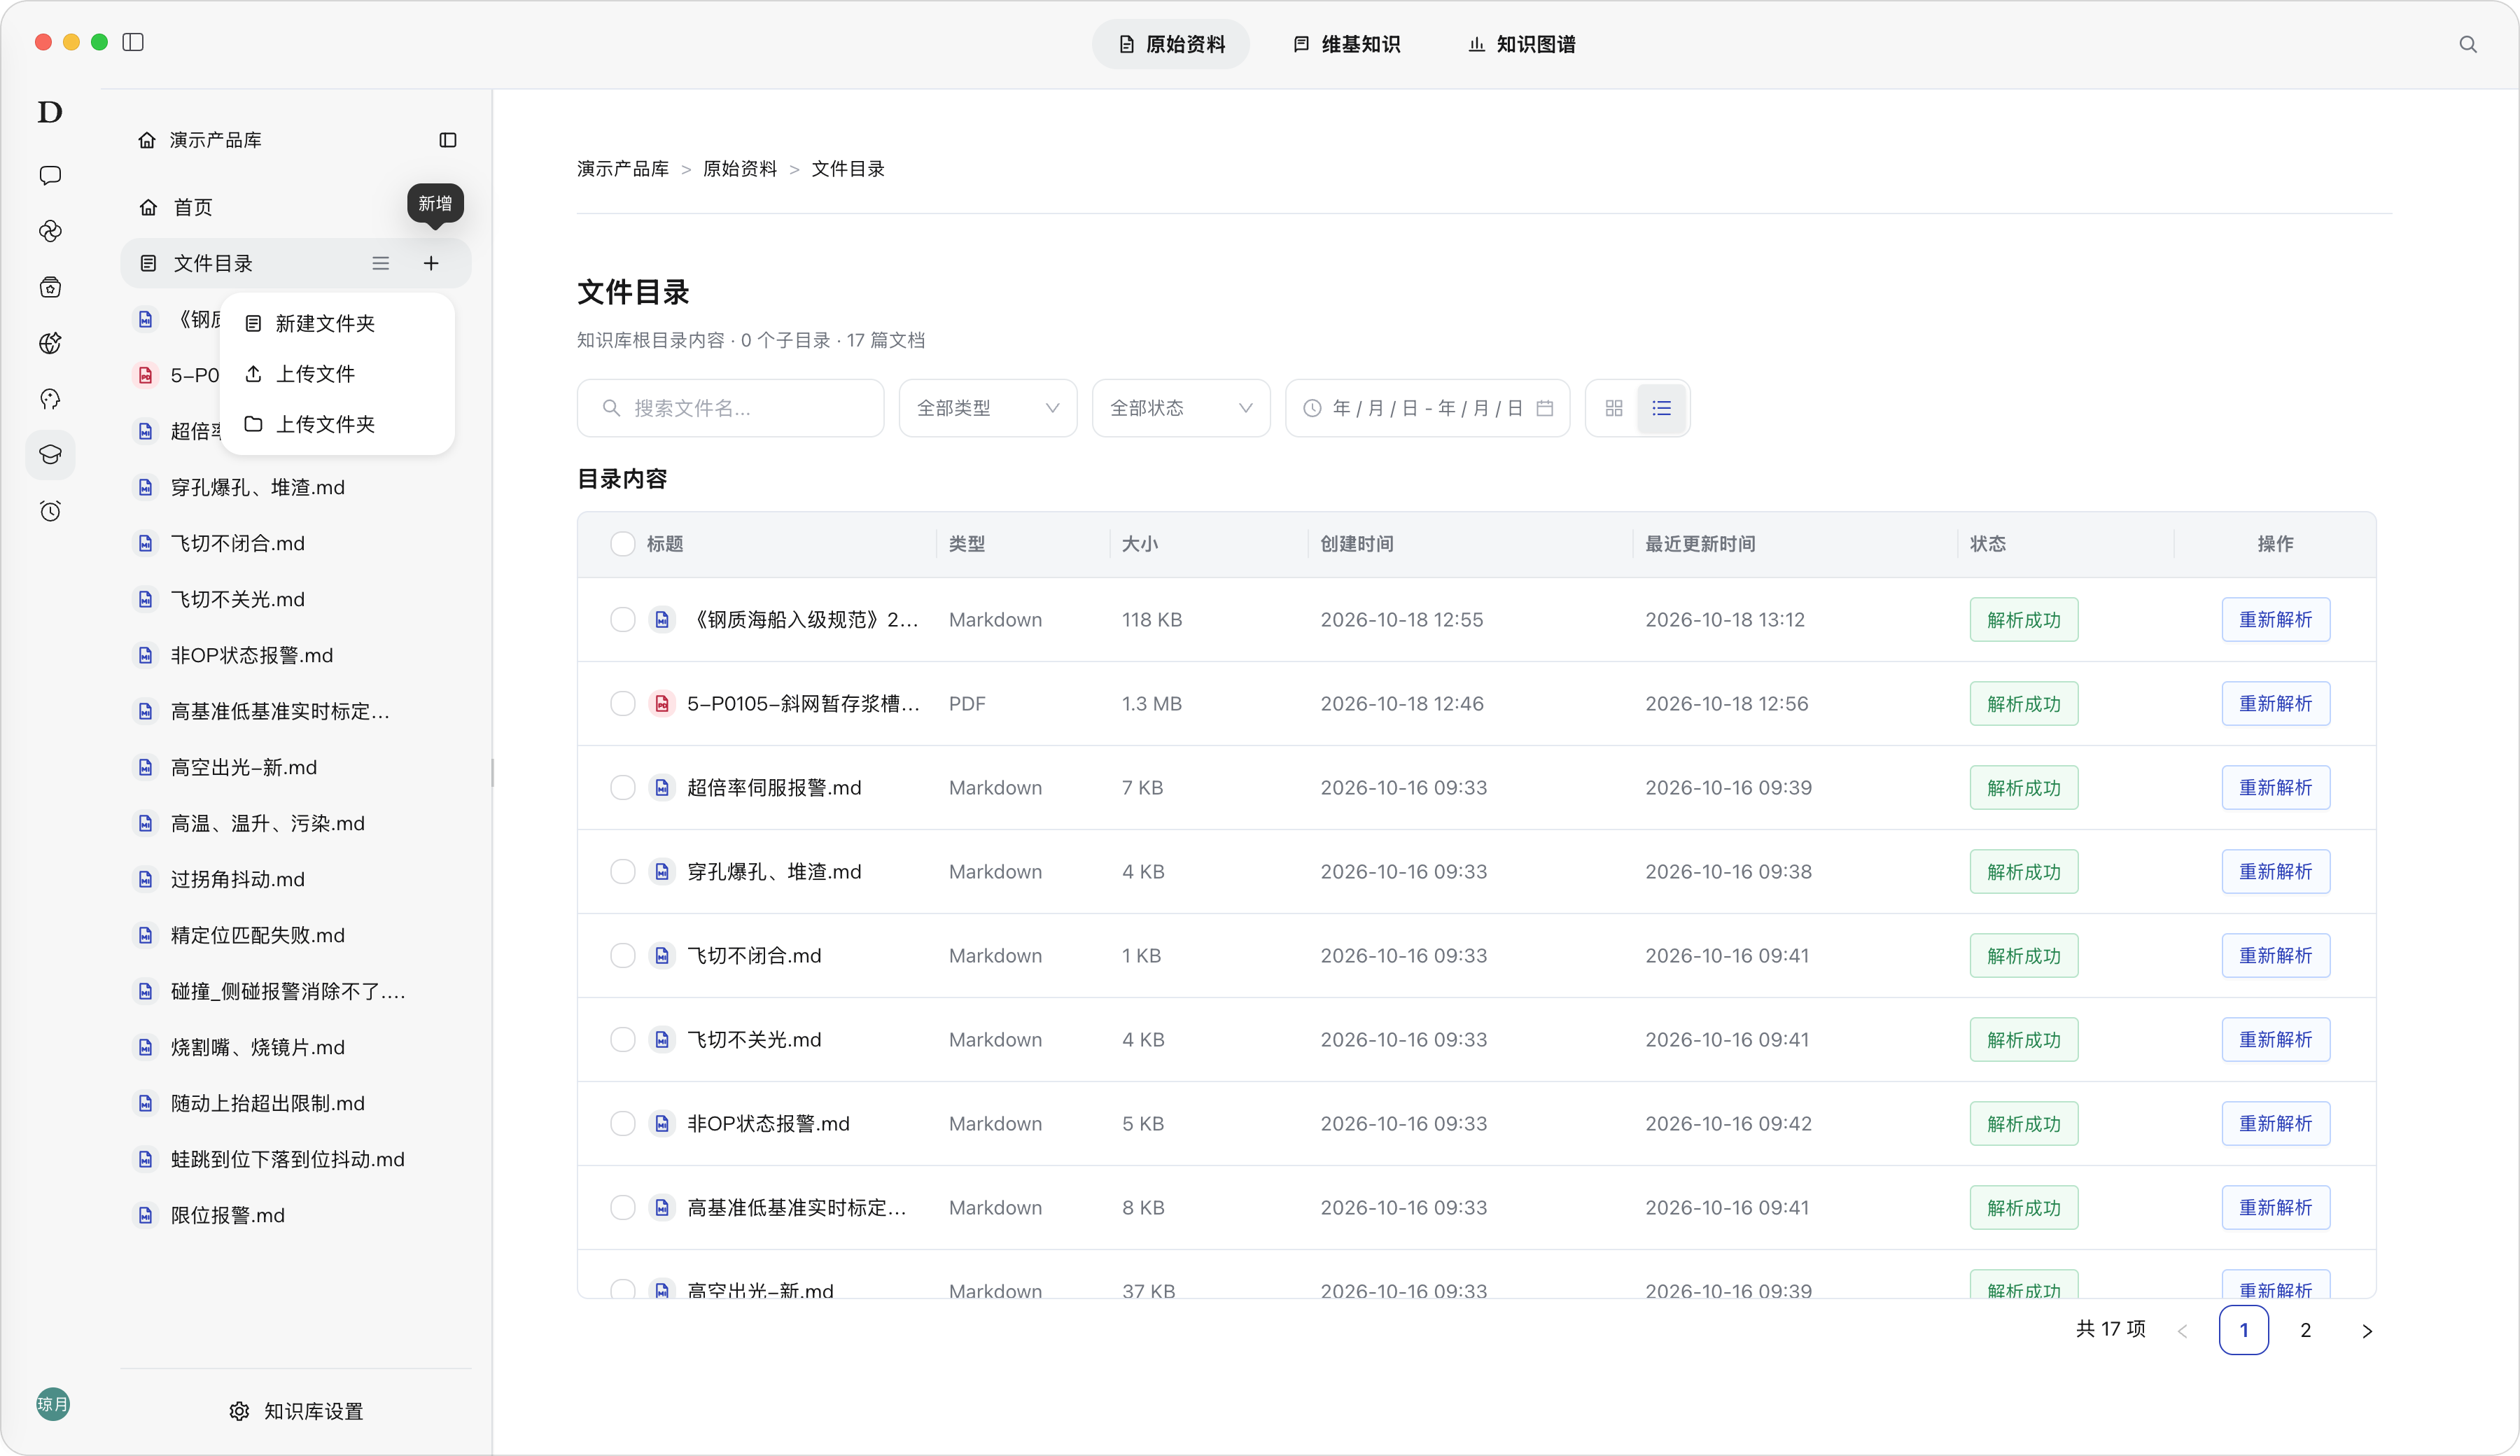
Add Entry
Description: Add Entry is used to create folders, upload files, or upload folders to supplement the Knowledge Base’s source materials.
Steps: Click “Add” on the left of File Directory, and select “Create Folder”, “Upload File”, or “Upload Folder”.
Result: After upload is selected, the files enter the Knowledge Base File Directory and display upload and parsing statuses.
Note: Before uploading, confirm that the file sources are reliable and the content complies with team knowledge governance requirements; materials only gain the foundation for subsequent retrieval and Wiki generation after successful parsing. Source Materials - Add
Supported Source Material Formats and Limits
- Single file size: Single file ≤ 100MB
- Folder depth: Target directory depth + uploaded folder relative depth ≤ 10 levels
- Upload quantity limits:
- A maximum of 1000 files per single upload
- A maximum of 1000 file and directory entries in total when uploading a folder
- A maximum of 1000 uploadable files collected for Agent directory upload Note: Formats such as zip, ppt, rtf, html, json, xml, audio, and video are not currently supported. ZIP archives cannot be uploaded directly; they must be fully extracted before uploading the directory.
| Supported File Type | Extensions |
|---|---|
| Documents | docx, doc, txt, md |
| Spreadsheets | xlsx, xls, csv |
| Presentations | pptx |
| Images | png, jpg, jpeg |
Source Materials - Add Entry
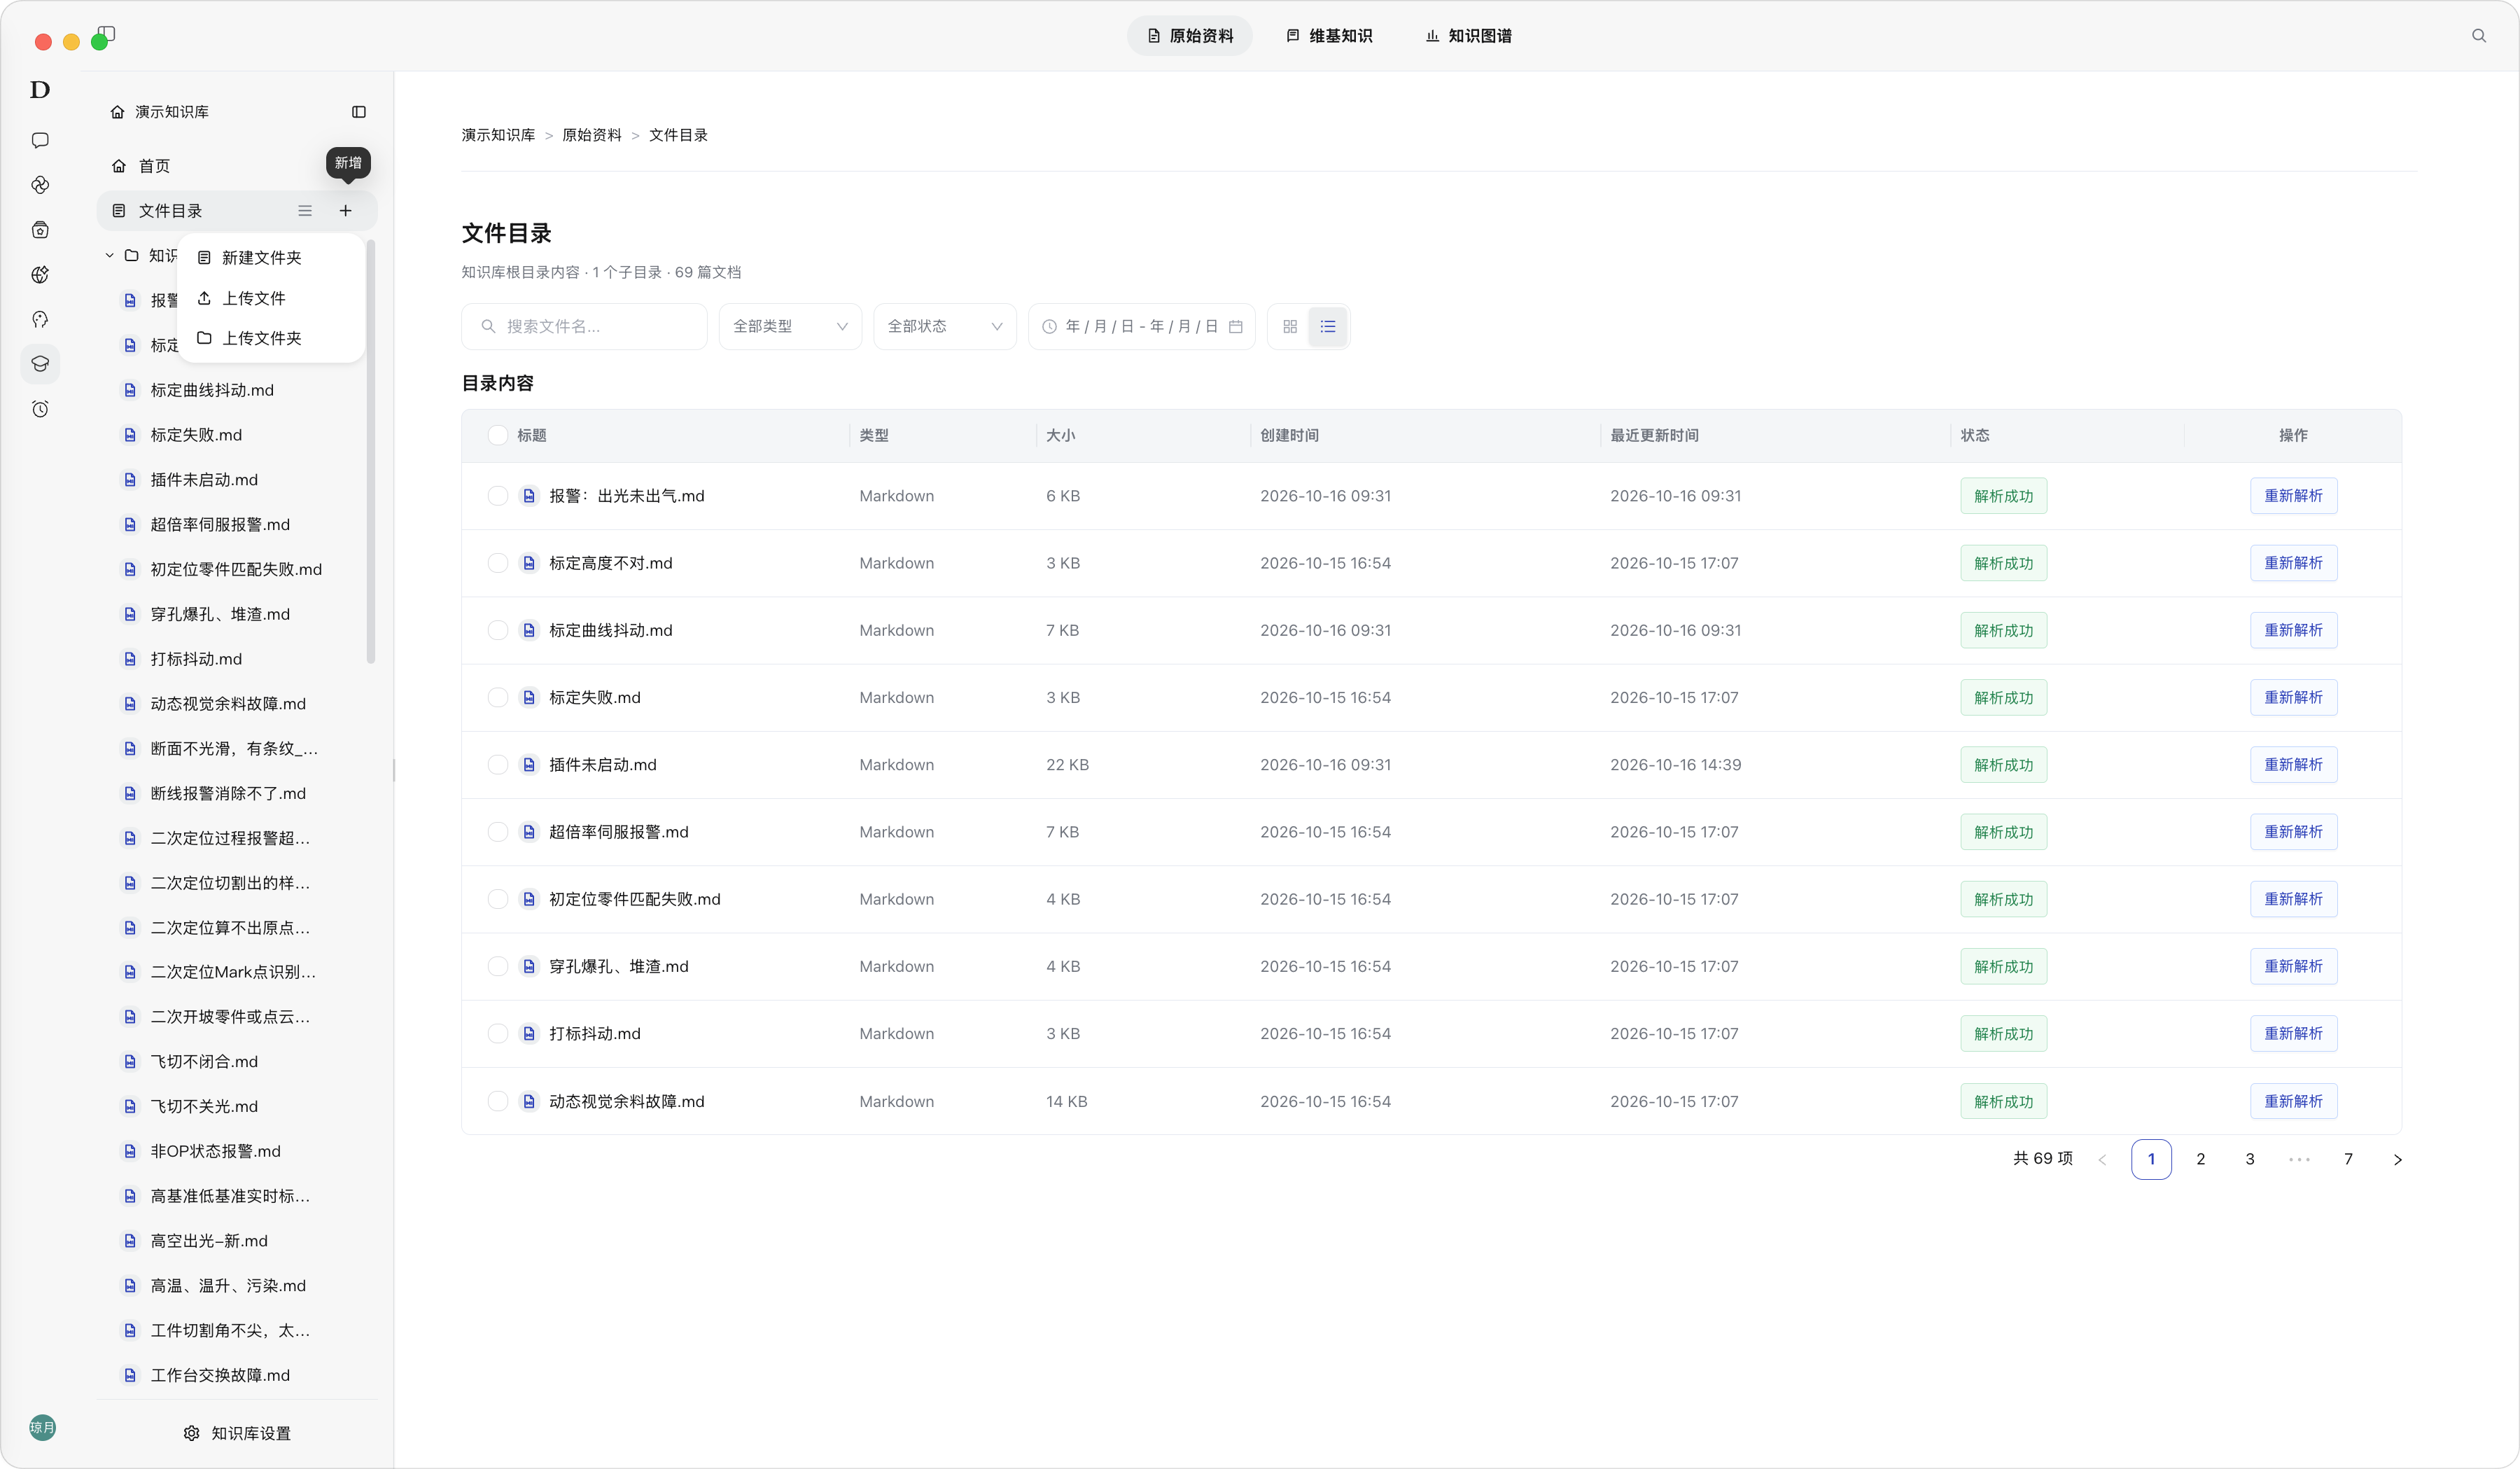
Source Materials - Upload File
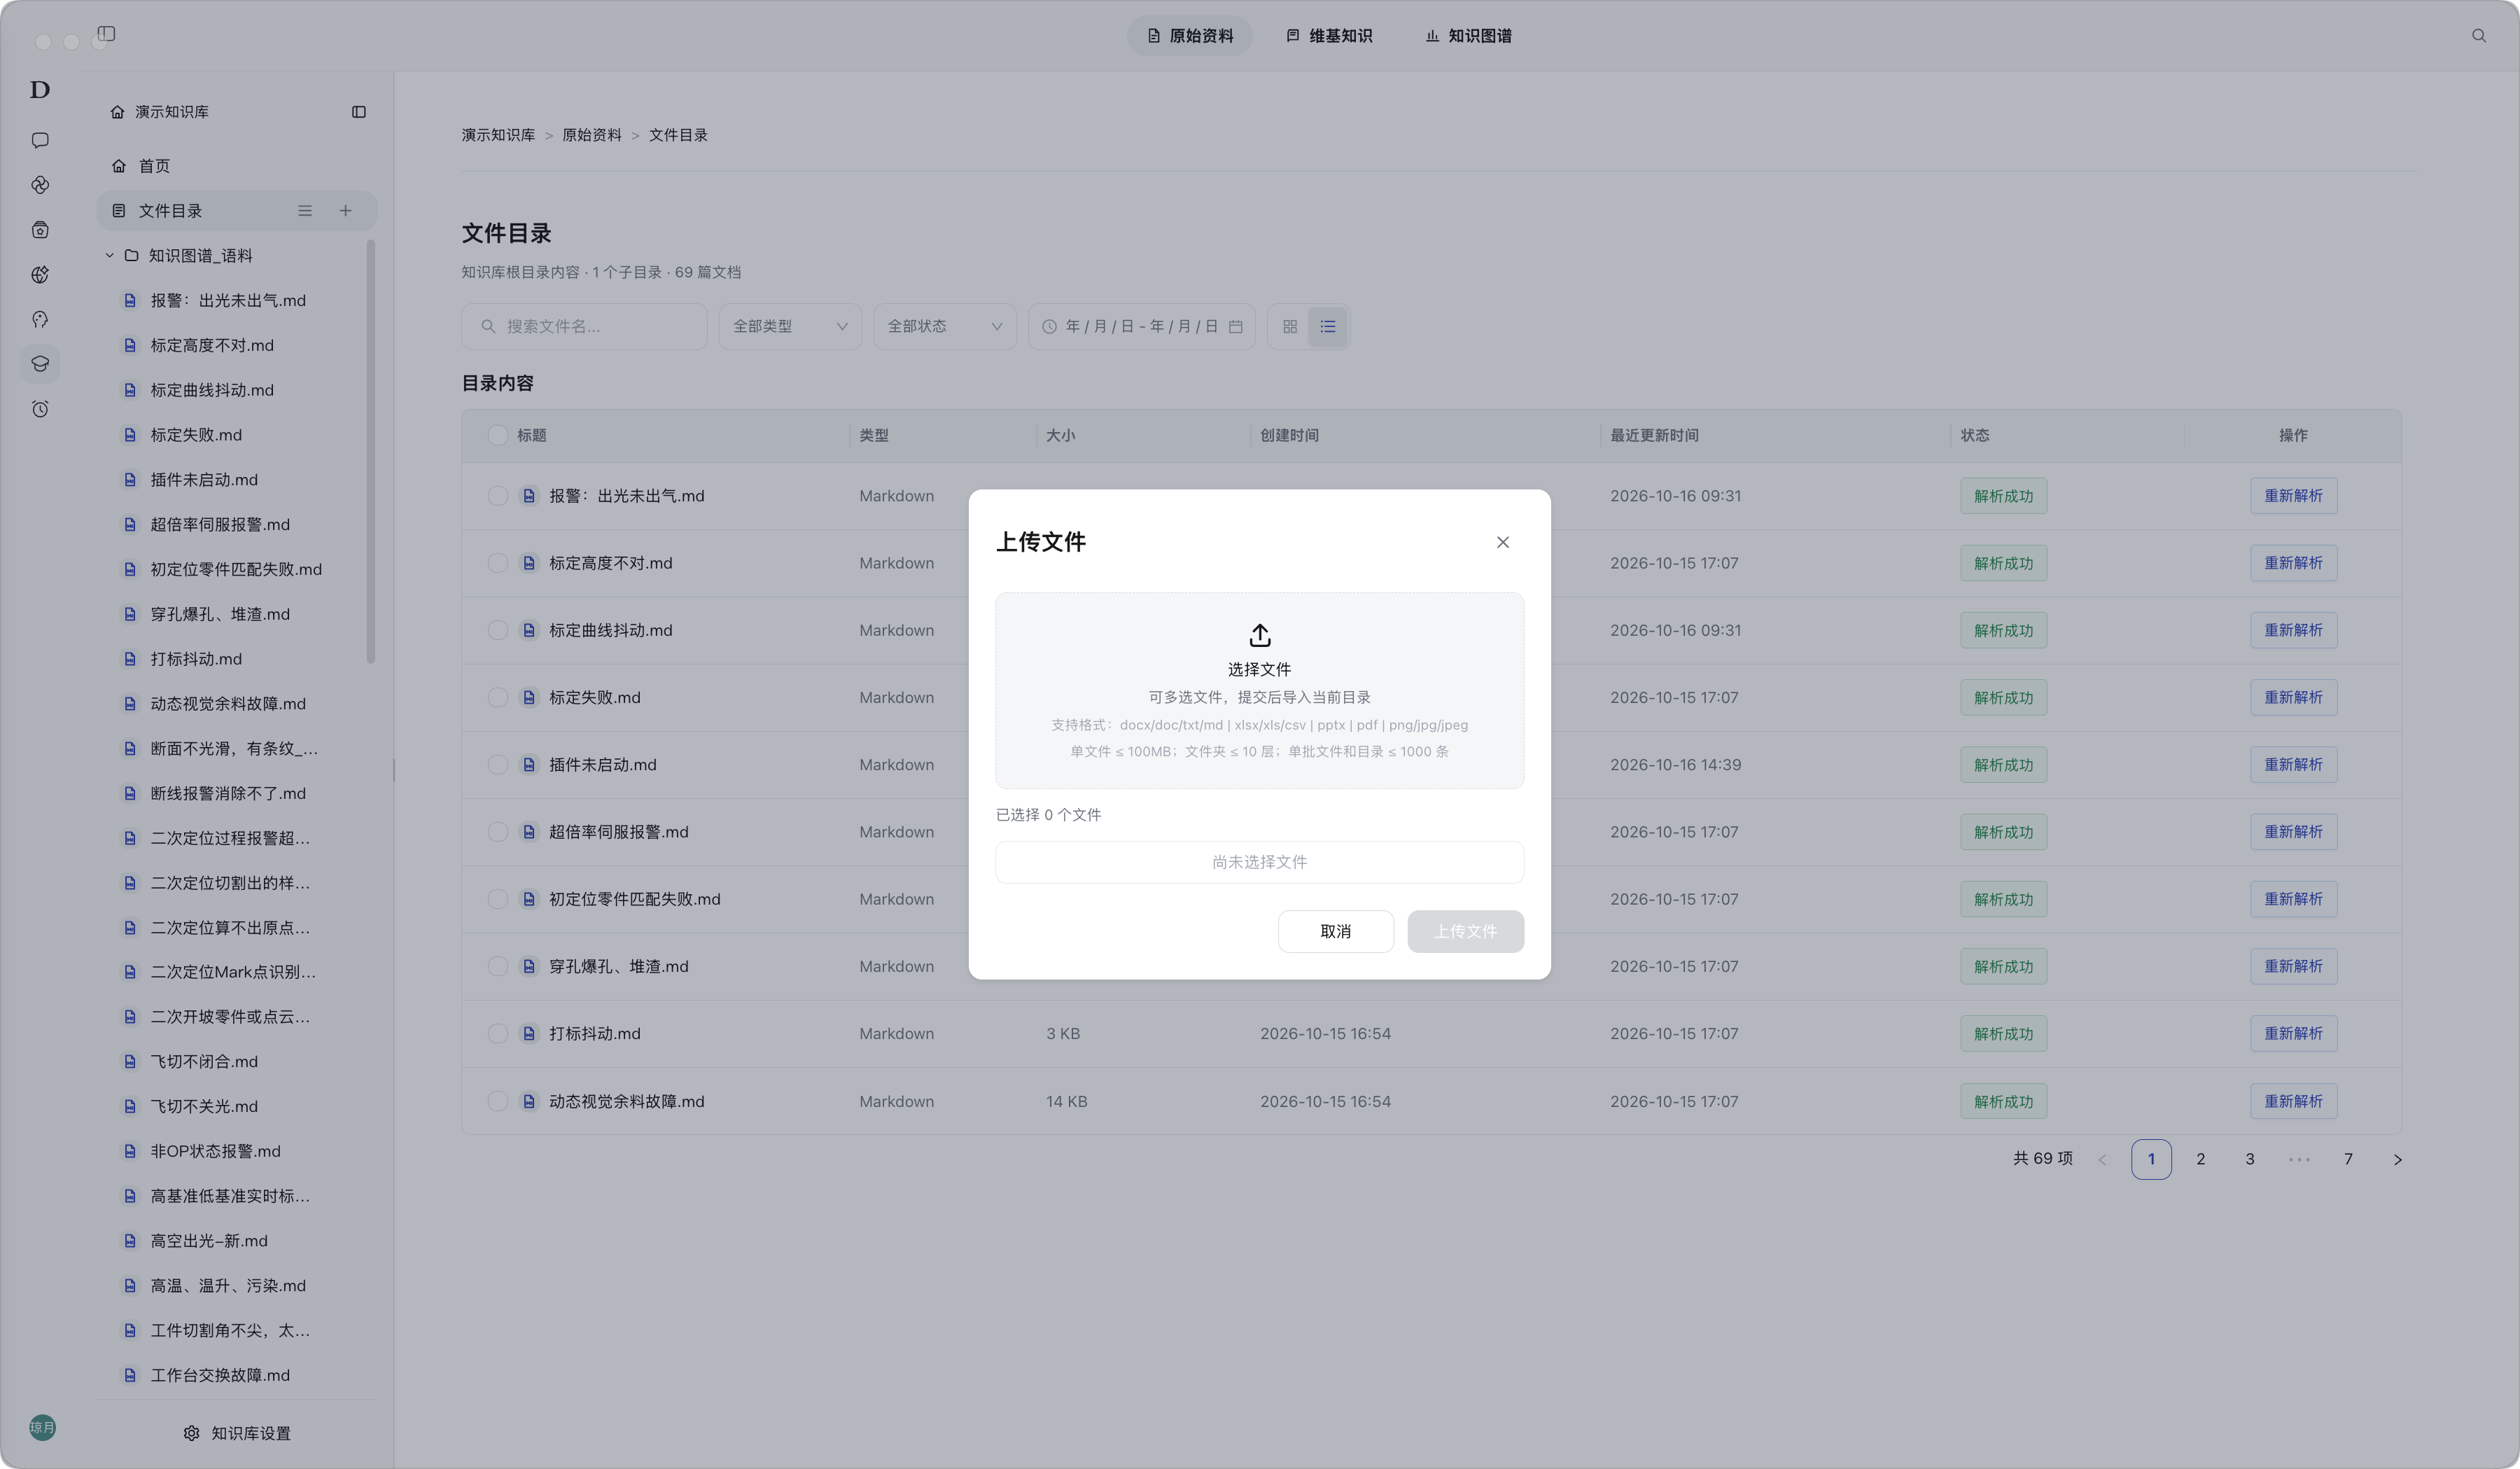
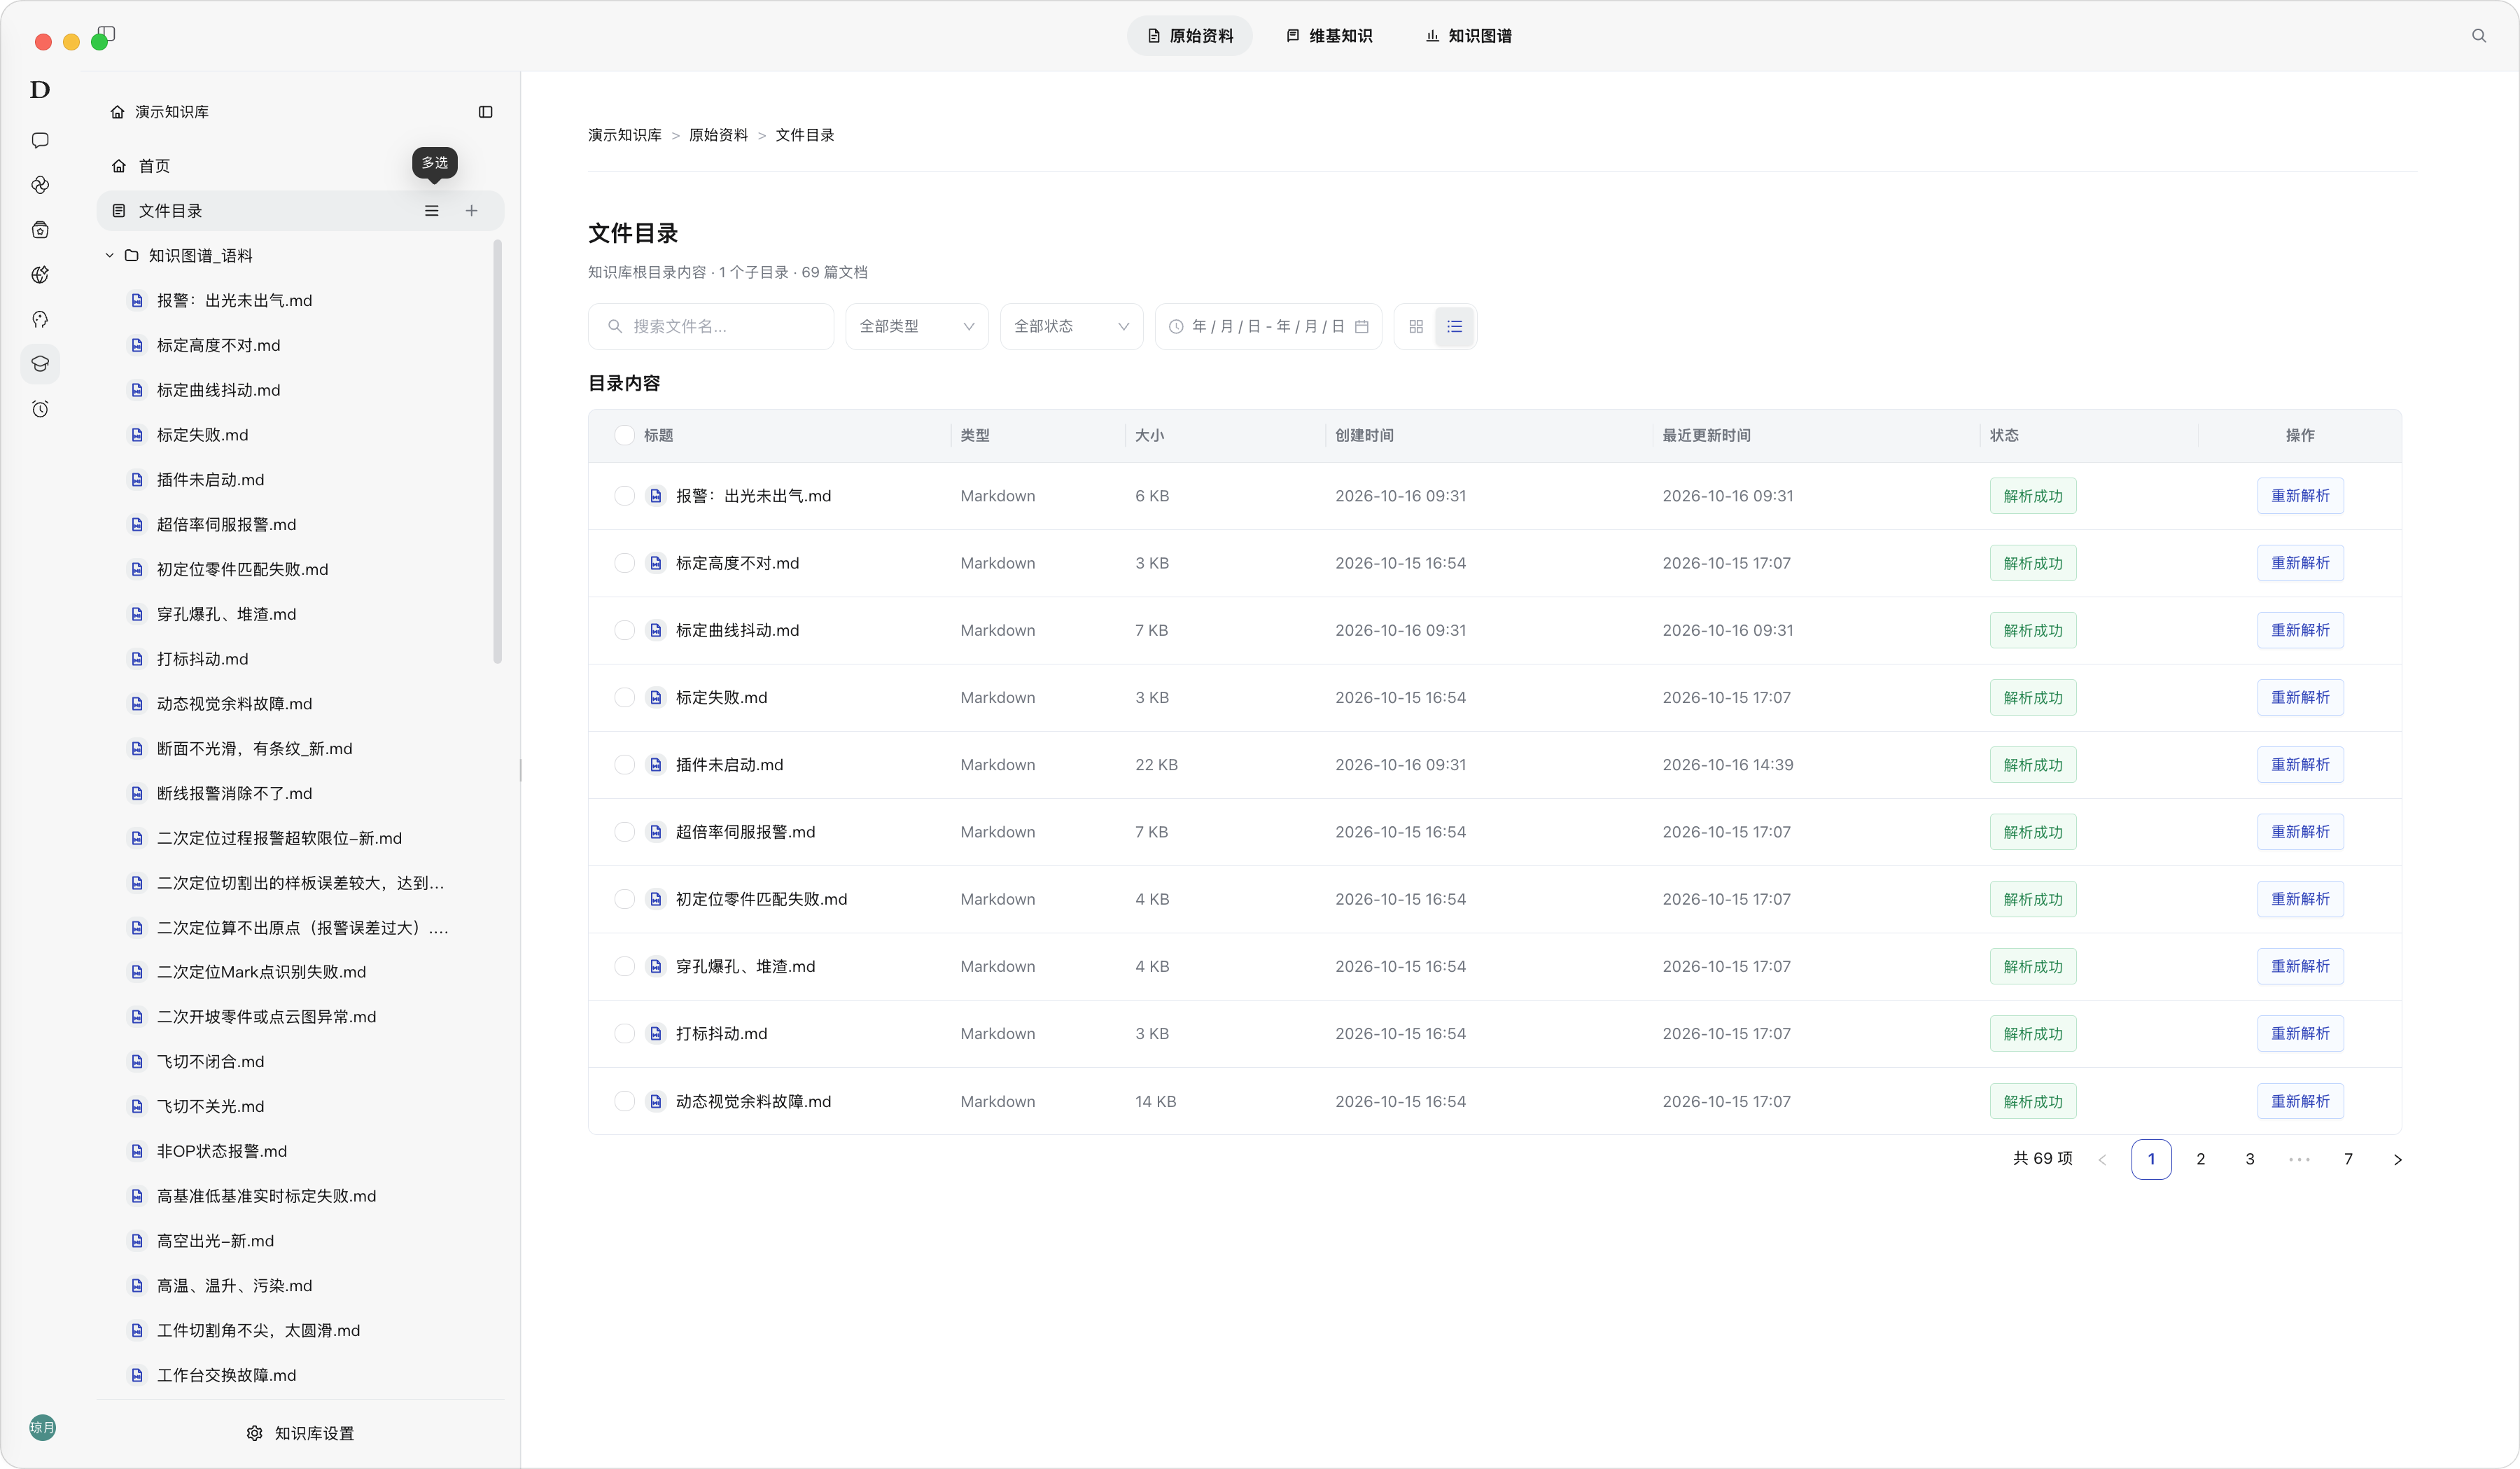
Multi-Select Mode and Batch Operations
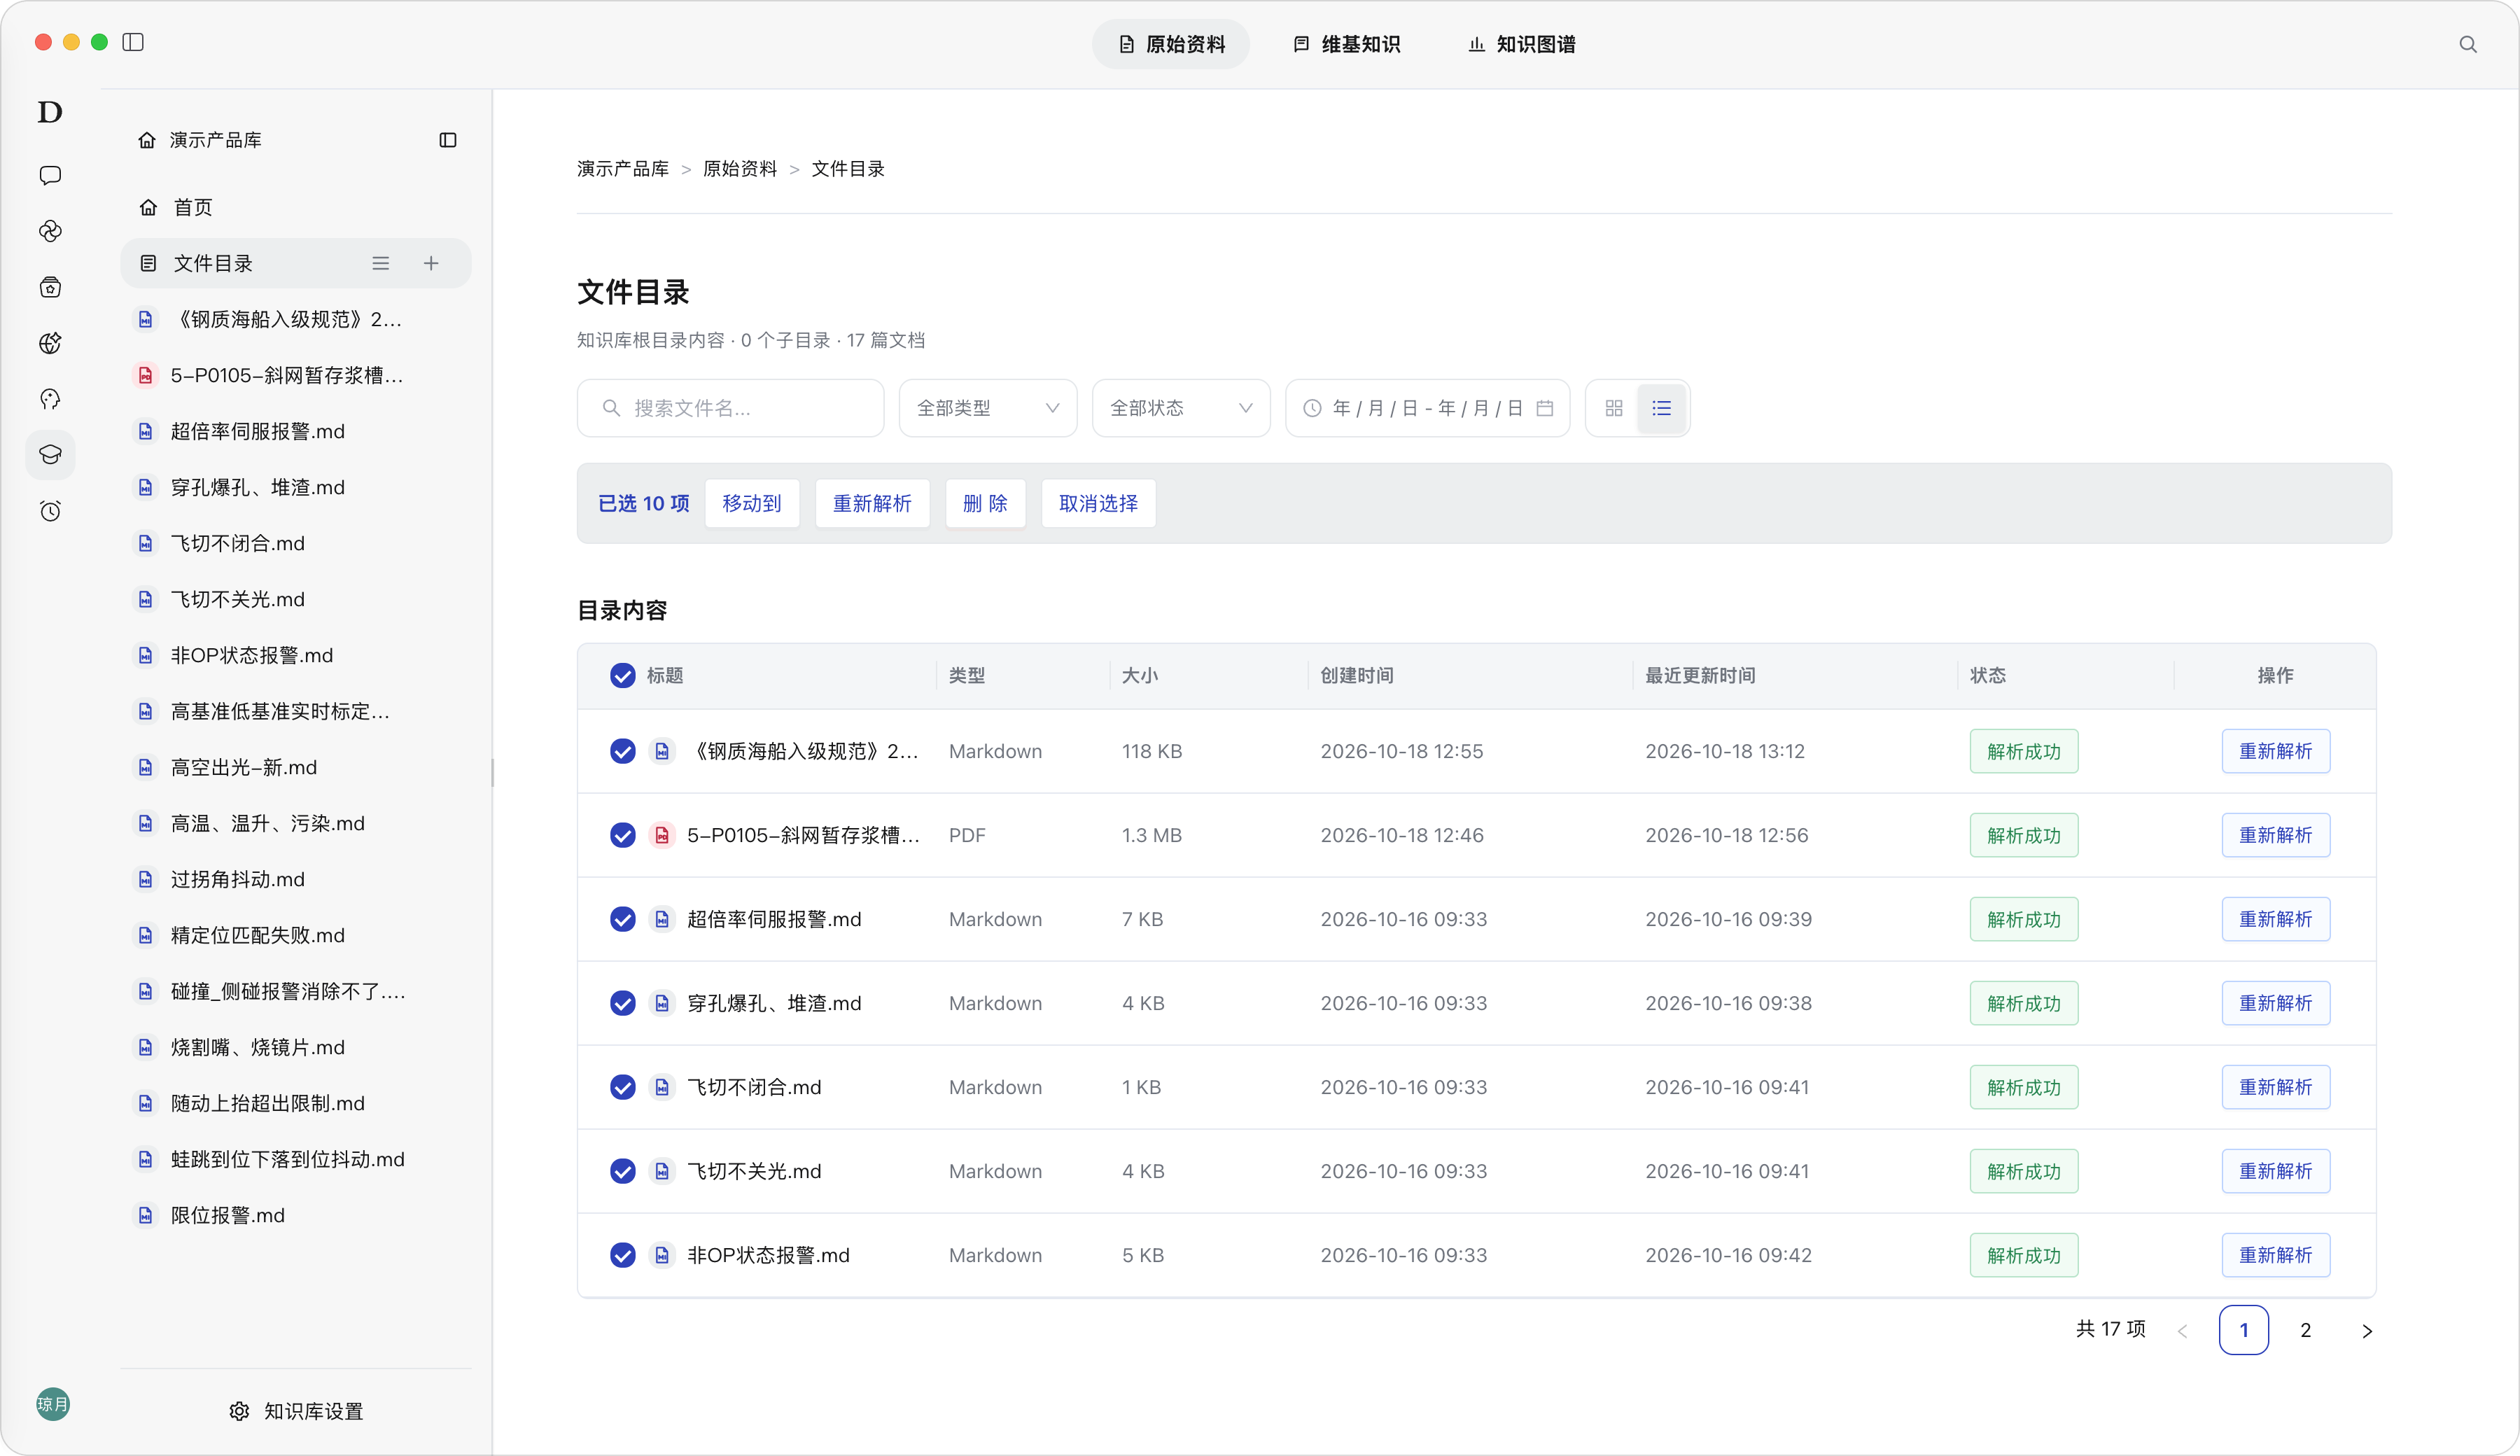
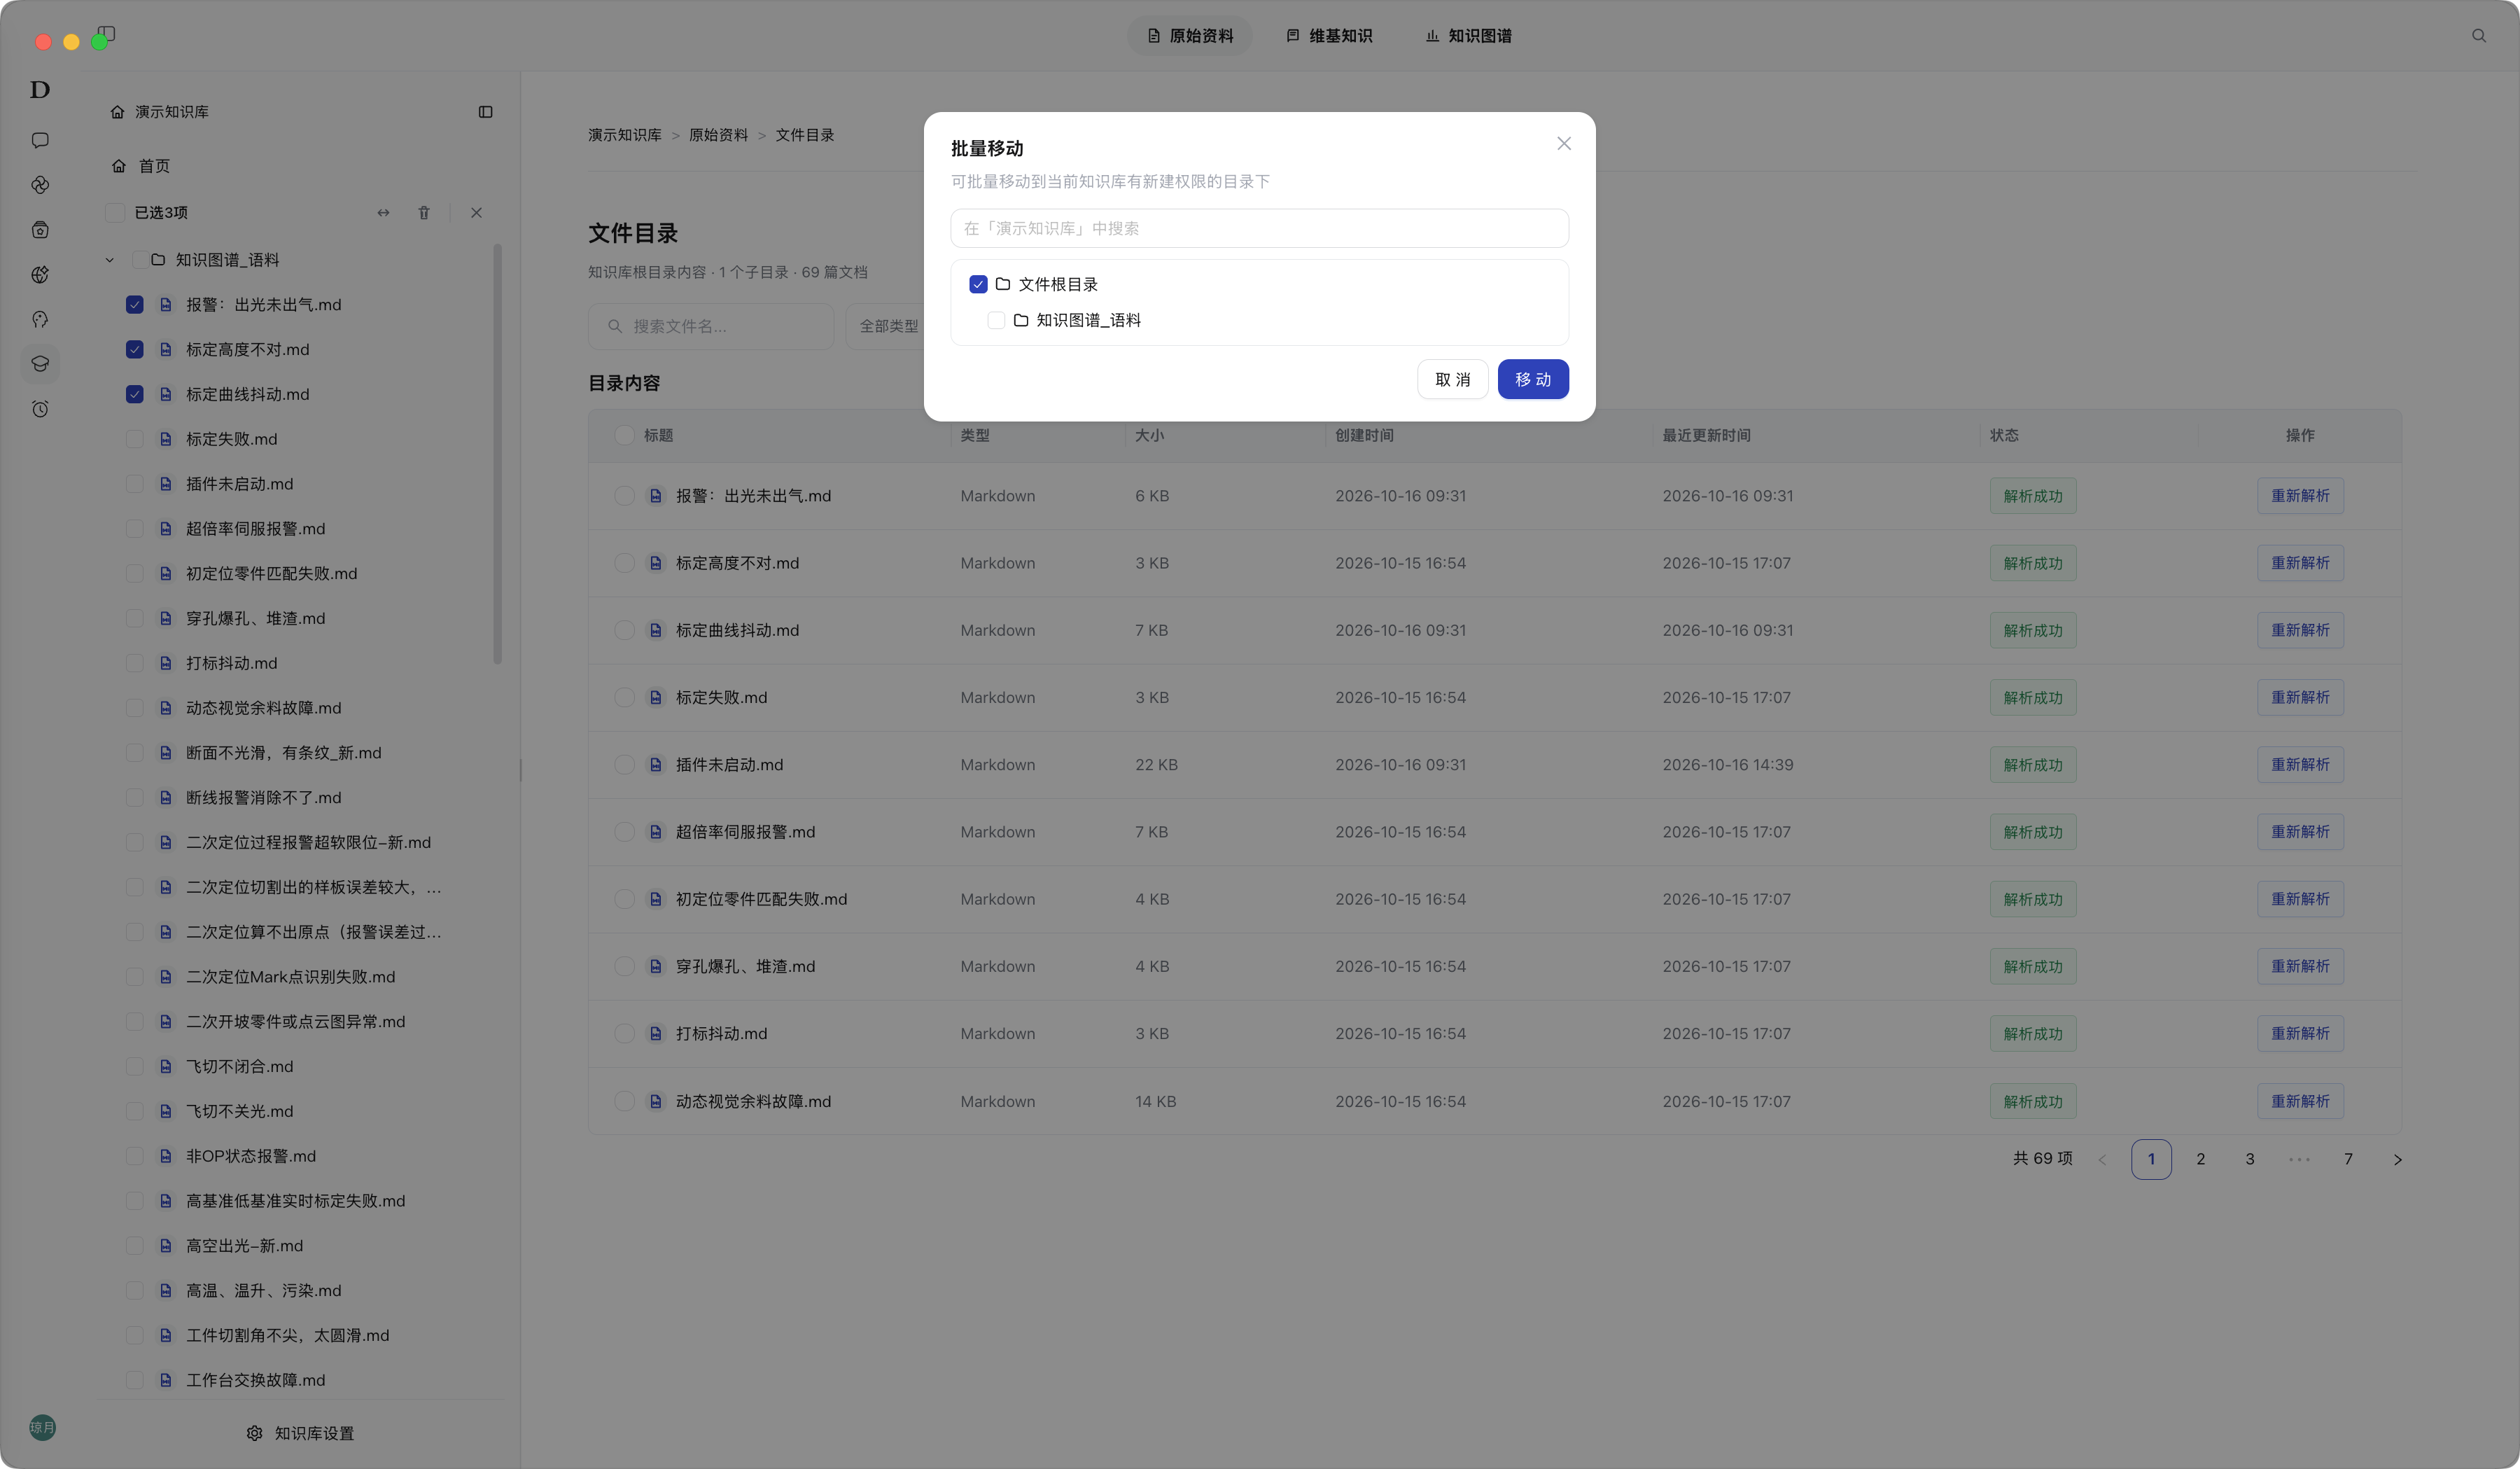
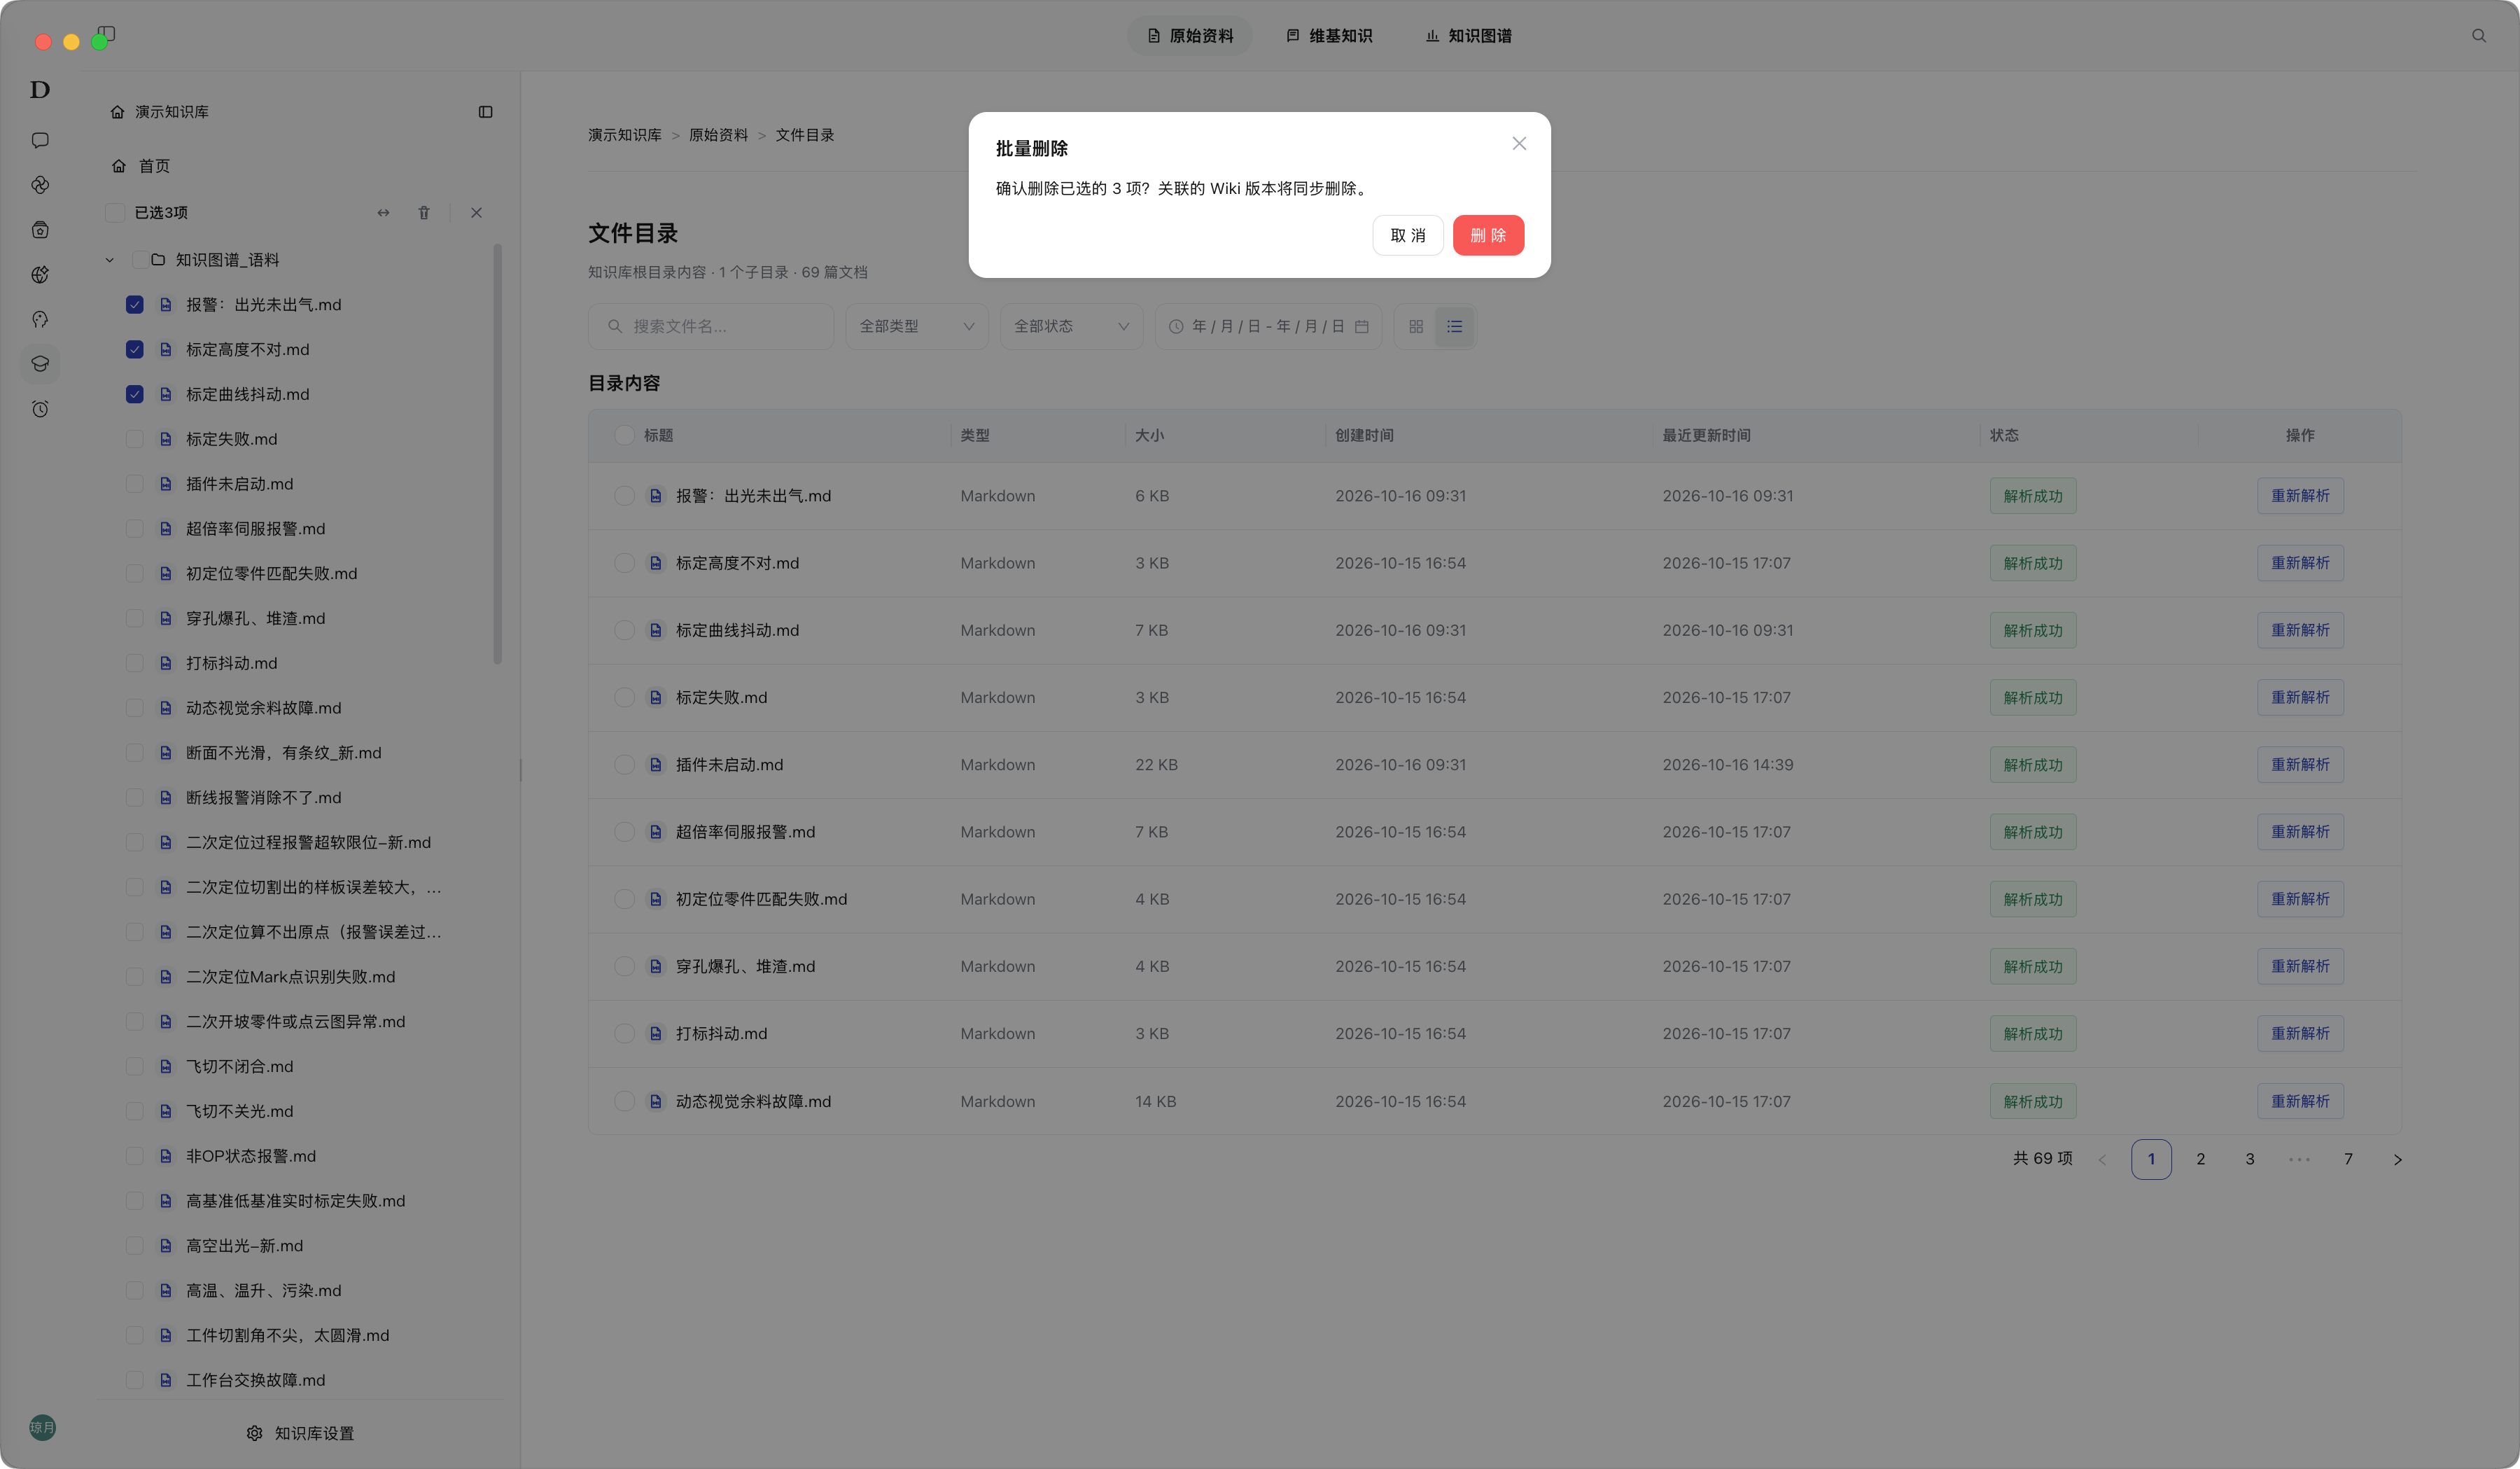
Description: Multi-select mode is used to manage multiple files at the same time, supporting batch move, batch delete, and exiting multi-select. It is suitable for organizing the Knowledge Base directory structure in batches.
Steps: In File Directory, click “Multi-select”, select the target files, and click “Batch Move” or “Batch Delete”.
Result: The top of the page displays the number of selected items; a target directory selection box pops up for batch move, and a confirmation box pops up for batch delete.
Note: The batch delete confirmation box will prompt “Associated Wiki versions will be deleted synchronously”; you must confirm the selection scope before executing. Canceling the operation does not modify data.
Multi-select mode
Batch move
Batch delete confirmation
More File Actions
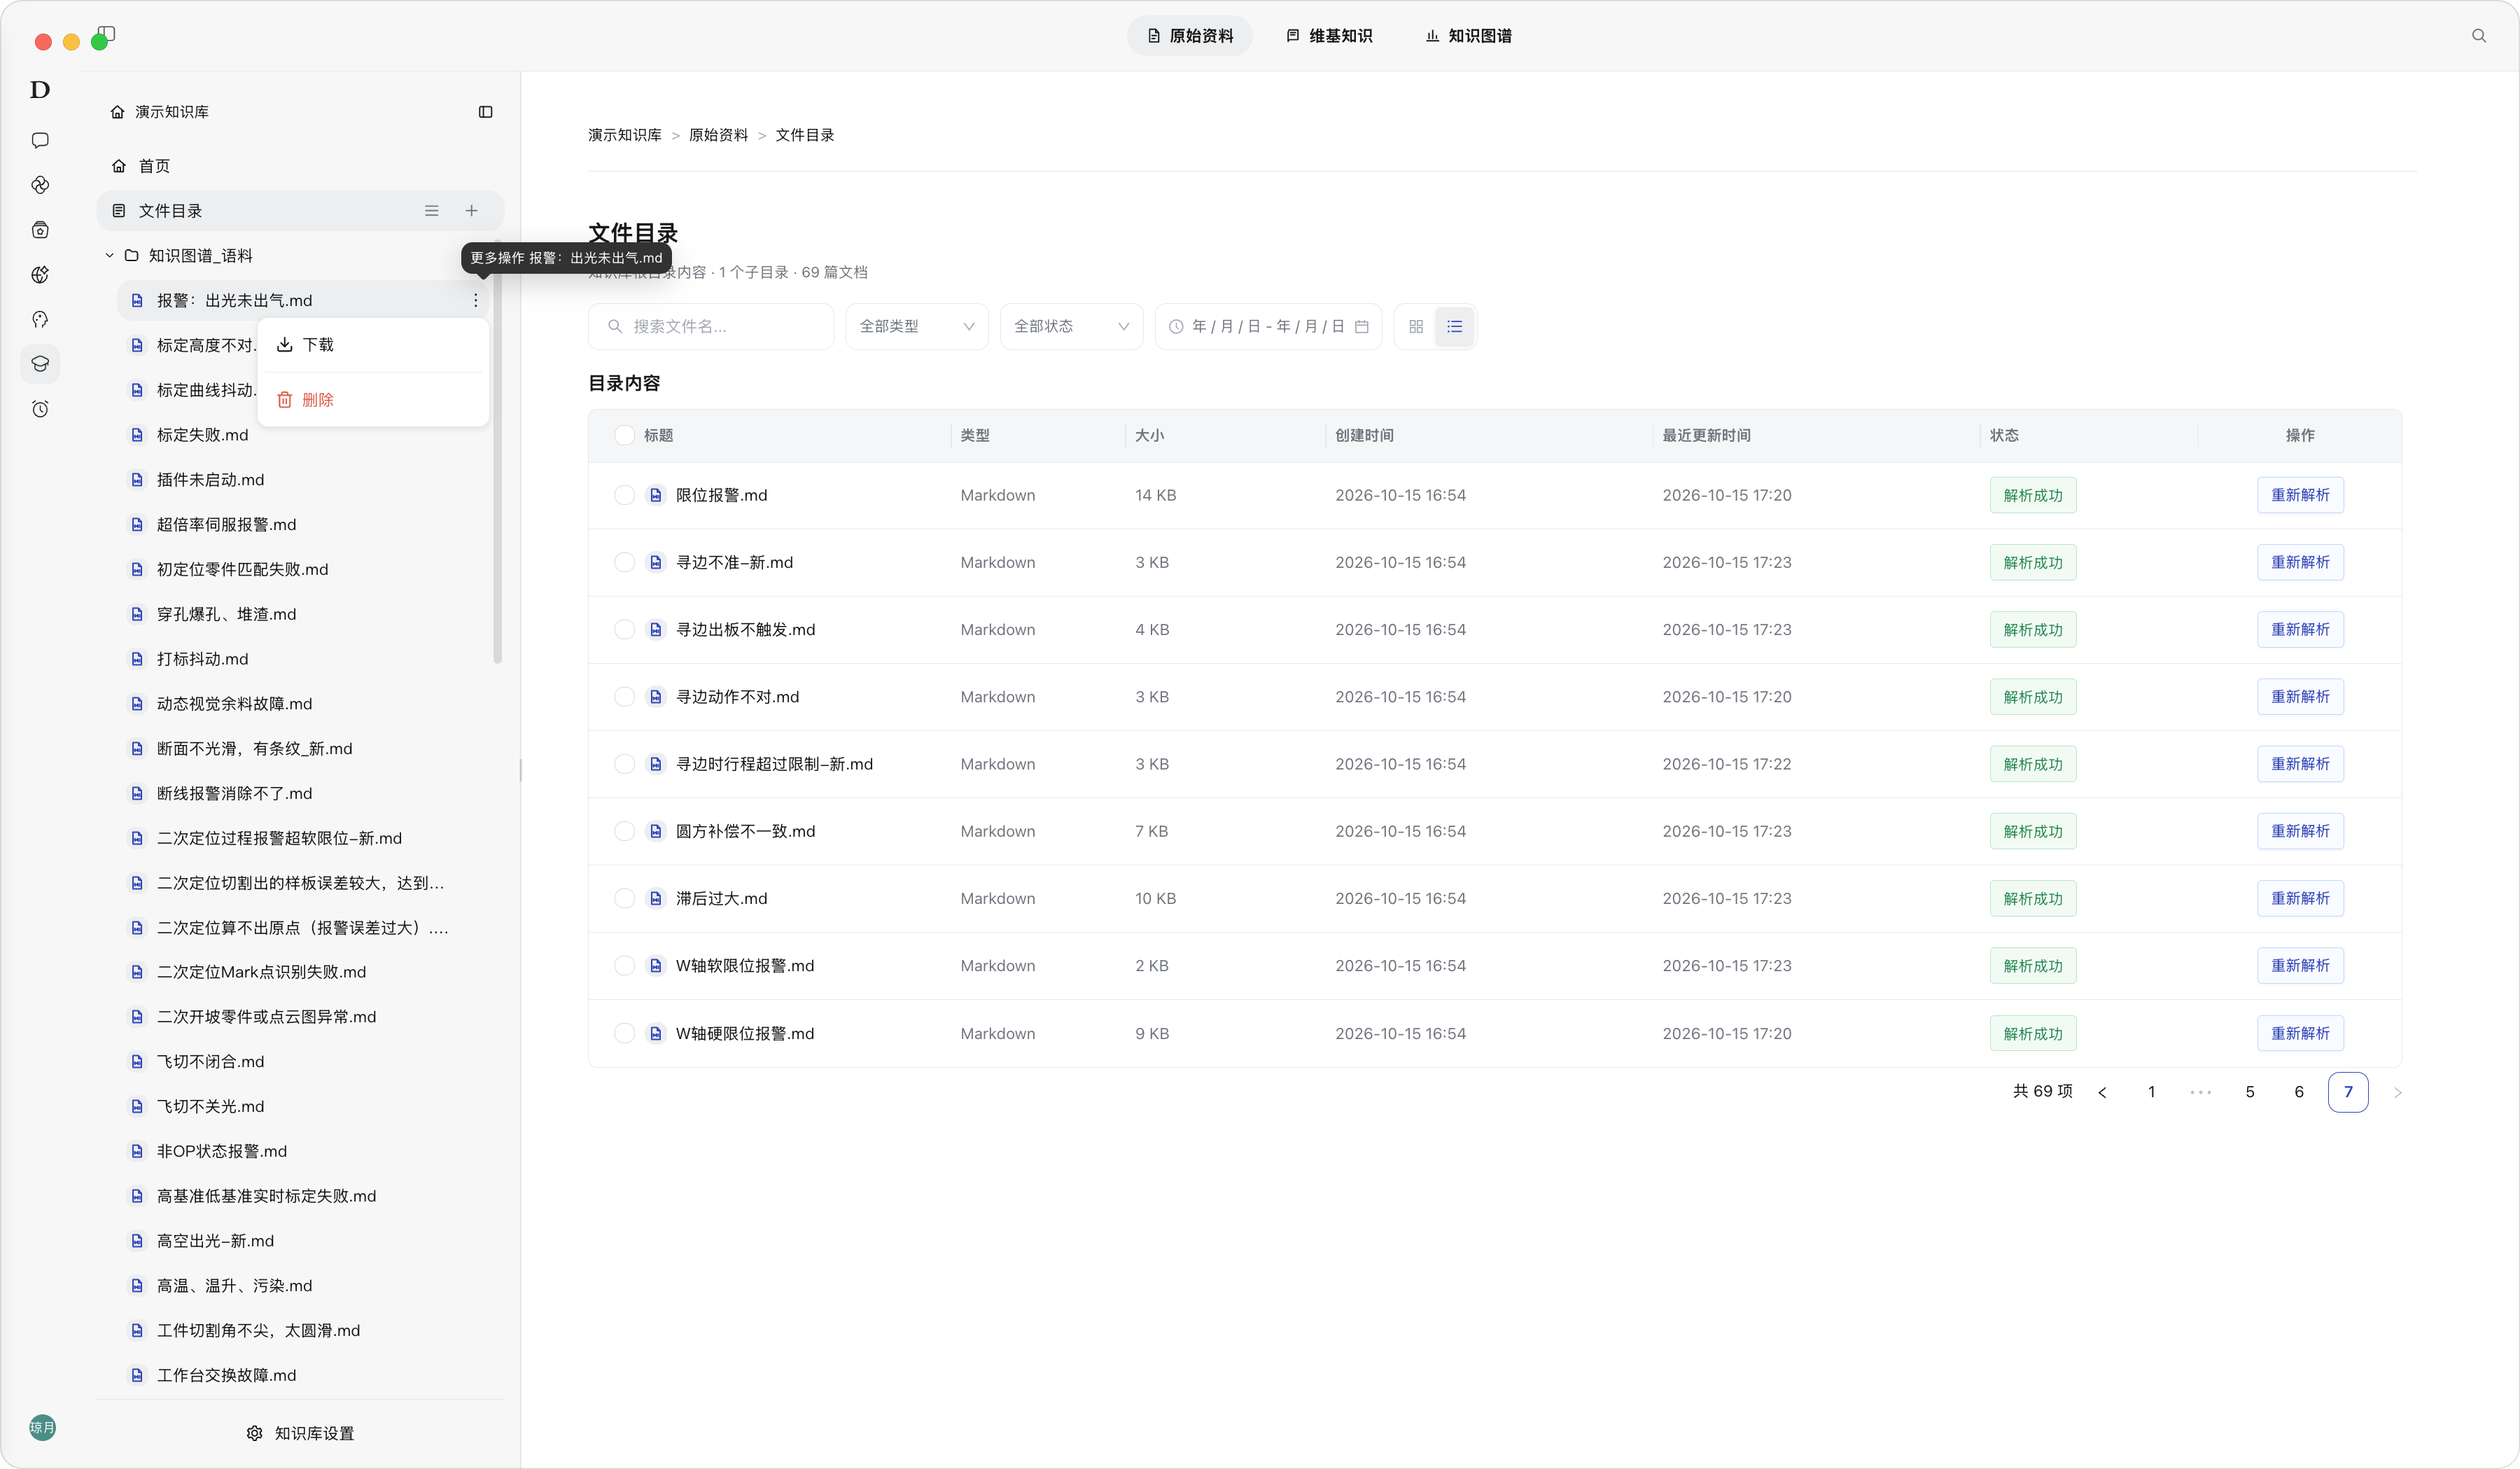
Description: More File Actions is used to manage a single file, supporting download and deletion. It is suitable for lifecycle management of individual materials.
Steps: In File Directory, click “More Actions” on the right side of the target file, and select “Download” or “Delete”.
Result: After download is selected, the browser or system starts downloading the file; after delete is selected, the deletion confirmation process begins.
Note: Deleting a file affects the generated associated Wiki versions, retrieval results, and lineage relationships. Before deleting, confirm whether the file is still used by the business.
More File Actions
File Preview and Parse Preview
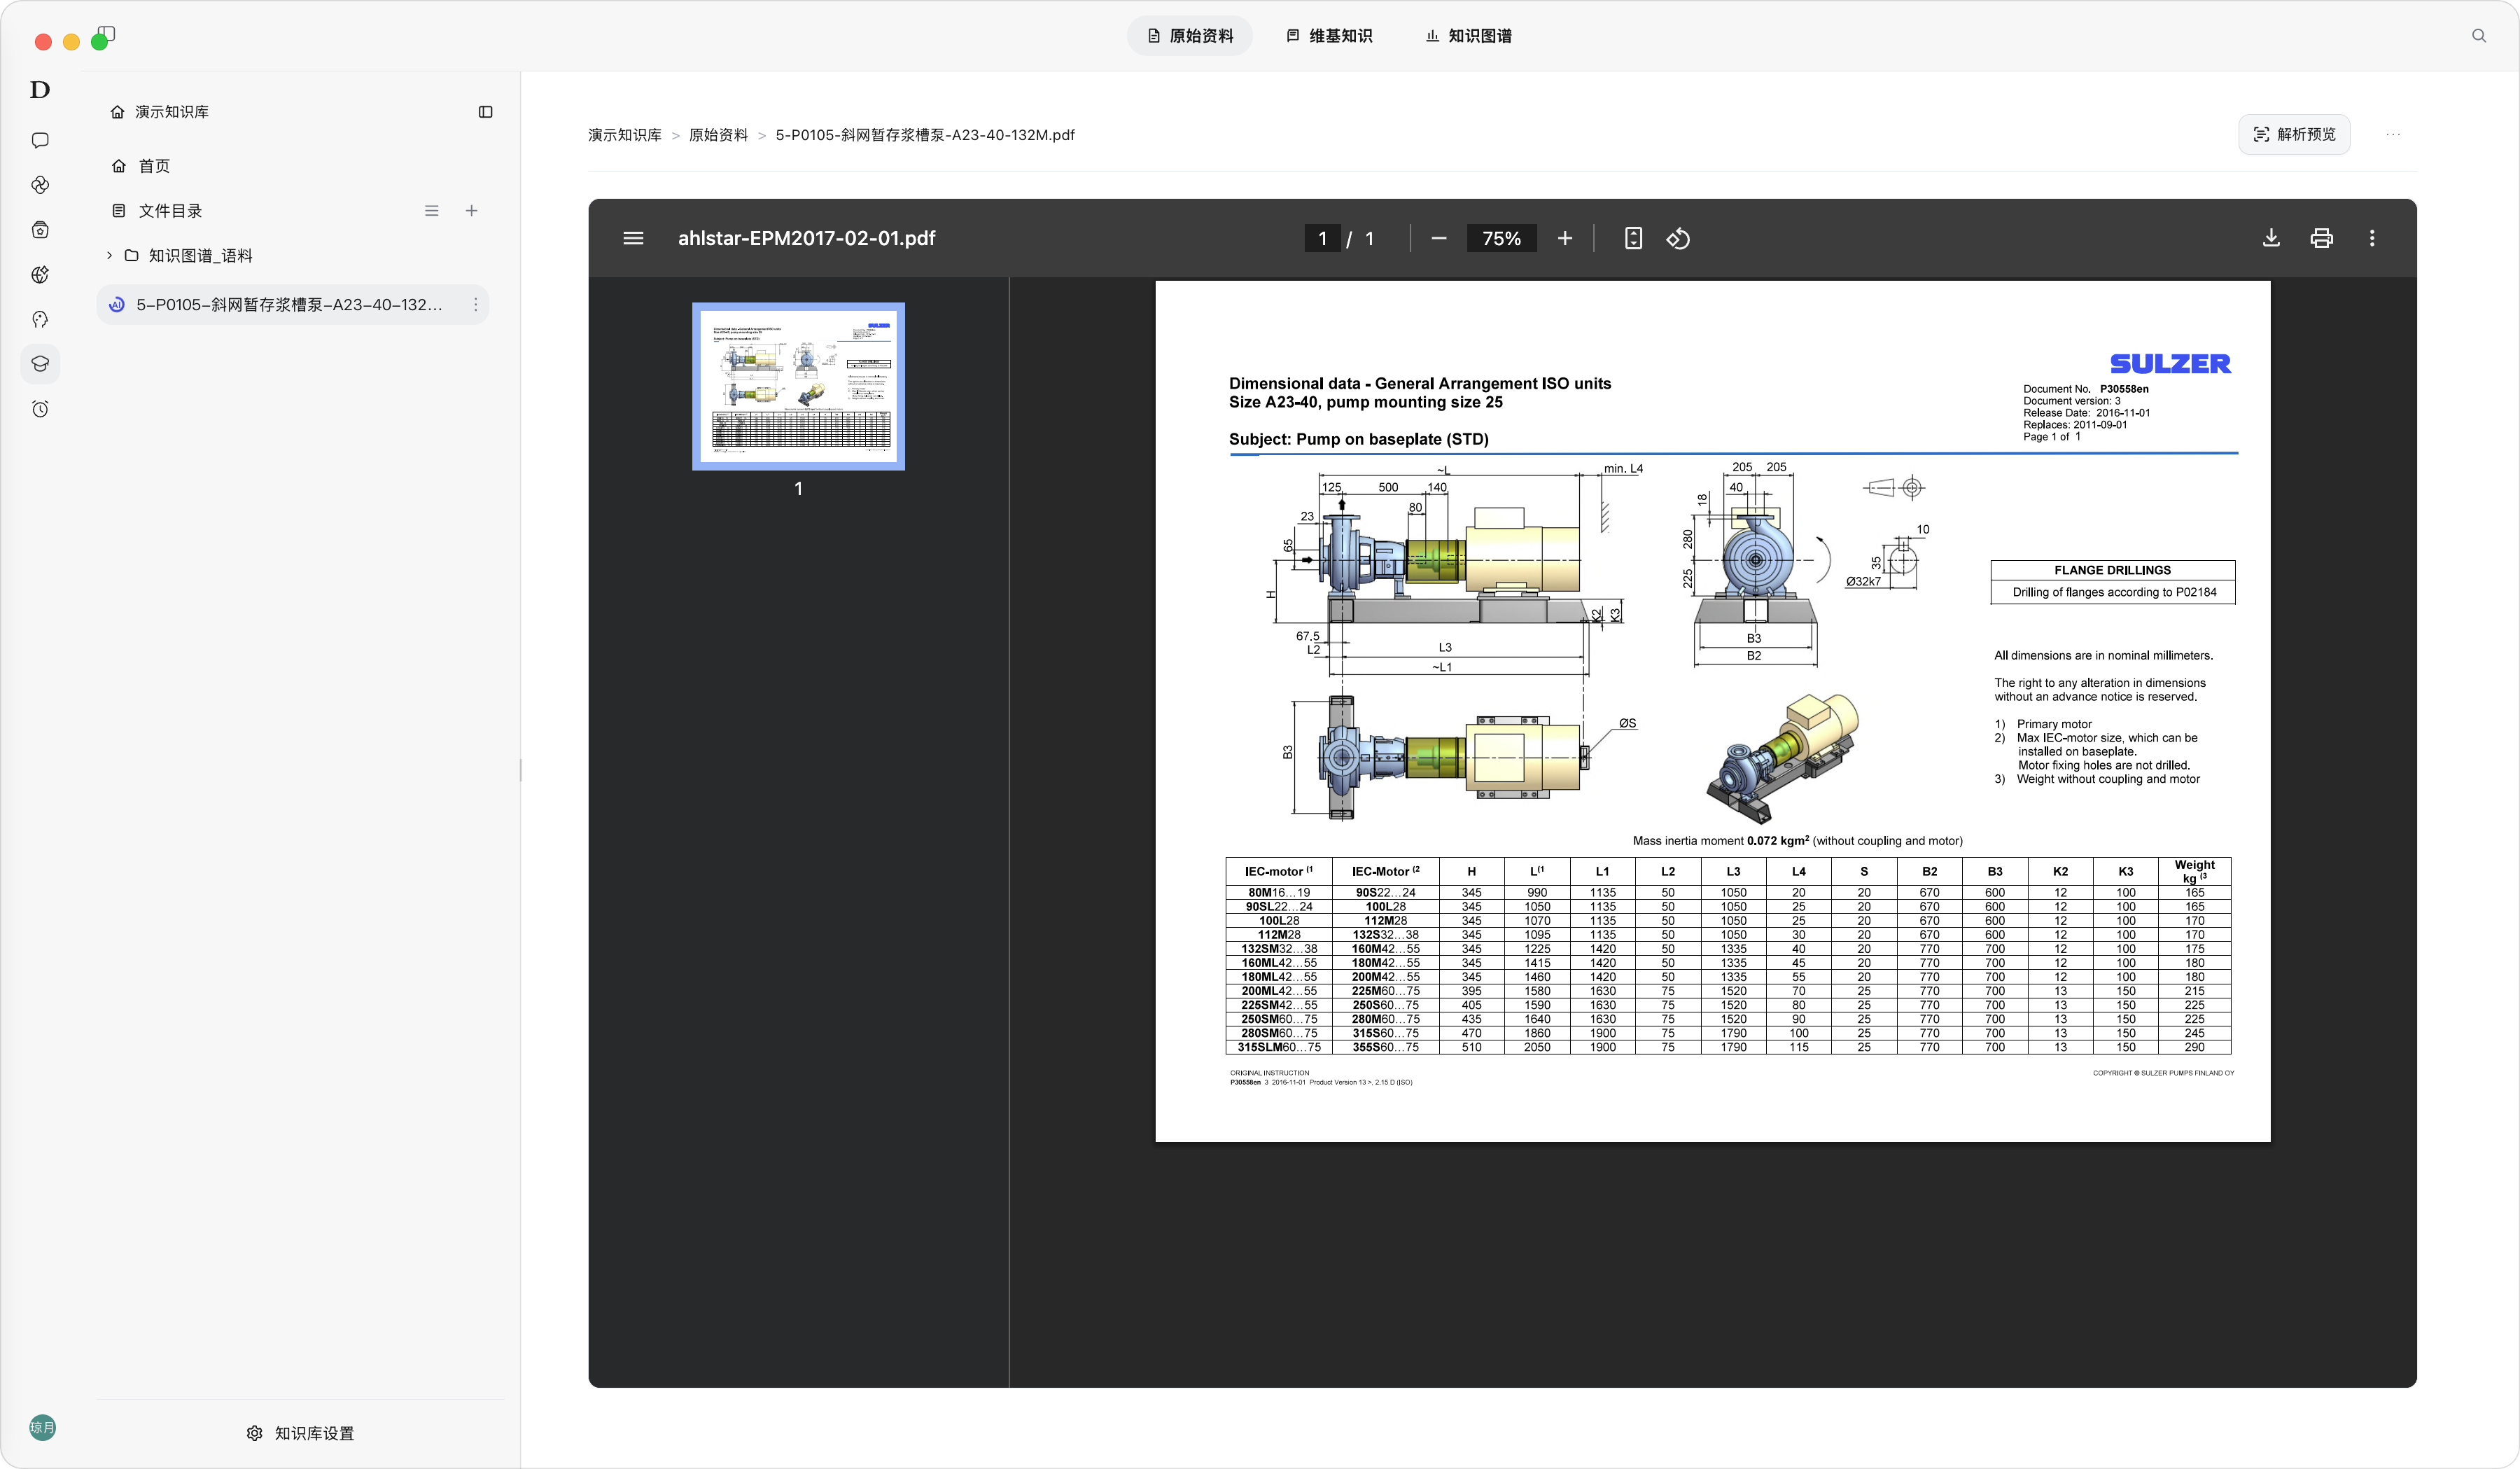
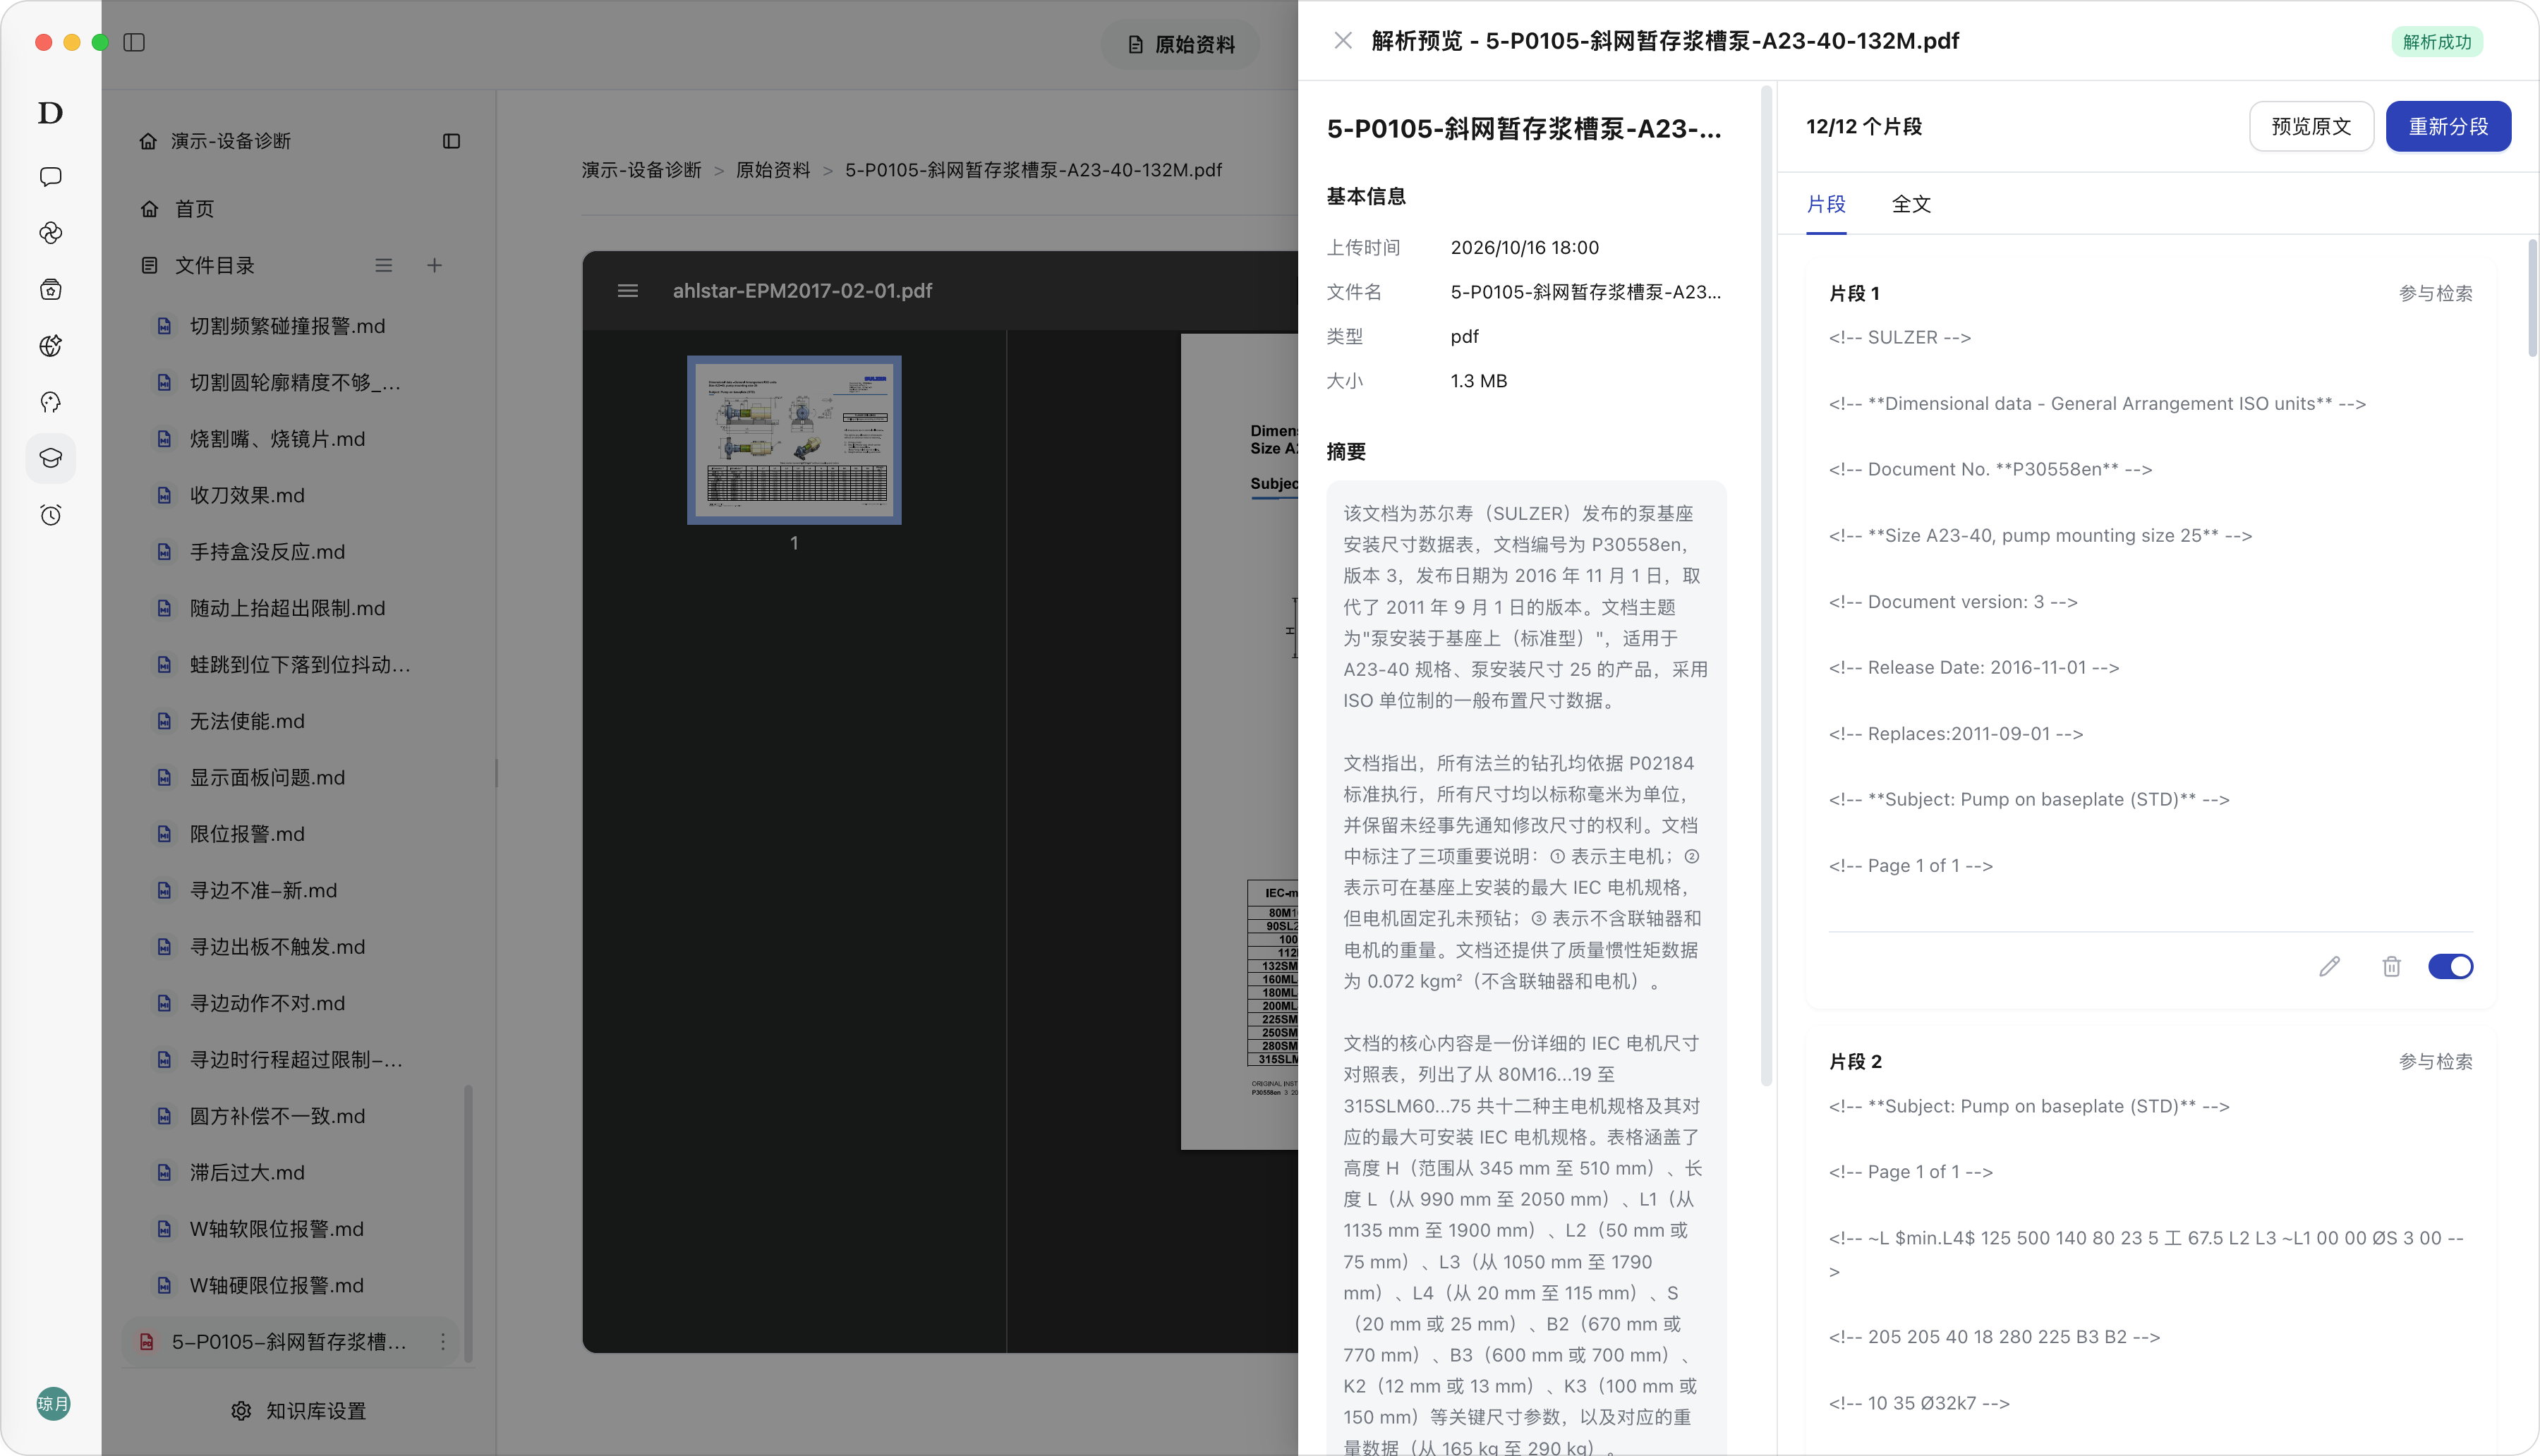
Description: File Preview is used to view basic file information and online preview capabilities; Parse Preview is used to view the parsed summary, chunk content, whether chunks participate in retrieval, and processing status.
Steps: Click the target file to enter the current file preview page; click “Parse Preview” to view parsing results; in chunks, you can edit, delete, or disable retrieval participation.
Result: The file preview page displays the file path, the Parse Preview entry, and preview tips. The Parse Preview page displays parsing status, basic information, summary, chunk list, chunk editing, deletion, and the retrieval participation switch.
Note: When the file is too large, the page will prompt to download it for preview. Parse Preview provides “Preview Original Text” and “Re-segment”; re-segmentation changes the chunks used for subsequent retrieval, so confirm the impact before executing. After a chunk’s retrieval participation is disabled, that chunk will not participate in knowledge retrieval, but the file itself will not be deleted.
File Preview
Parse Preview
Edit Chunks and Retrieval Participation
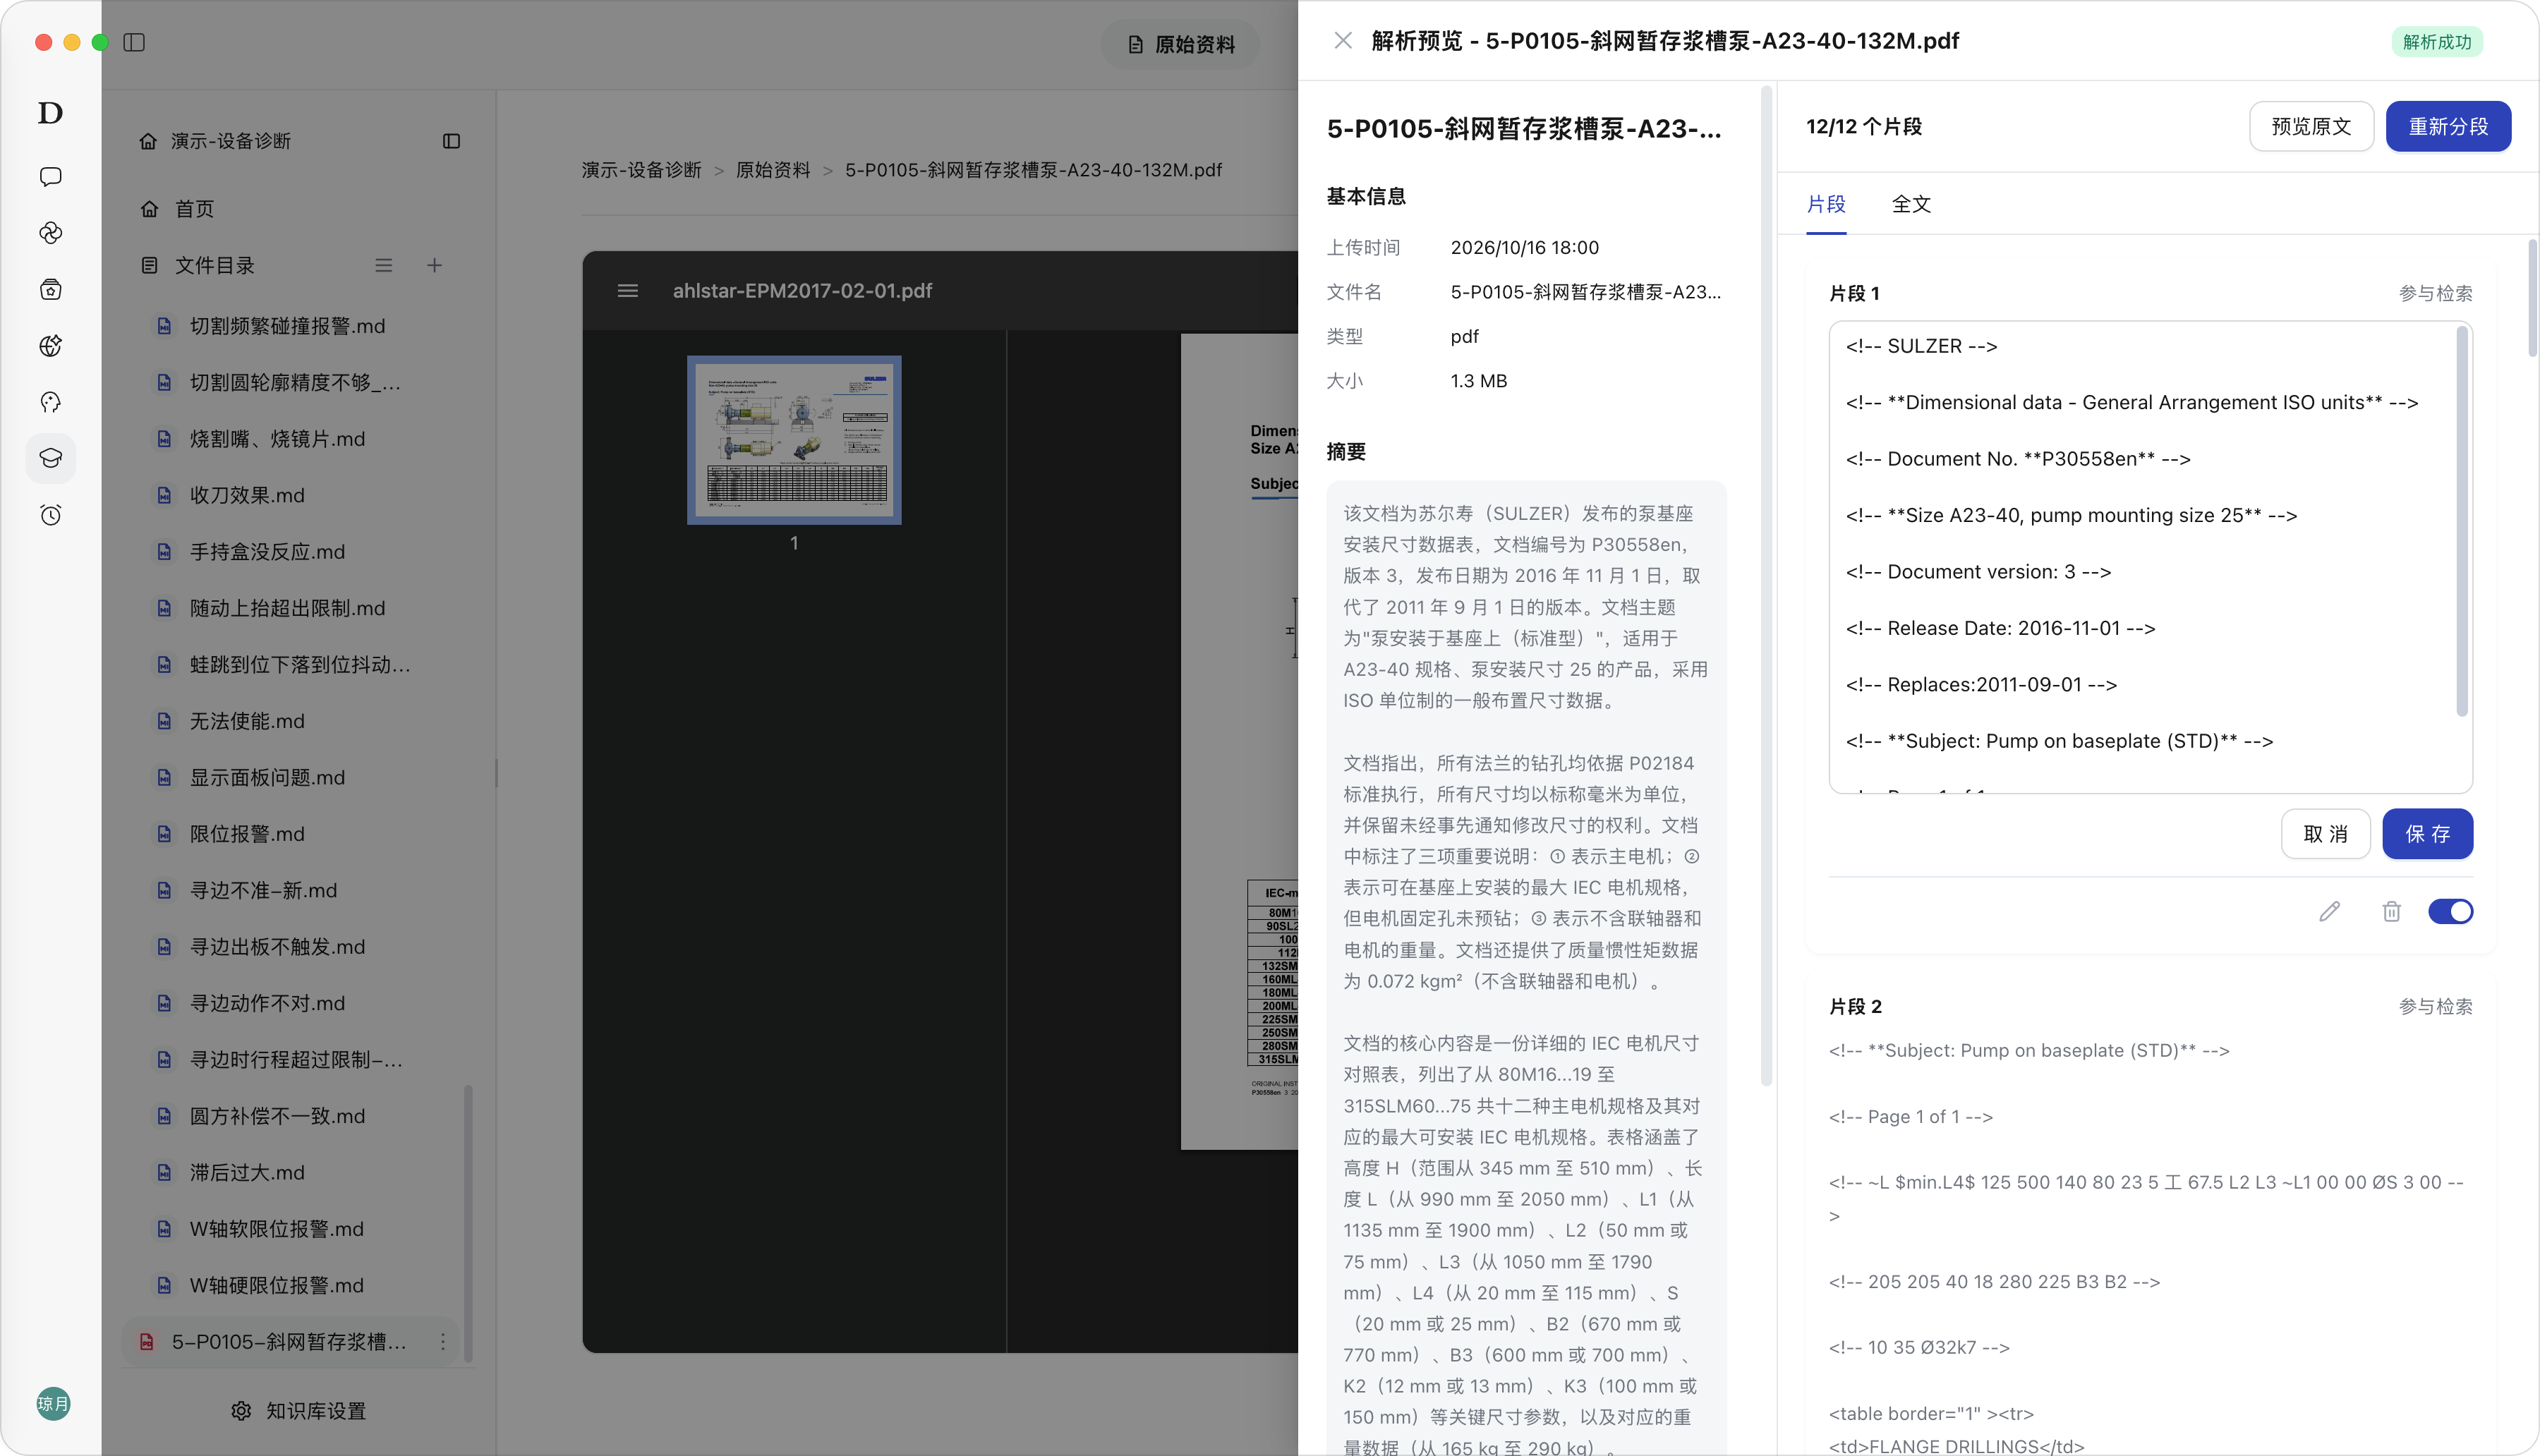
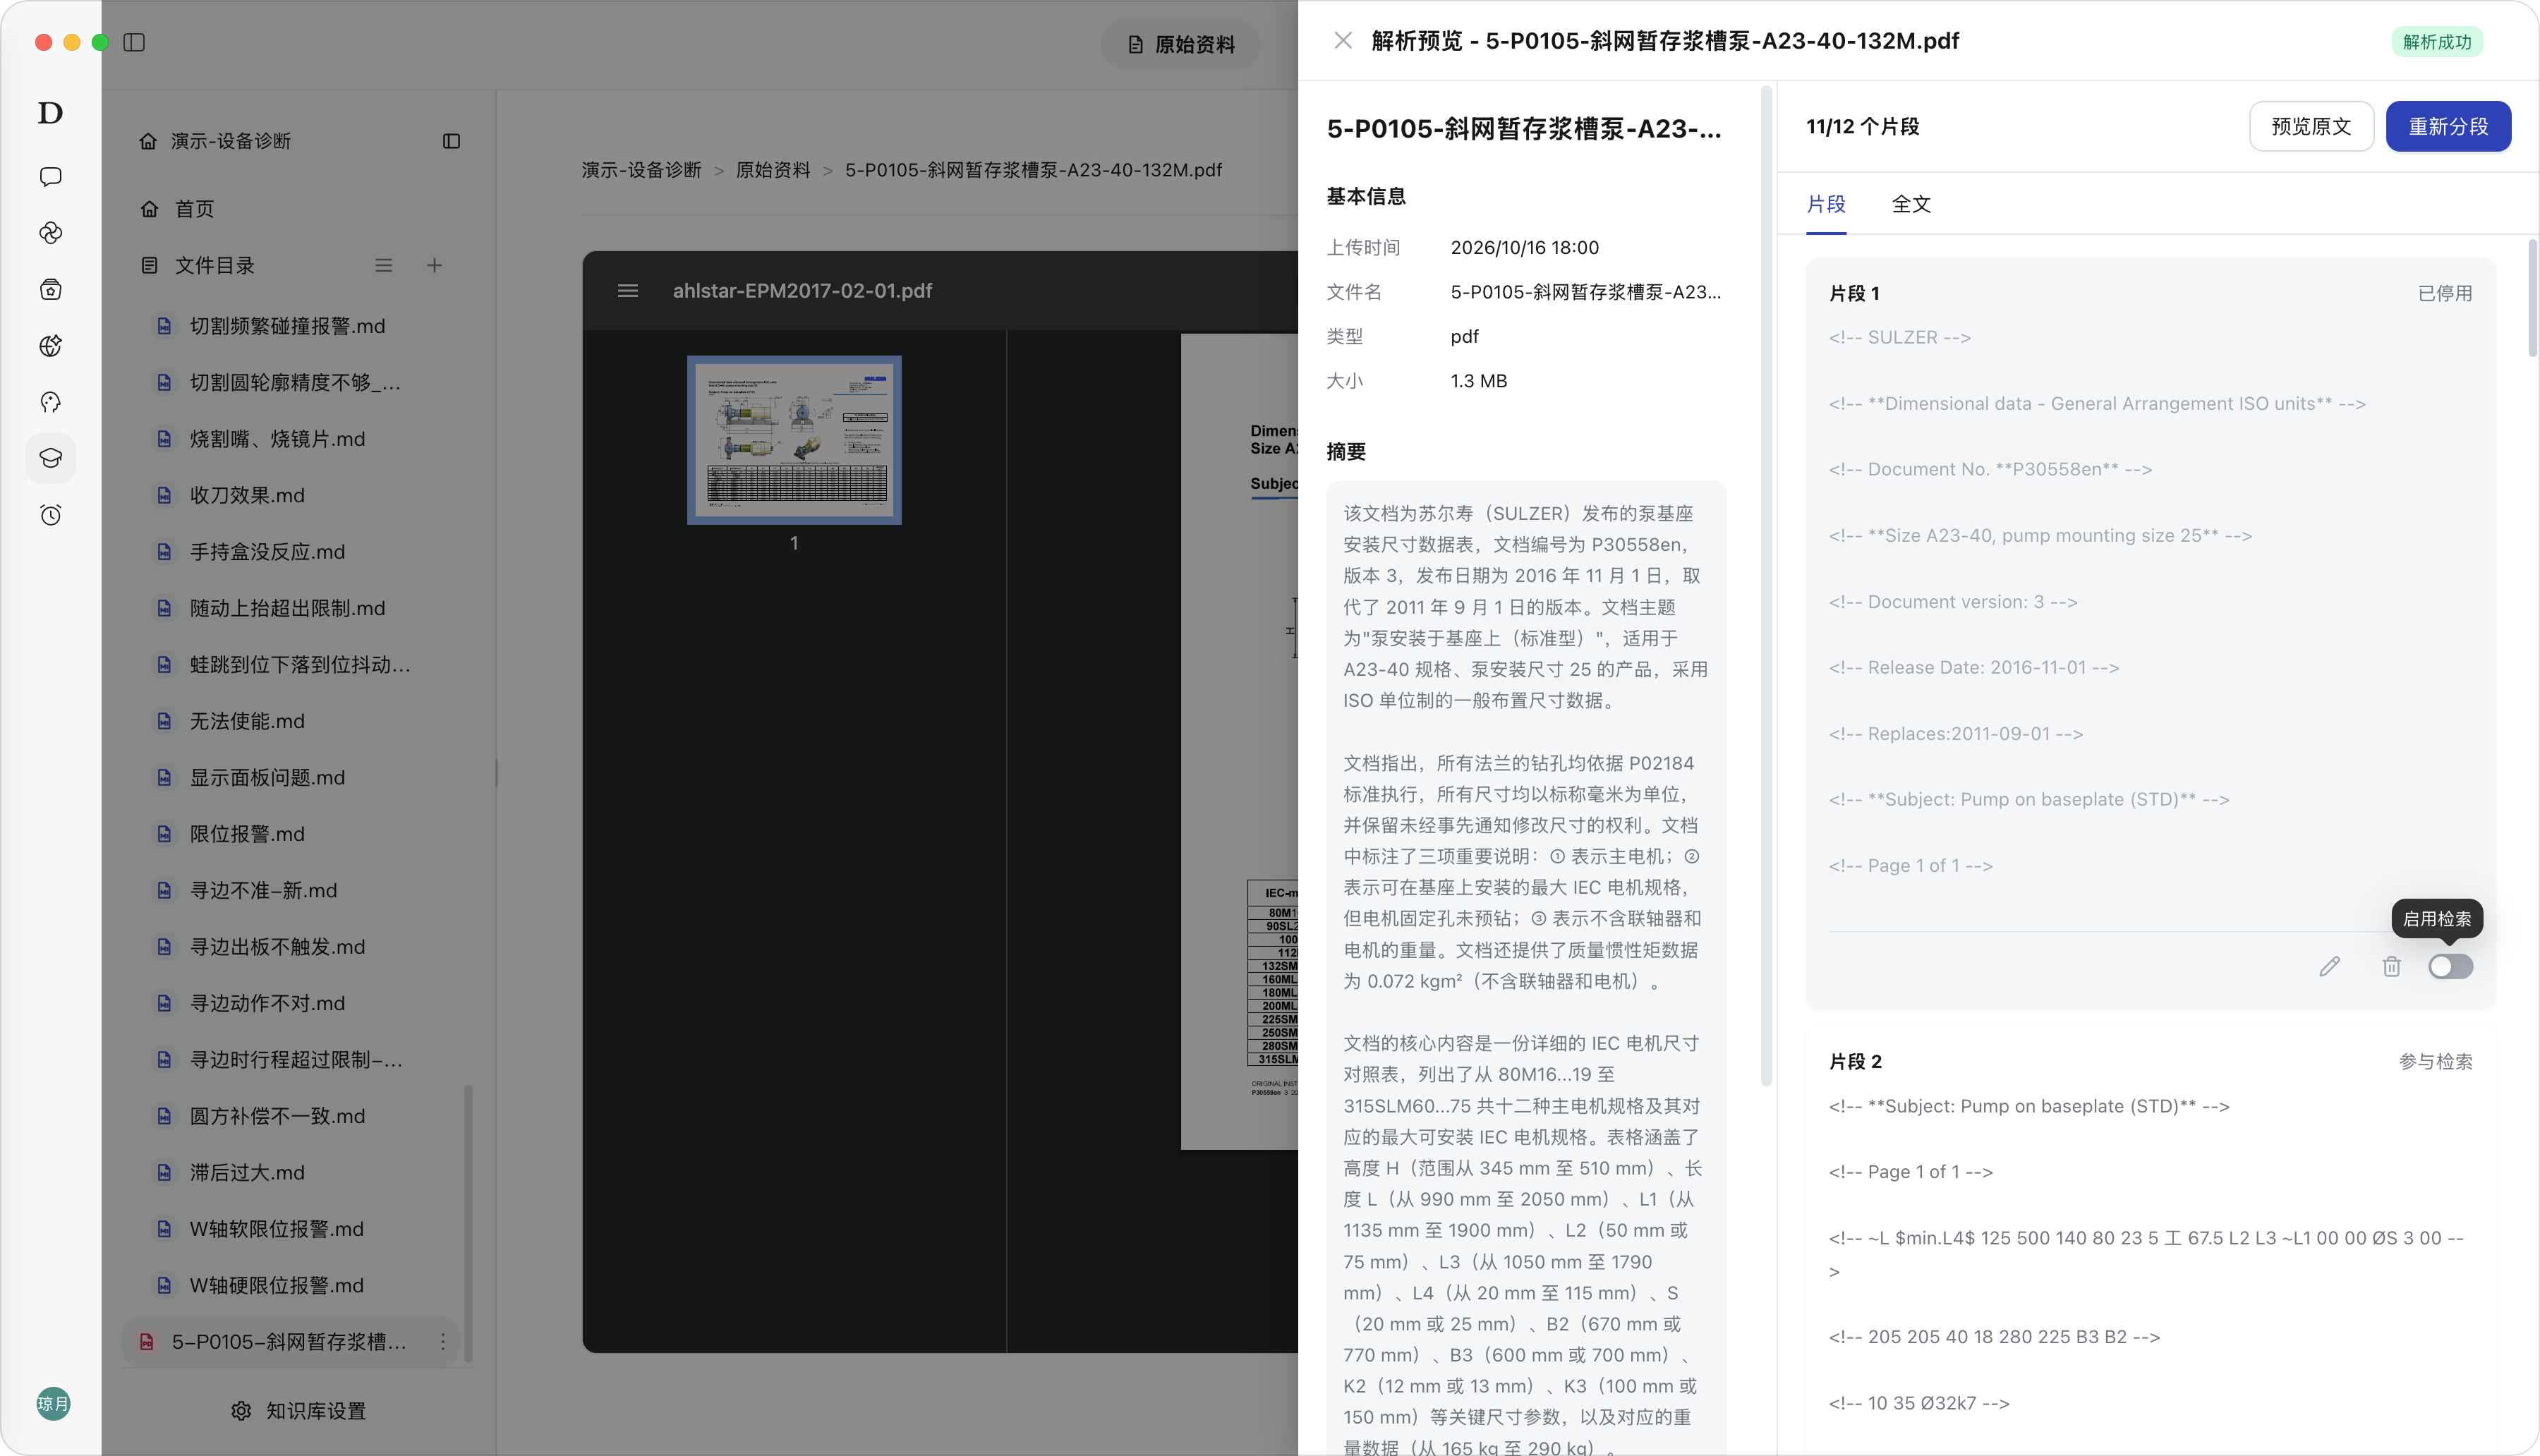
Description: Edit Chunk is used to manually correct parsed knowledge chunks; retrieval participation is used to control whether a chunk enters retrieval results.
Steps: In Parse Preview, click “Edit Chunk” on the target chunk, modify the content, and save; to control the retrieval scope, toggle “Include in Retrieval” on the right side of the chunk.
Result: After editing and saving, the chunk content is updated; after retrieval participation is disabled, the chunk status is displayed as disabled.
Note: Editing chunks is a modification of knowledge content and affects the basis for subsequent retrieval and answers. Do not delete key context to avoid answers lacking evidence.
Edit chunking chunks
Chunk retrieval participation switch
Knowledge Base Wiki Knowledge
Wiki Knowledge is the accumulation layer of the Shared Knowledge Base, organizing parsed materials into readable, maintainable, and traceable Wiki pages.
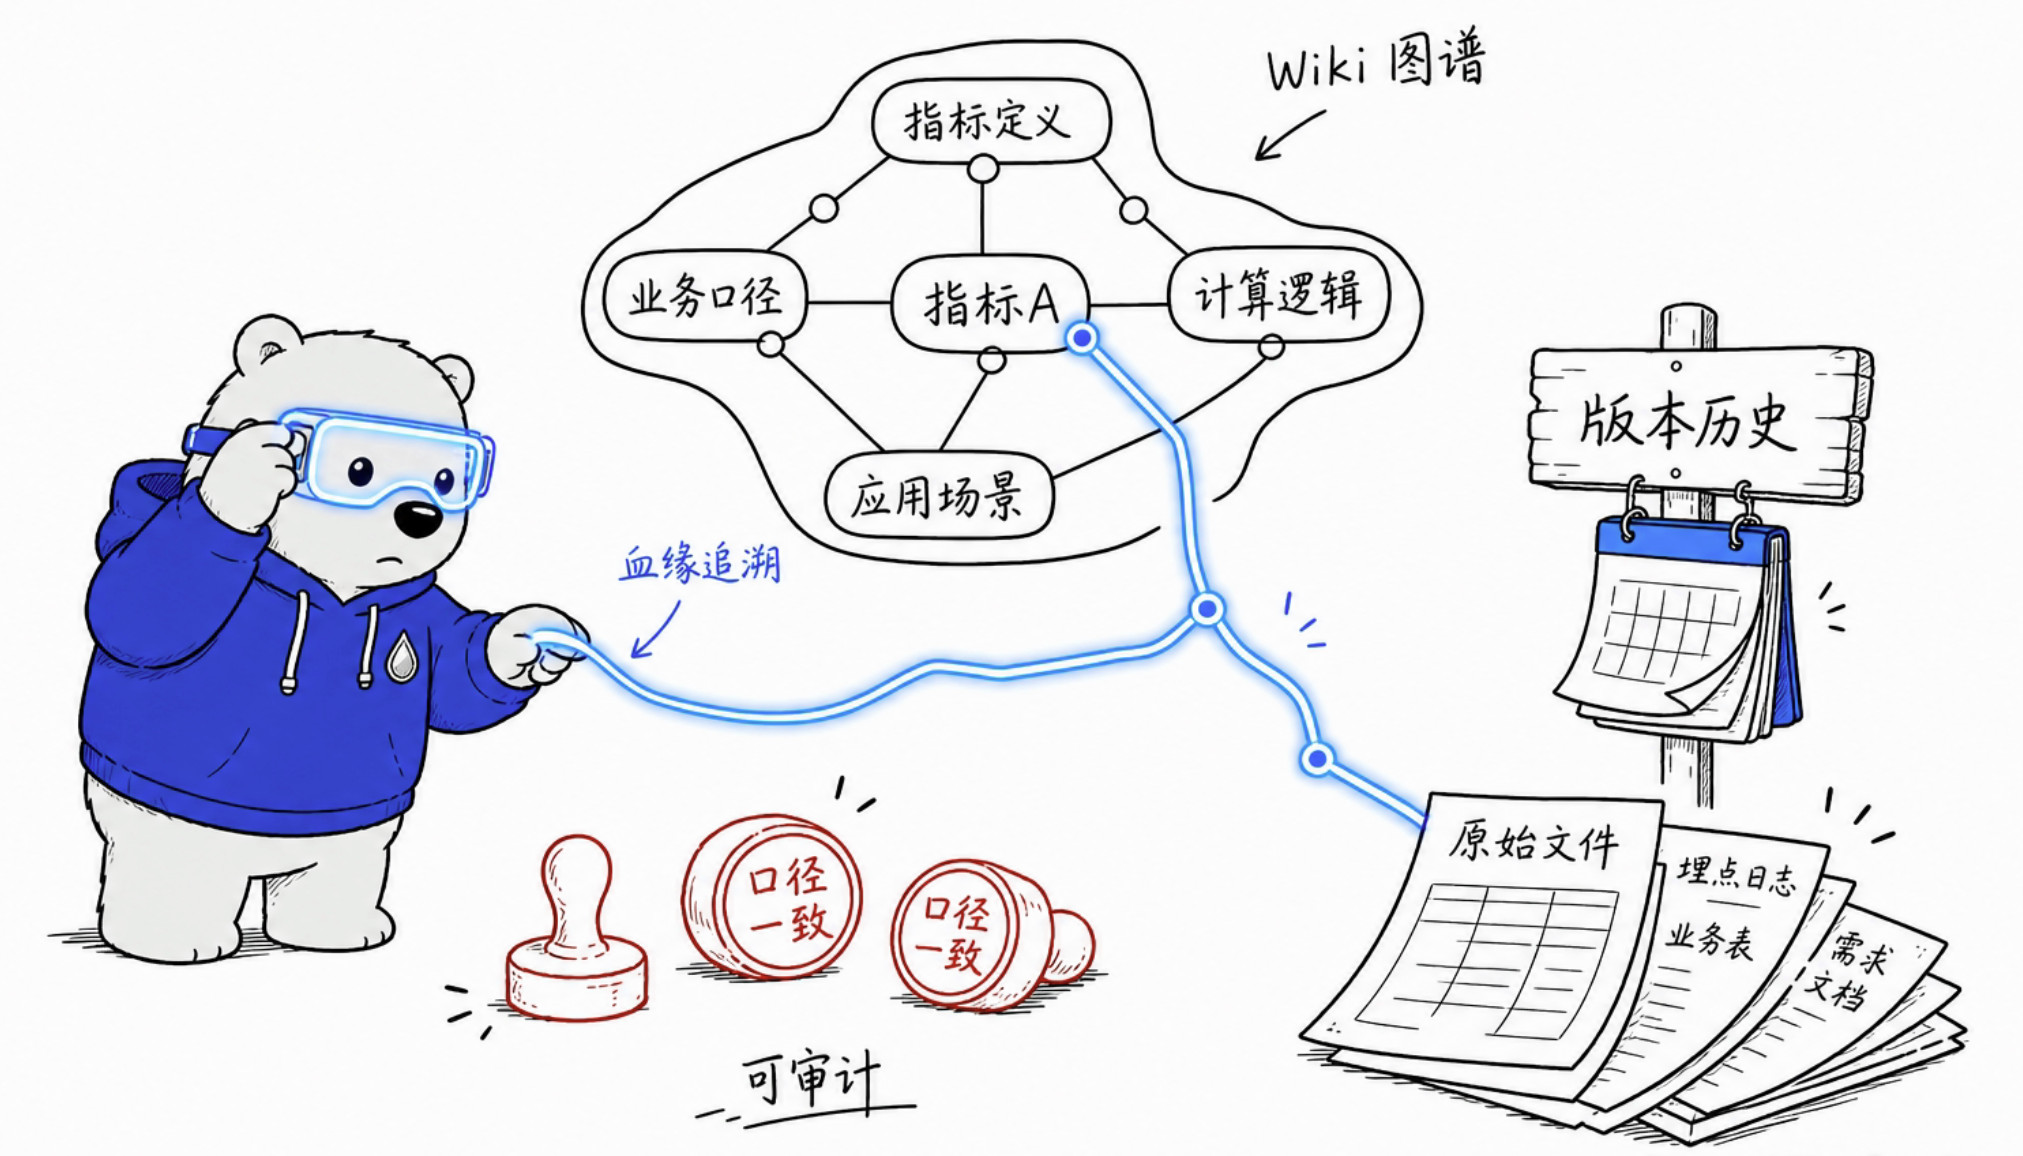
This module is oriented to knowledge governance: the index is responsible for discovery; page details are responsible for reading; editing is responsible for correcting definitions; Version History is responsible for tracing; Wiki Graph is responsible for viewing associations; Data Lineage is responsible for verifying source chains.
| Secondary Function | Description |
|---|---|
| Wiki Index | Quickly inventory the knowledge assets of the current Knowledge Base |
| Wiki Page Details | Supports reading, source tracing, and jumping to related knowledge |
| Edit Entry | Unify team definitions and correct parsing errors |
| Version History | View change summaries and body differences |
| Wiki Graph | Discover key pages, isolated content, and knowledge gaps |
| Data Lineage | Check materials that have not generated Wiki and pages missing sources |
Wiki Index
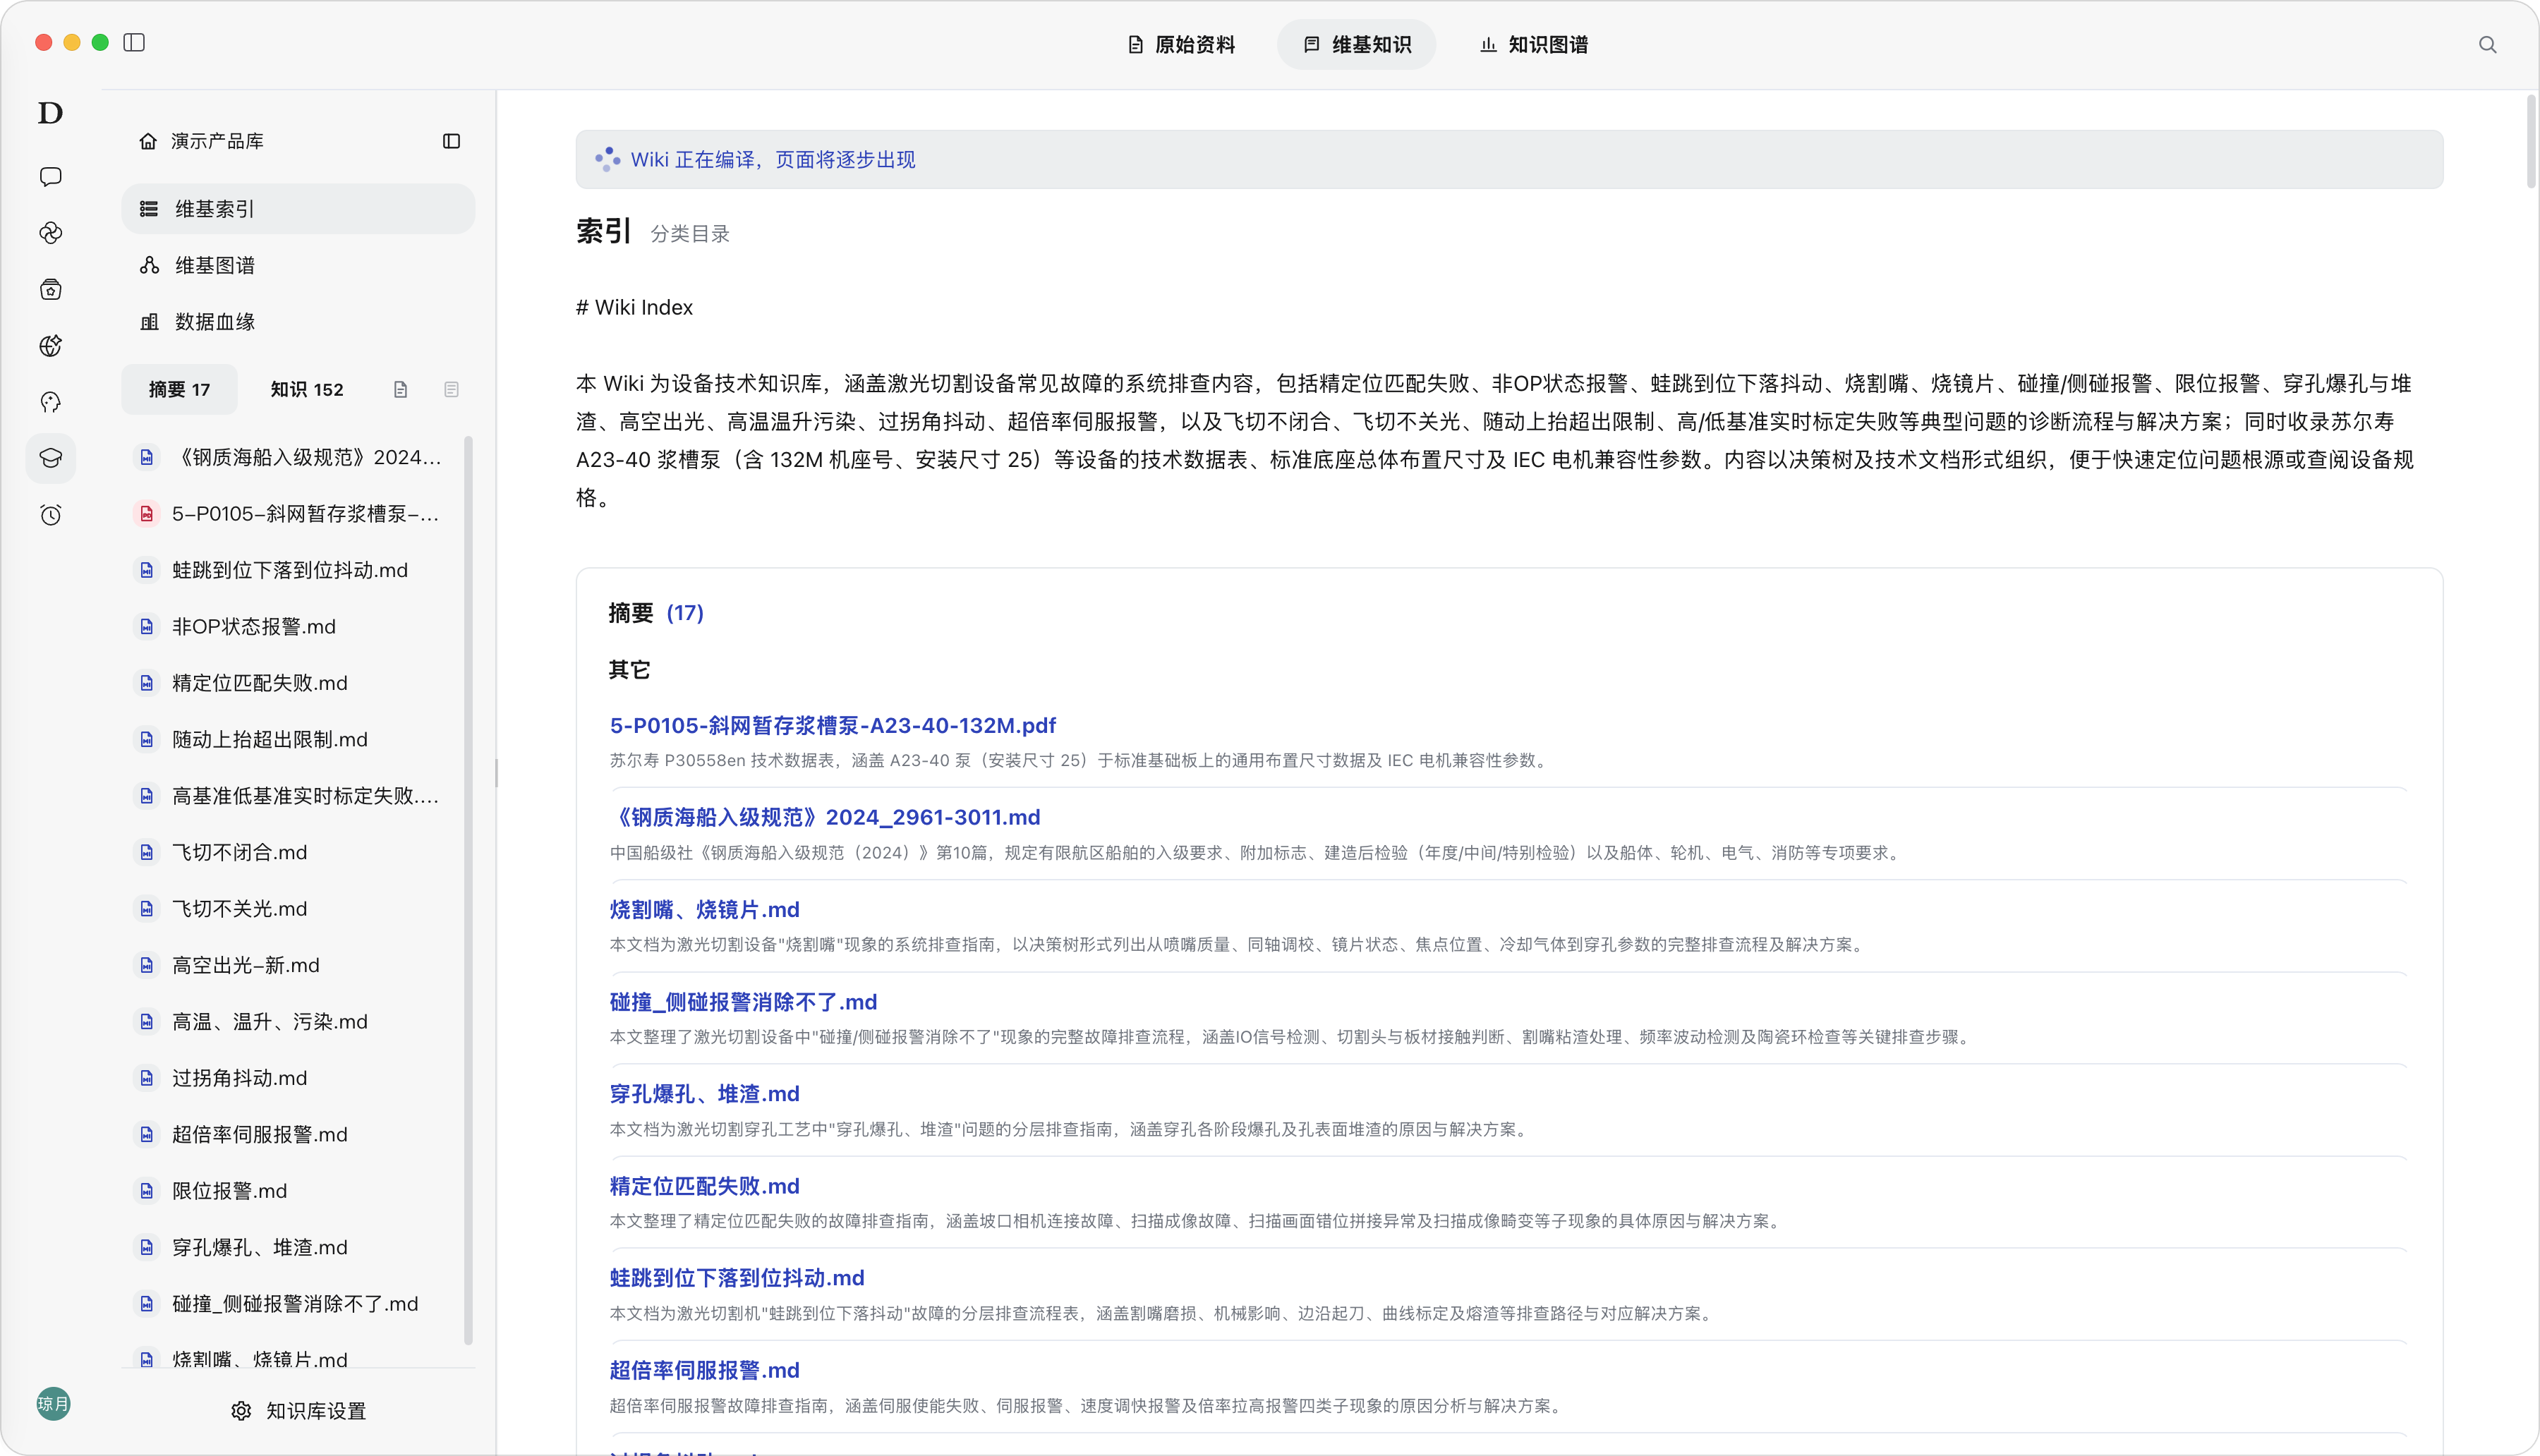
Description: Wiki Index organizes Wiki pages by summaries, entities, and concepts, helping users quickly understand what core knowledge has been accumulated in the current Knowledge Base.
Steps: After entering the Knowledge Base, click “Wiki Knowledge”; “Wiki Index” opens by default; filter page types by “Summary” or “Knowledge”, and click the target entry to view.
Result: The page displays the index description, summary groups, entity groups, concept groups, and the corresponding entry summaries.
Note: Wiki Index is suitable as the entry point for knowledge inventory. If the index is empty, check whether resources have been parsed or whether Wiki content is being generated.
Wiki Index
Wiki Page Details
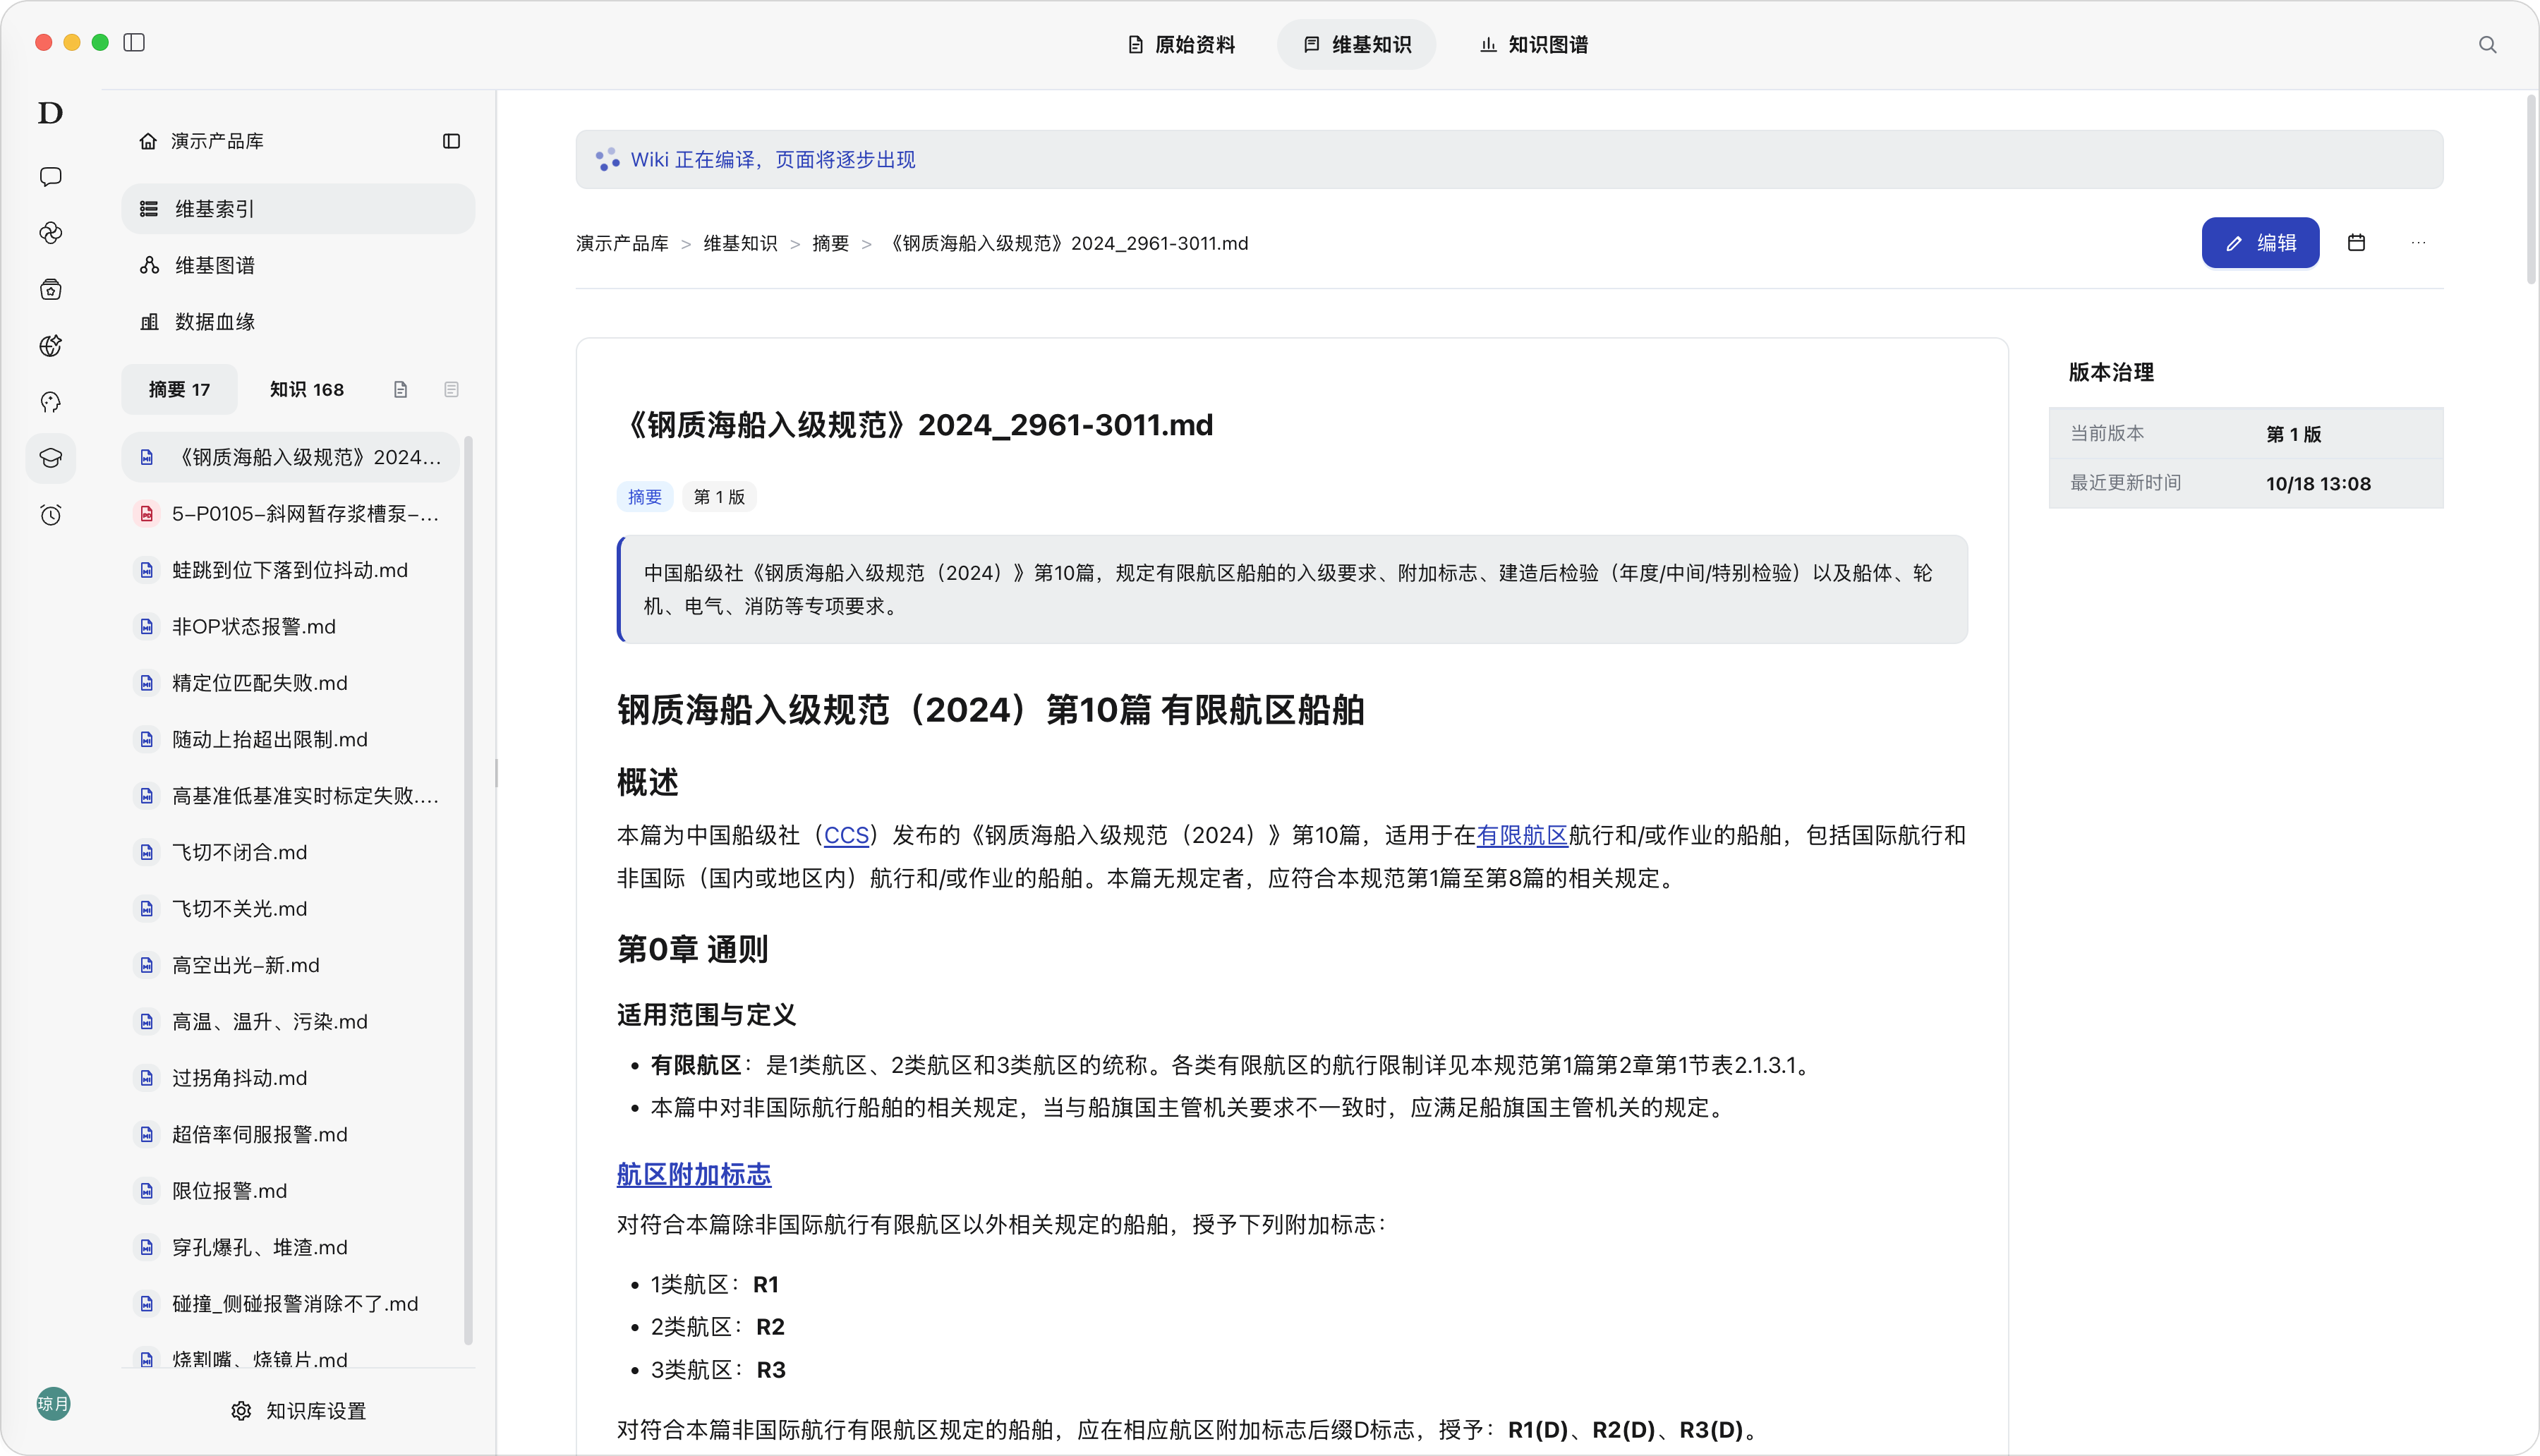
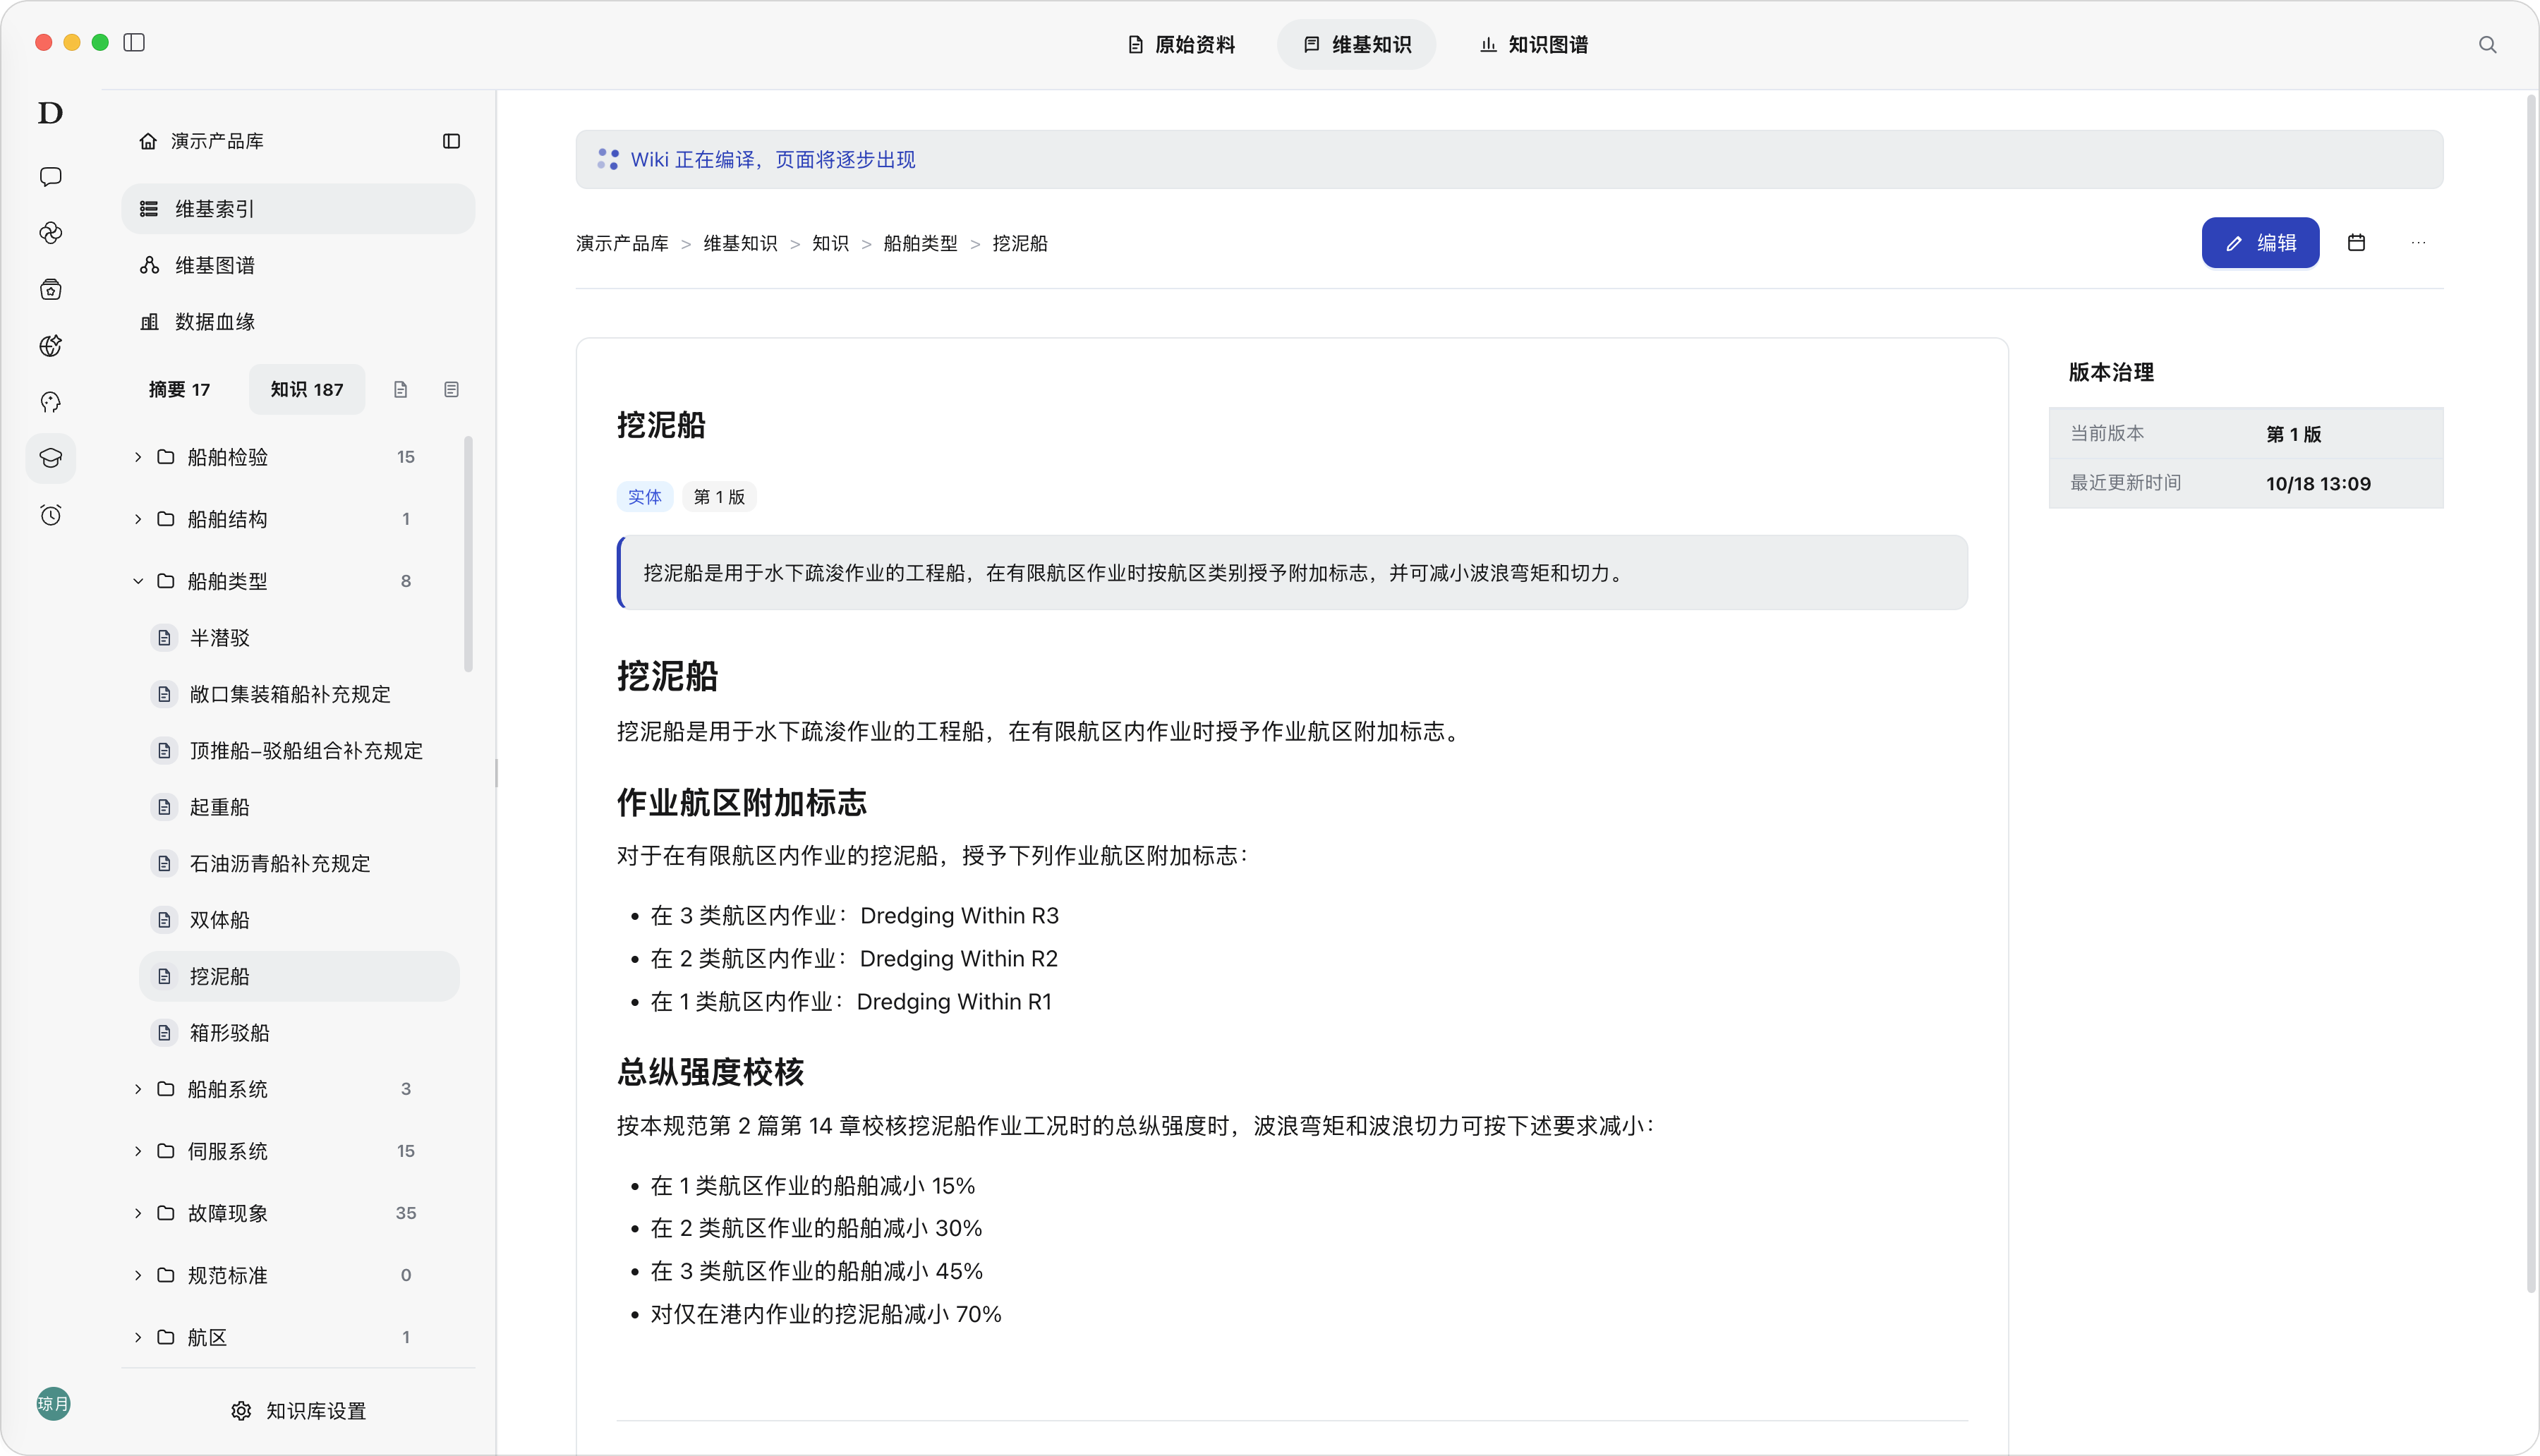
Description: Wiki Page Details is used to read the title, category, version, summary, and body of a single entry; it is the reading page for entering specific knowledge from the index.
Steps: In Wiki Index, click the target entry to enter the page details.
Result: The page displays the entry name, its category, version, summary, and body; if the page provides source or association entries, you can continue tracing related content.
Note: Sources, internal links, and governance information are subject to actual page display. If the source is empty, go to Data Lineage to check the completeness of the chain to avoid being unable to trace the origin later.
Wiki Page Details - Summary
Wiki Page Details - Knowledge
Edit Entry
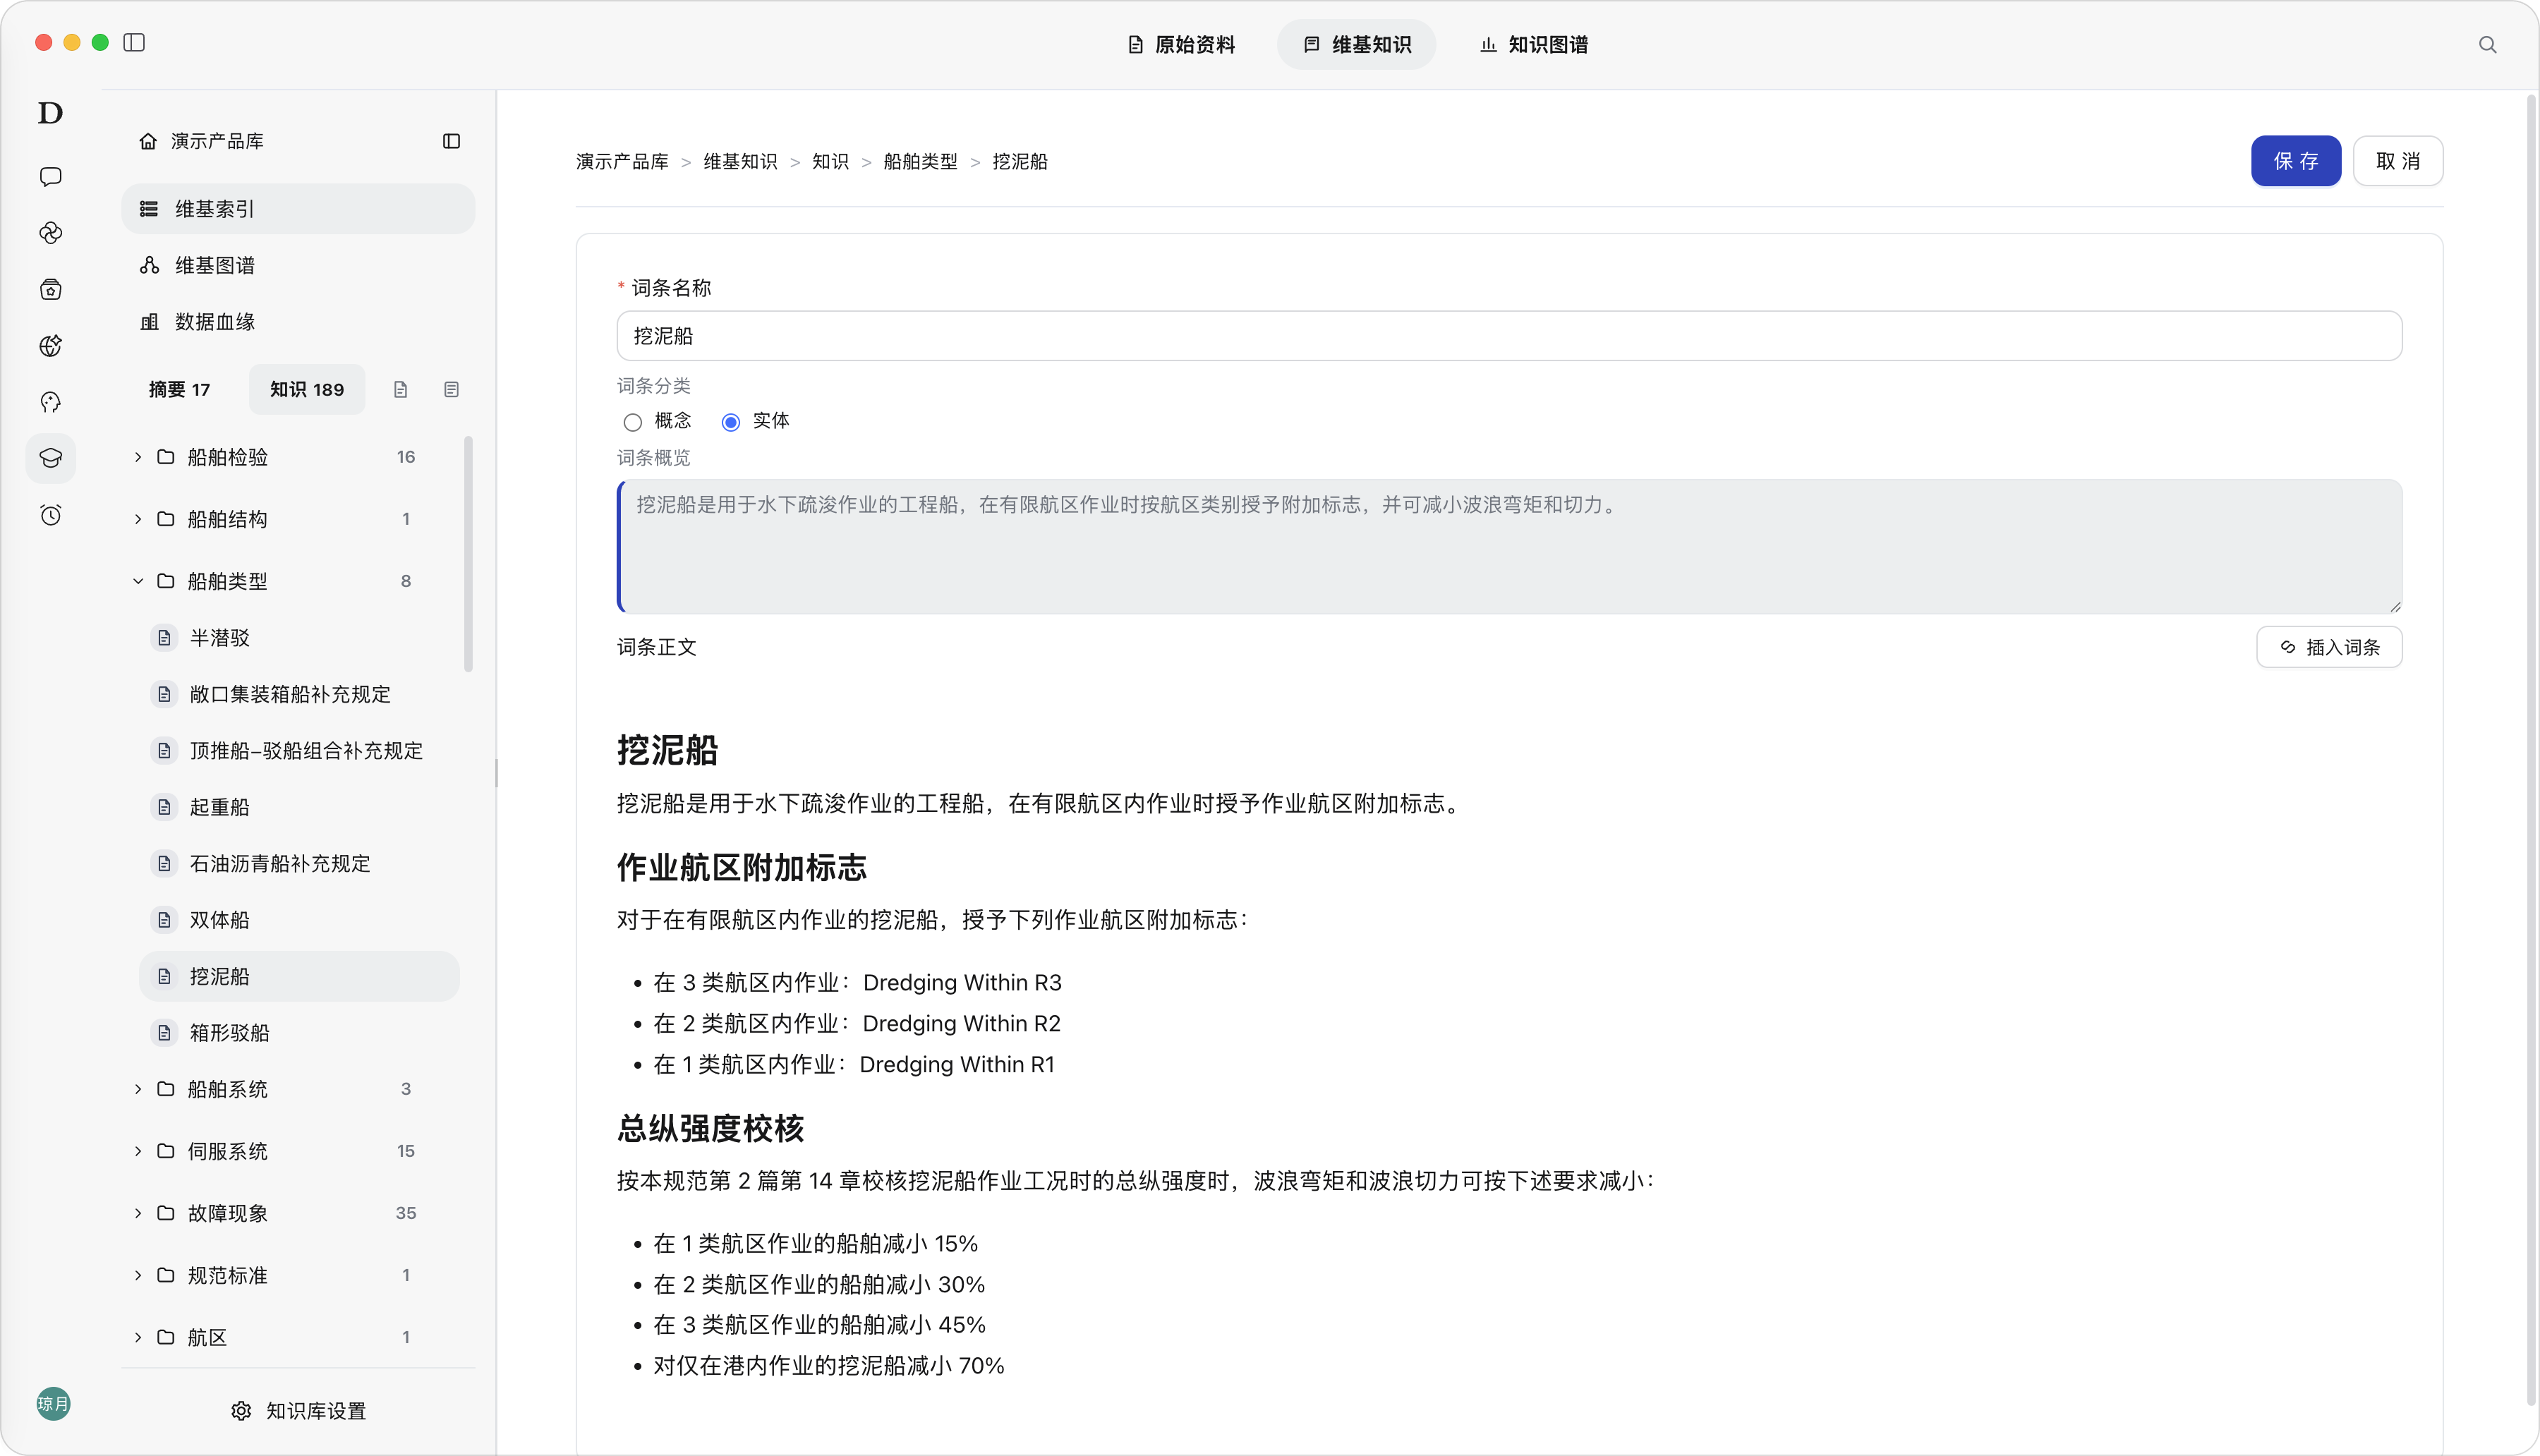
Description: Edit Entry is used to manually correct the entry name, category, overview, and body, ensuring that Wiki content matches actual business definitions. It does not re-parse the original files but directly maintains the already-generated Wiki pages. Edits affect the Wiki Index, Wiki Graph, retrieval results, and the basis for Agent answers.
Steps:
(1) On Wiki Page Details, click “Edit”,
(2) Modify “Entry Name”. The name is required; it is recommended to use the business name unified by the team.
(3) Adjust “Entry Category” as needed.
(4) Modify “Entry Overview” to describe the entry’s definition, conclusion, or applicable scope in one or two sentences.
(5) Maintain detailed content in “Entry Body”; you can use formatting capabilities such as headings, lists, bold, code blocks, and quotes. To reference other Wiki pages, click “Insert Entry” and select the target entry.
(6) Click “Save” to submit the changes; click “Cancel” to discard the changes.
Result: After saving successfully, the page returns to the reading state, displaying the new entry name, category, overview, and body. The Wiki Index, page categories, associations, and graph display are updated with the saved results; subsequent content changes are recorded in Version History.
Note: The entry name is required; the entry category, overview, and body jointly determine the knowledge definition. Editing affects subsequent knowledge references, so confirm content accuracy before saving.
| Field | Description |
|---|---|
| Entry Name | The title of the Wiki page and an important identifier displayed in the index, internal links, and graph |
| Entry Category | Used to describe the knowledge type of a Wiki page, mainly divided into “Summary, Entity, Concept”. |
| Entry Overview | Used to quickly understand the entry content; displayed in the page summary area and in the index |
| Entry Body | Carries the complete knowledge content of the entry; headings, lists, code blocks, quotes, and entry links can be inserted |
Edit Entry
Entry Category
The category determines the grouping position and page ownership of an entry in the Wiki Index, helping users find and maintain content by different knowledge types.
Entry category rules: Summary pages of Wiki Knowledge are fixed as “Summary”; knowledge pages can be switched between “Entity / Concept”.
| Category | Applicable Content | Examples | Value |
|---|---|---|---|
| Summary | An overall overview of a source material | Product white paper summary, project summary | Helps users quickly understand the overall content of a source material |
| Entity | Identifiable specific business objects | Products, organizations, devices, systems, customers, projects | Accumulates specific objects into reusable business knowledge |
| Concept | Methods, mechanisms, processes, rules, or general terms | Knowledge governance, Data Lineage, Retrieval Test, go-live process | Helps users understand business methods and general concepts |
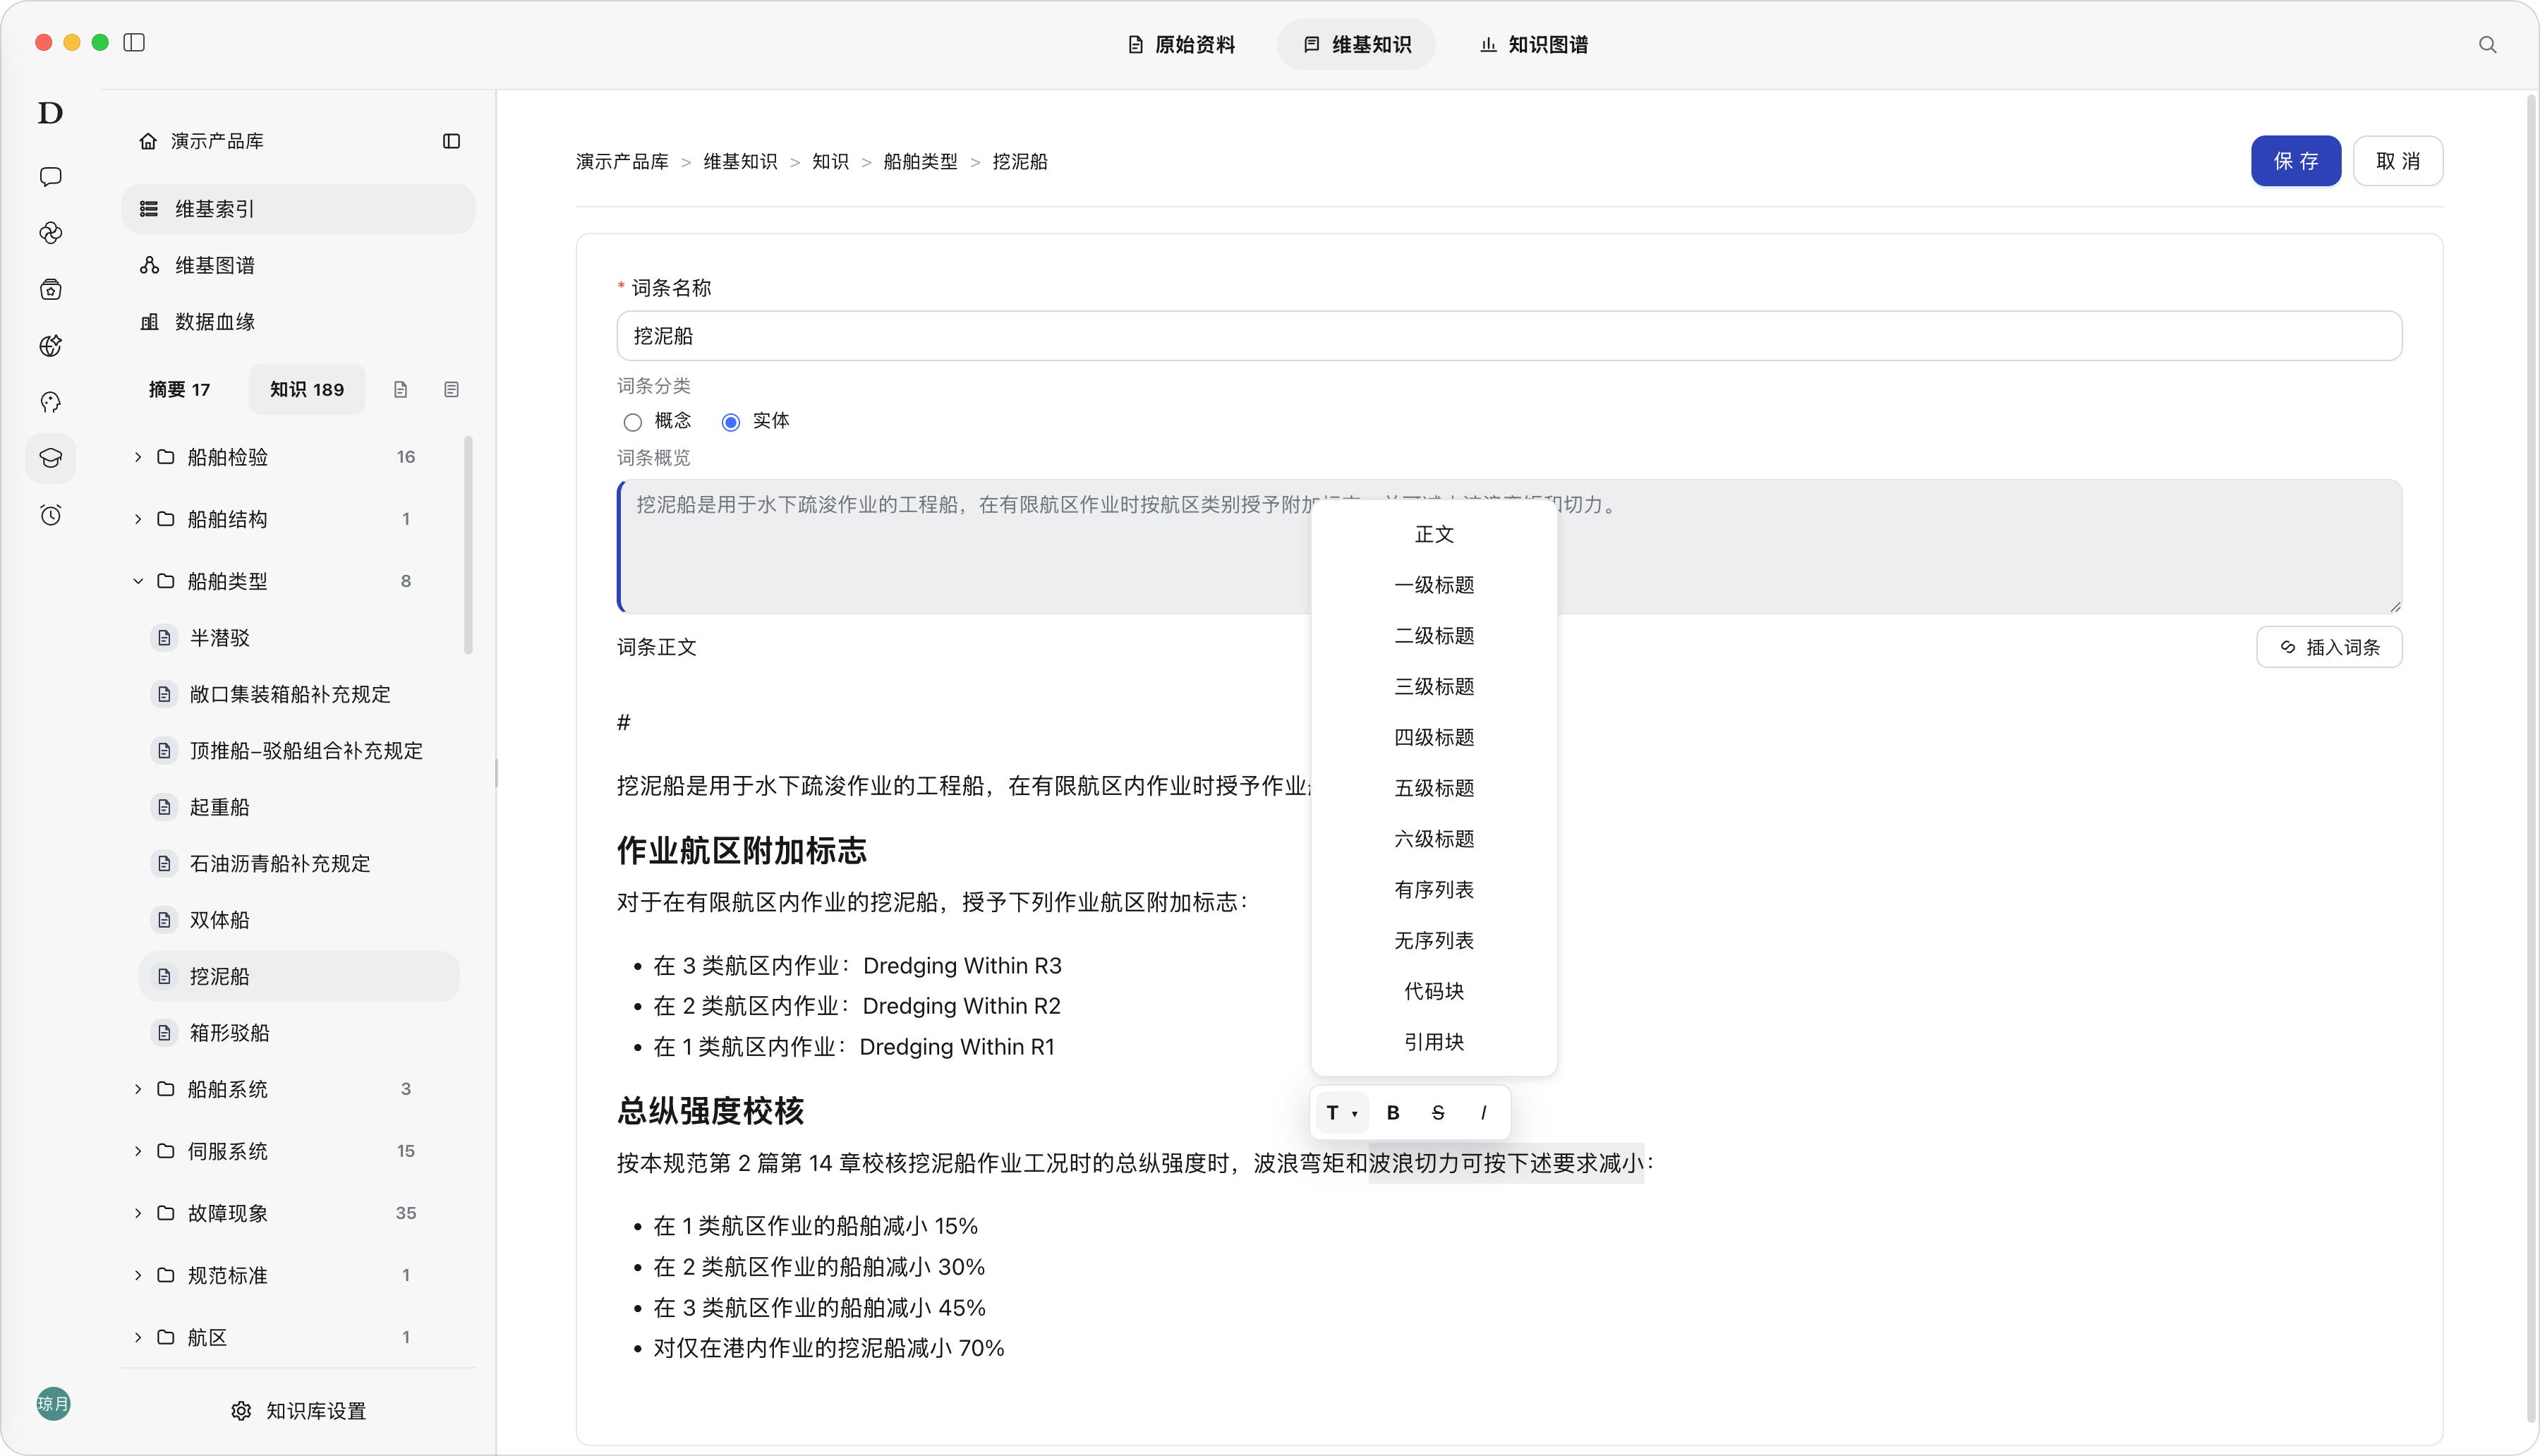
Entry Body Editing
The body editor supports:
- Body paragraphs and headings from level 1 to level 6.
- Ordered lists and unordered lists.
- Code blocks and quote blocks.
- Bold, italic, strikethrough
- Wiki internal links, and removing existing Wiki links.
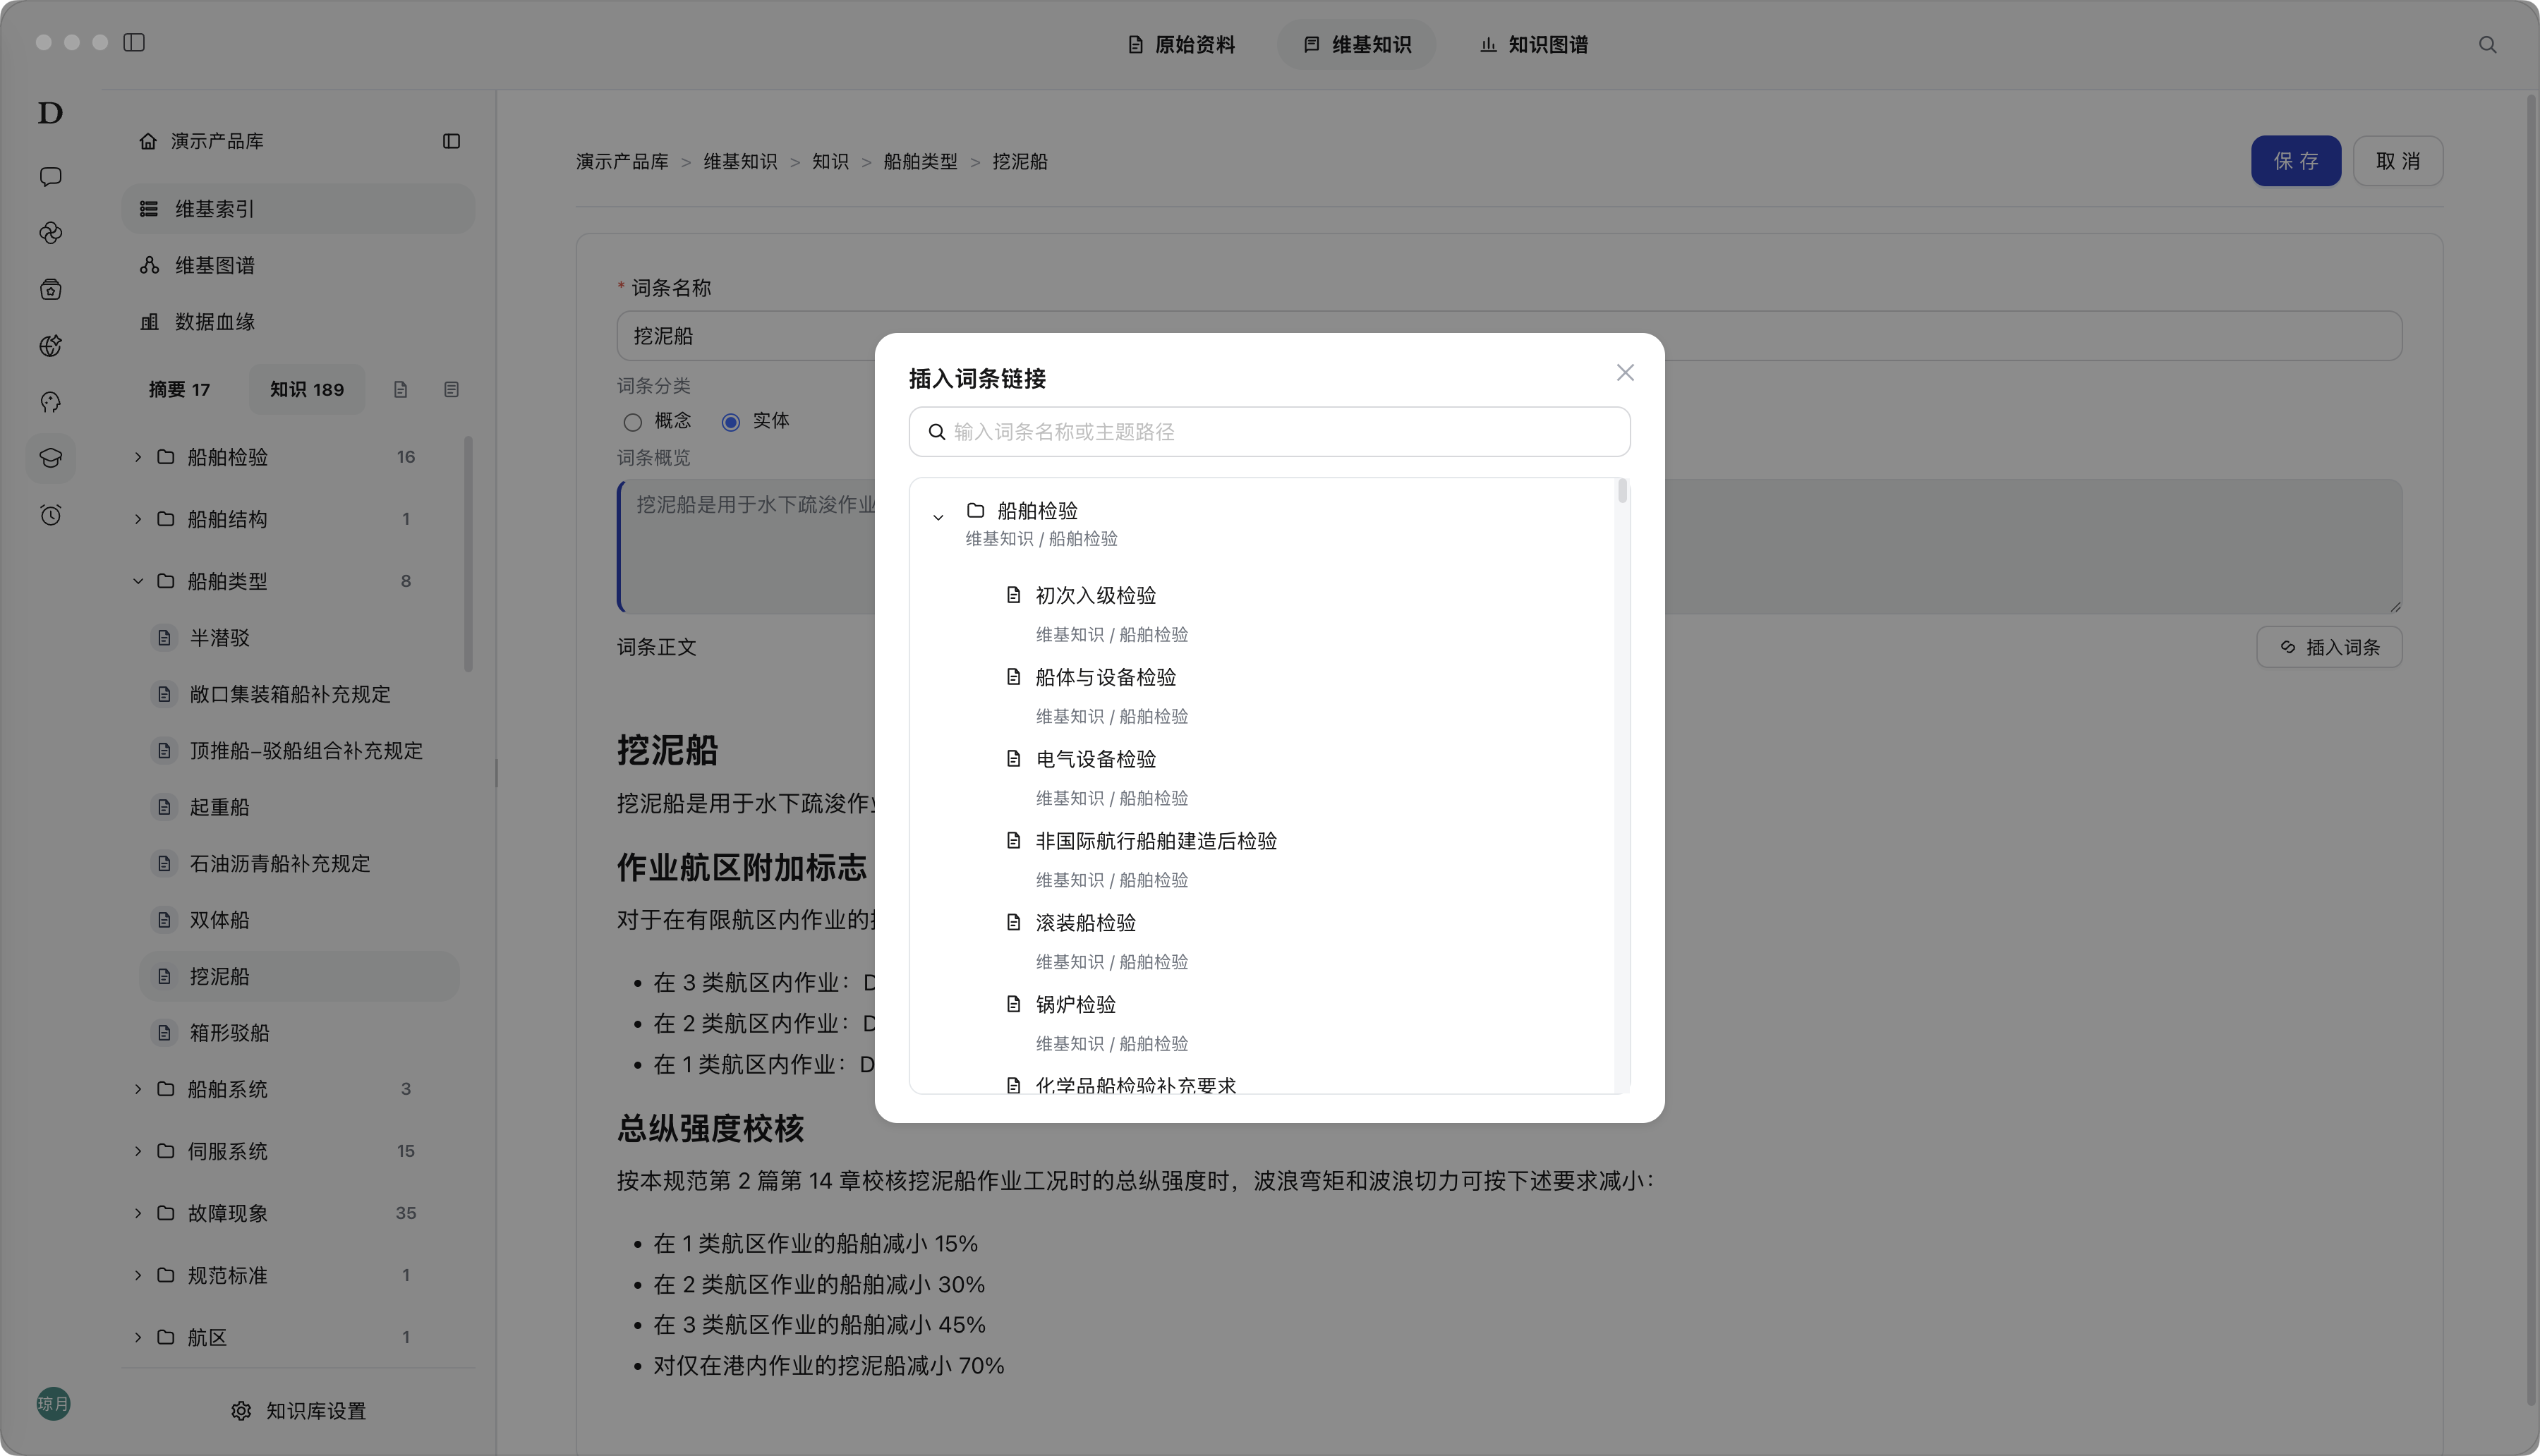
Insert Entry
Insert Entry is used to add a link to another Wiki page in the body of the current entry, establishing associations between entries.
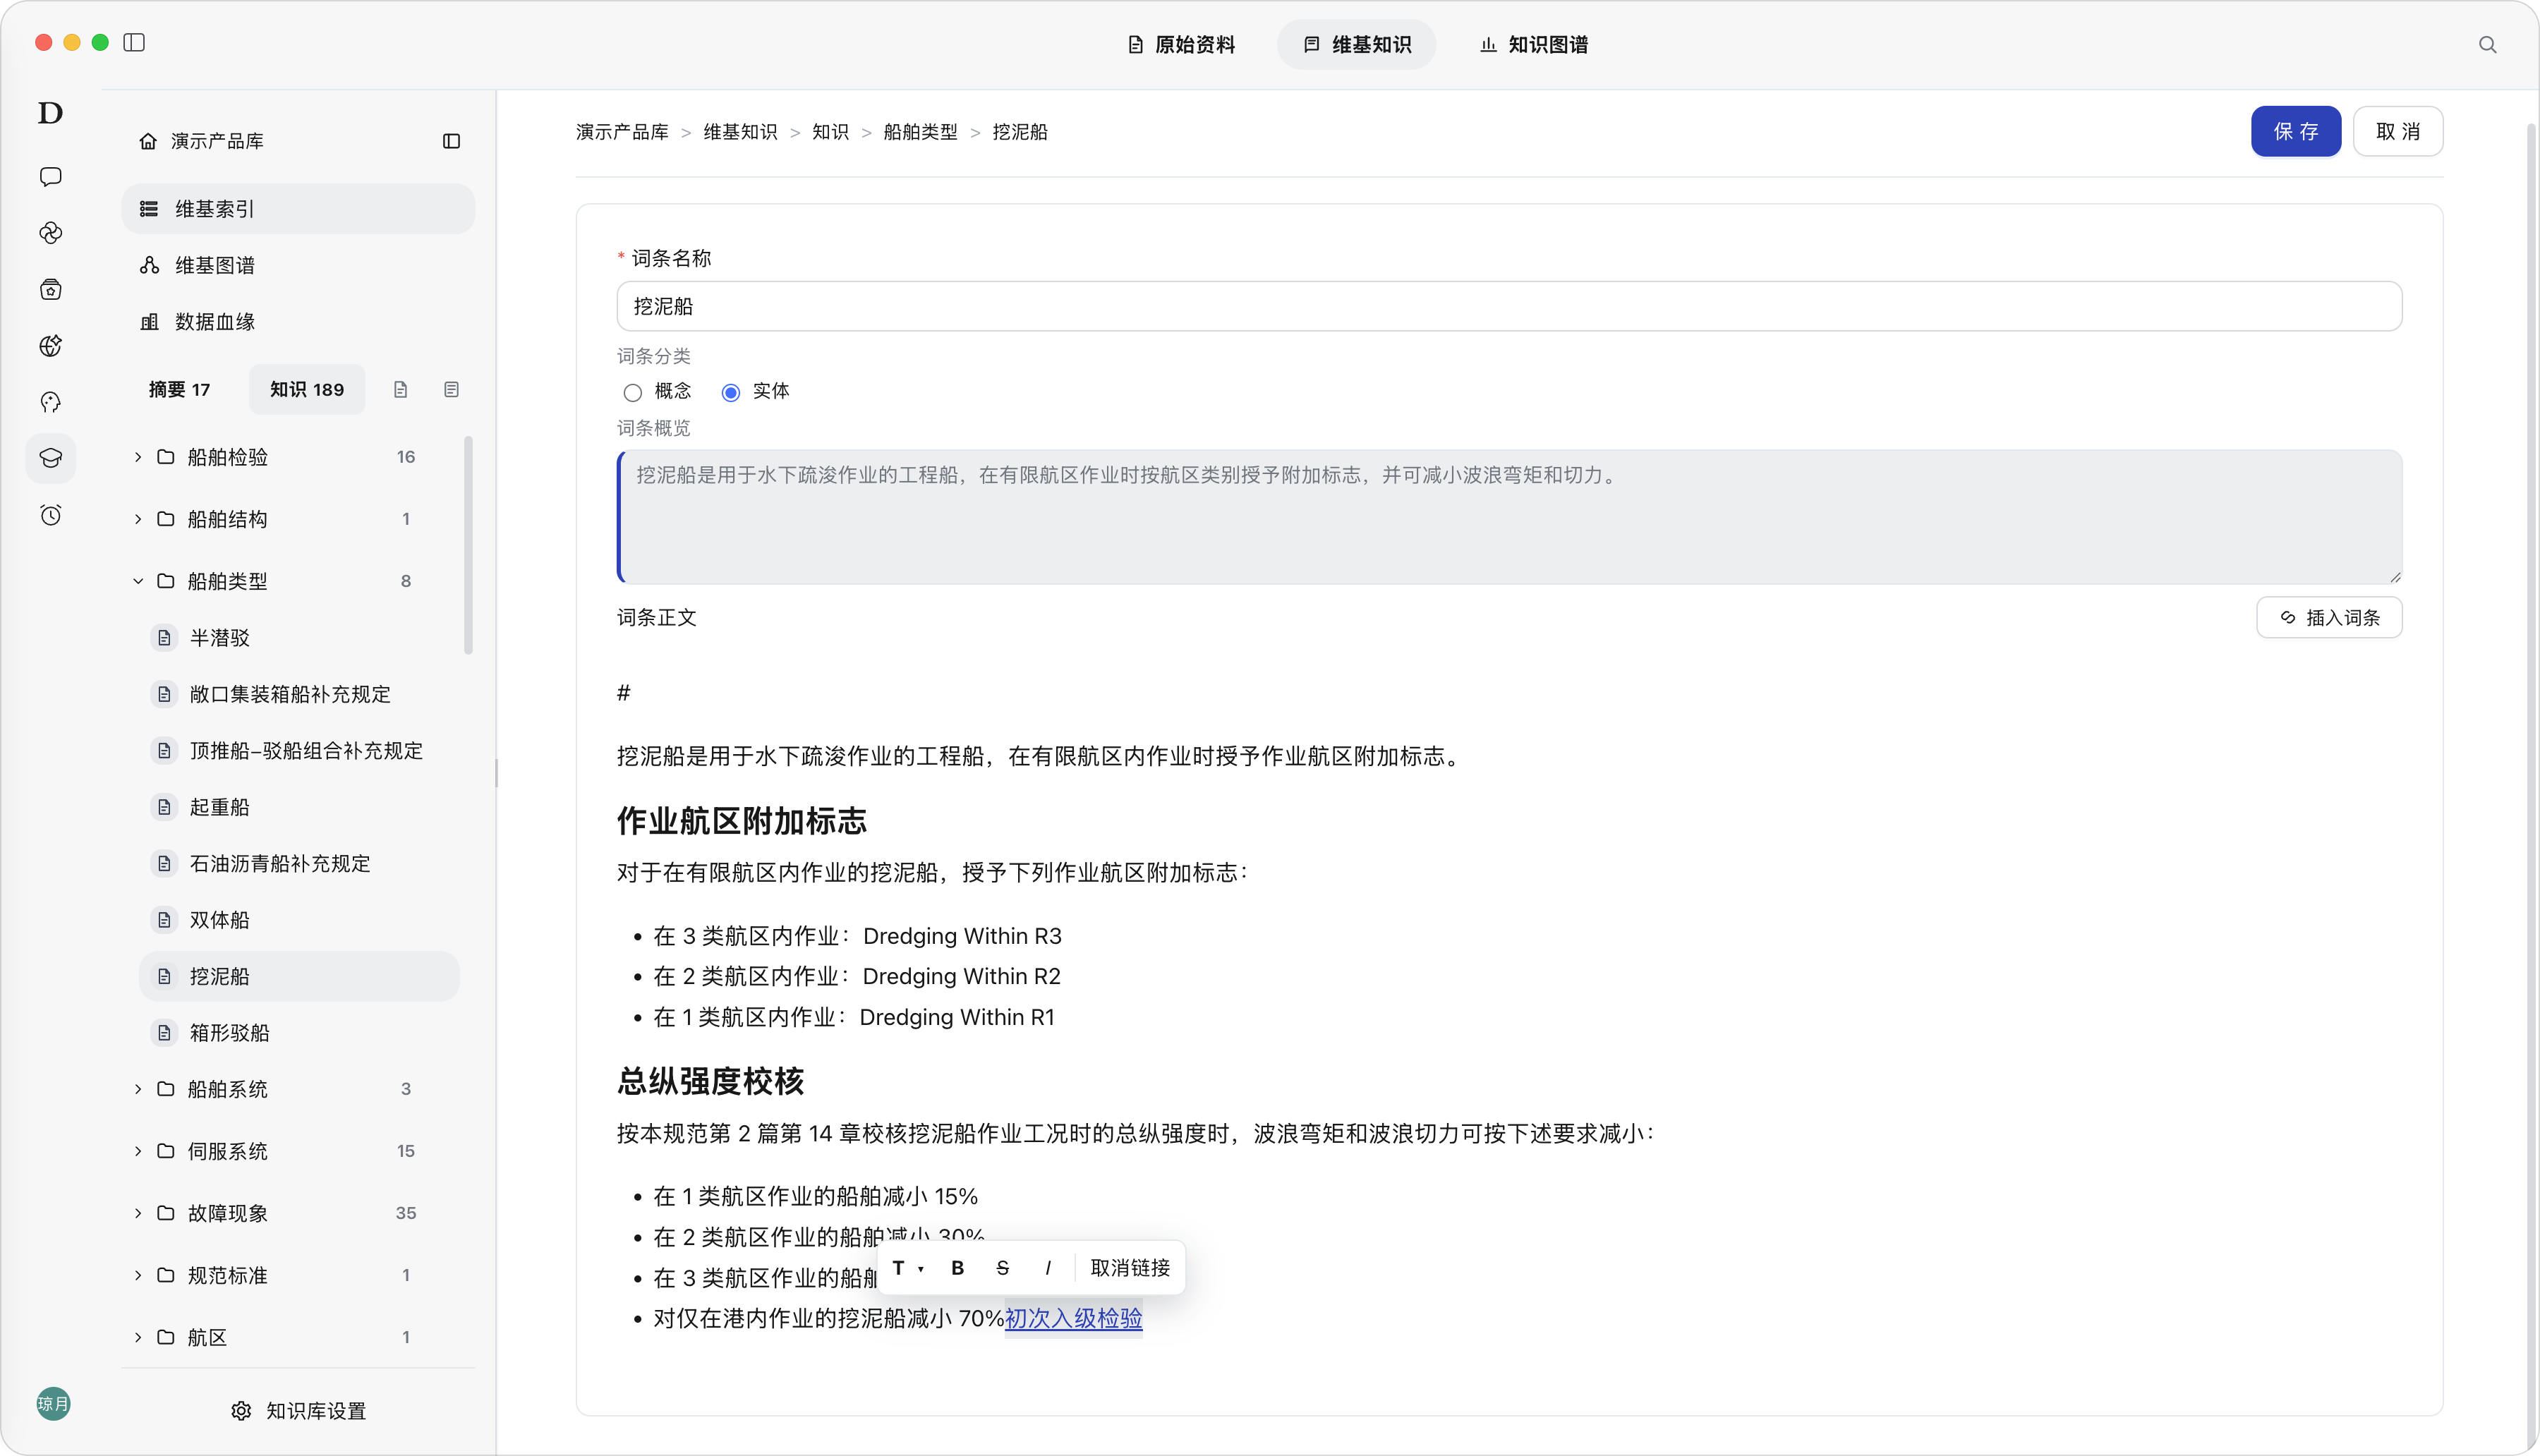
After insertion, users can jump from the current entry to the referenced entry, and the system also forms page associations and Wiki Graph relationships based on such links. If a link is no longer needed, select the link in the editing state and use “Unlink”.
Edit Entry - Insert Entry
Edit Entry - Unlink
Version History
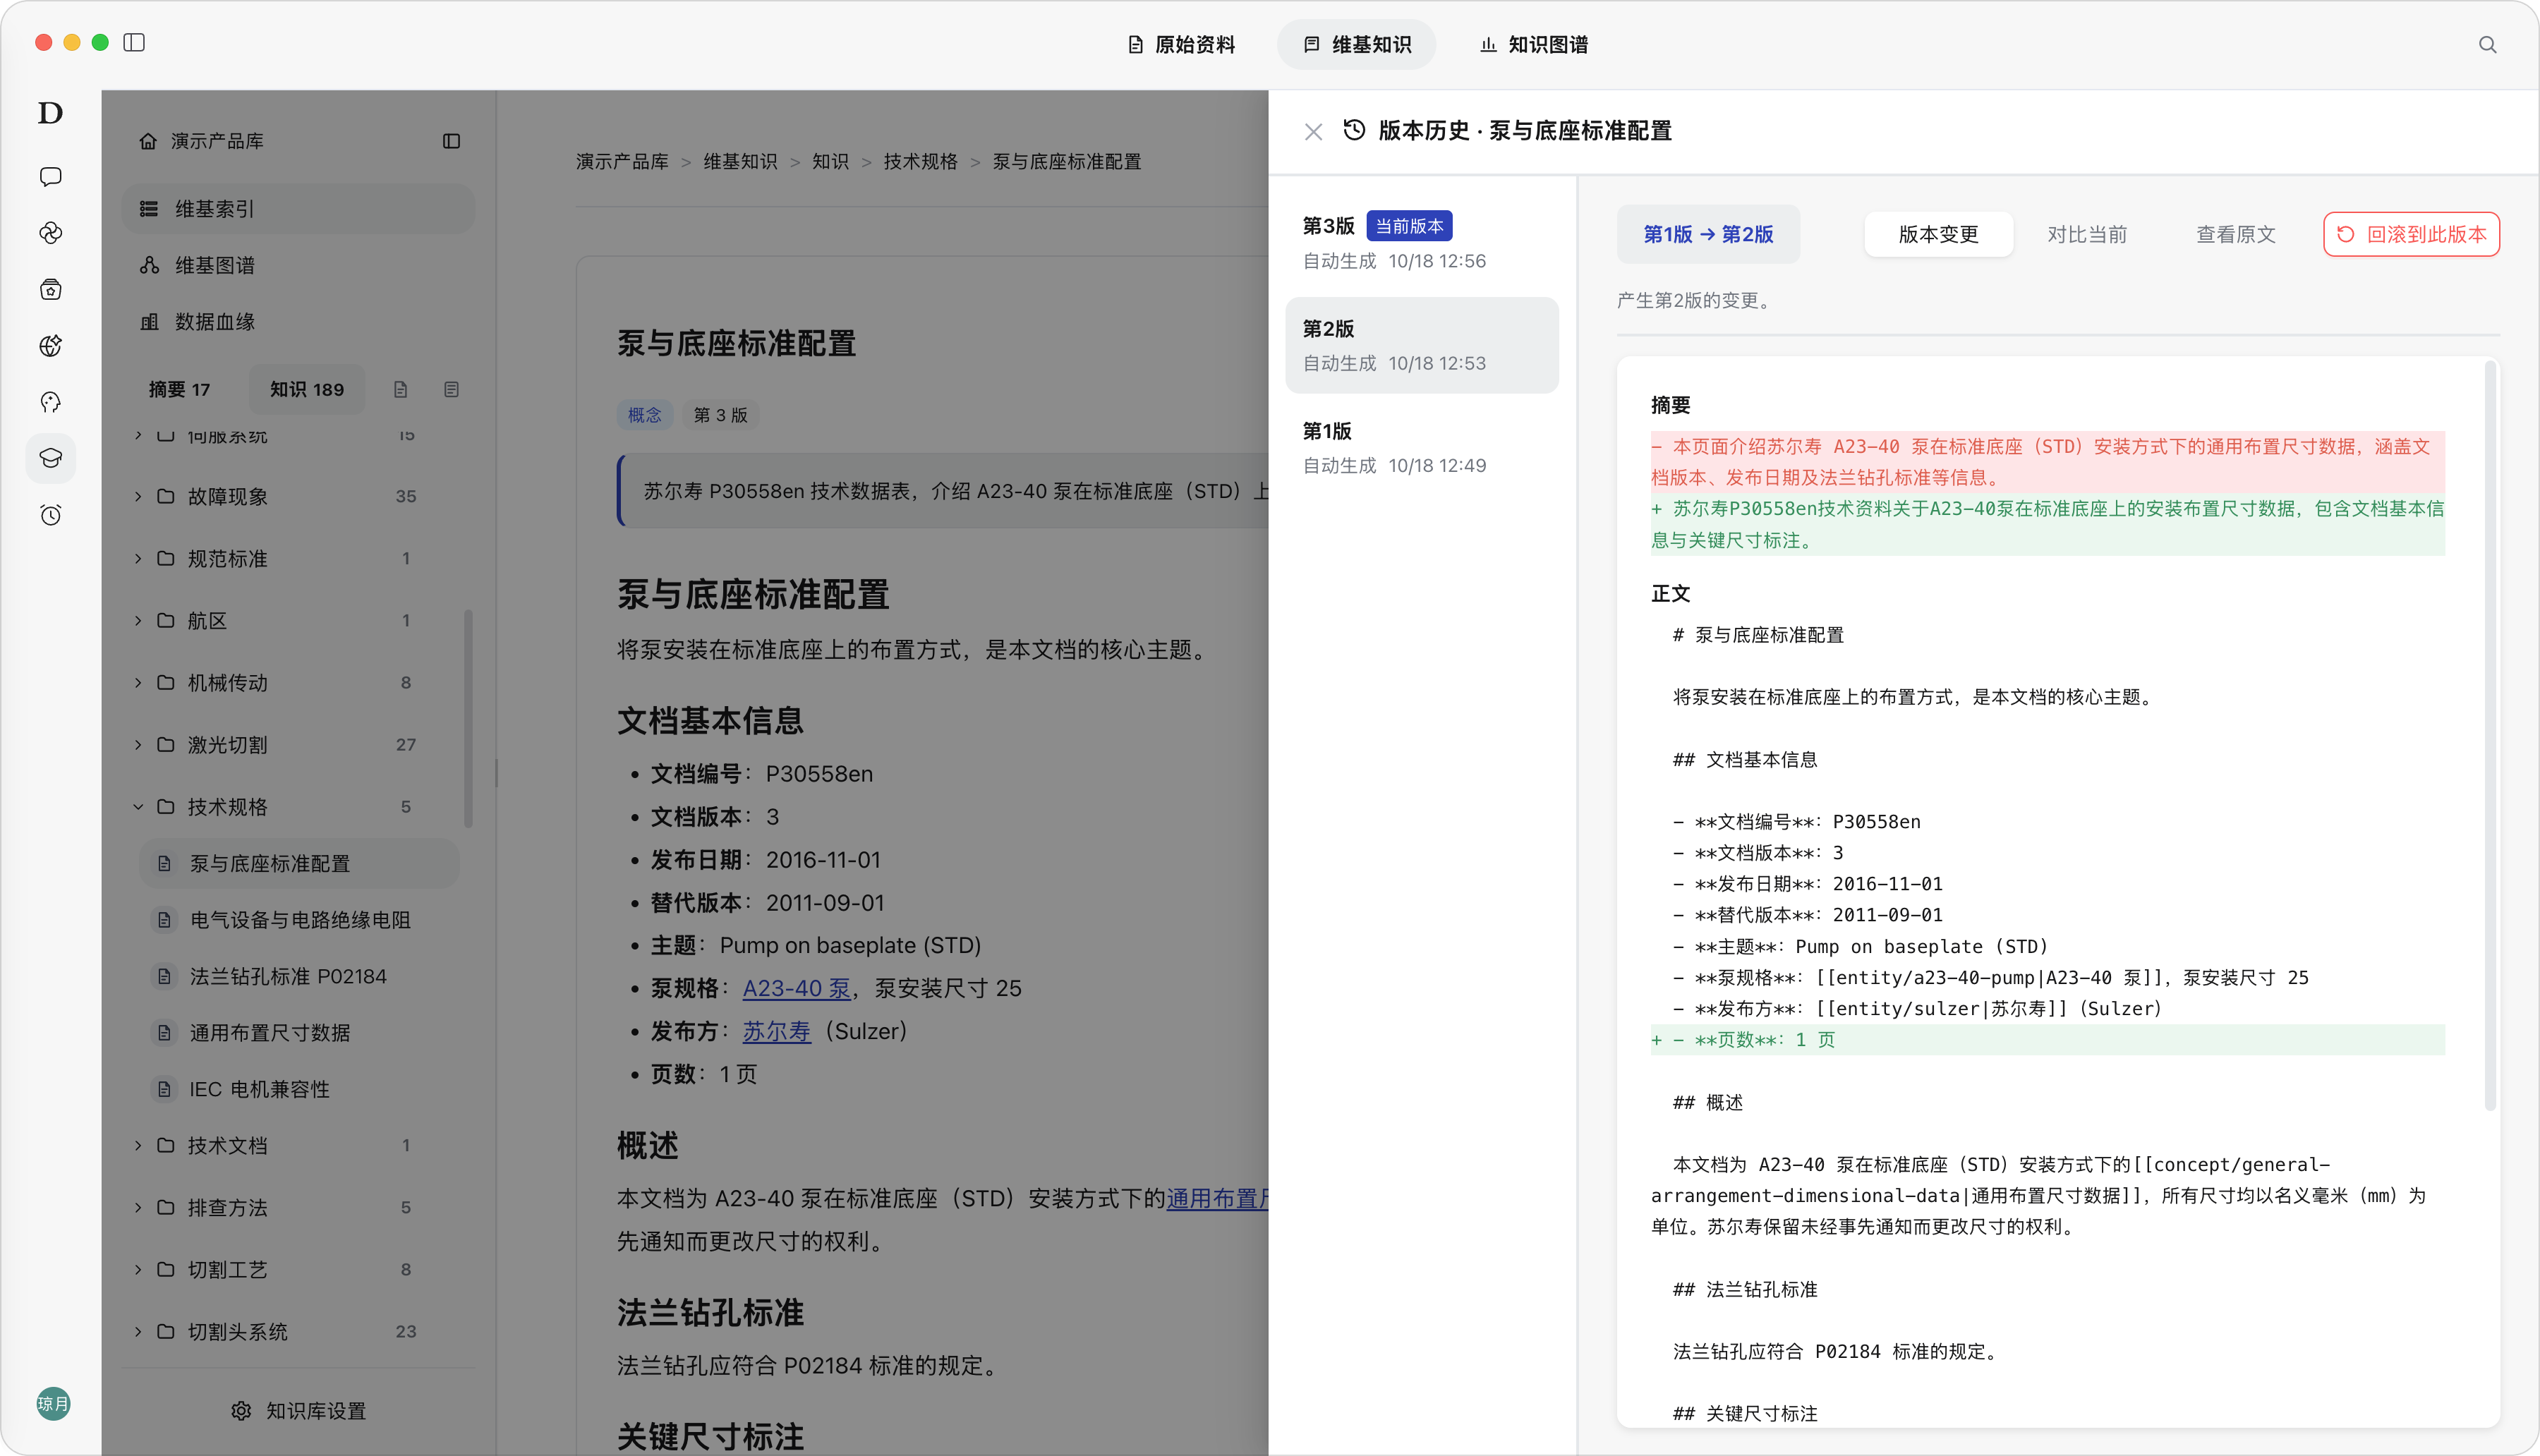
Description: Version History is used to view the historical versions, current version, change summaries, and body differences of a Wiki page, helping users trace knowledge evolution.
Steps: On Wiki Page Details, click “Version History” to view the version list and body differences.
Result: The Version History drawer is displayed on the right, including the current version, auto-generated information, title, summary, and body changes.
Note: Version History is used for tracing. You can view the current version, auto-generation time, and title / summary / body changes; when there is no version history, it will prompt “Snapshots will be recorded after page content changes”.
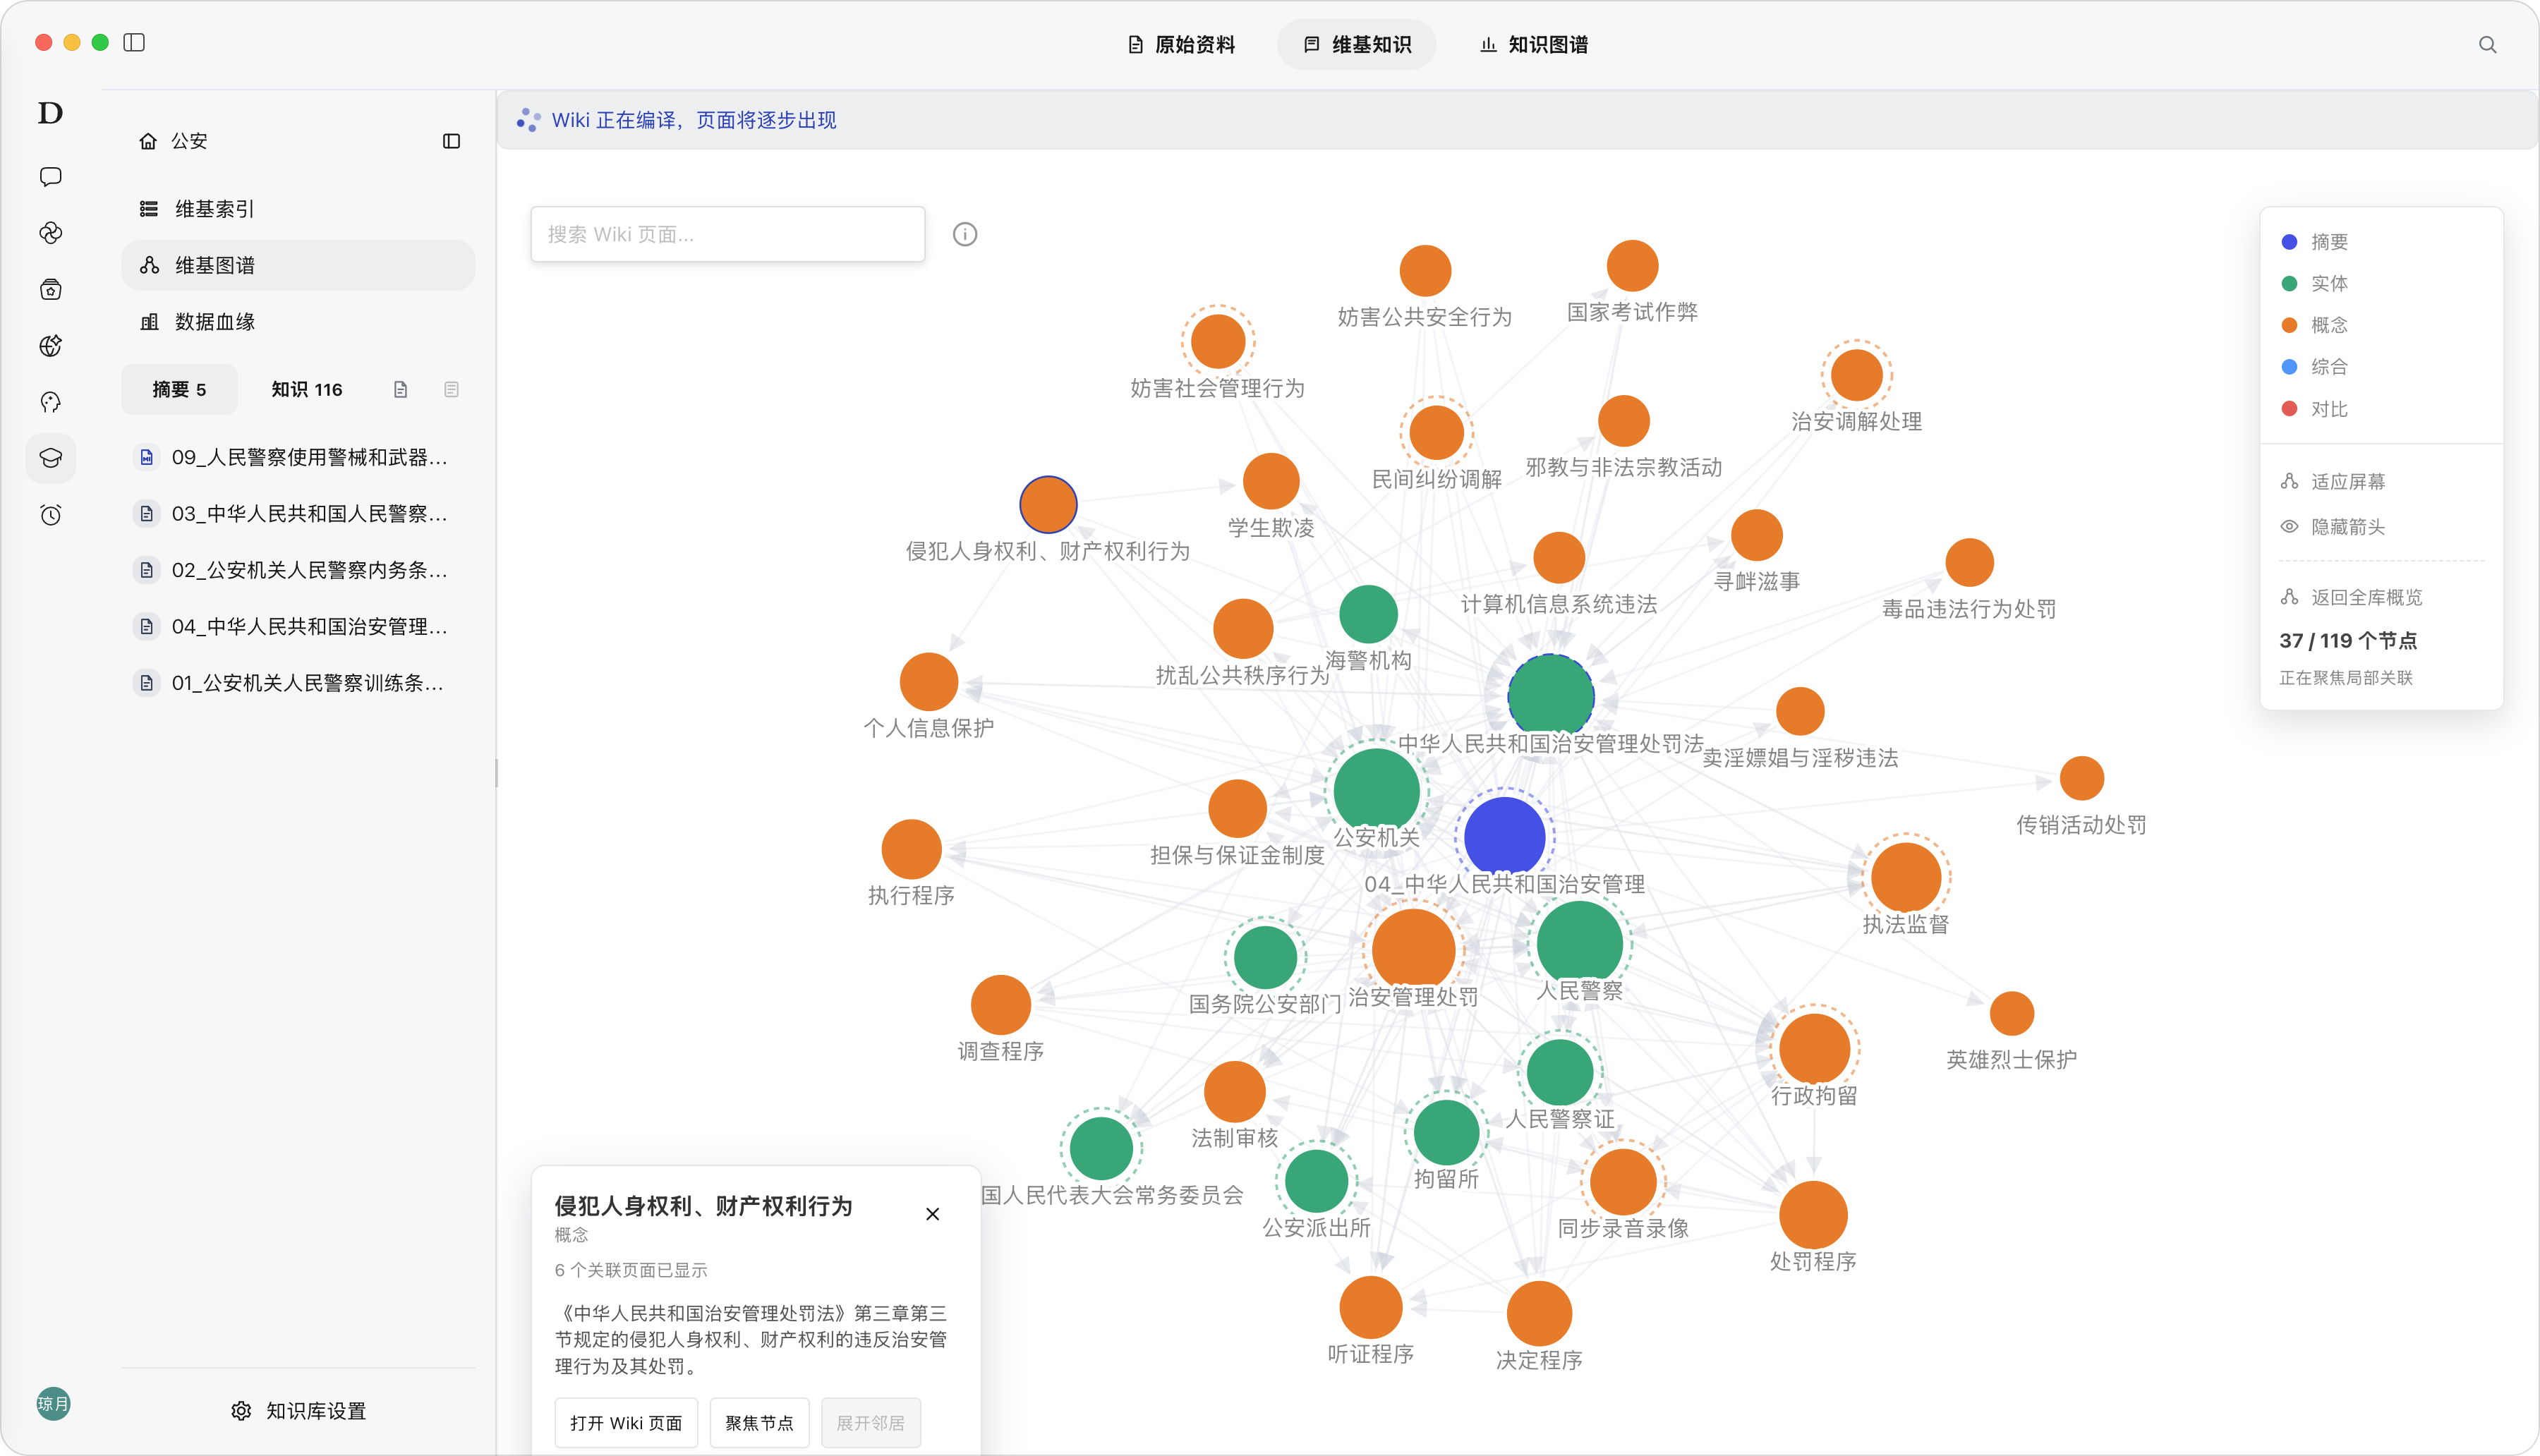
Wiki Graph
Description: Wiki Graph is used to display the association relationships between Wiki pages, helping users understand knowledge structure and discover key pages and knowledge gaps.
Steps: Click “Wiki Graph” on the left of Wiki Knowledge, filter nodes by type, search Wiki pages, and click a node to view details; use fit-to-screen, hide arrows, and canvas operation instructions.
Result: The page displays node relationships, legend controls, node counts, and canvas operation tips.
Note: Wiki Graph reflects the link relationships between Wiki pages and is not equivalent to the entity-relationship Knowledge Graph.
Data Lineage
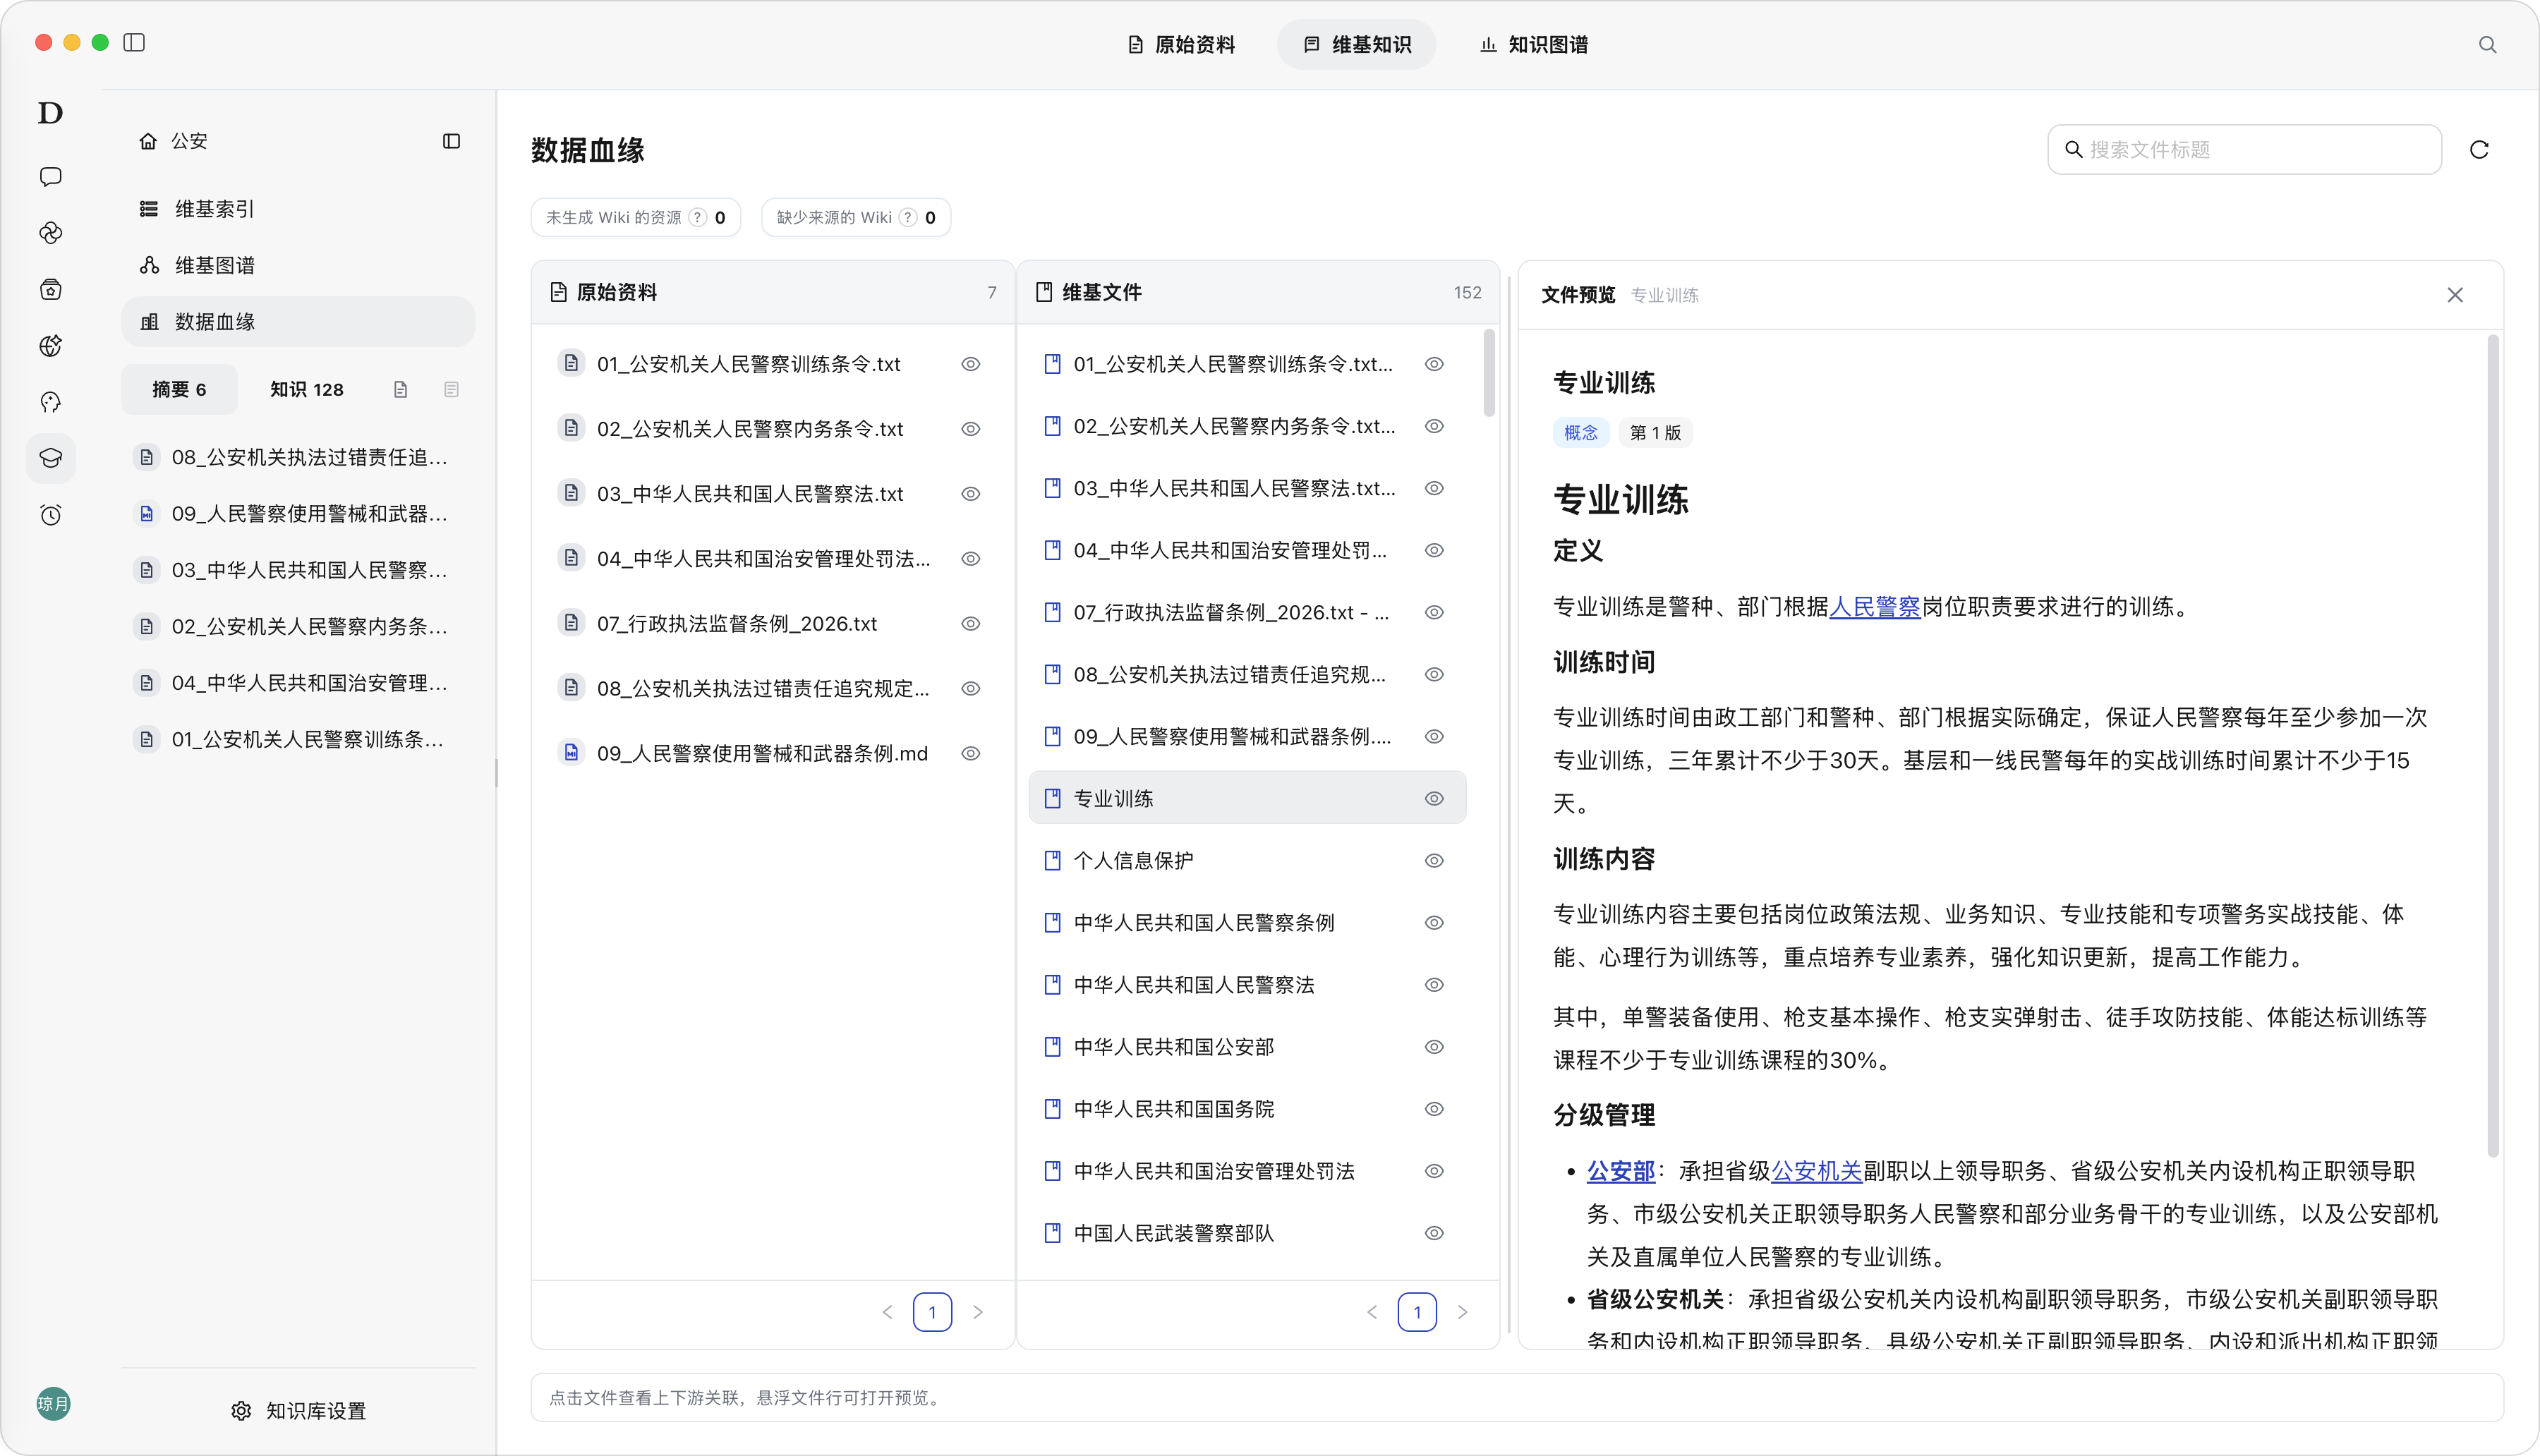
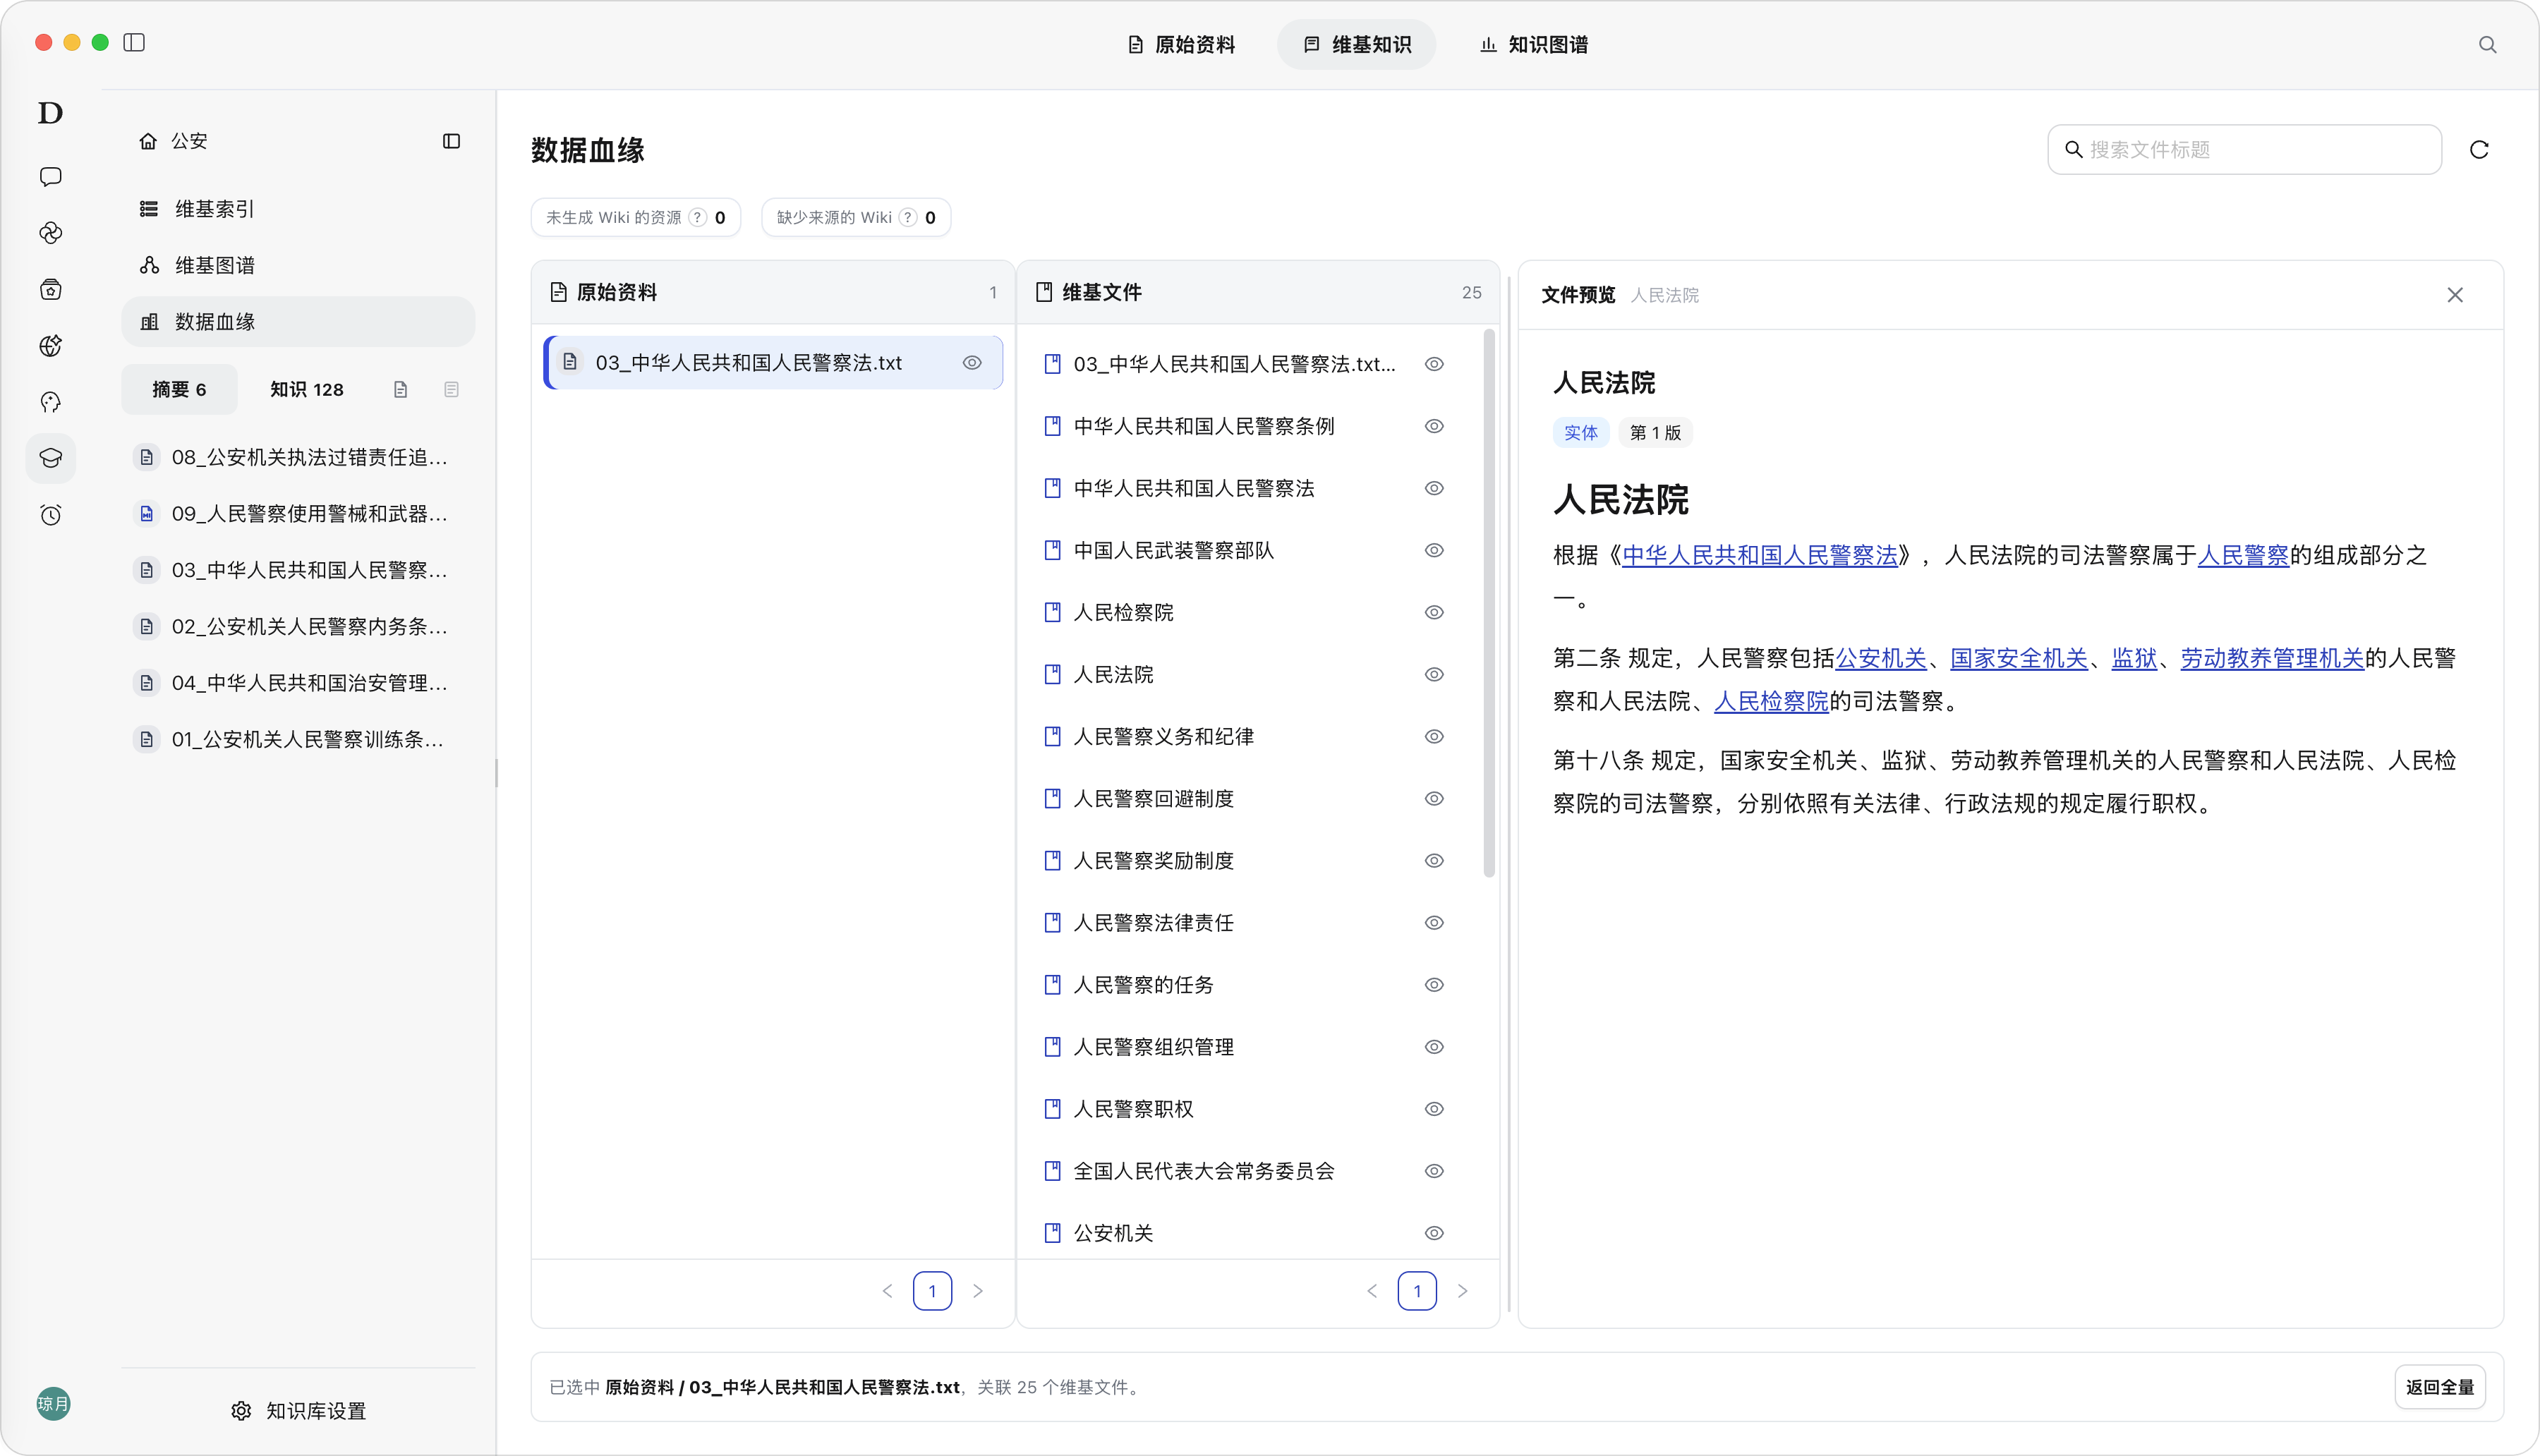
Description: Data Lineage is used to view the generation, reference, and missing relationships between resource files and Wiki files, helping users determine whether knowledge is traceable. “Resources without generated Wiki” means the source materials have not yet generated valid Wiki knowledge products; “Wiki missing sources” means the Wiki knowledge lacks source basis. Deleting Raw source materials does not automatically delete the generated Wiki; the lineage will mark the source material as deleted.
Steps: Click “Data Lineage” on the left of Wiki Knowledge, search file titles, click a resource file or Wiki file, and view upstream and downstream associations and the file preview on the right.
Result: The page displays resource files, Wiki files, resources without generated Wiki, Wiki missing sources, and file preview.
Note: Wiki missing sources affects knowledge credibility; resources without generated Wiki means the current materials have not completed knowledge processing.
Data Lineage list
Data Lineage - View File Lineage
Knowledge Base Knowledge Graph
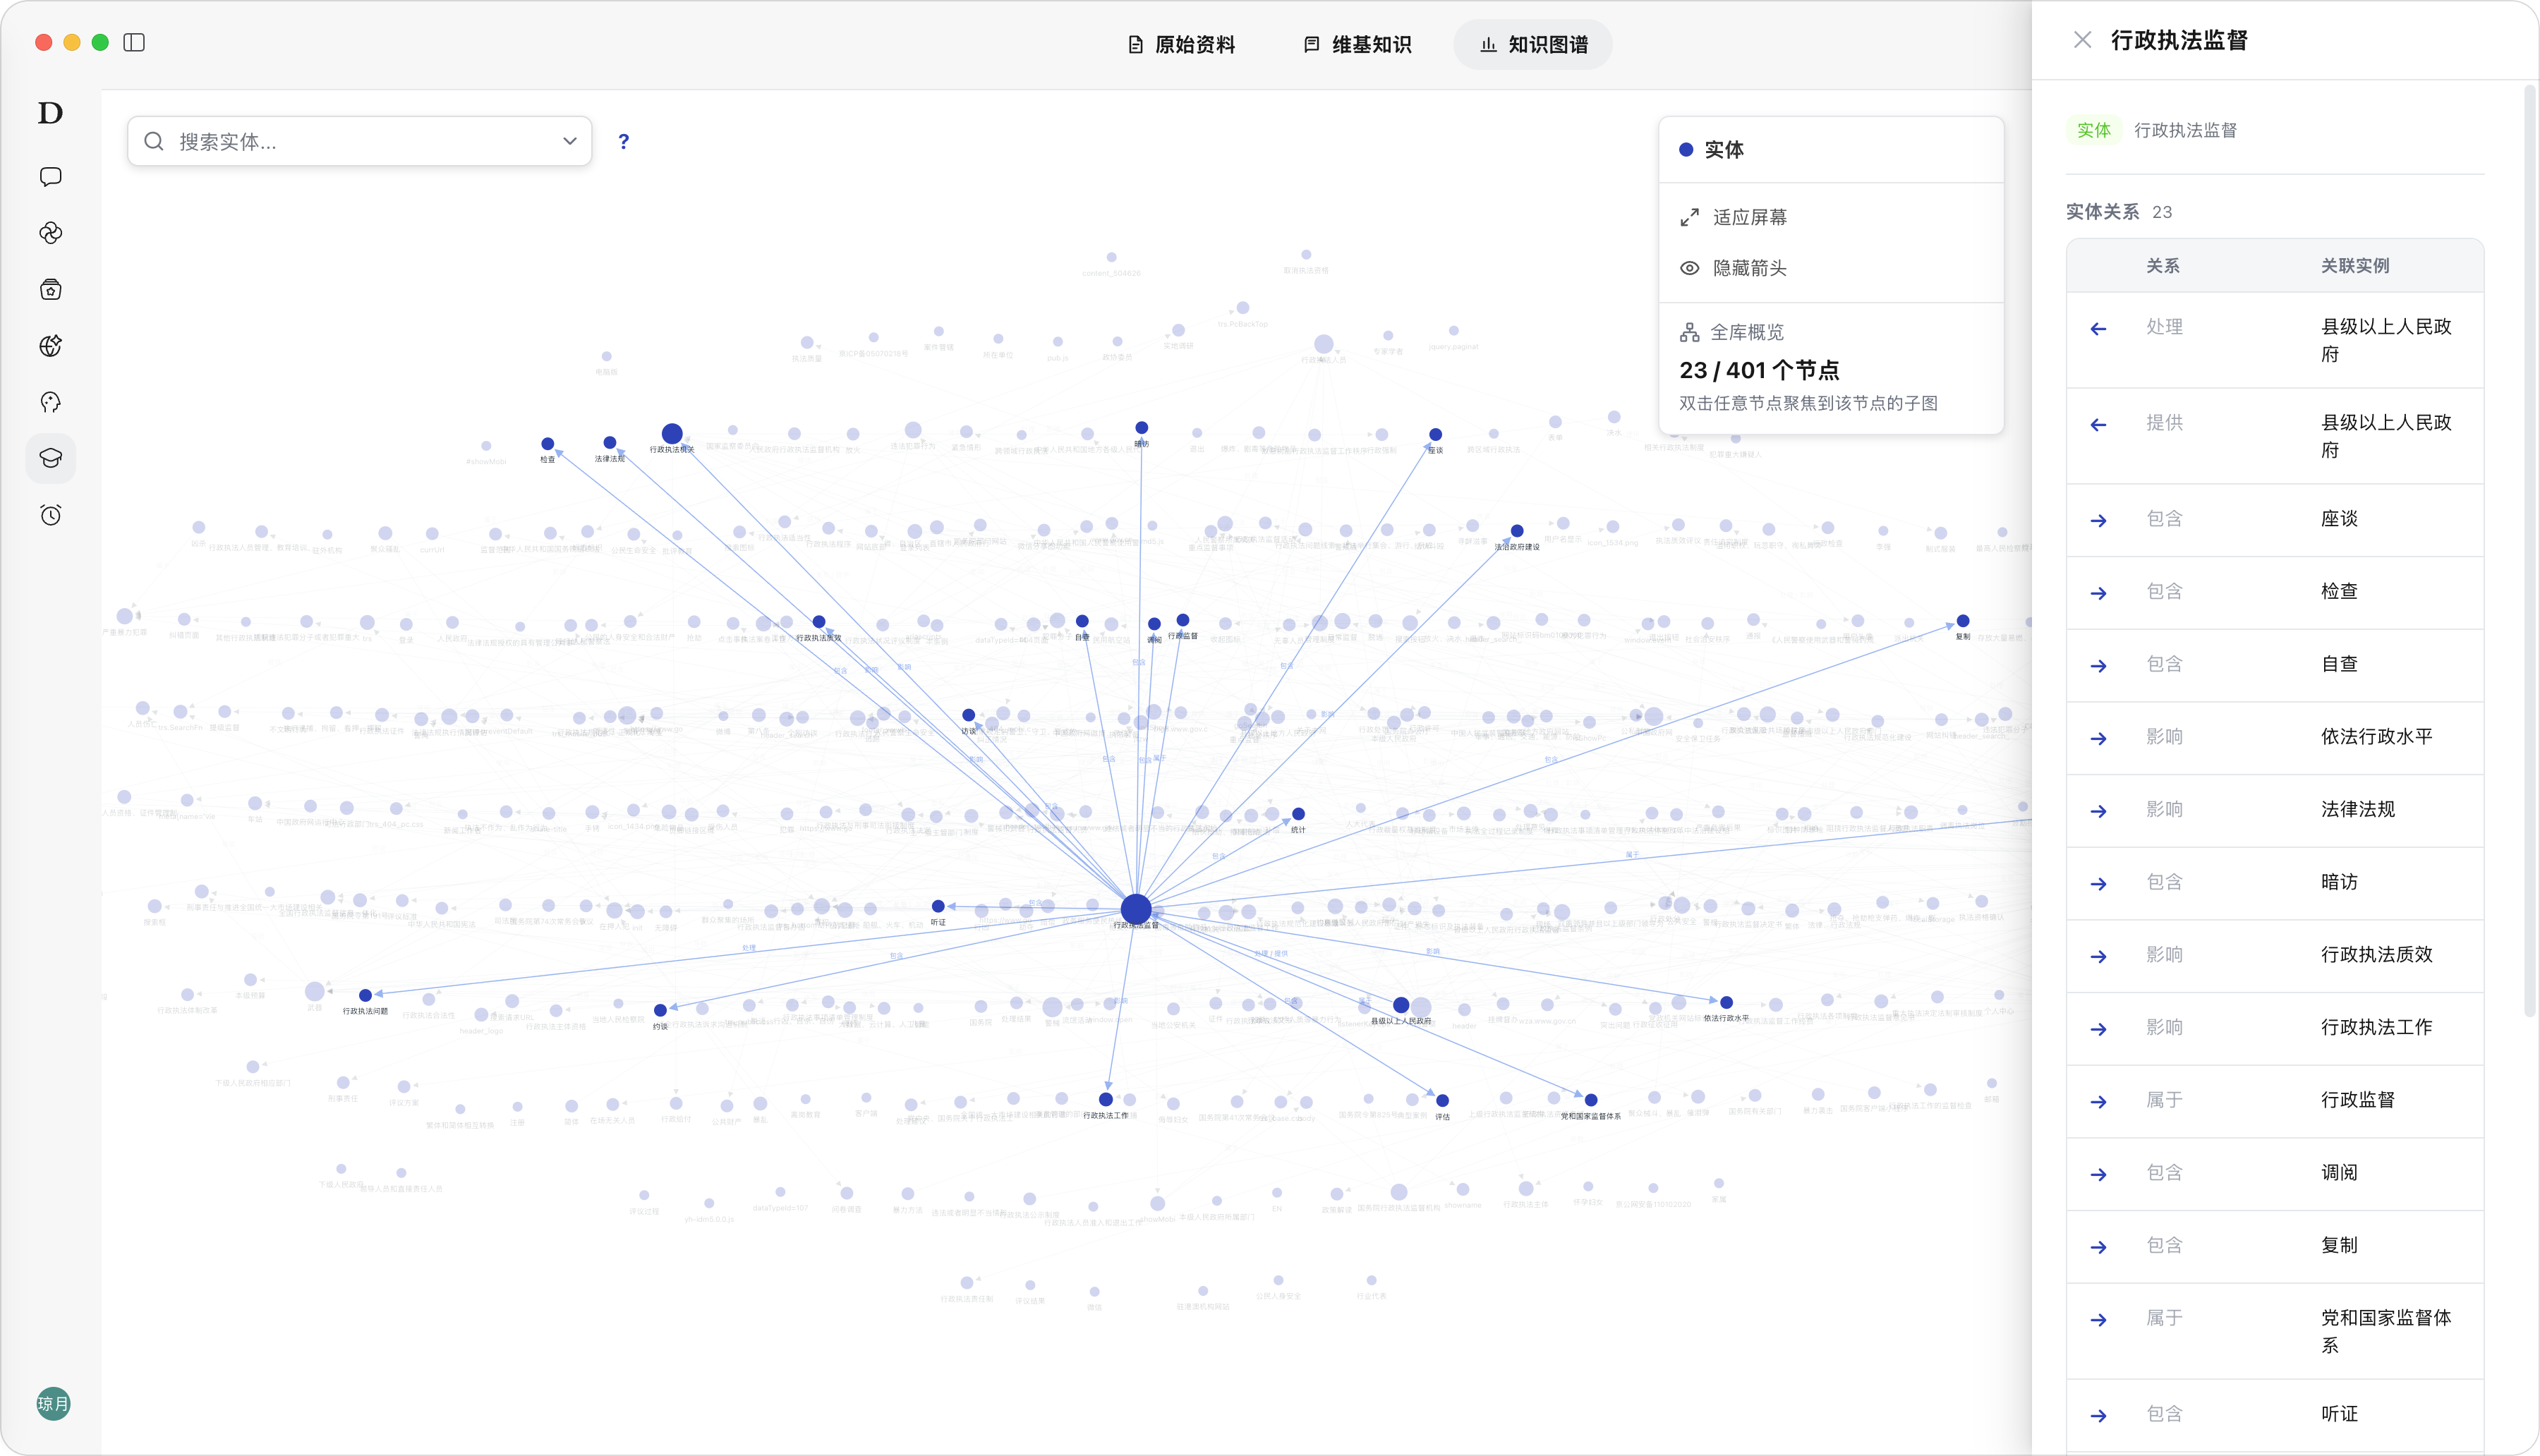
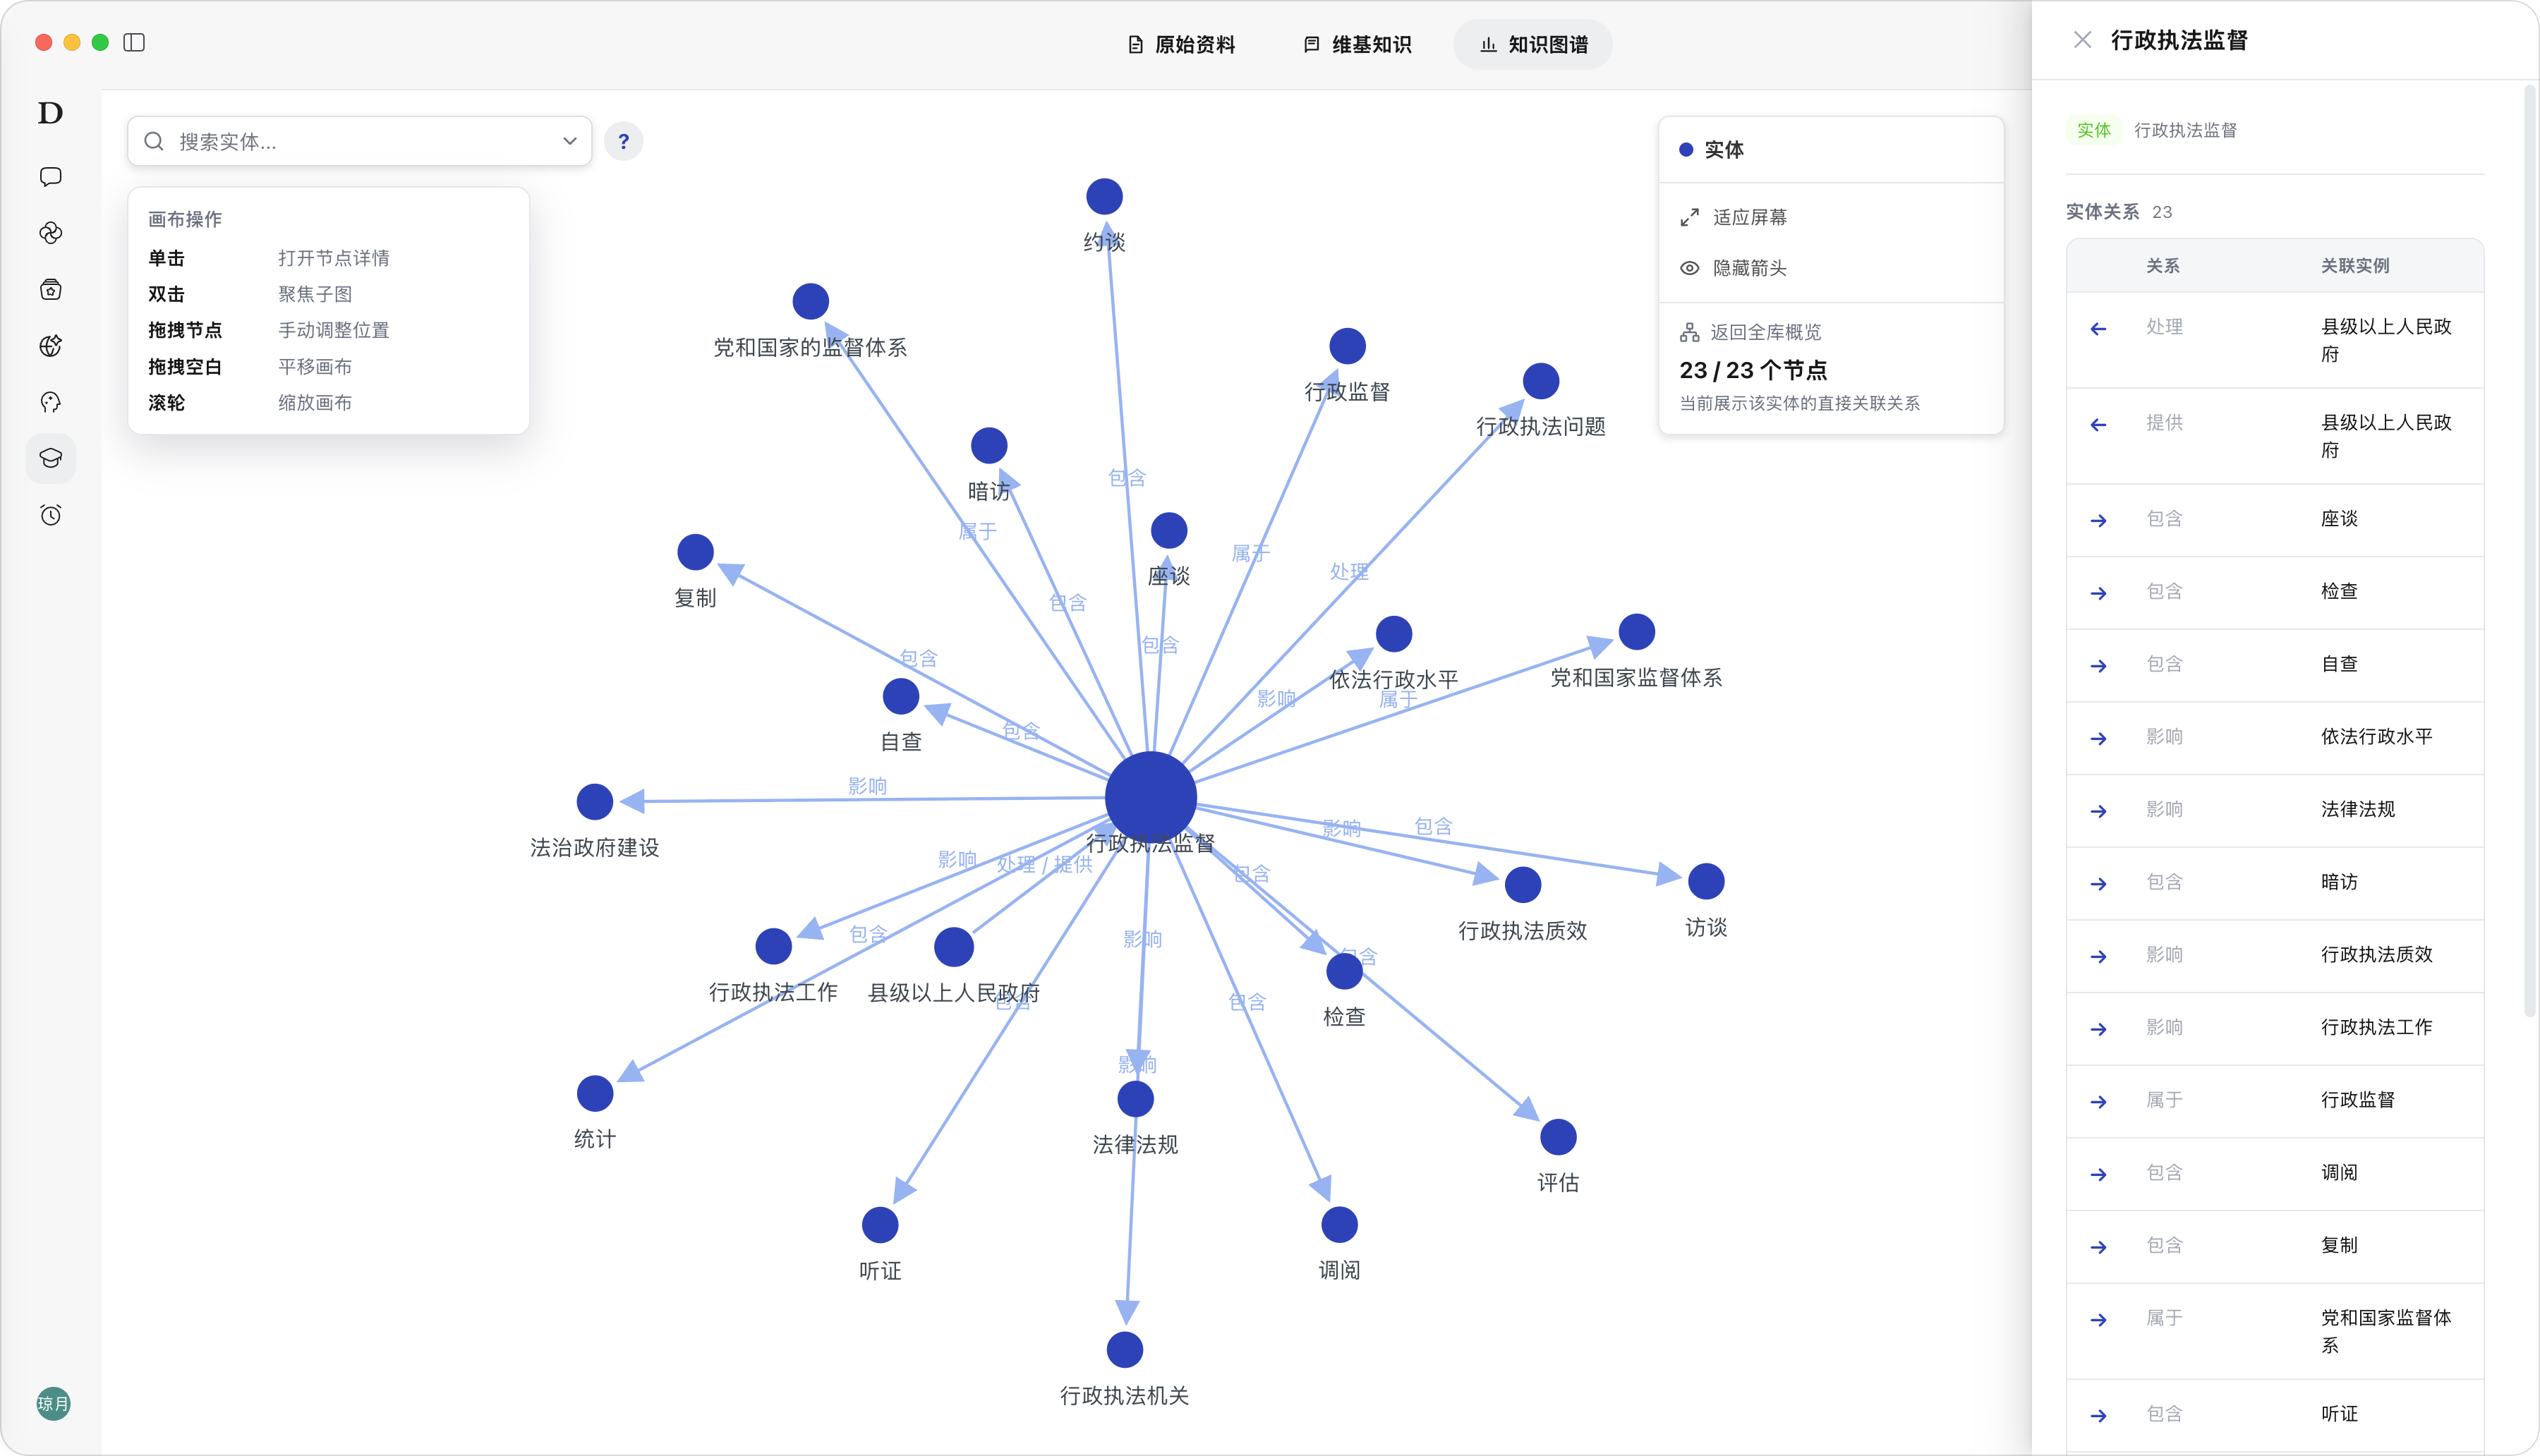
Description: The Knowledge Graph is used to display the entities and entity relationships that have been extracted from the Knowledge Base. It transforms business objects, organizations, products, processes, risks, metrics, and other content in materials into a visual relationship network, helping users view associations between objects, locate key entities, and understand business structure.
Steps:
- [Prerequisite step, recommended to complete before uploading files] Go to “Knowledge Base Settings → Indexing & Parsing → Knowledge Graph” to enable entity-relationship extraction and save the configuration. See the Knowledge Base Settings - Knowledge Graph section for details. After the configuration is complete, newly uploaded or re-parsed materials will generate entities and relationships.
- Recommended order: complete the configuration first → then upload new materials; the system automatically extracts entities and relationships during the parsing phase, with no extra operations required;
- Remedy for materials already uploaded: after the configuration is complete, you need to manually trigger re-parsing of existing materials to generate entities and relationships.
- After the configuration is complete and the graph is generated, enter an entity name in the search box, or browse the graph canvas directly.
- Single-click a node to view entity details and the entity’s outgoing / incoming relationships.
- Double-click a node to focus on the local subgraph of that entity. Click “Back to Full Overview” to return to the overall view.
- Use drag nodes, drag blank area, scroll wheel zoom, fit-to-screen, and hide / show arrows to adjust the display. Result: The page displays entity nodes, relationship edges, node counts, and the current display range. In entity details, “Outgoing” and “Incoming” relationships are displayed by direction, including relationship types and associated instances.
Note:
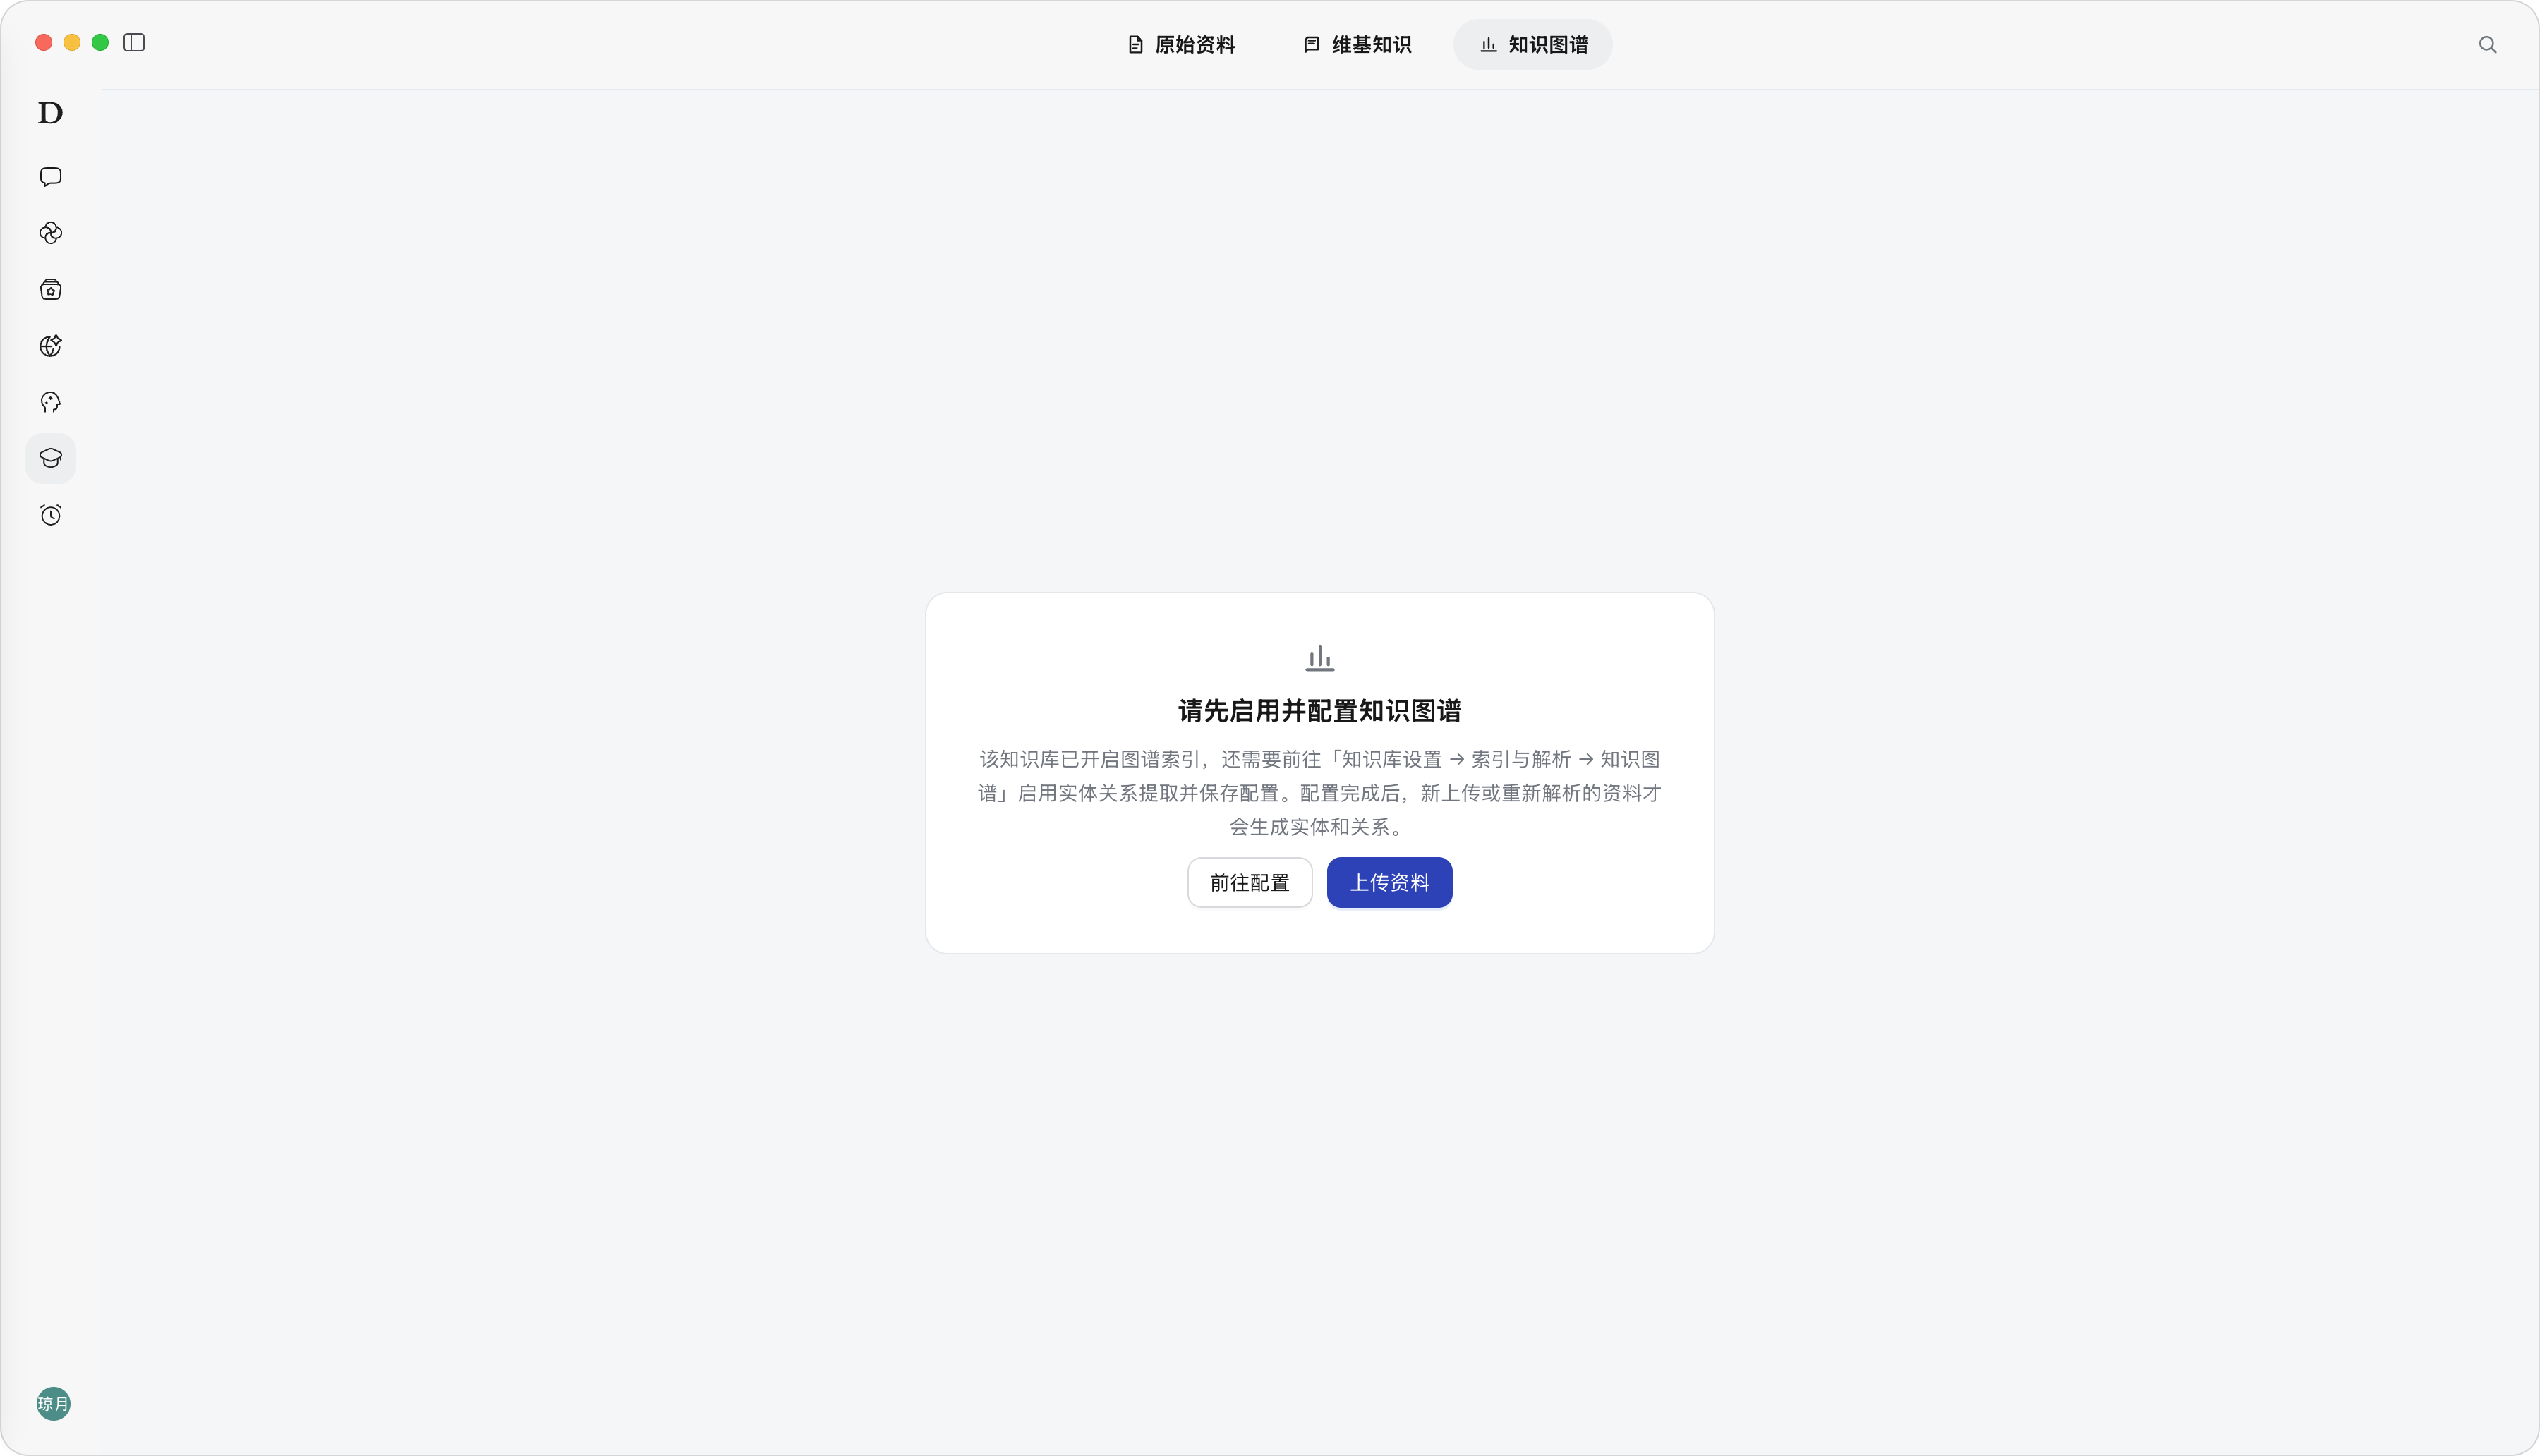
- If it prompts that the Knowledge Graph is not enabled, you need to go to “Knowledge Base Settings → Indexing & Parsing → Knowledge Graph” to complete the configuration first.
- Order reminder: the Knowledge Graph configuration does not automatically take effect for materials uploaded before the configuration that have not been re-parsed; it is recommended to complete the configuration before uploading the first batch of materials to reduce repeated operations. Differences between Knowledge Graph and Wiki Graph:
Wiki Graph shows “which entries reference each other”; Knowledge Graph shows “what relationships exist between business objects”.
| Comparison Item | Knowledge Graph | Wiki Graph |
|---|---|---|
| Nodes | Entities, such as products, organizations, devices, customers, processes | Wiki pages / entries |
| Edges | Relationships between entities, such as “belongs to, supplies, points to, depends on” | Reference links between Wiki pages |
| Data source | The model extracts entities and relationships from source materials | Entry links in Wiki body content |
| Main value | Expresses structured relationships between business objects | Views knowledge associations between Wiki pages |
Knowledge Graph - Empty state prompt
Knowledge Graph - Full overview
Knowledge Graph - Local subgraph
Knowledge Base Settings
Knowledge Base Settings is the configuration and quality check module of the Shared Knowledge Base. Basic Information determines how the Knowledge Base is identified; Wiki Settings determine how new Wiki is generated; Chunking Settings determine how new materials are split into retrieval chunks; Retrieval Test verifies whether these configurations can actually recall valid content.
| Secondary Function | Difference | Description |
|---|---|---|
| Basic Information | Maintains Knowledge Base identity and the auto-compile switch | Controls name, description, and the Wiki auto-generation entry |
| Wiki Settings | Defines Wiki extraction rules | Makes new Wiki conform to team knowledge definitions |
| Chunking Settings | Defines material splitting rules | Balances retrieval recall rate and context completeness |
| Retrieval Test | Verifies actual recall effectiveness | Checks whether knowledge is usable before going live |
Basic Information
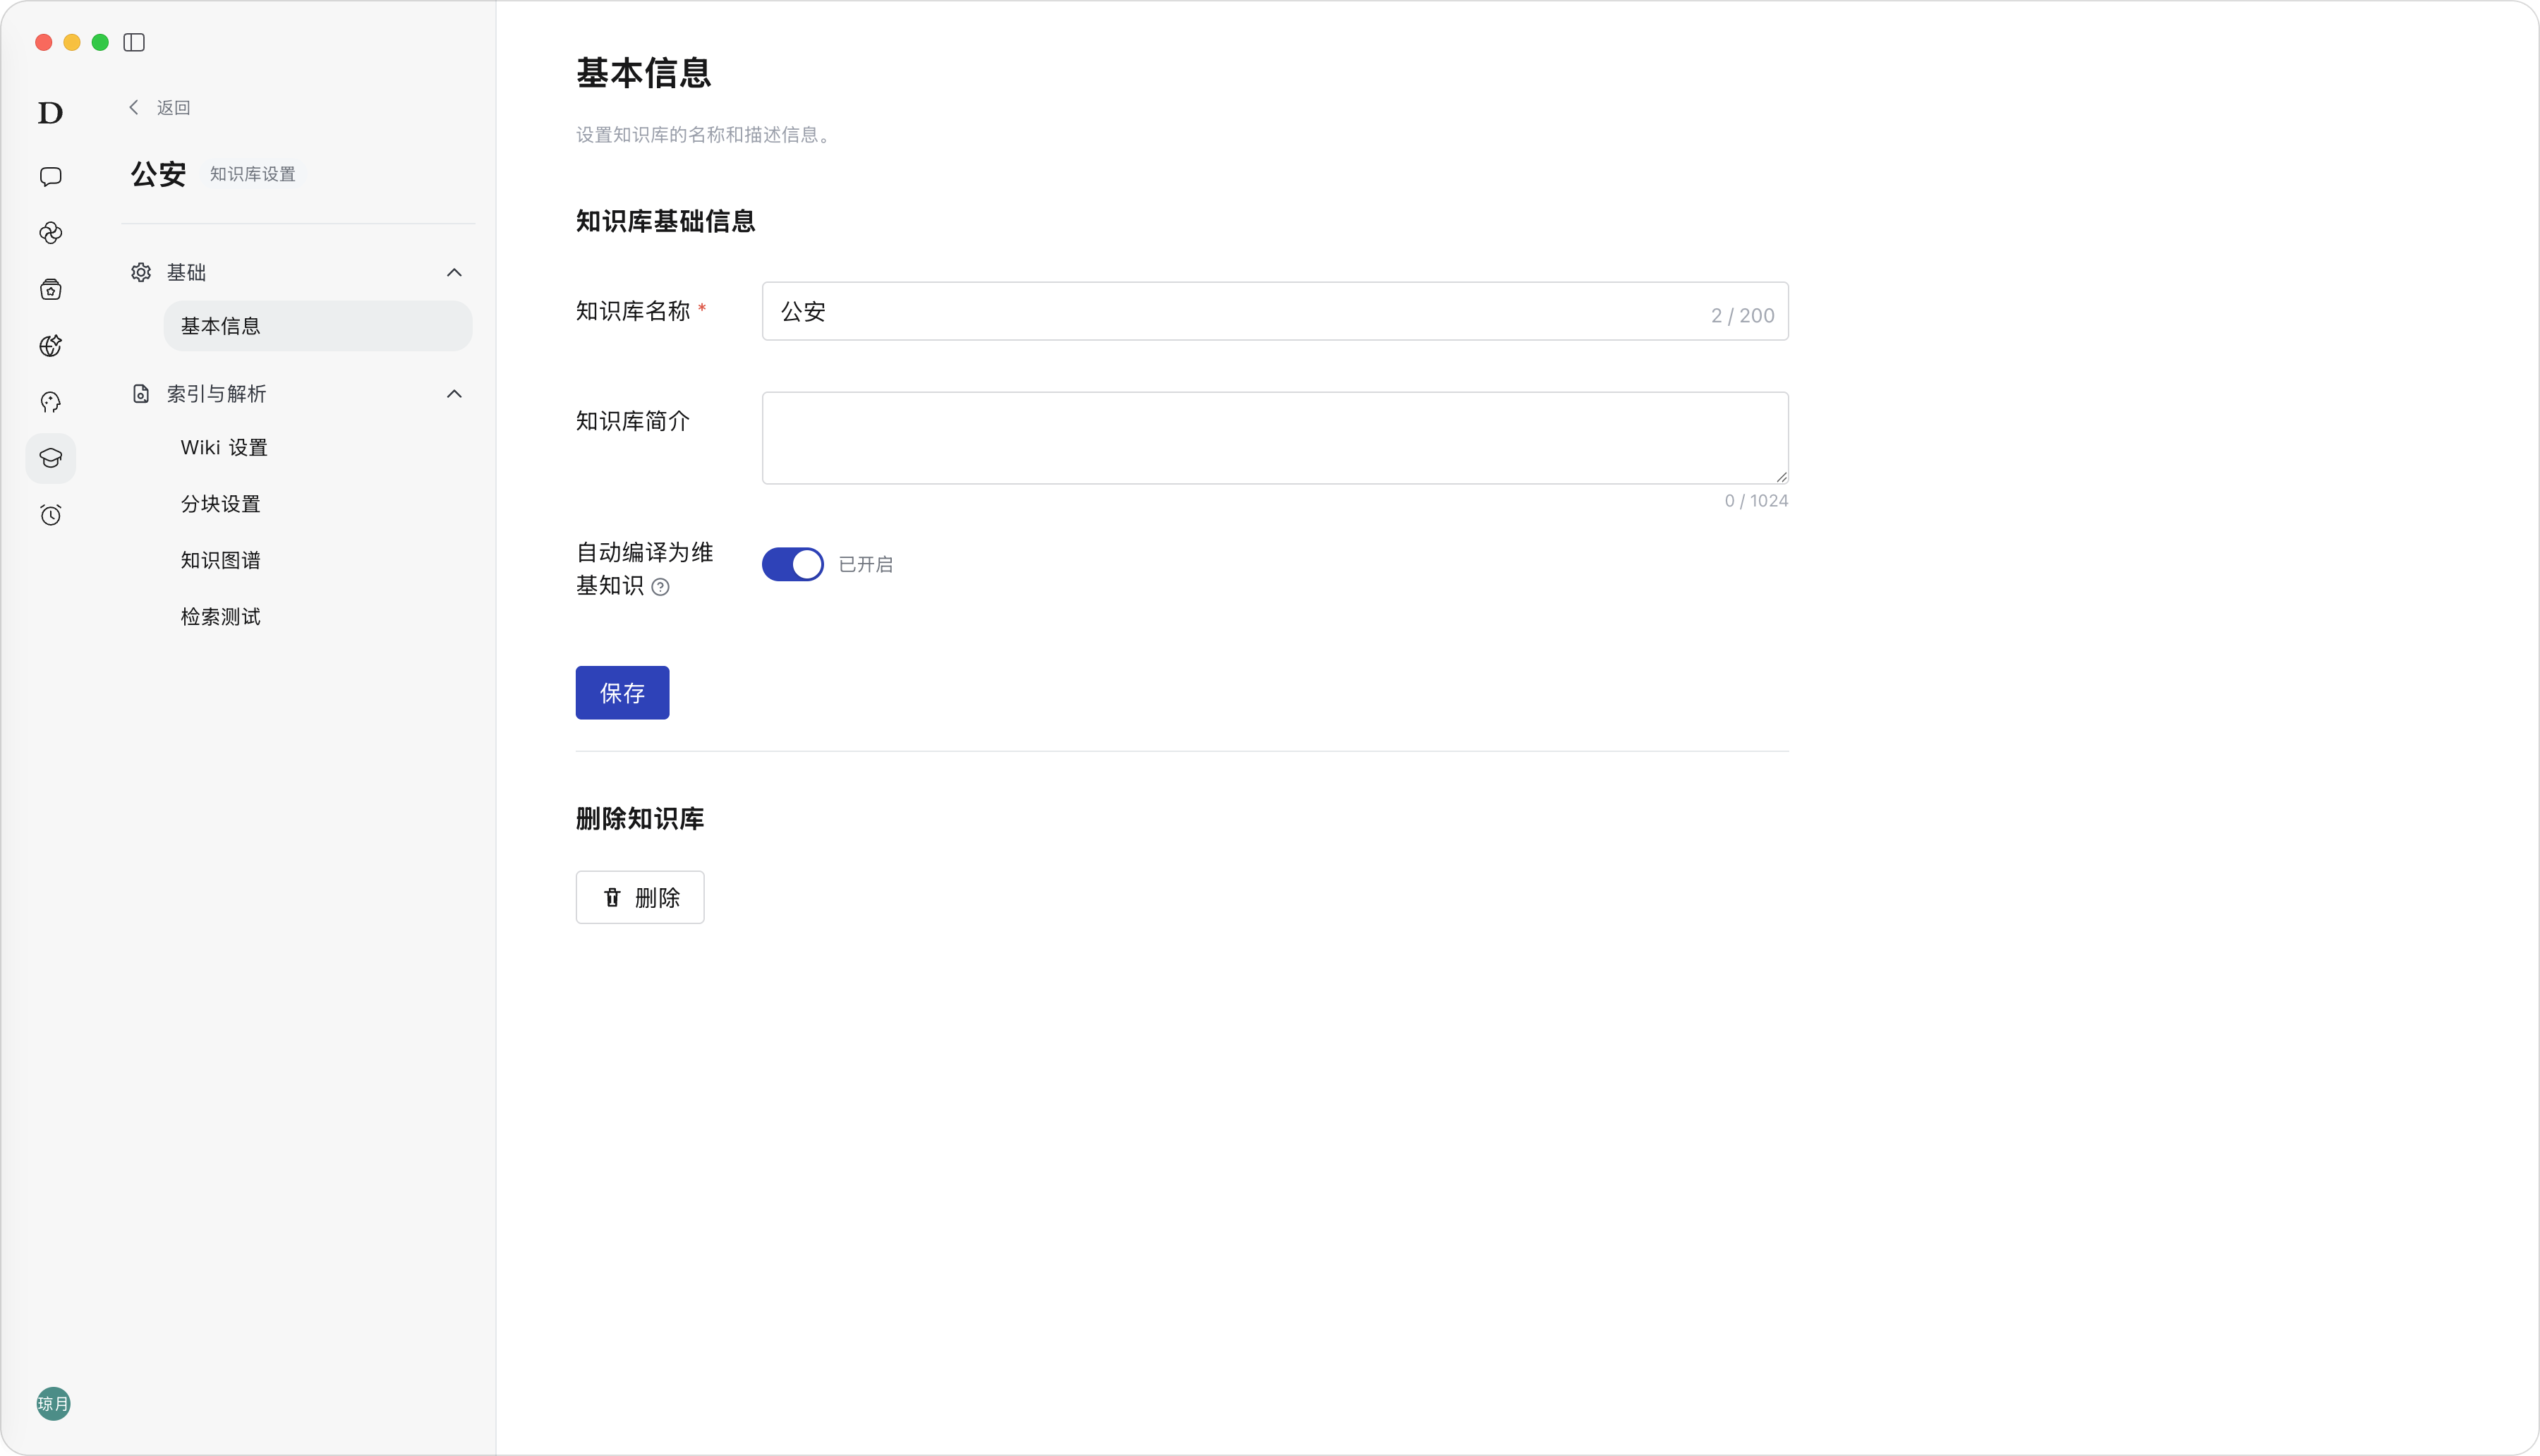
Description: Basic Information is used to maintain the Knowledge Base name, Knowledge Base description, and the “Auto-compile to Wiki Knowledge” switch, and provides the entry for deleting the Knowledge Base.
Steps: After entering the Knowledge Base, click “Knowledge Base Settings”, select “Basic Information”, modify the name or description, toggle “Auto-compile to Wiki Knowledge” as needed, and click “Save”.
Result: After saving, the basic Knowledge Base information is updated. The description of the “Auto-compile to Wiki Knowledge” switch is: when enabled, files are automatically compiled into Wiki knowledge upon upload; when disabled, manual compilation is required in the knowledge list of source materials.
Note: The Knowledge Base name is required, and the page displays a maximum length of 200 characters. Deleting a Knowledge Base affects all resources and knowledge outcomes in it. Only Knowledge Bases created by the currently logged-in user can be deleted. A Knowledge Base cannot be deleted while it has tasks in progress.
Knowledge Base Settings - Basic Information
Wiki Settings
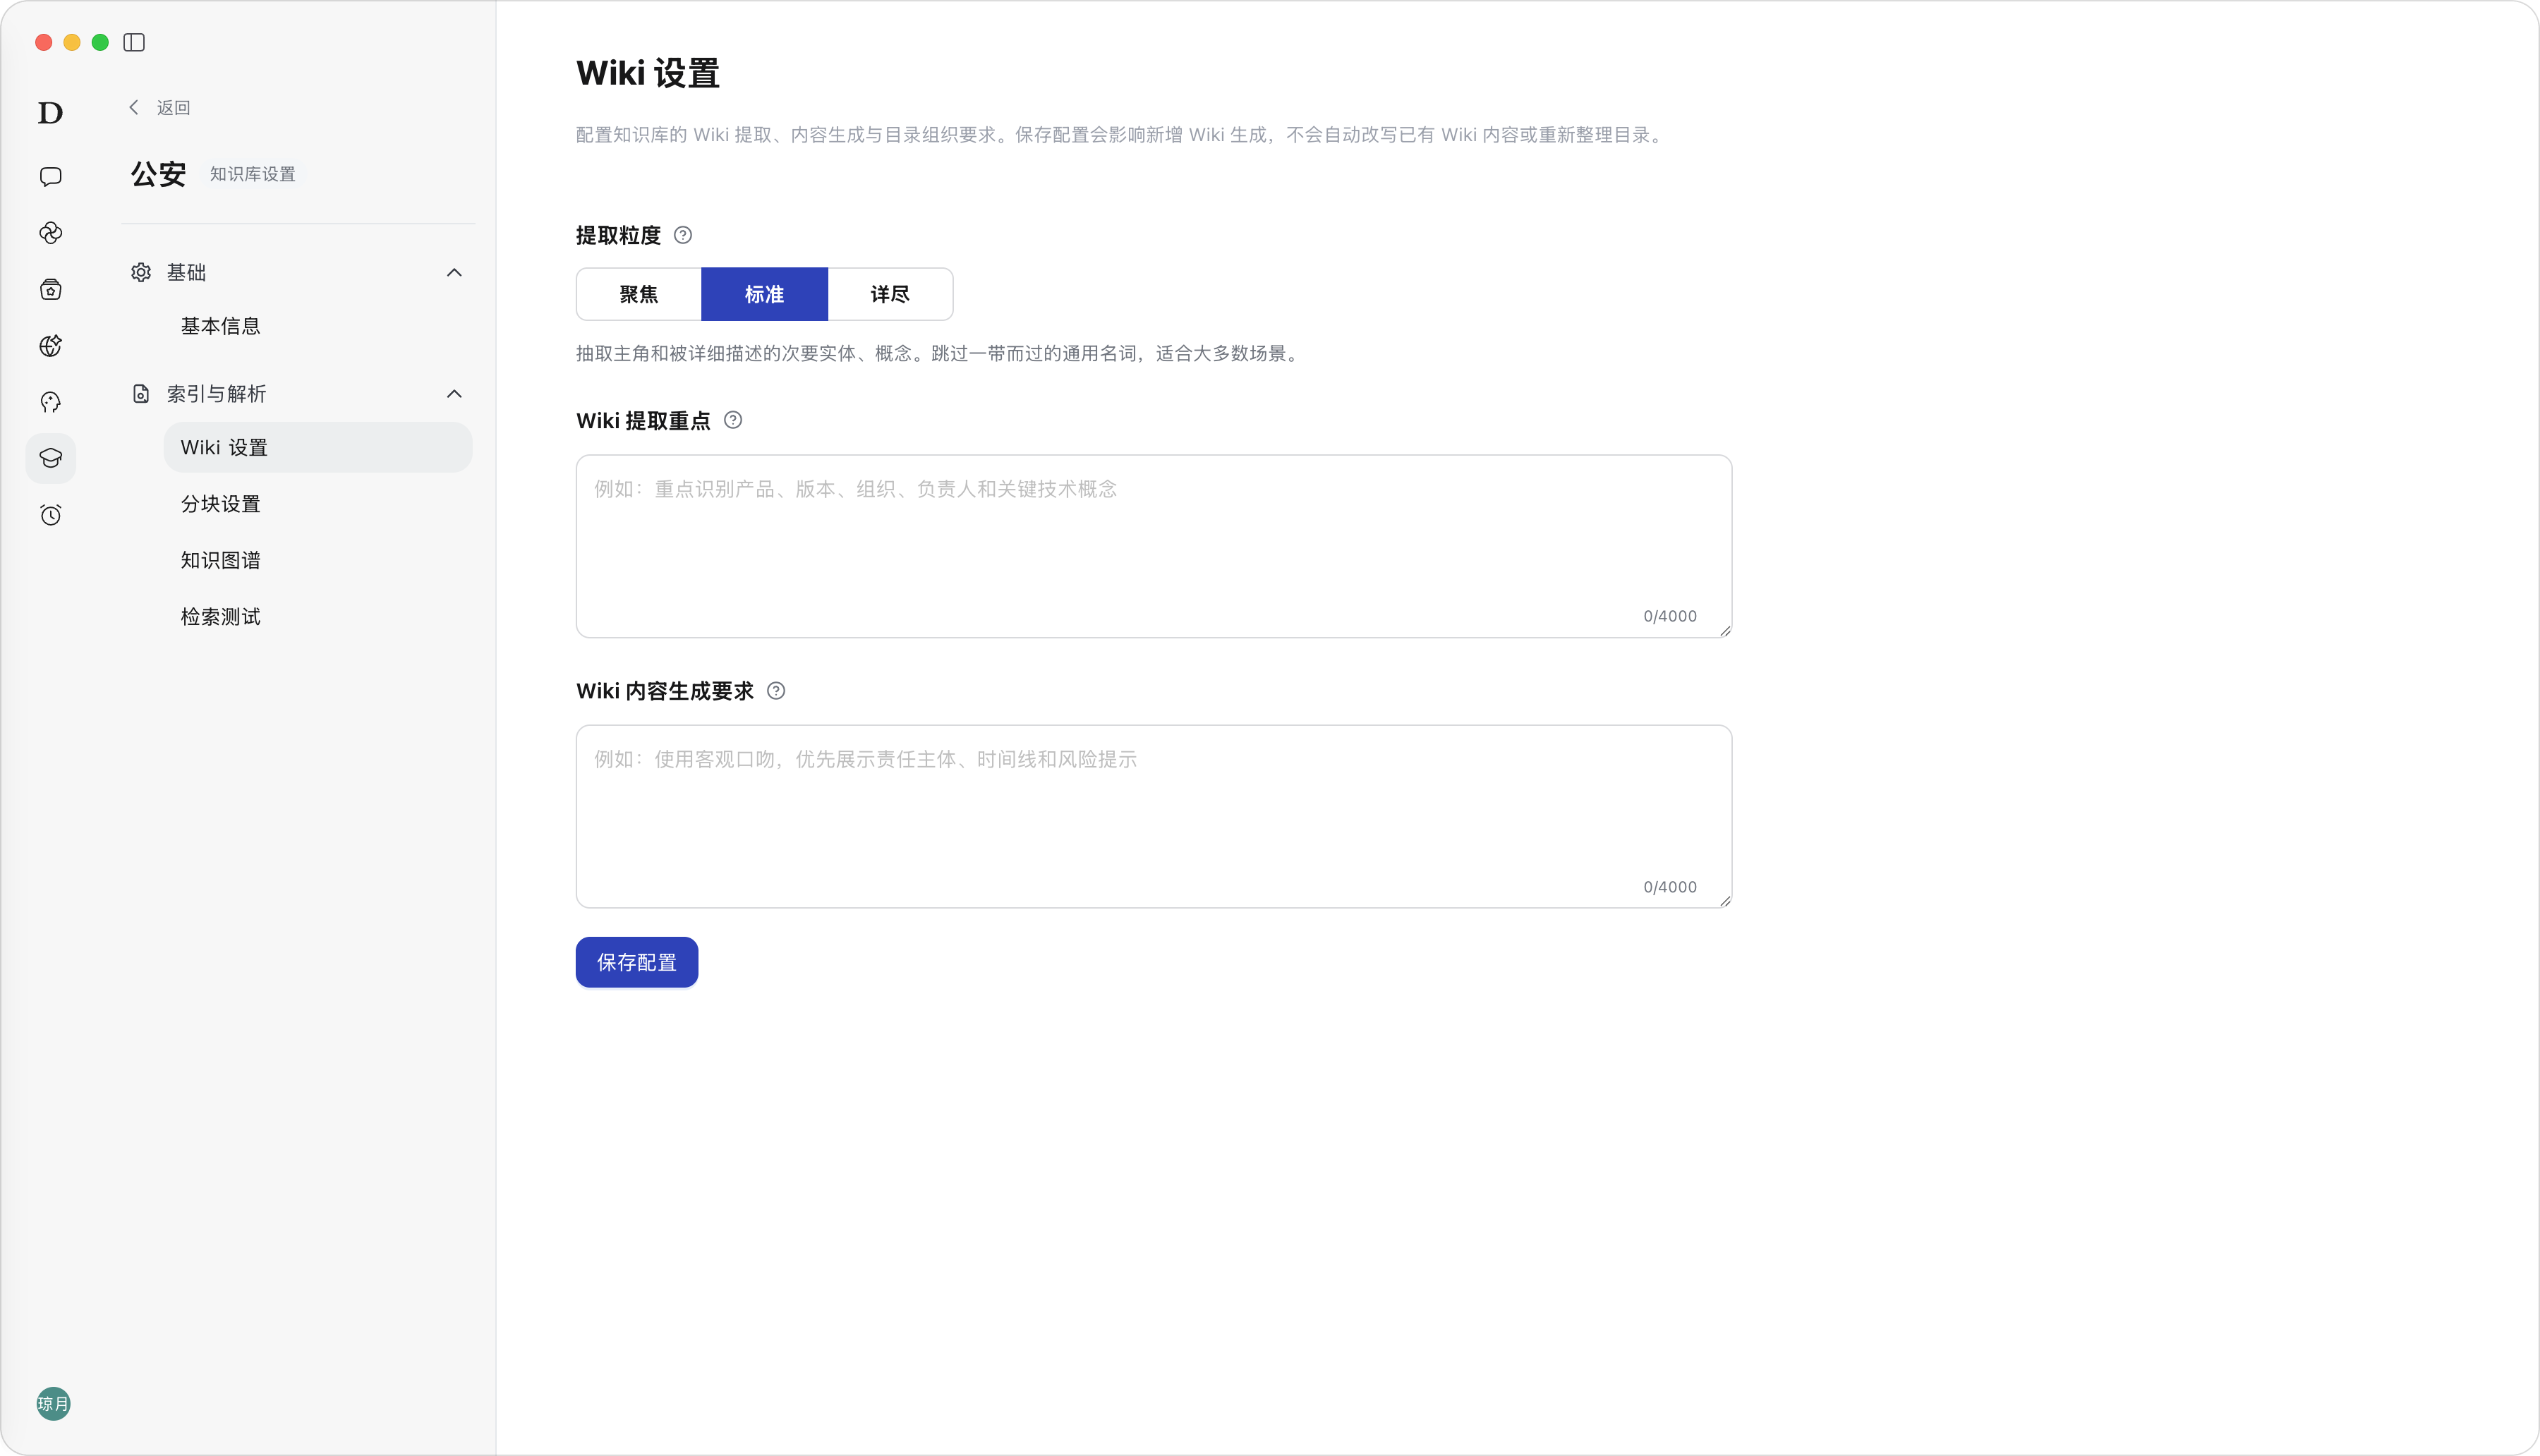
Description: Wiki Settings is used to configure Wiki extraction granularity, extraction focus, and content generation requirements, affecting how new Wiki is generated.
Steps: In Knowledge Base Settings, select “Wiki Settings”, choose “Focused”, “Standard”, or “Comprehensive” extraction granularity, fill in Wiki extraction focus and content generation requirements, and click “Save Configuration”.
Result: After saving, subsequently generated Wiki will extract and organize content according to the current configuration.
Note: Wiki extraction focus and content generation requirements each display a 4000-character limit. This configuration does not automatically rewrite existing Wiki pages, nor does it reorganize the directory. It is recommended to confirm the team’s unified definitions before modifying the configuration.
Wiki Settings
Chunking Settings
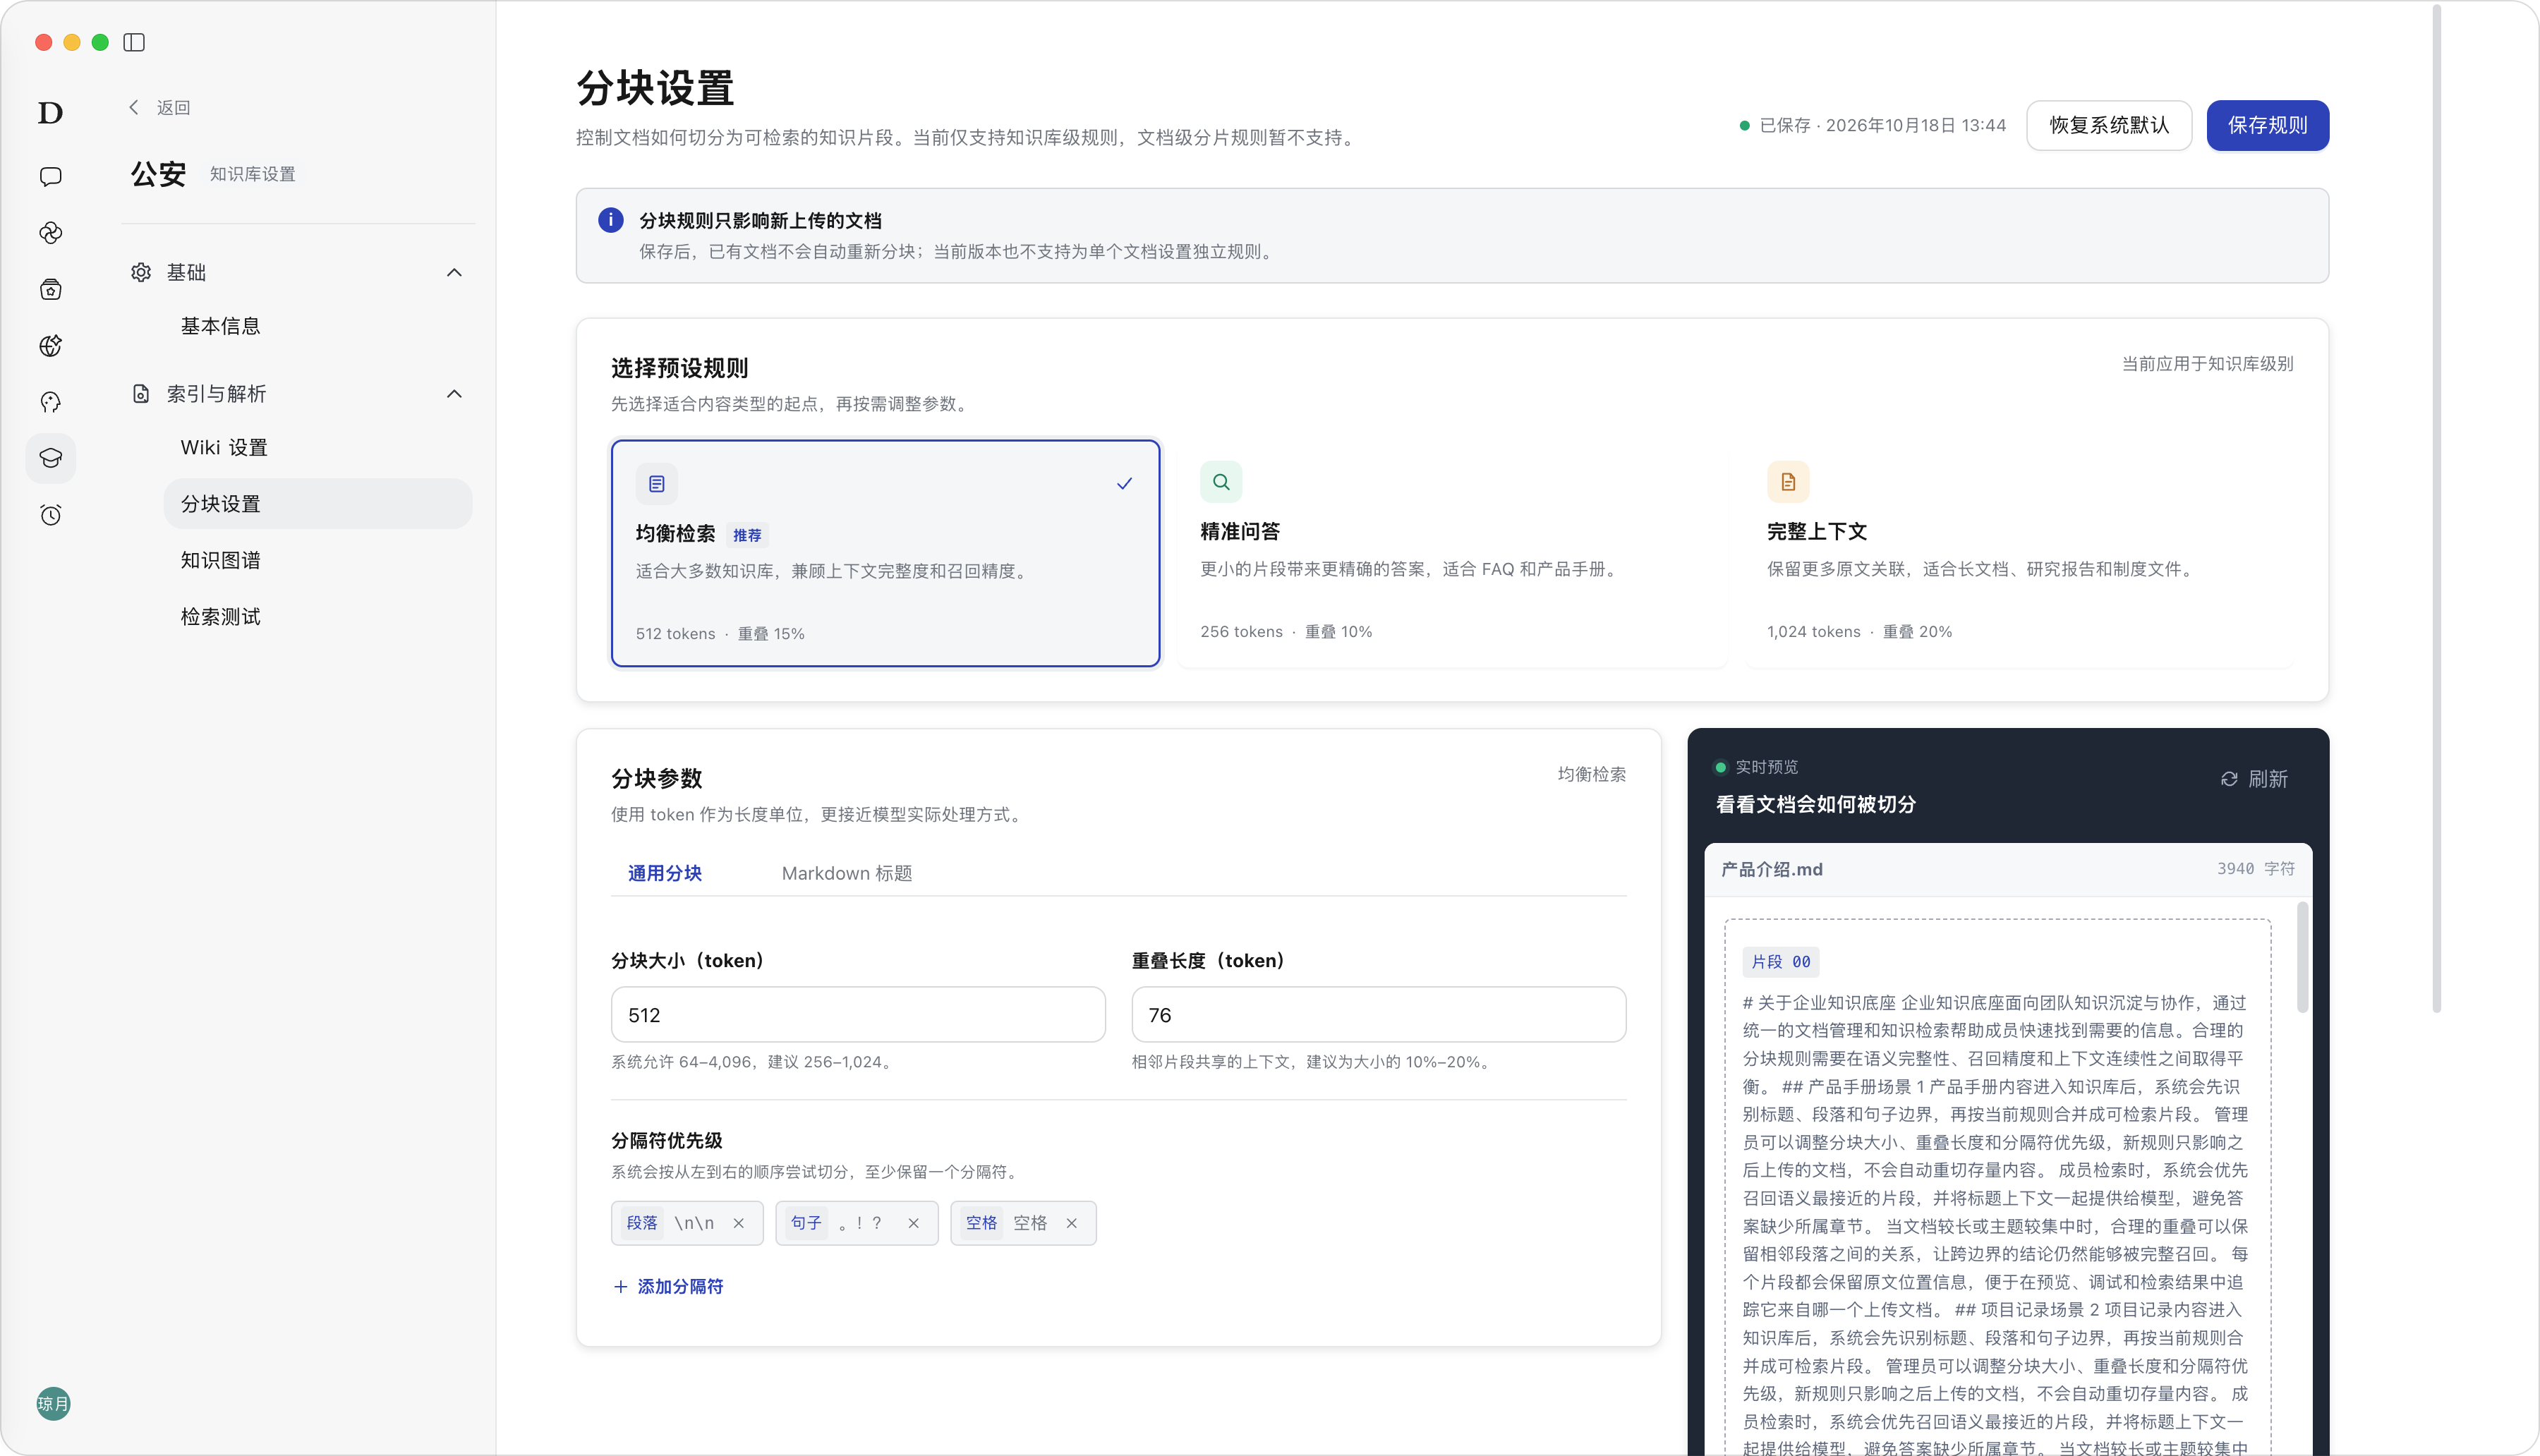
Description: Chunking Settings is used to control how documents are split into retrievable knowledge chunks, affecting retrieval recall effectiveness and context completeness.
Steps: In Knowledge Base Settings, select “Chunking Settings”, first select the “Precise Q&A”, “Balanced Retrieval”, or “Complete Context” preset rules, or adjust chunk size, overlap length, and separator priority; when necessary, switch between “General Chunking” or “Markdown Heading” mode, and click “Save Rules”.
Result: After saving, newly uploaded documents will be processed according to the current chunking rules; the real-time preview on the right shows how documents will be split.
Note:
(1) Chunk size allows 64-4096 tokens; the system recommends 256-1024; the overlap length is recommended to be 10%-20% of the chunk size.
(2) Chunking rules only affect newly uploaded documents; existing documents are not automatically re-chunked.
(3) Currently only Knowledge Base-level rules are supported; per-document independent rules are not supported.
Chunking Settings
Knowledge Graph Settings
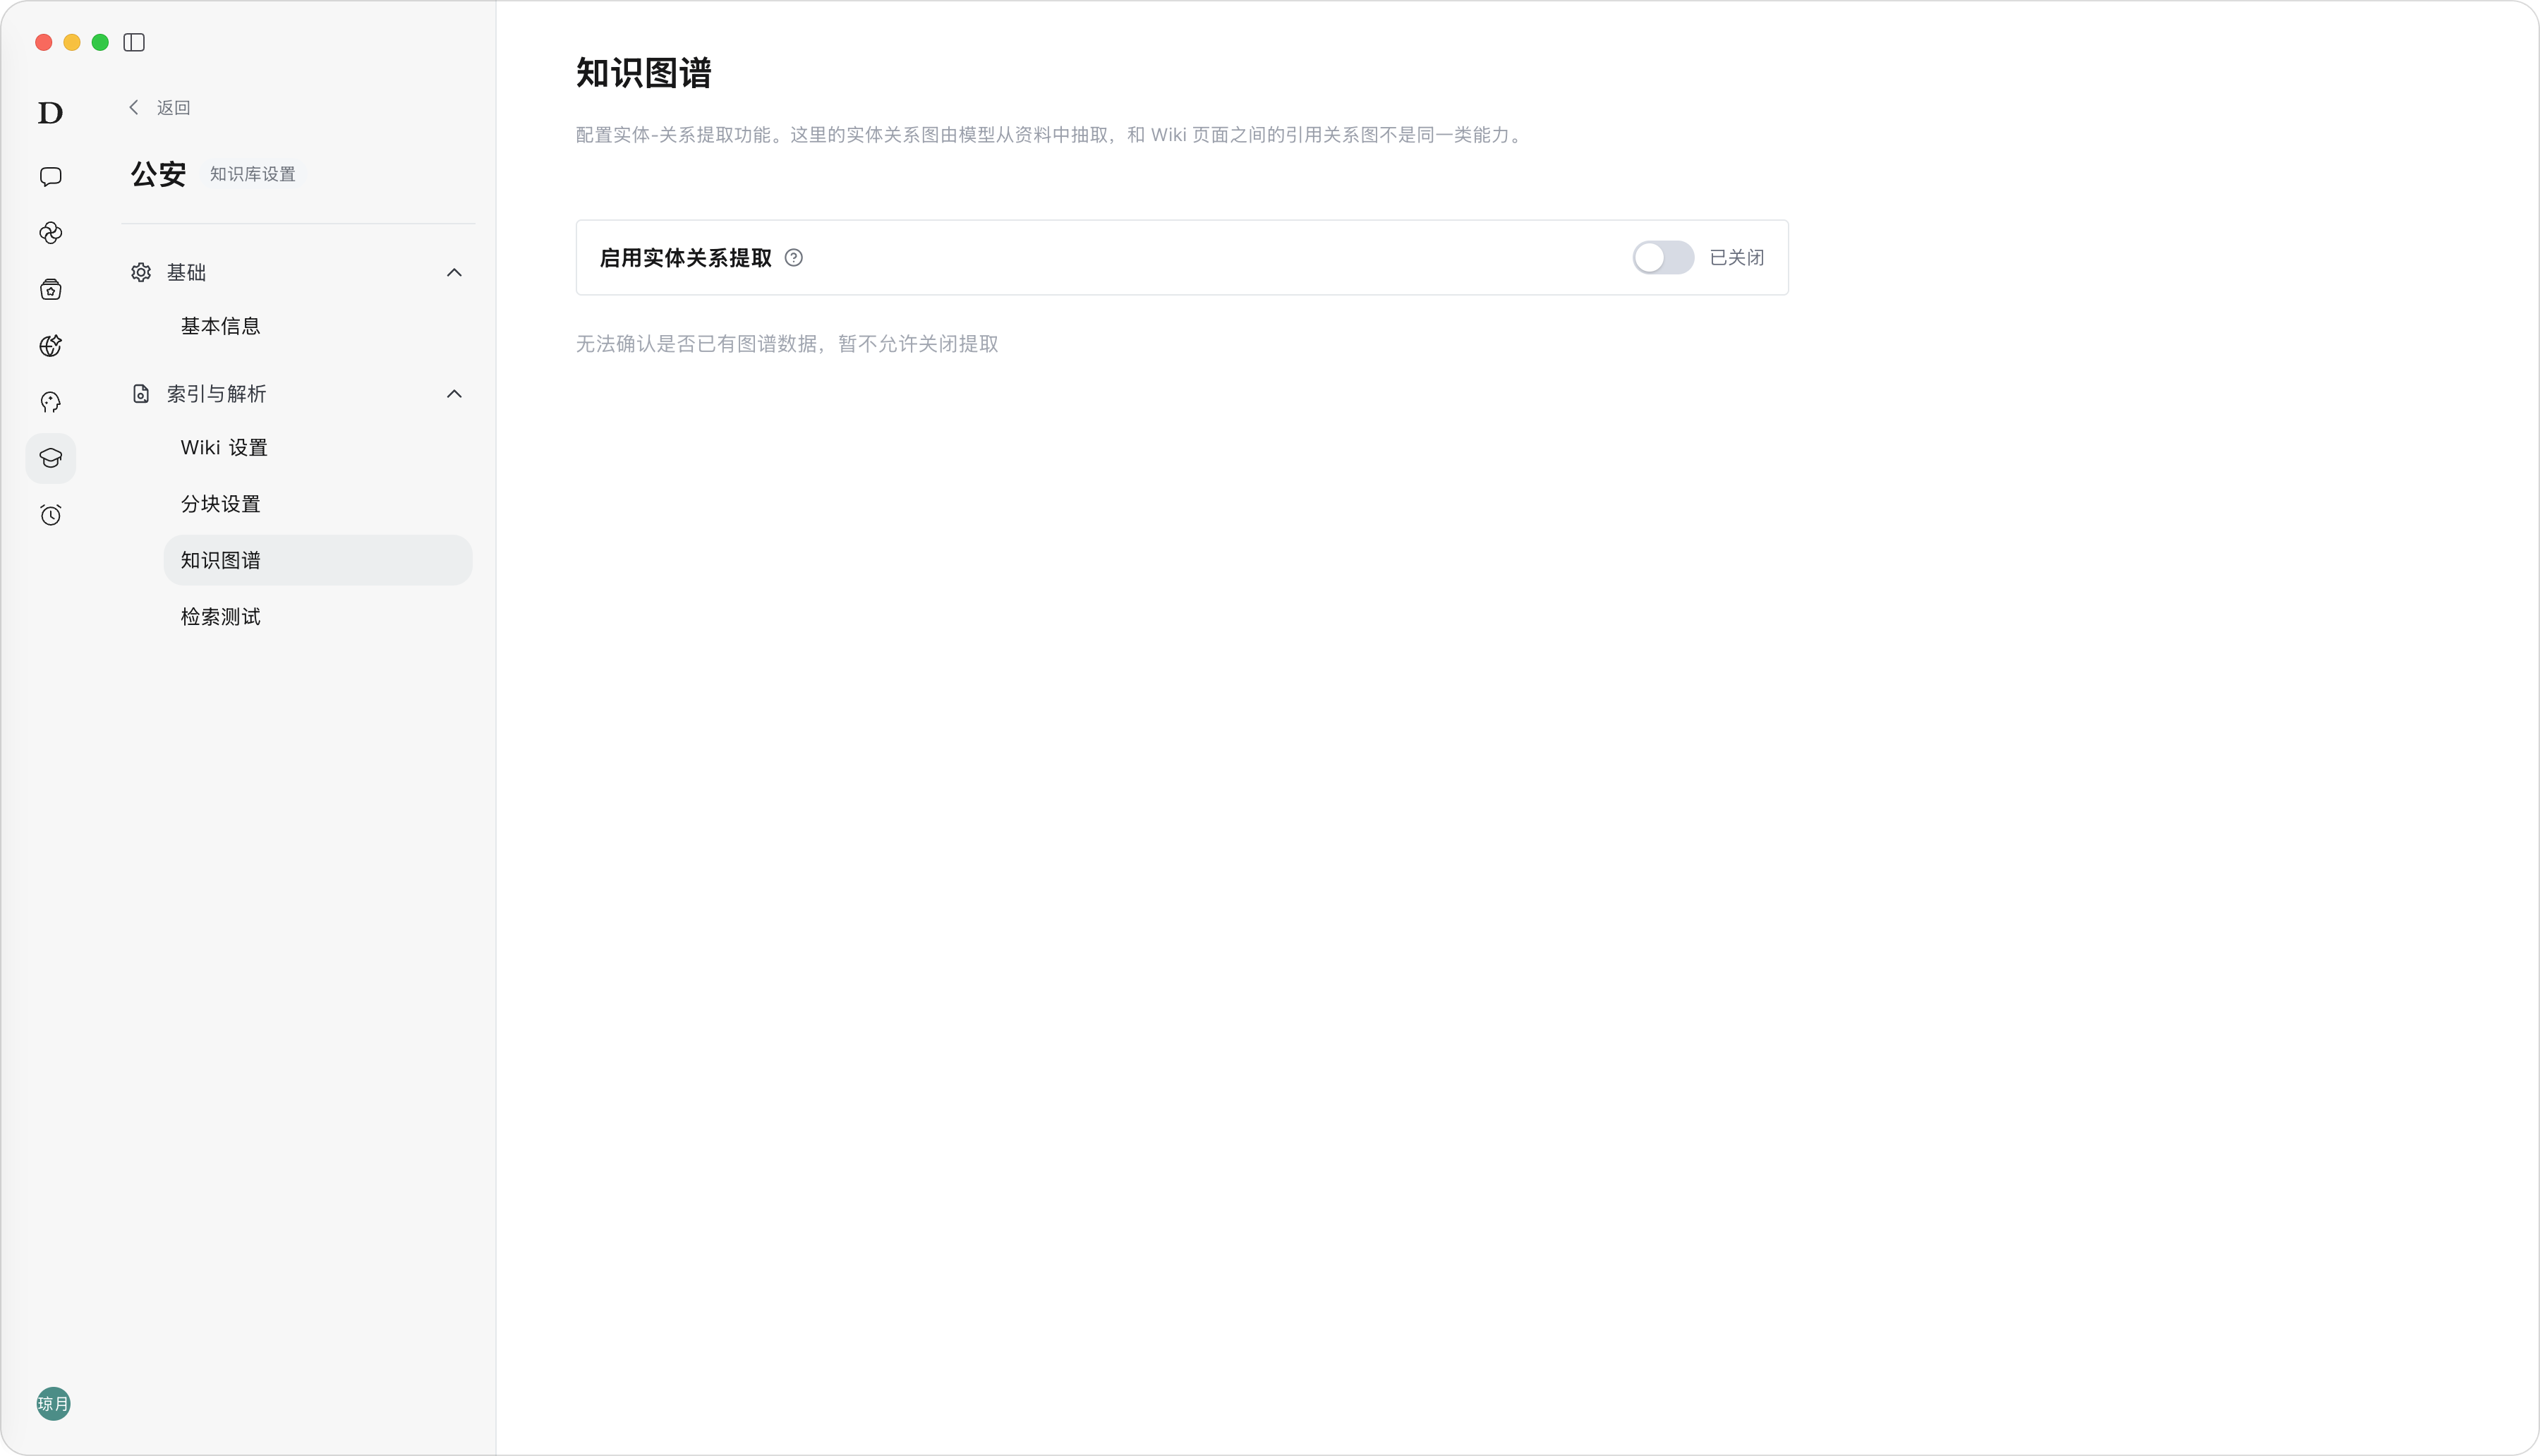
Description: Knowledge Graph Settings is used to configure entity-relationship extraction capabilities. Administrators can decide whether to enable the Knowledge Graph, select business extraction templates, define relationship types, supplement domain extraction requirements, and constrain the model’s extraction effect through example text, example entities, and example relationships.
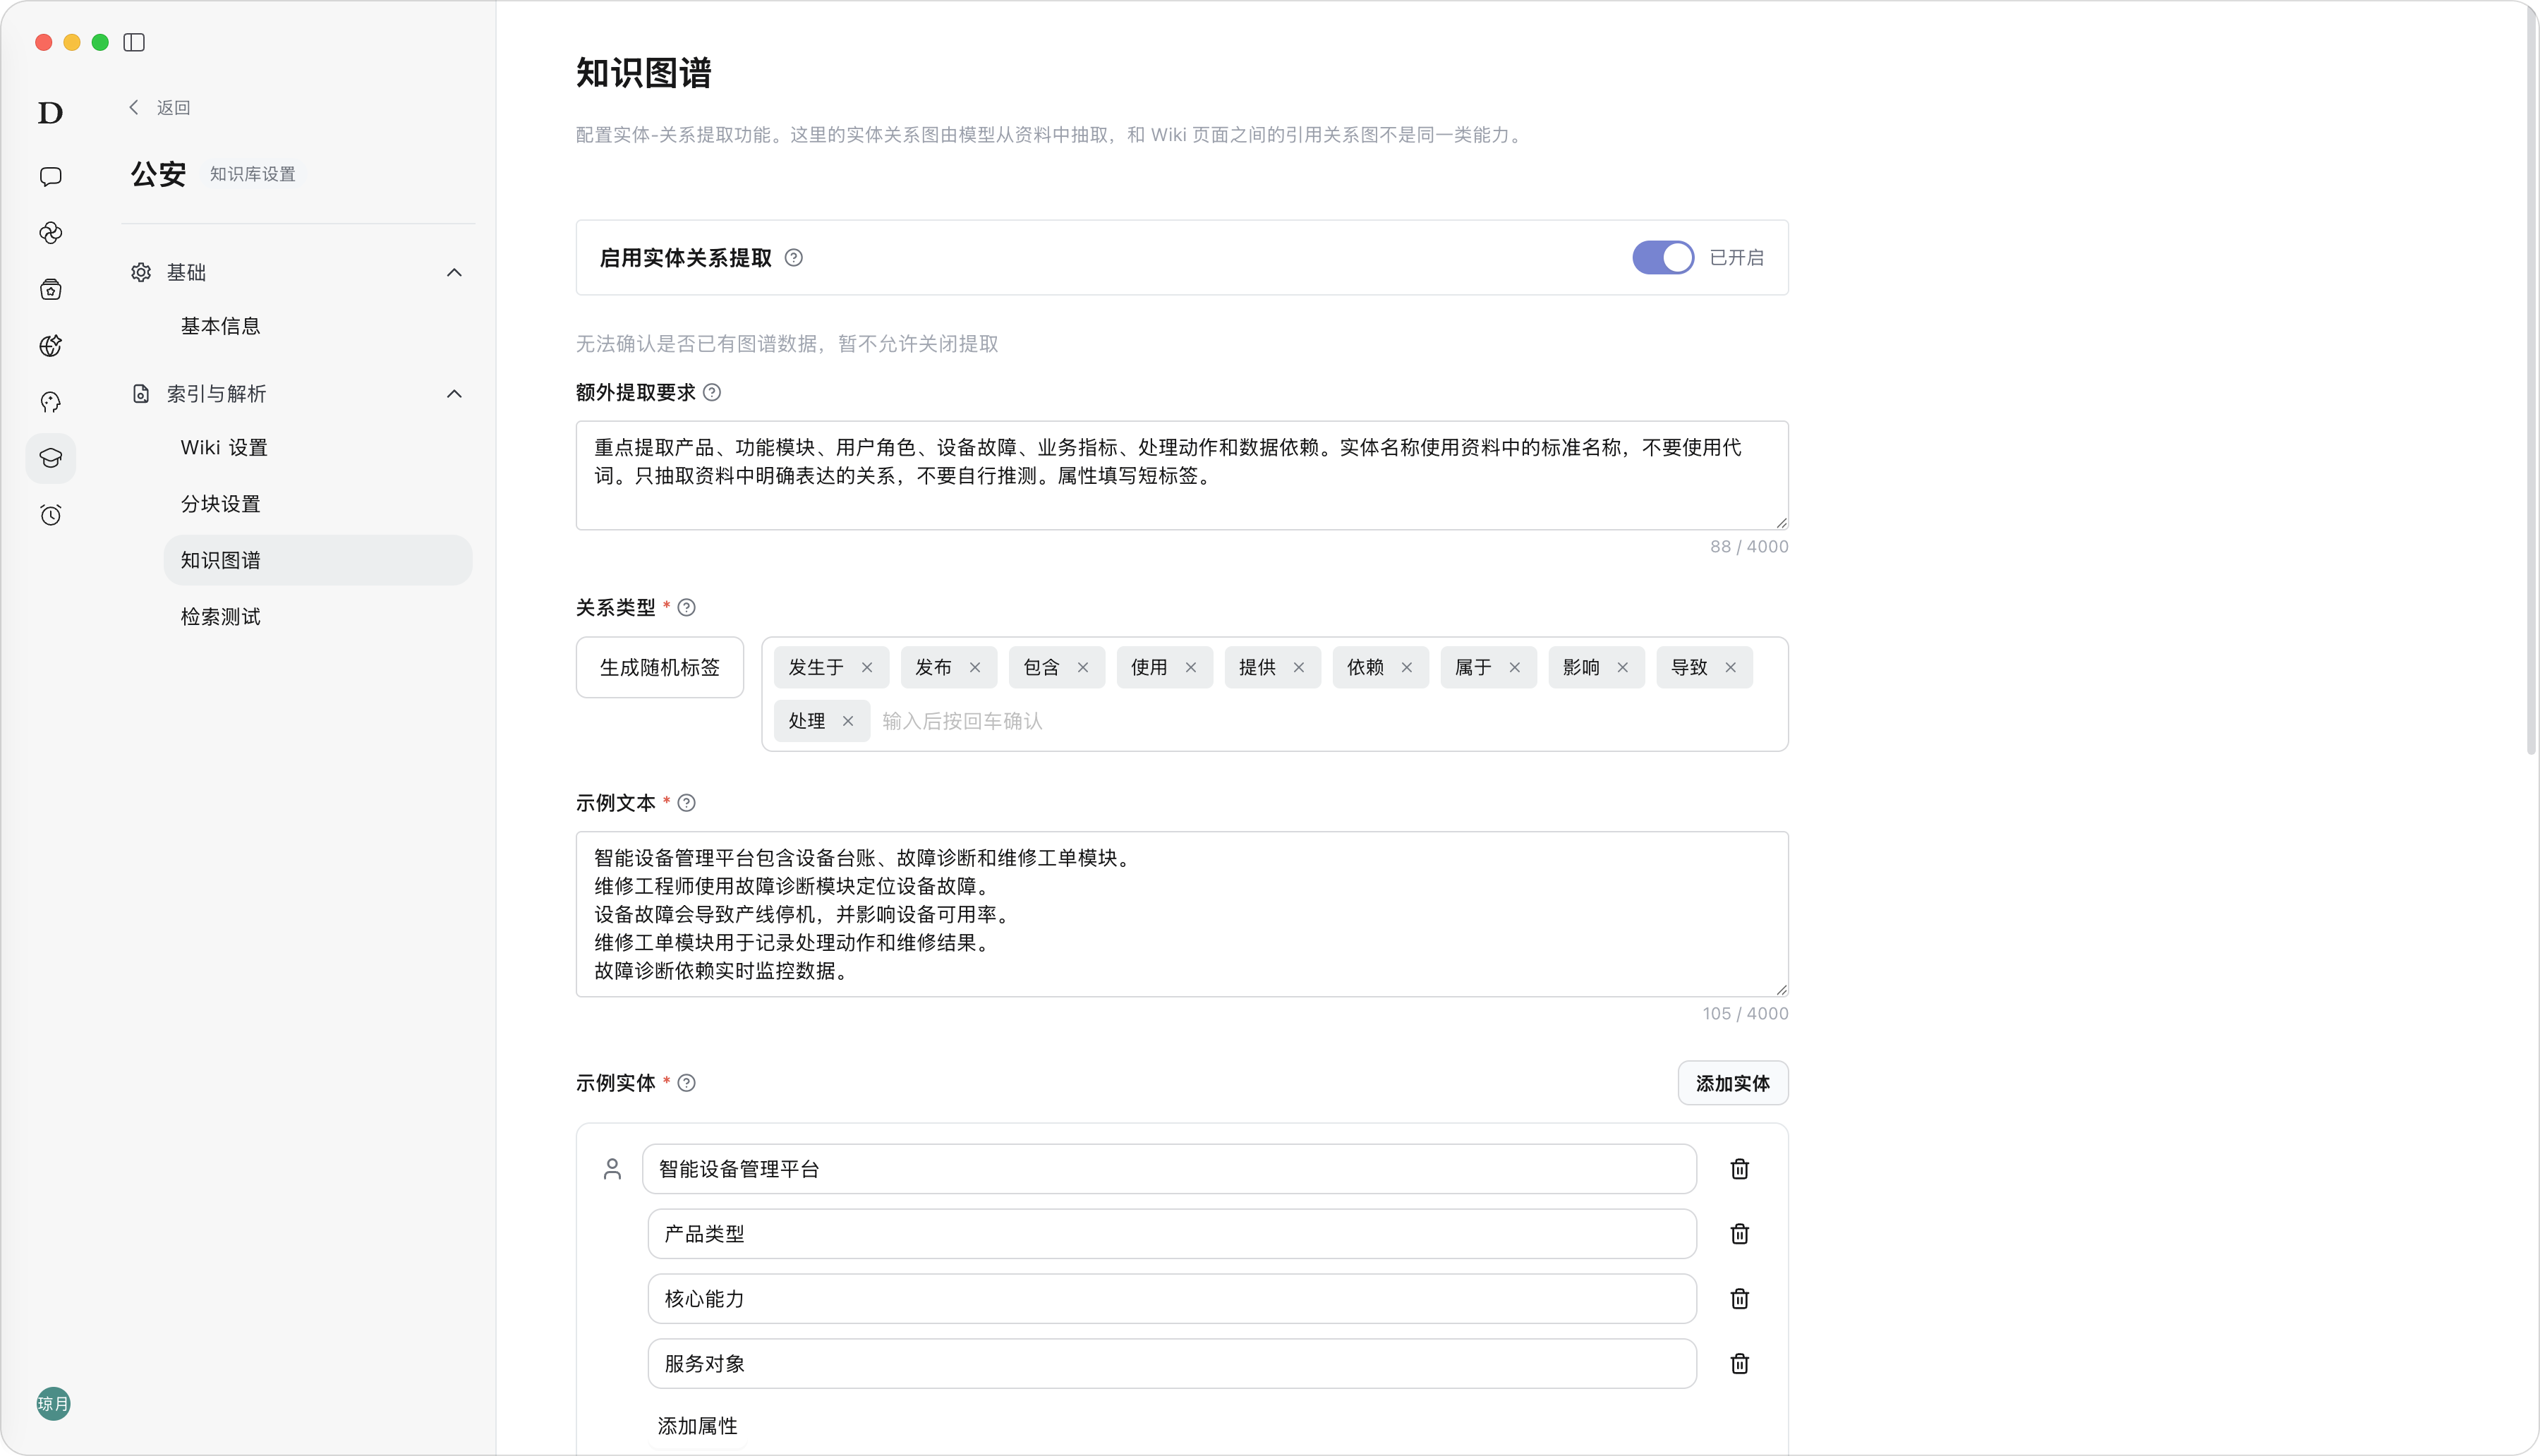
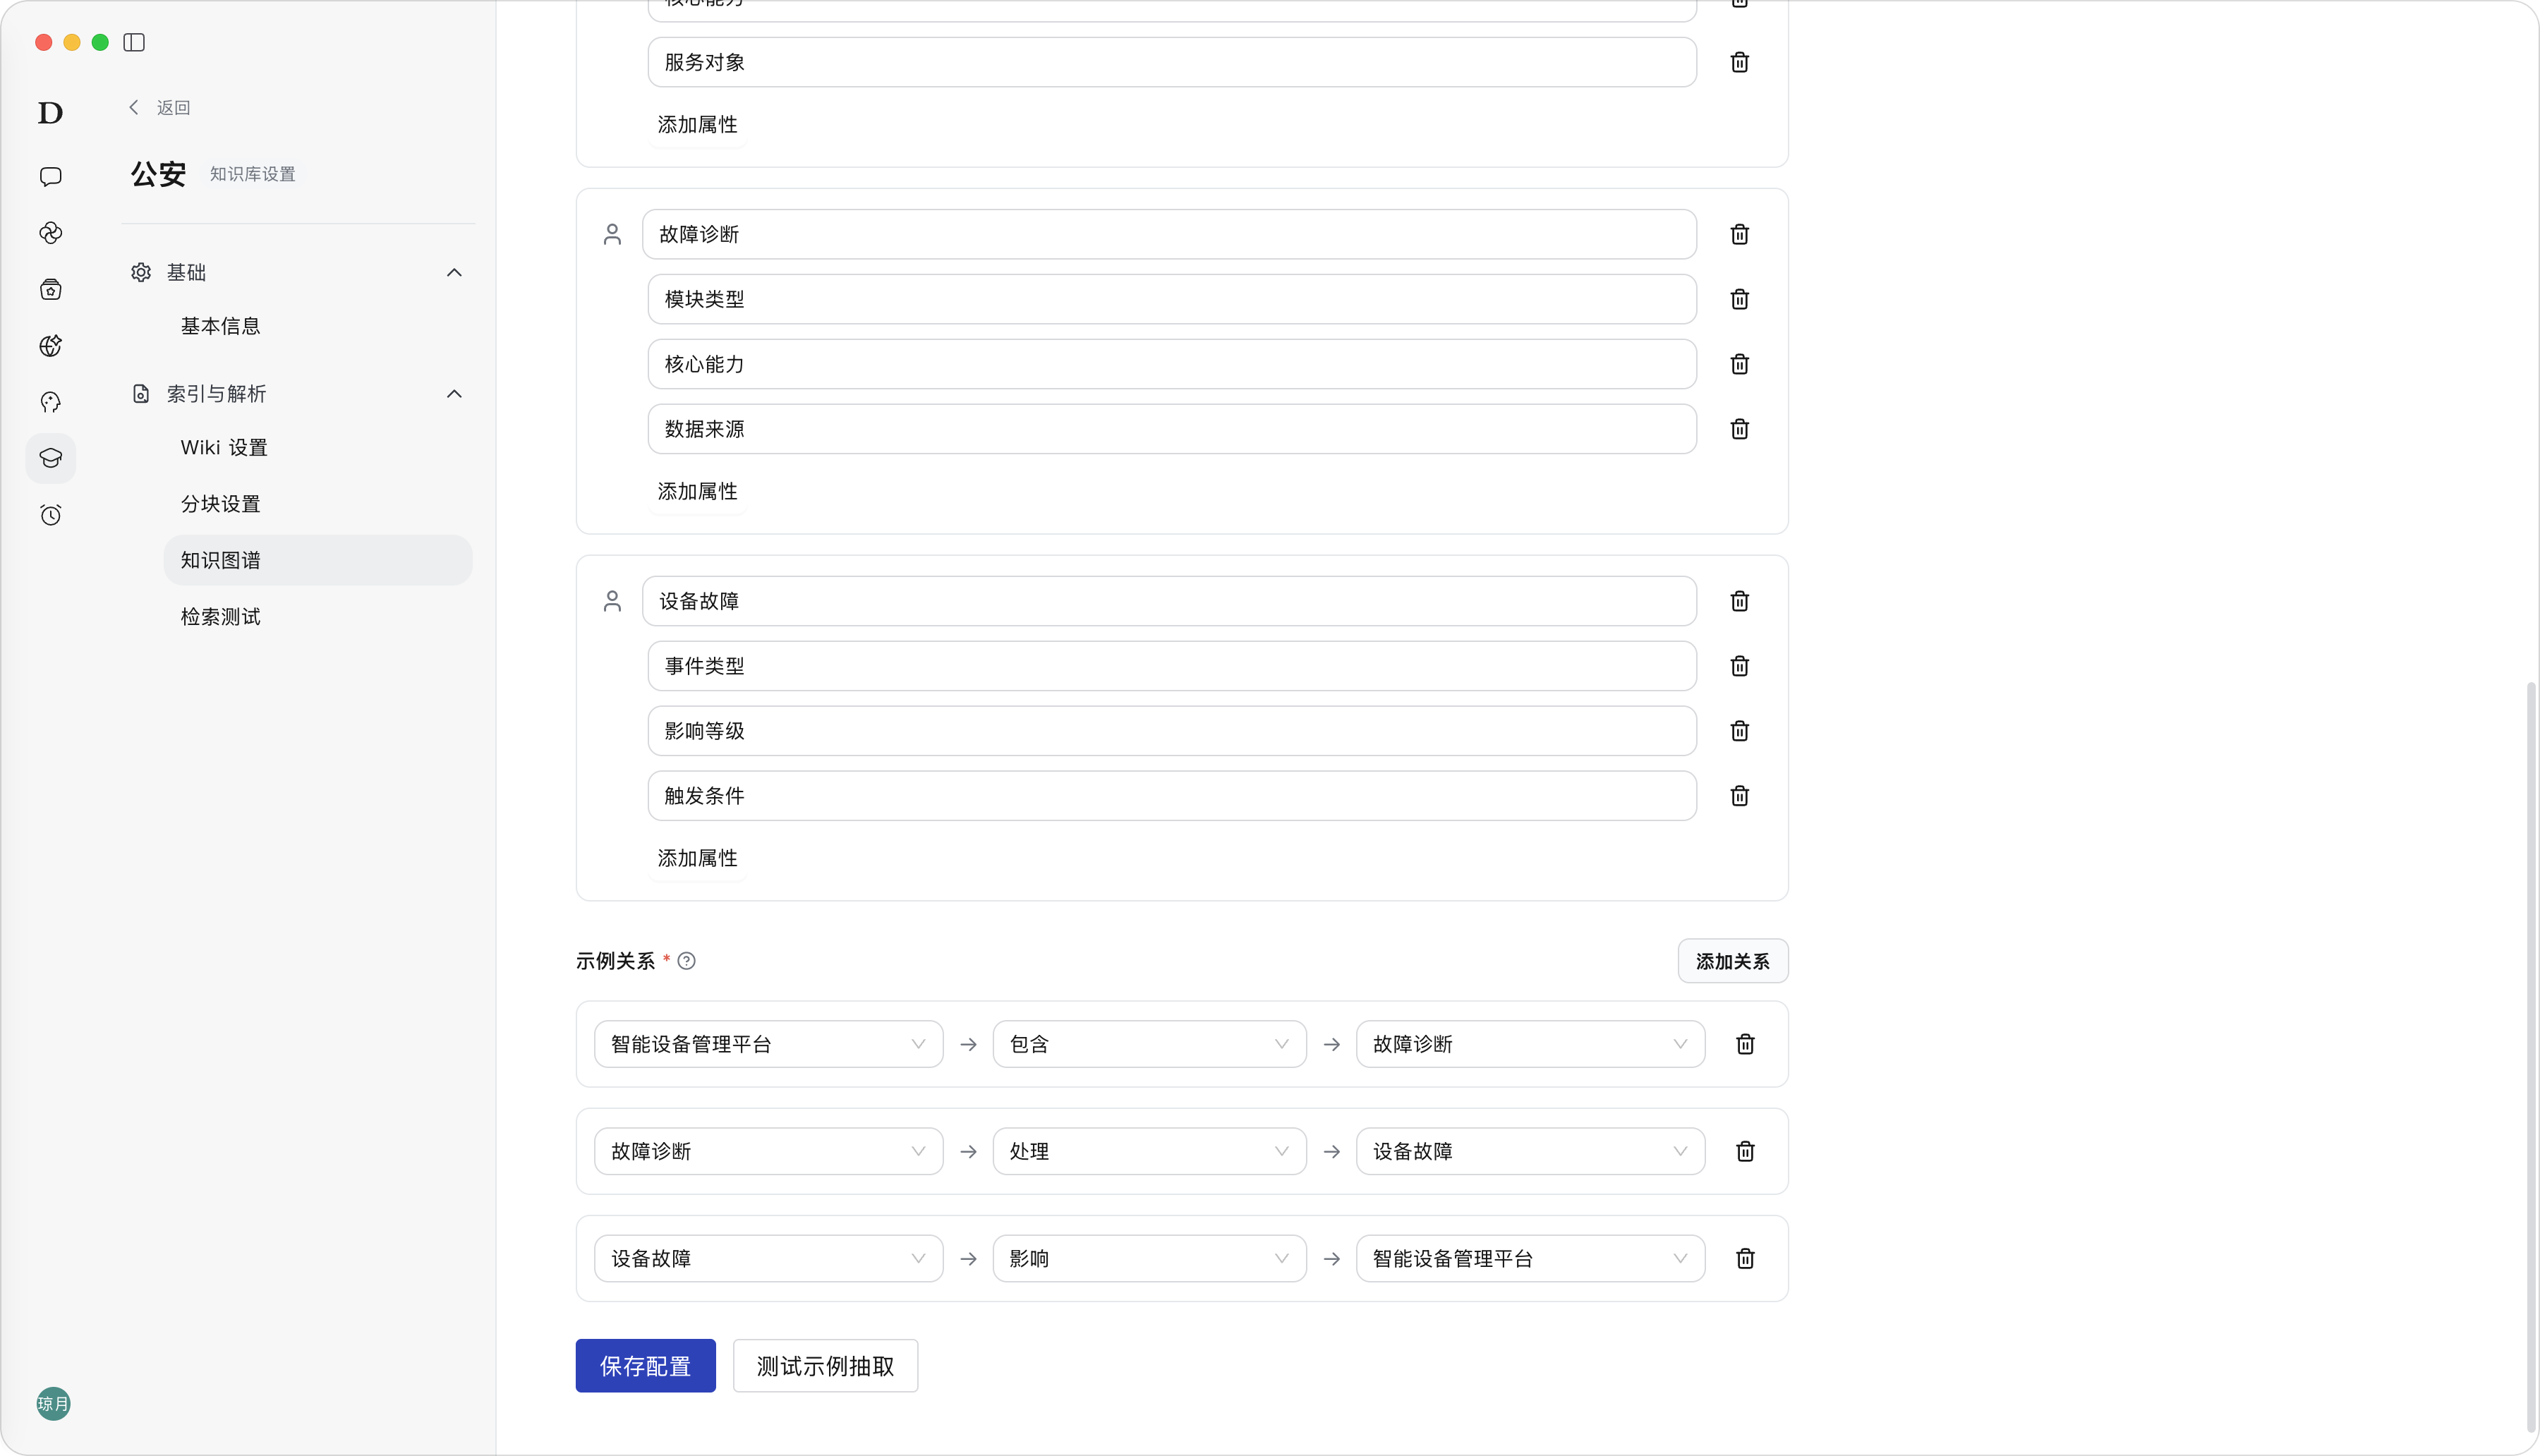
Among them, “example text, example entities, example relationships” form a Few-shot sample annotation group—providing the model with example questions with standard answers, serving as an extraction reference to unify entity naming, extraction granularity, and relationship annotation standards, and to constrain the model’s extraction effect.
Steps:
- Enter the target Knowledge Base. Click “Knowledge Base Settings”. Go to “Indexing & Parsing → Knowledge Graph”.
- Turn on “Enable Entity-Relationship Extraction”.
- Fill in “Additional Extraction Requirements”: supplement business-specific extraction rules and boundaries.
- Define “Relationship Types”: configure the relationship labels to be recognized in this extraction.
- Configure the Few-shot sample group:
- Fill in “Example Text”: paste 1-2 typical original paragraphs covering the target business scenario as the raw sample material;
- Click “Test Example Extraction”: the model automatically generates “Example Entities” and “Example Relationships”; check whether the model output fits the sample standard as an annotation reference for entity extraction.
- Click “Save Configuration”. Result:
- After saving successfully, the system prompts “Knowledge Graph configuration saved”.
- After extraction is enabled, subsequently uploaded or re-parsed documents will extract entities and relationships with reference to the configured rules, relationship types, and Few-shot sample standards. Note:
- Enabling the Knowledge Graph does not automatically process historical materials; existing materials need to be re-parsed or click “Start Extraction”.
- When the Knowledge Graph already has data, the system does not support directly disabling entity-relationship extraction.
- Configuration changes take effect only after saving. Knowledge Graph Settings - Knowledge Graph enable switch
Knowledge Graph configuration reference:
Additional Extraction Requirements
Focus on extracting products, function modules, user roles, device failures, business metrics, handling actions, and data dependencies. Entity names use the standard names in the materials; do not use pronouns. Only extract relationships explicitly expressed in the materials; do not speculate. Fill attributes with short labels.
Relationship Types
Contains, Uses, Causes, Affects, Belongs to, Occurs in, Depends on, Provides, Causes
Example Text
The smart device management platform contains device ledger, fault diagnosis, and maintenance work order modules. Maintenance engineers use the fault diagnosis module to locate device failures. Device failures can cause production line downtime and affect device availability. The maintenance work order module is used to record handling actions and maintenance results. Fault diagnosis depends on real-time monitoring data.
Example Entities
| Entity Name | Attribute 1 | Attribute 2 | Attribute 3 |
|---|---|---|---|
| Smart device management platform | Product type | Core capability | Service target |
| Fault diagnosis | Module type | Core capability | Data source |
| Device failure | Event type | Impact level | Trigger condition |
| Production line downtime | Event type | Impact level | Trigger condition |
Example Relationships
| Start Entity | Relationship Type | End Entity |
|---|---|---|
| Smart device management platform | Contains | Fault diagnosis |
| Fault diagnosis | Handles | Device failure |
| Device failure | Causes | Production line downtime |
Knowledge Graph configuration 1
Knowledge Graph configuration 2
Retrieval Test
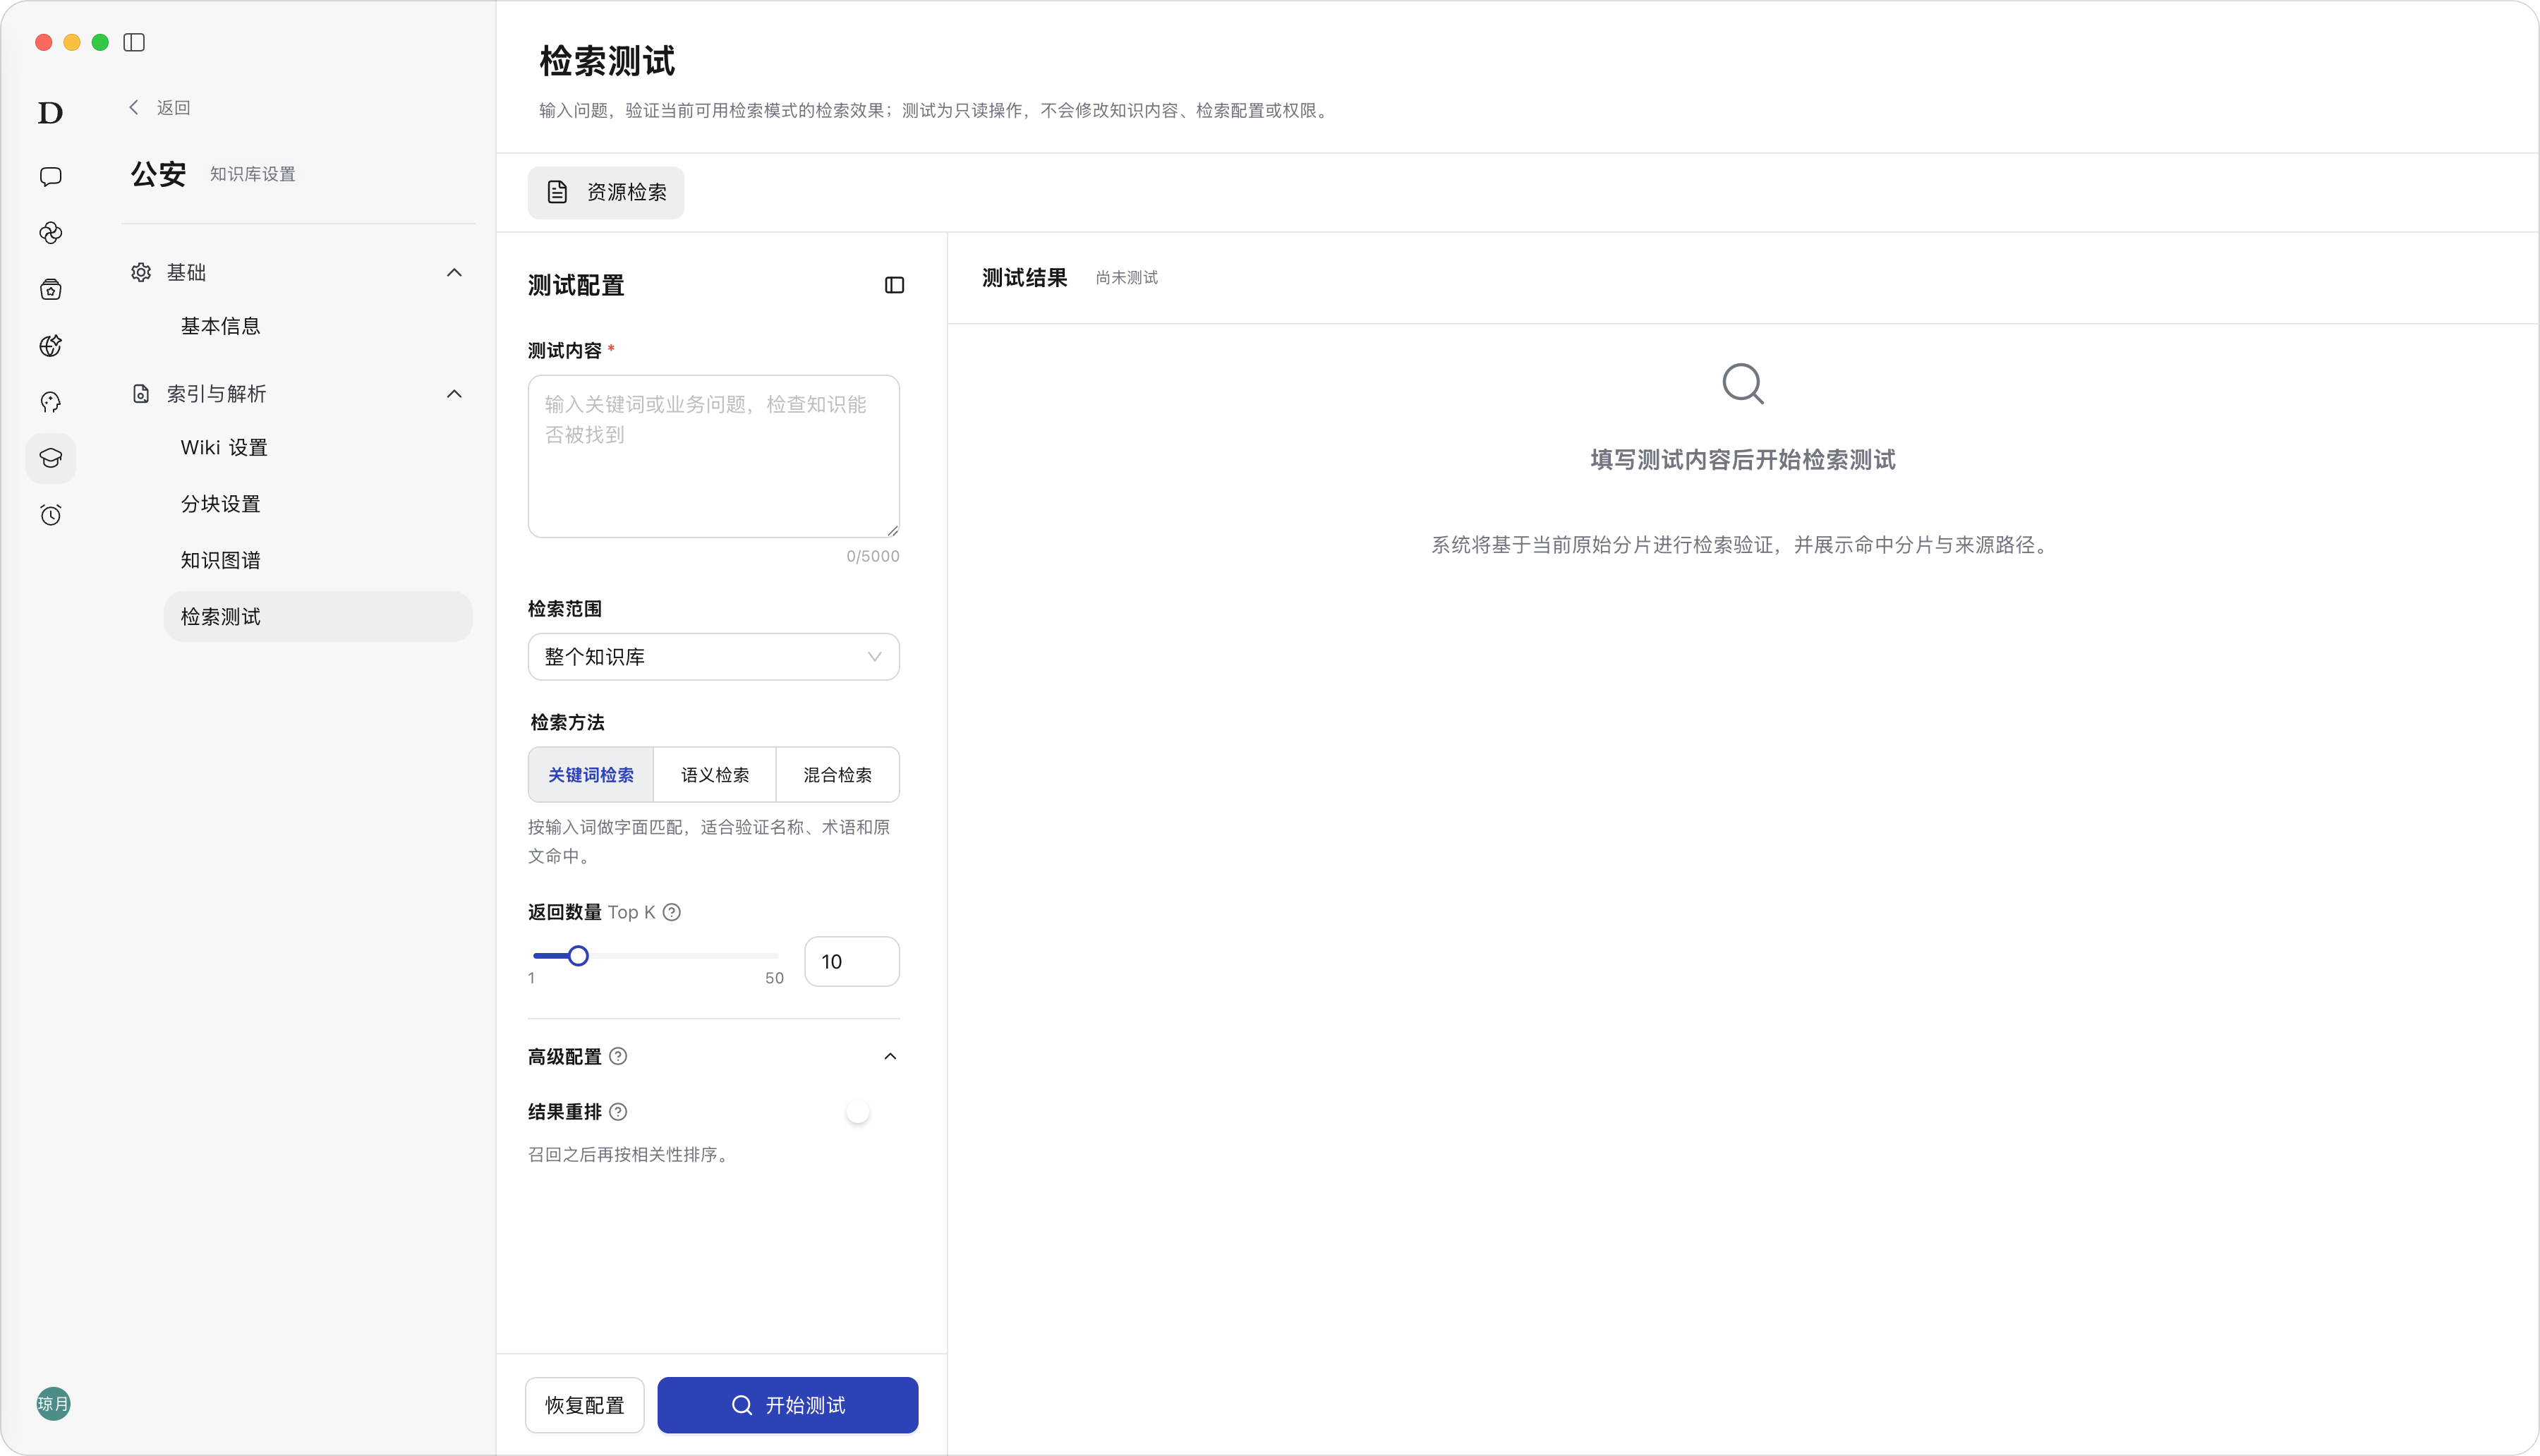
Description: Retrieval Test is used to verify whether the current Knowledge Base content can be correctly recalled. It simulates user questions or keyword searches to check whether original chunks are retrieved, and is an important quality check tool before the Knowledge Base goes live.
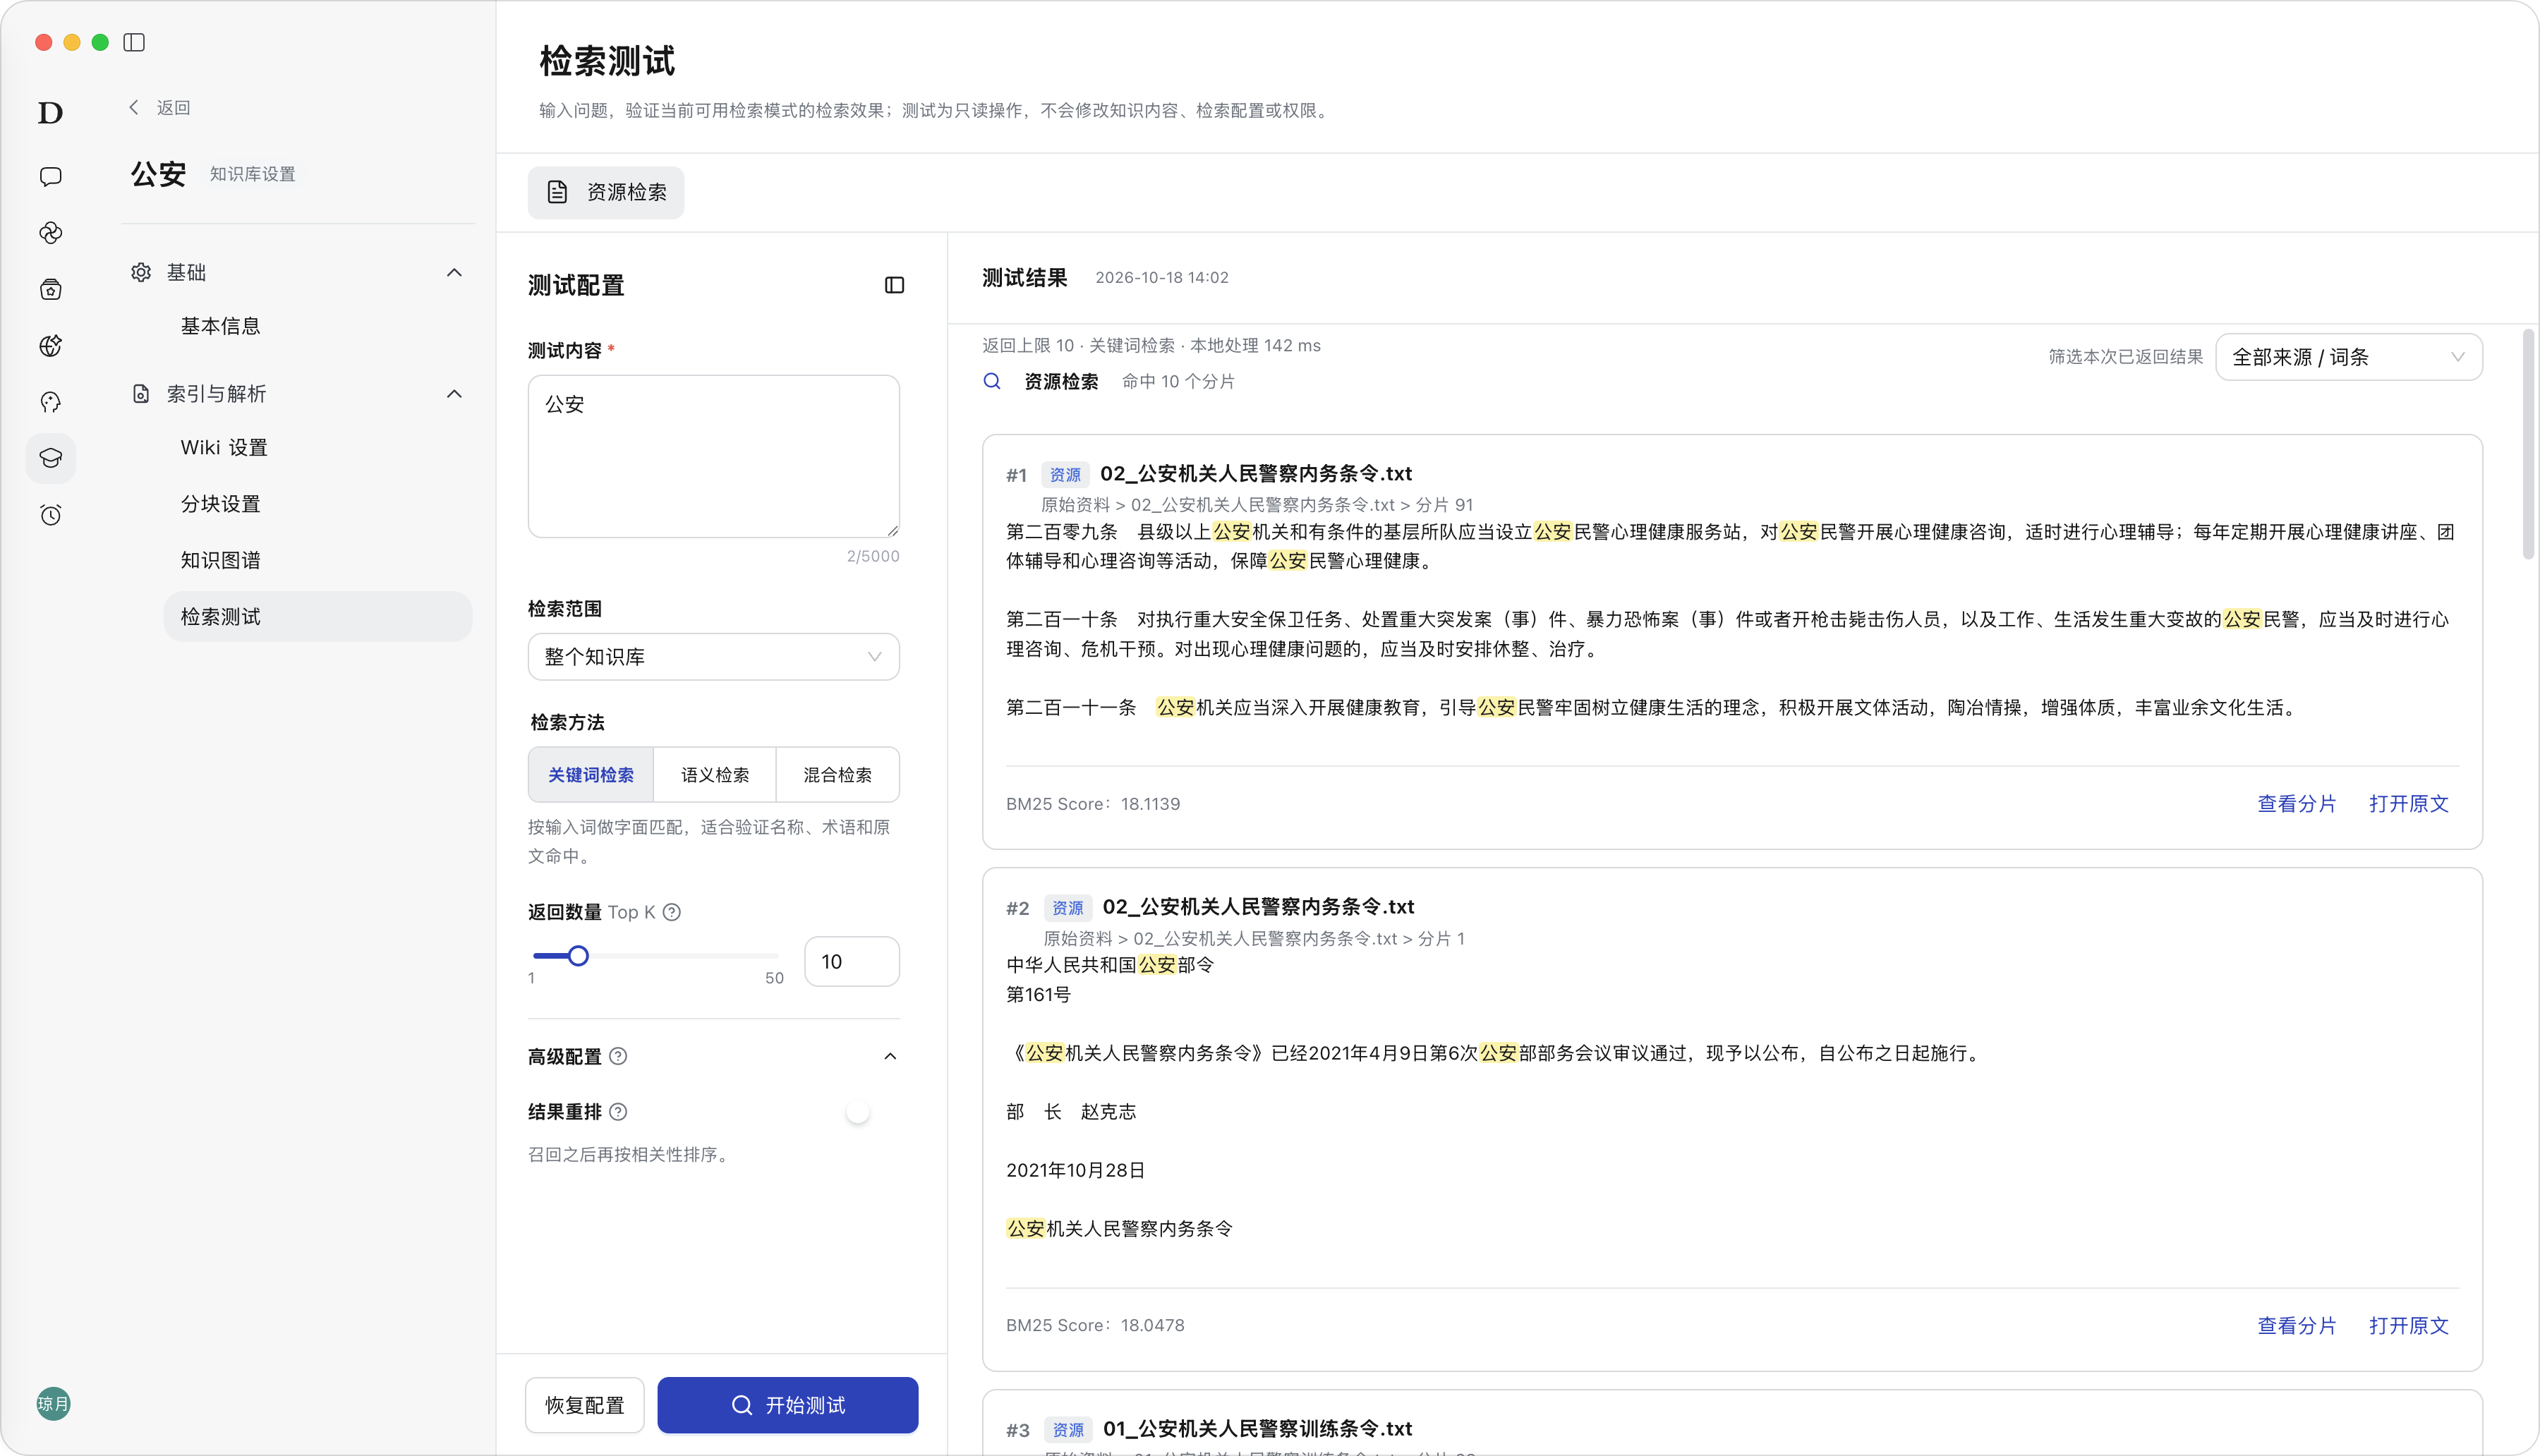
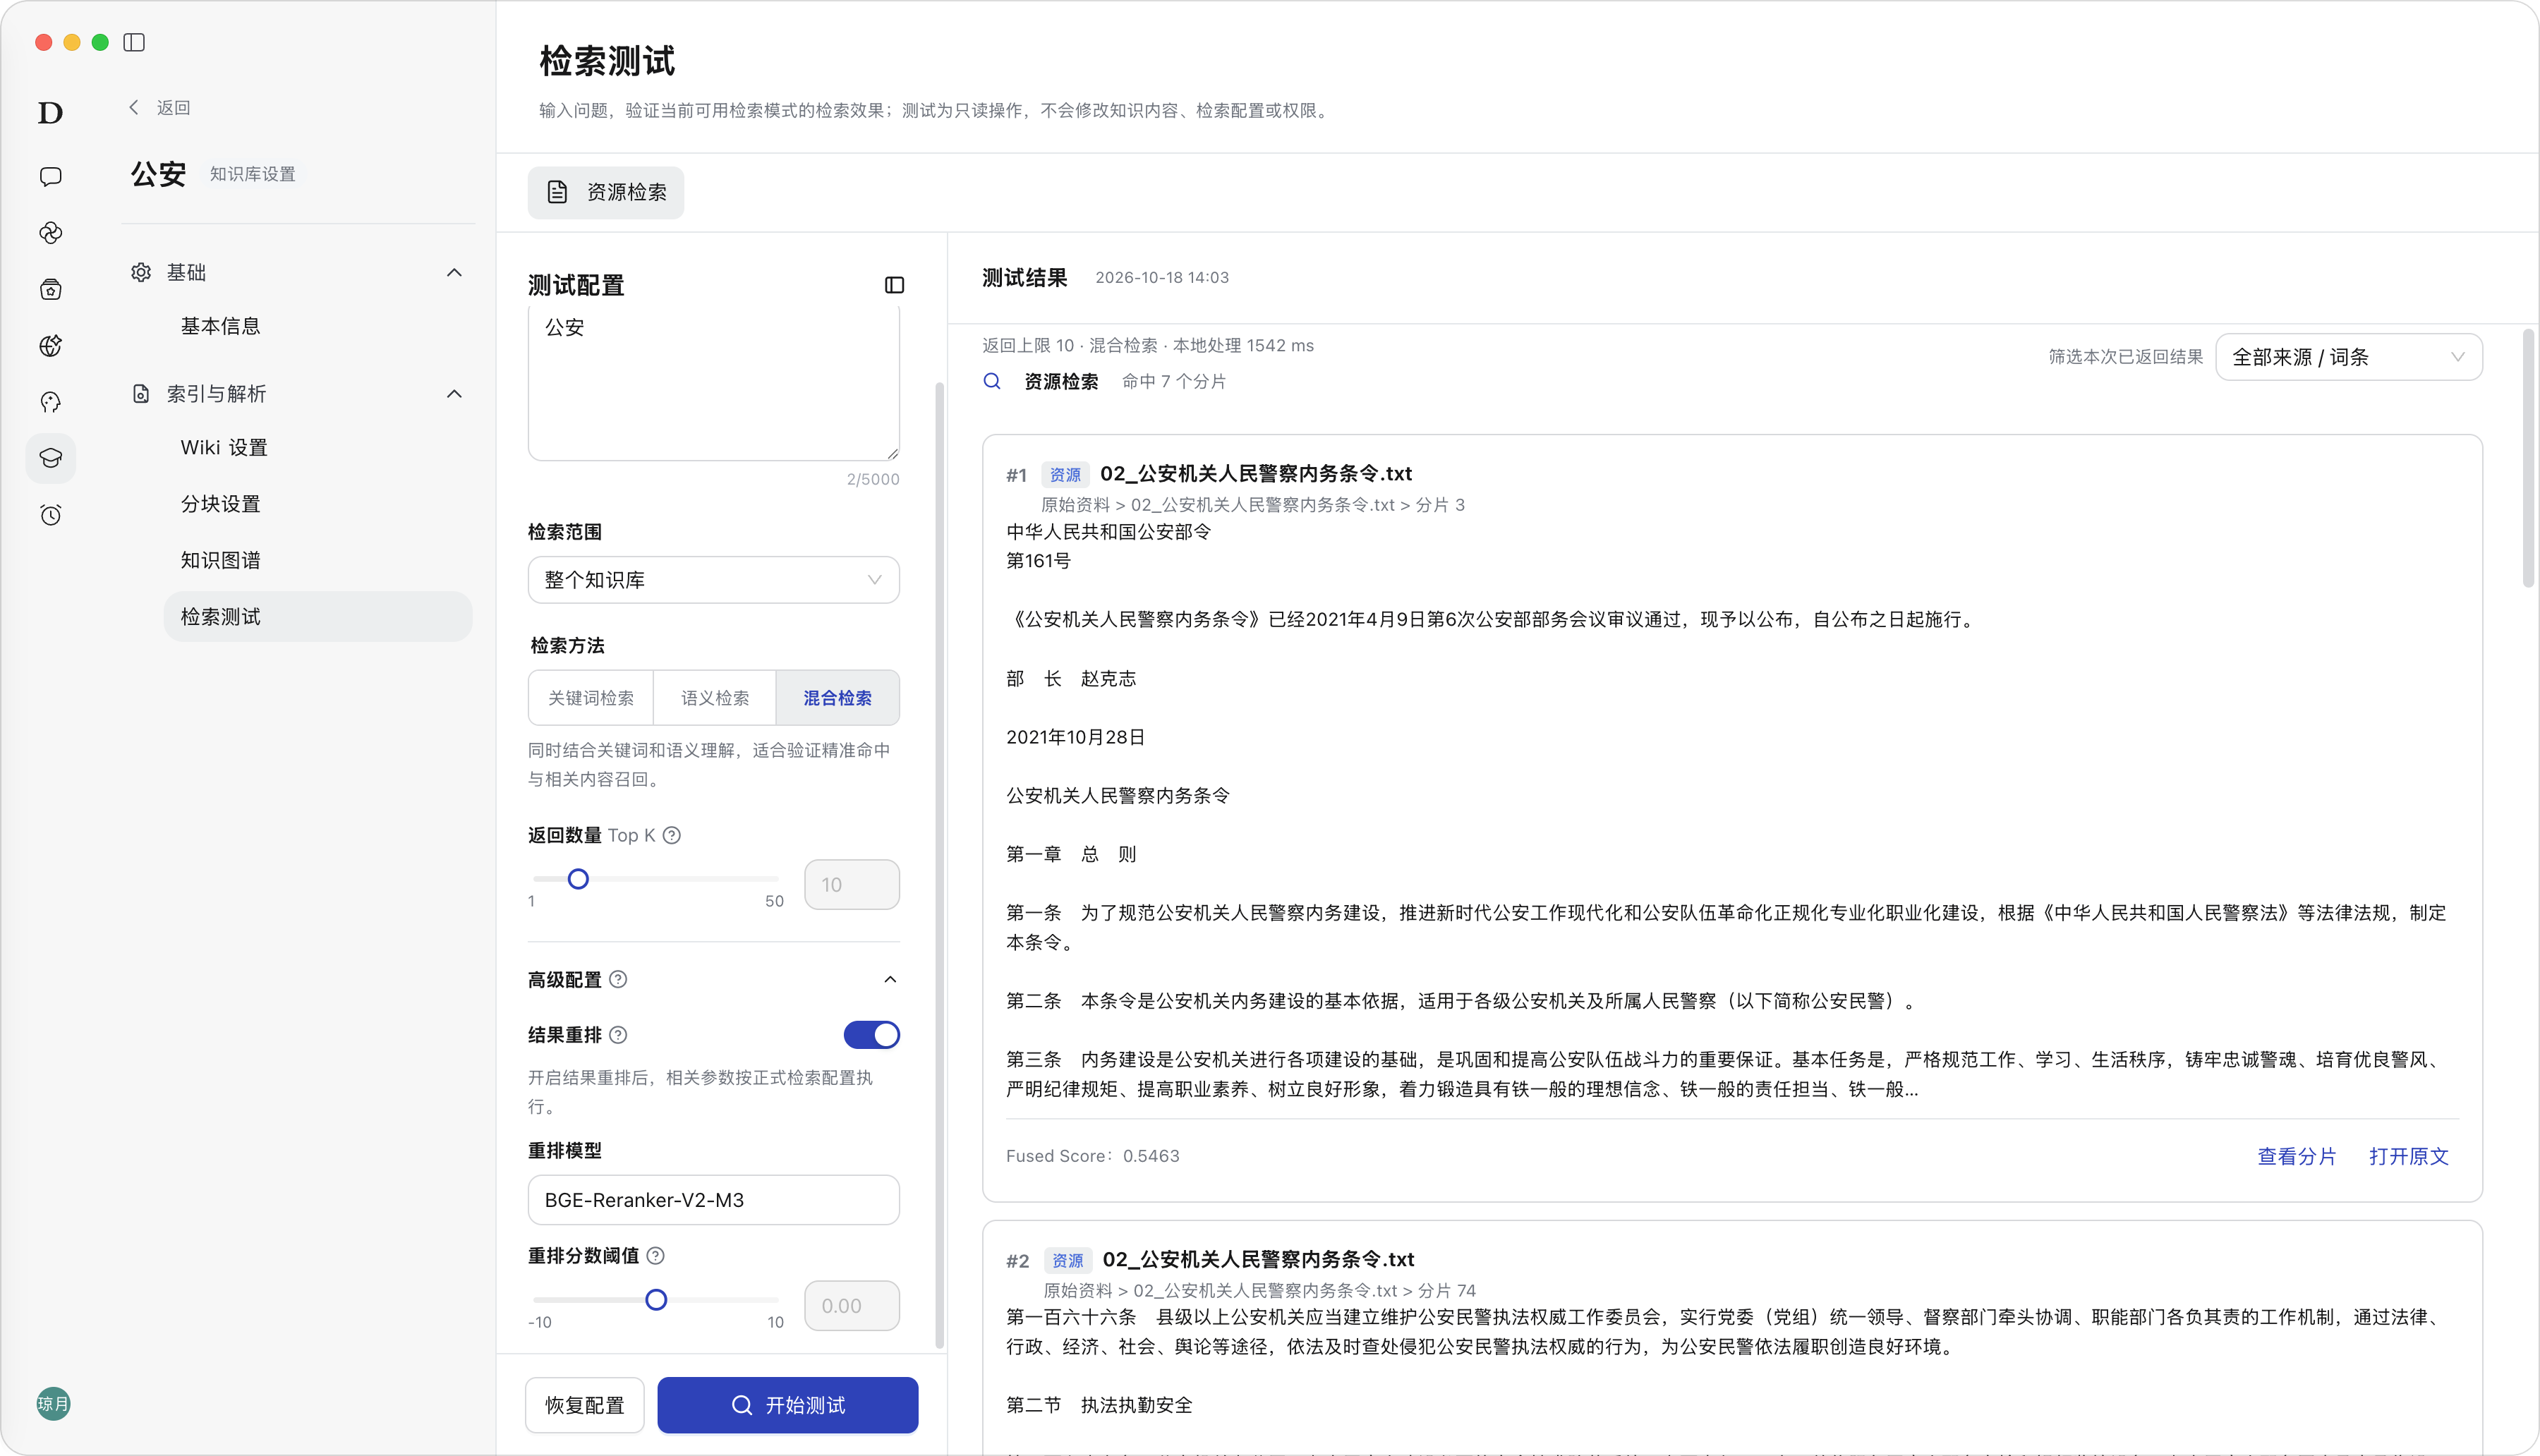
Steps: In Knowledge Base Settings, select “Retrieval Test”, enter the required test content, select the retrieval scope, keyword / semantic / hybrid retrieval method, the number of returned results Top K, and whether to enable result reranking, then click “Start Test”.
Result: The test results display hit chunks, source paths, retrieval methods, time consumed, and entries to view chunks / open the original text.
Note: The test content displays a 5000-character limit. Retrieval Test is a read-only operation and does not modify knowledge content, formal retrieval configurations, or access permissions. When the test fails, prioritize checking parsing status, chunking configuration, and whether chunks participate in retrieval.
| Term | Definition | Applicable Scenarios |
|---|---|---|
| Keyword retrieval | A retrieval method based on literal matching; the system splits the query content into keywords and looks for matching words in knowledge chunks | Querying precise terms such as product names, error codes, interface names, and clause numbers |
| Semantic retrieval | A retrieval method based on semantic vectors; the system calculates the similarity in meaning between the query content and knowledge chunks | Scenarios where the query wording differs from the original text but is semantically close |
| Hybrid retrieval | A retrieval method that performs keyword retrieval and semantic retrieval simultaneously and fuses the two result sets | Most formal retrieval scenarios; recommended for priority use |
| Return Top K | Limits the retrieval results to a maximum of the top K records | Controls the number of returned results, context length, and result focus |
| Result reranking | After initial recall is complete, the system uses a reranking model to re-evaluate candidate results and reorders them according to their relevance to the current question. | Scenarios with high requirements for answer precision that need to display the most relevant content first |
Retrieval Test - Empty state
Retrieval Test results
Retrieval Test reranked results
Agent Conversation Invocation
Agent Conversation Invocation is the consumption layer of the Shared Knowledge Base, turning parsed materials and Wiki knowledge into knowledge assets usable in conversations. In a conversation, users first determine the task input, then select task resources and the knowledge foundation; the Agent retrieves and executes according to the selected scope.
Conversation Input Area
Description: The conversation input area is the unified entry for users to interact with Agents. It is used to describe task requirements, select matching experts / expert teams, mount Shared Knowledge Bases and task resources, and trigger the Agent to execute tasks after submission; all conversation Q&A and task processing are initiated from this area.
Steps:
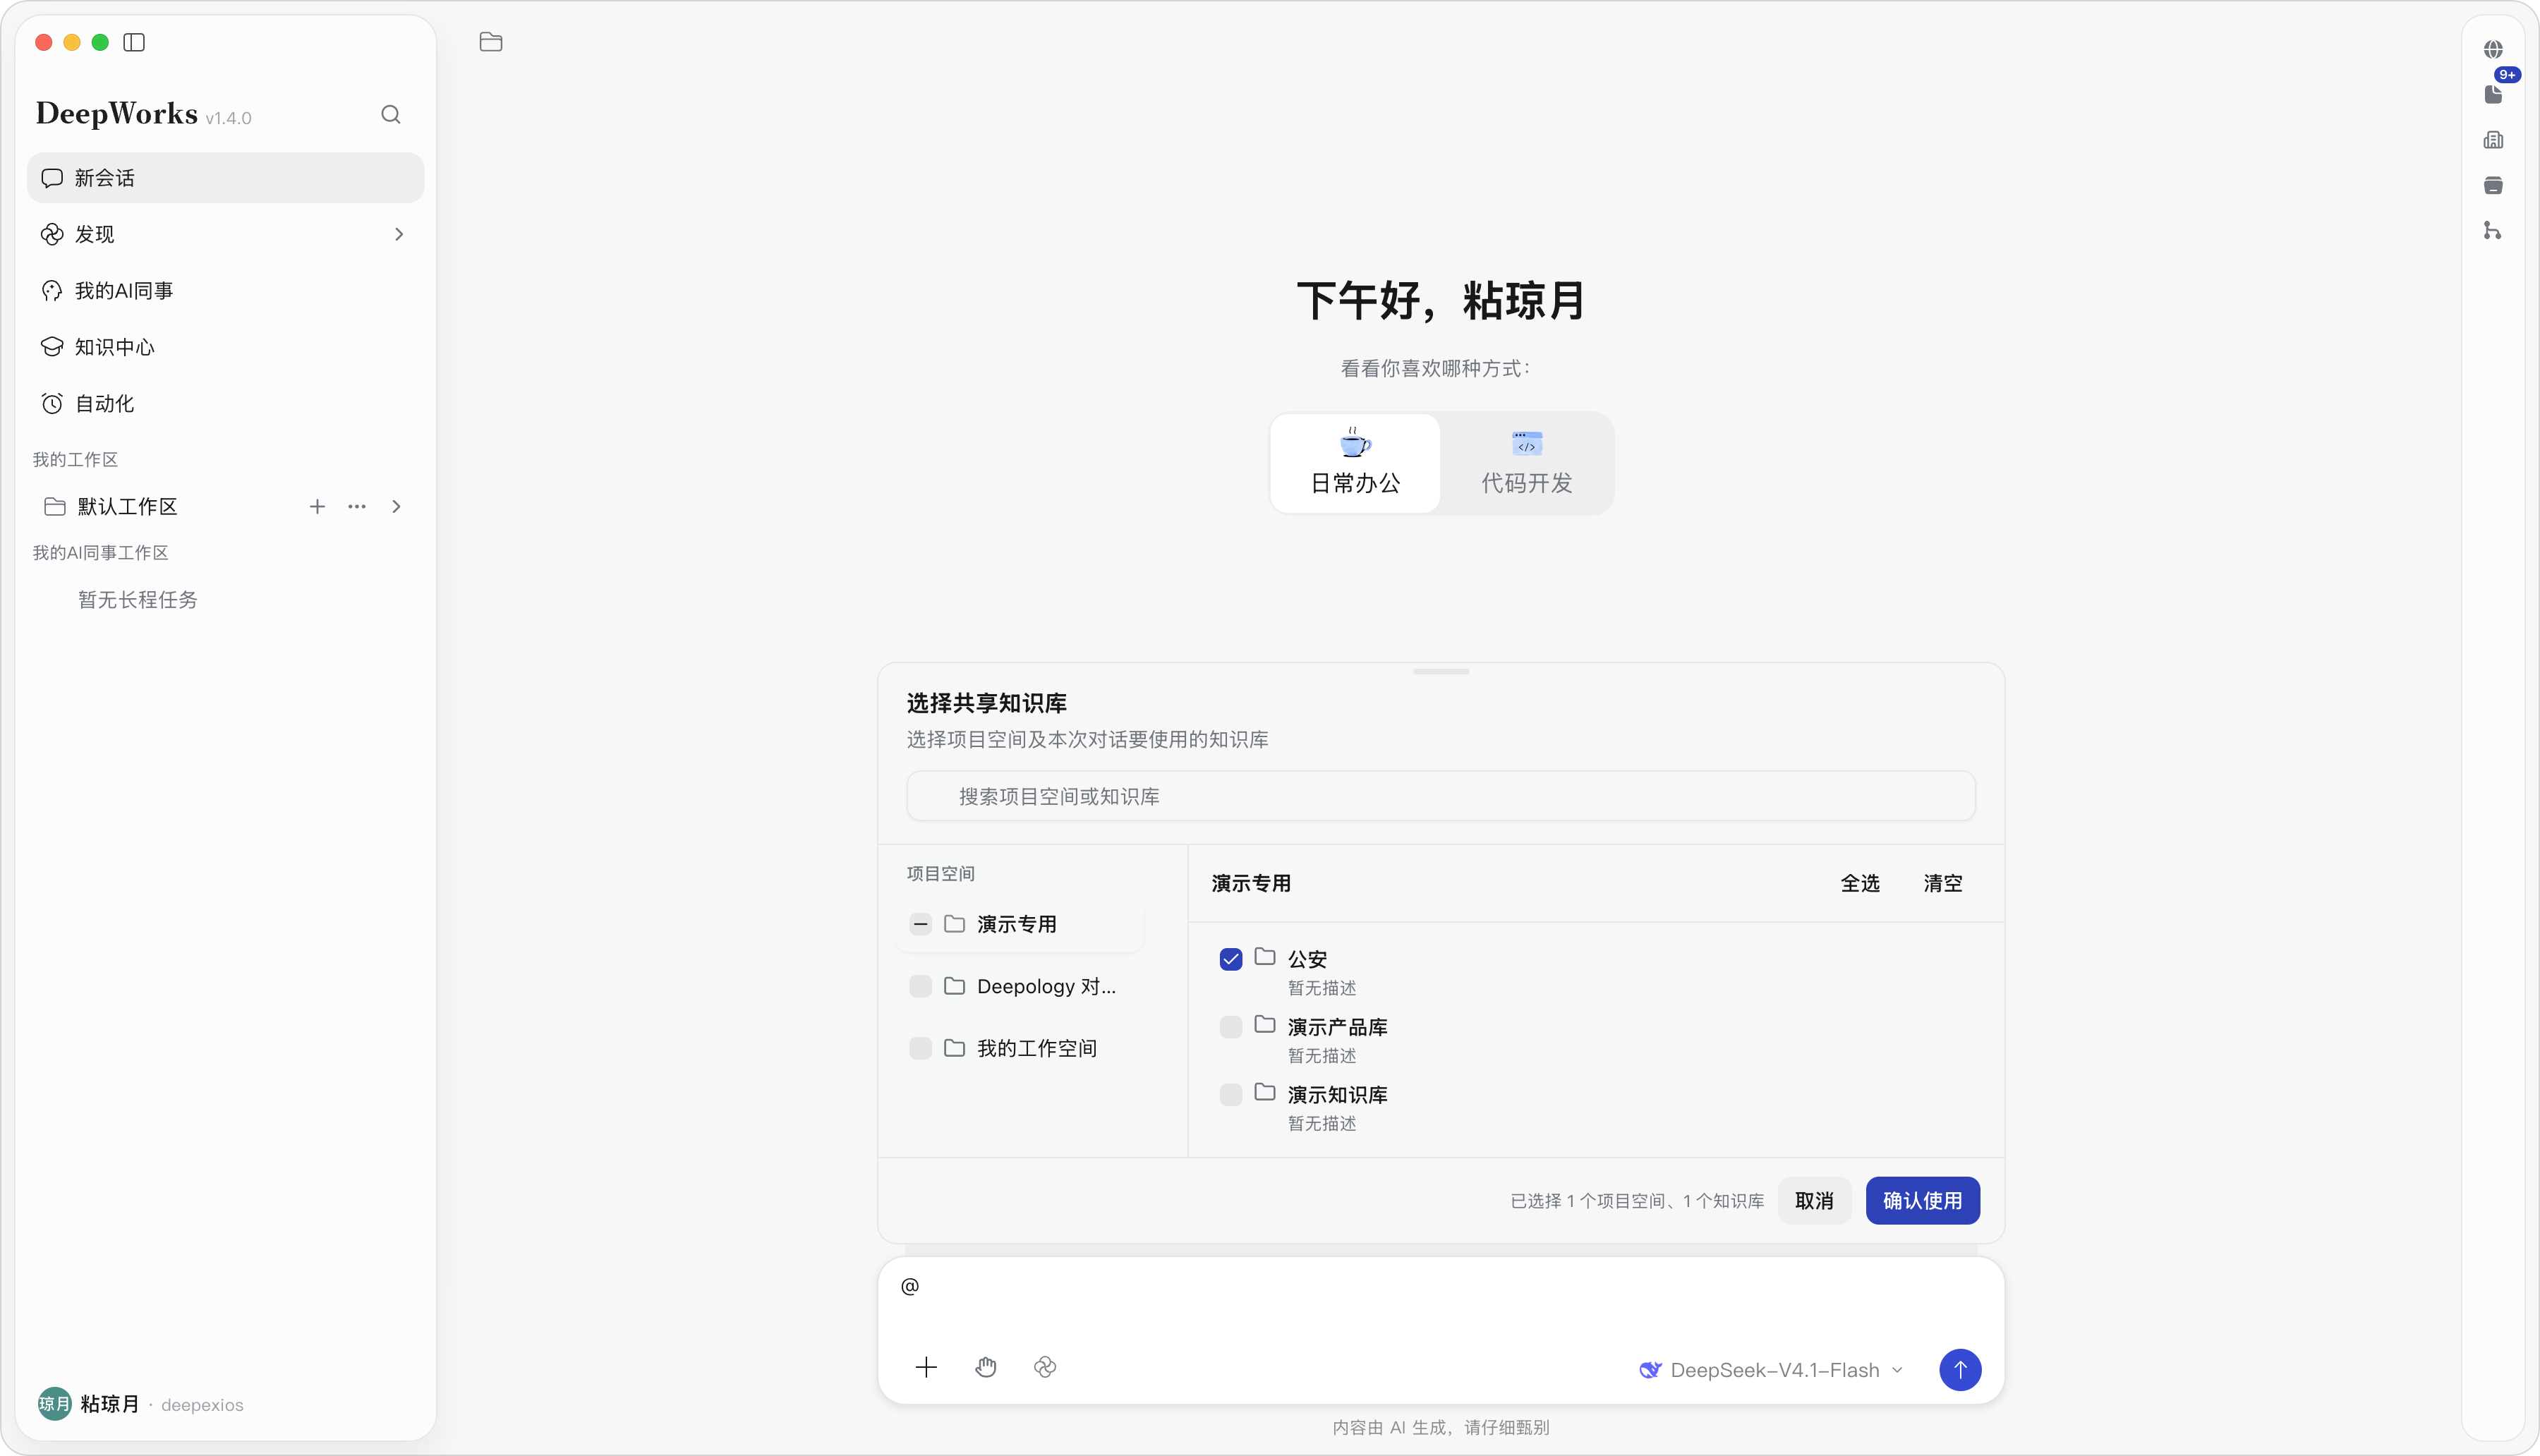
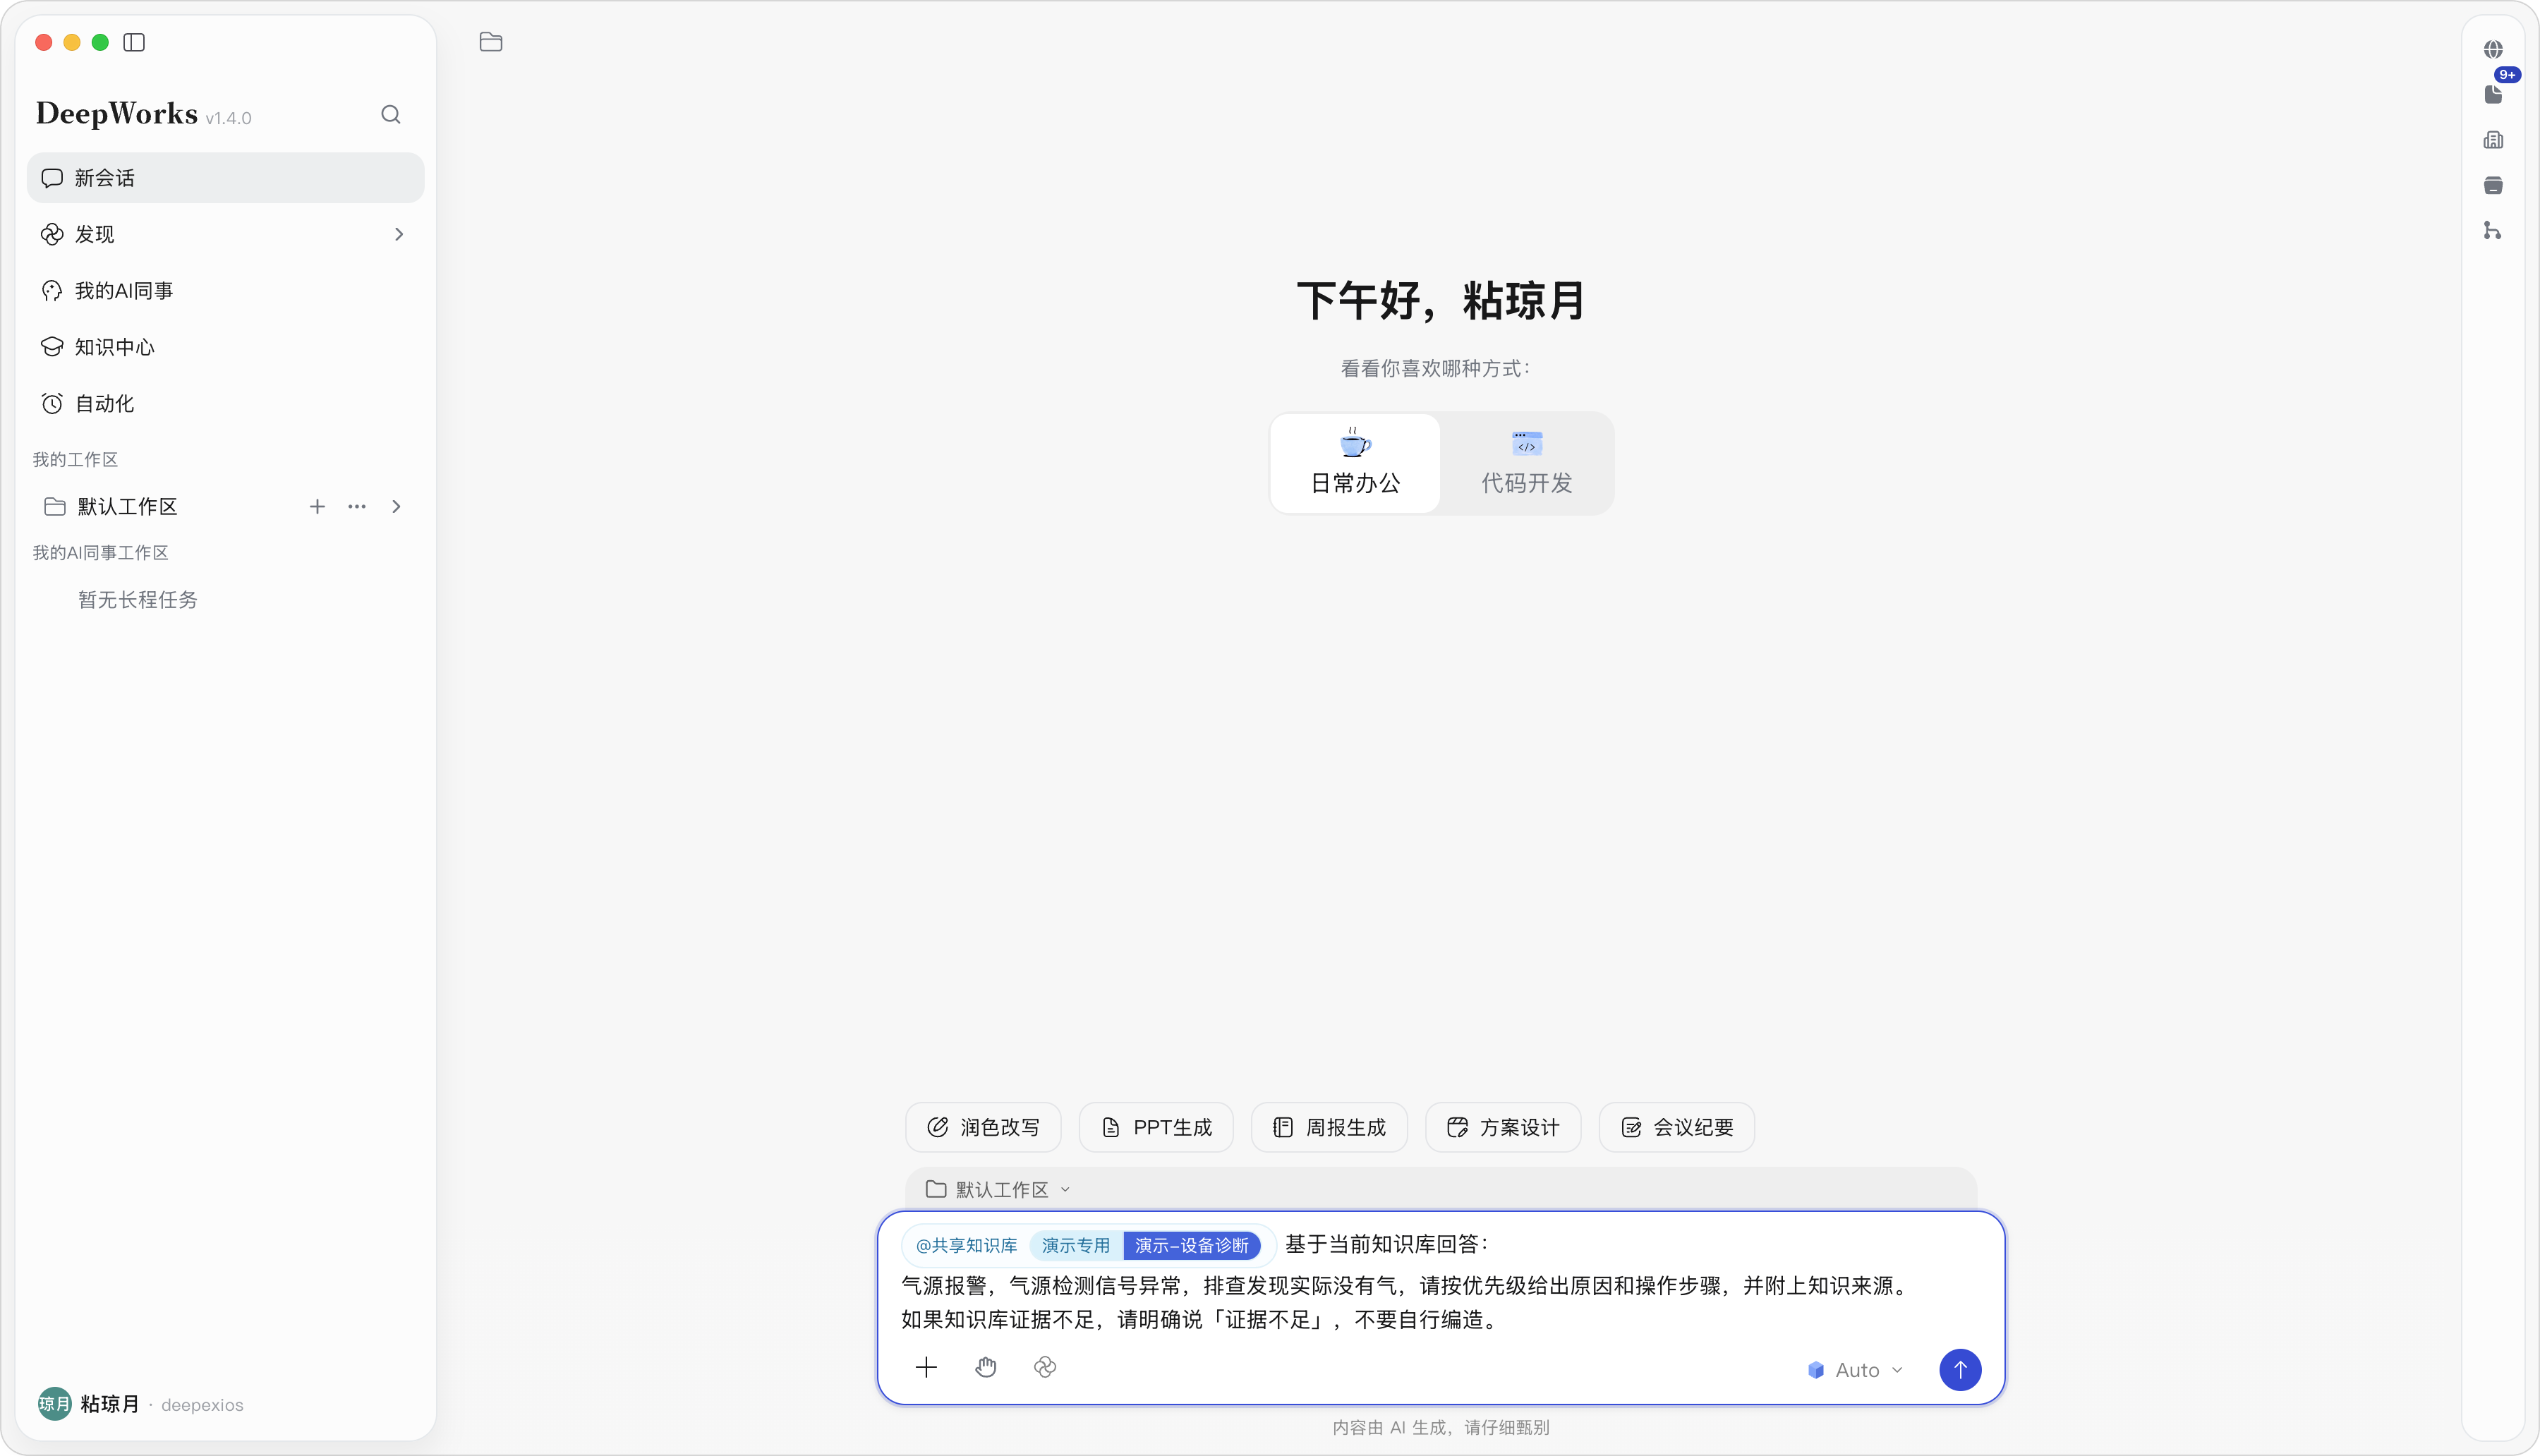
(1) Click to activate the conversation input box, type ”@” to bring up the resource selection panel, select “Shared Knowledge Base” in the categories, check the target Knowledge Base, and click confirm; the input box will display the reference tag of the selected Knowledge Base;
(2) Select matching experts / expert teams and mount other task resources as needed;
(3) Describe the specific question or task requirements in the input box;
(4) After confirming that all selections are correct, click the “Send” button to submit the task.
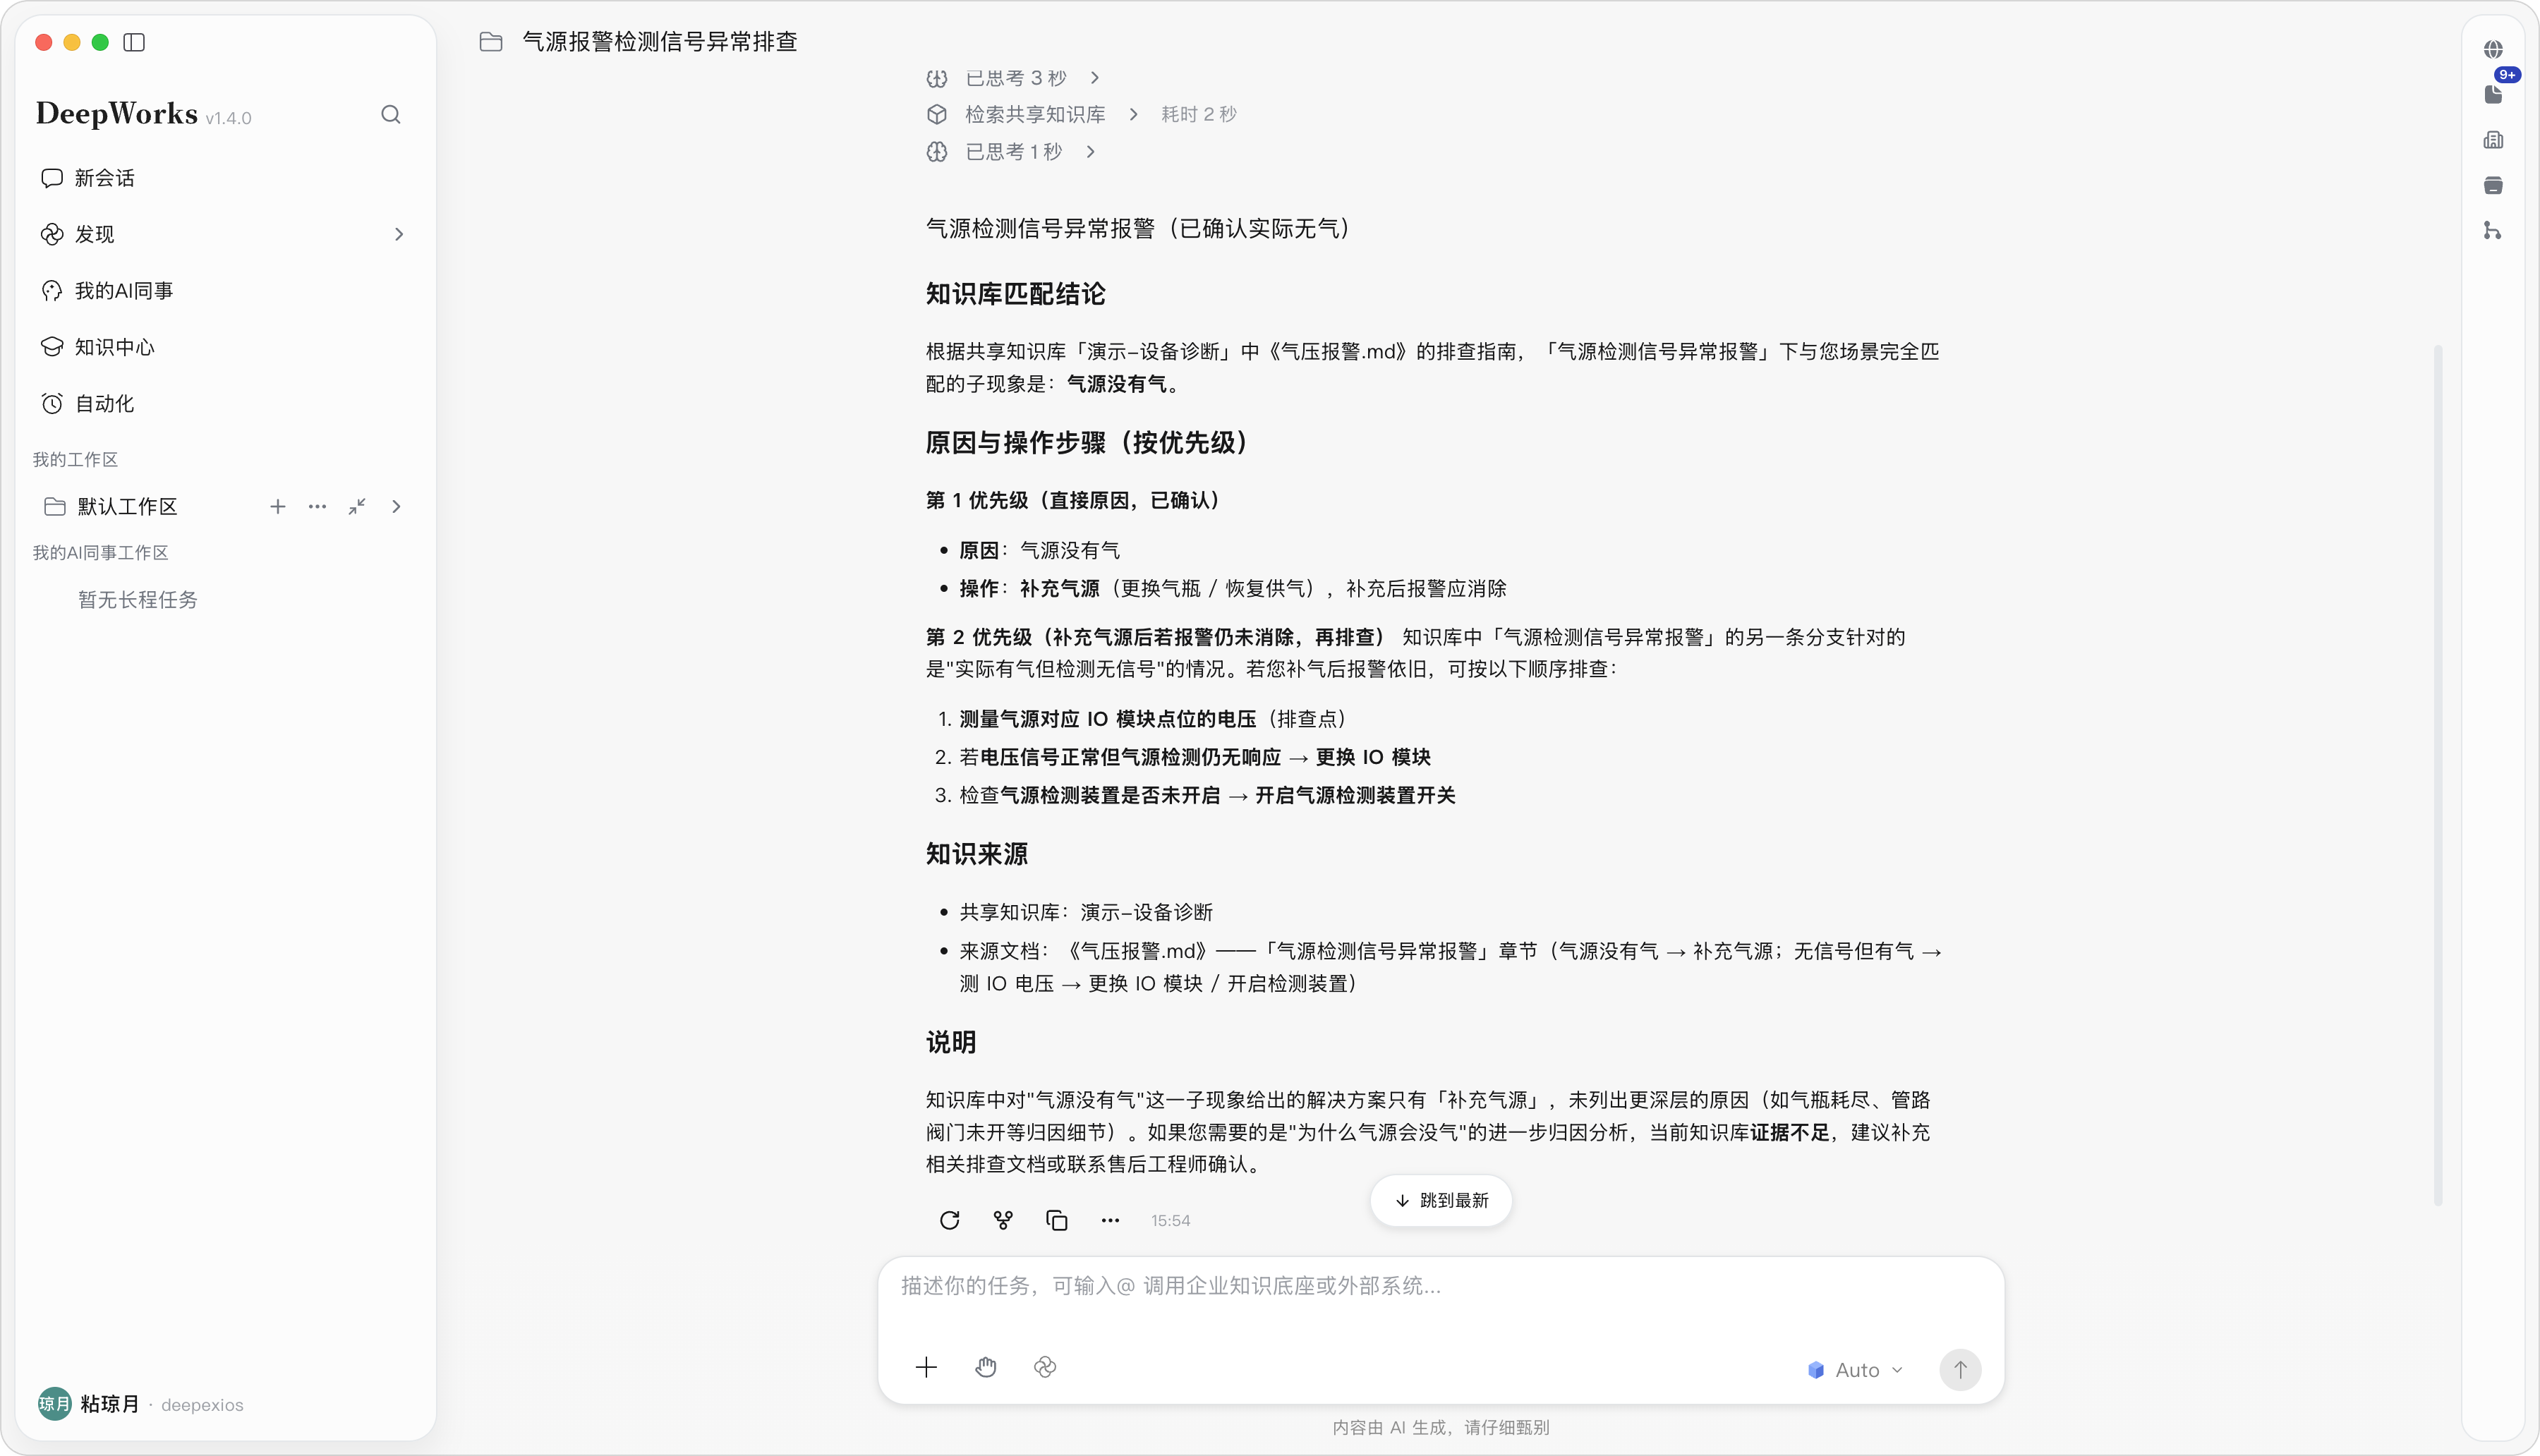
Result: The Agent starts processing the task and organizes output according to the selected knowledge foundation, skills, and experts. Whether source citations are displayed depends on the task type and page return; users should verify whether the answer basis comes from the selected Knowledge Base.
Note: Before clicking the “Send” button, confirm that the selected knowledge foundation is correct; otherwise, the Agent may answer with mismatched sources or insufficient evidence.
Select Shared Knowledge Base
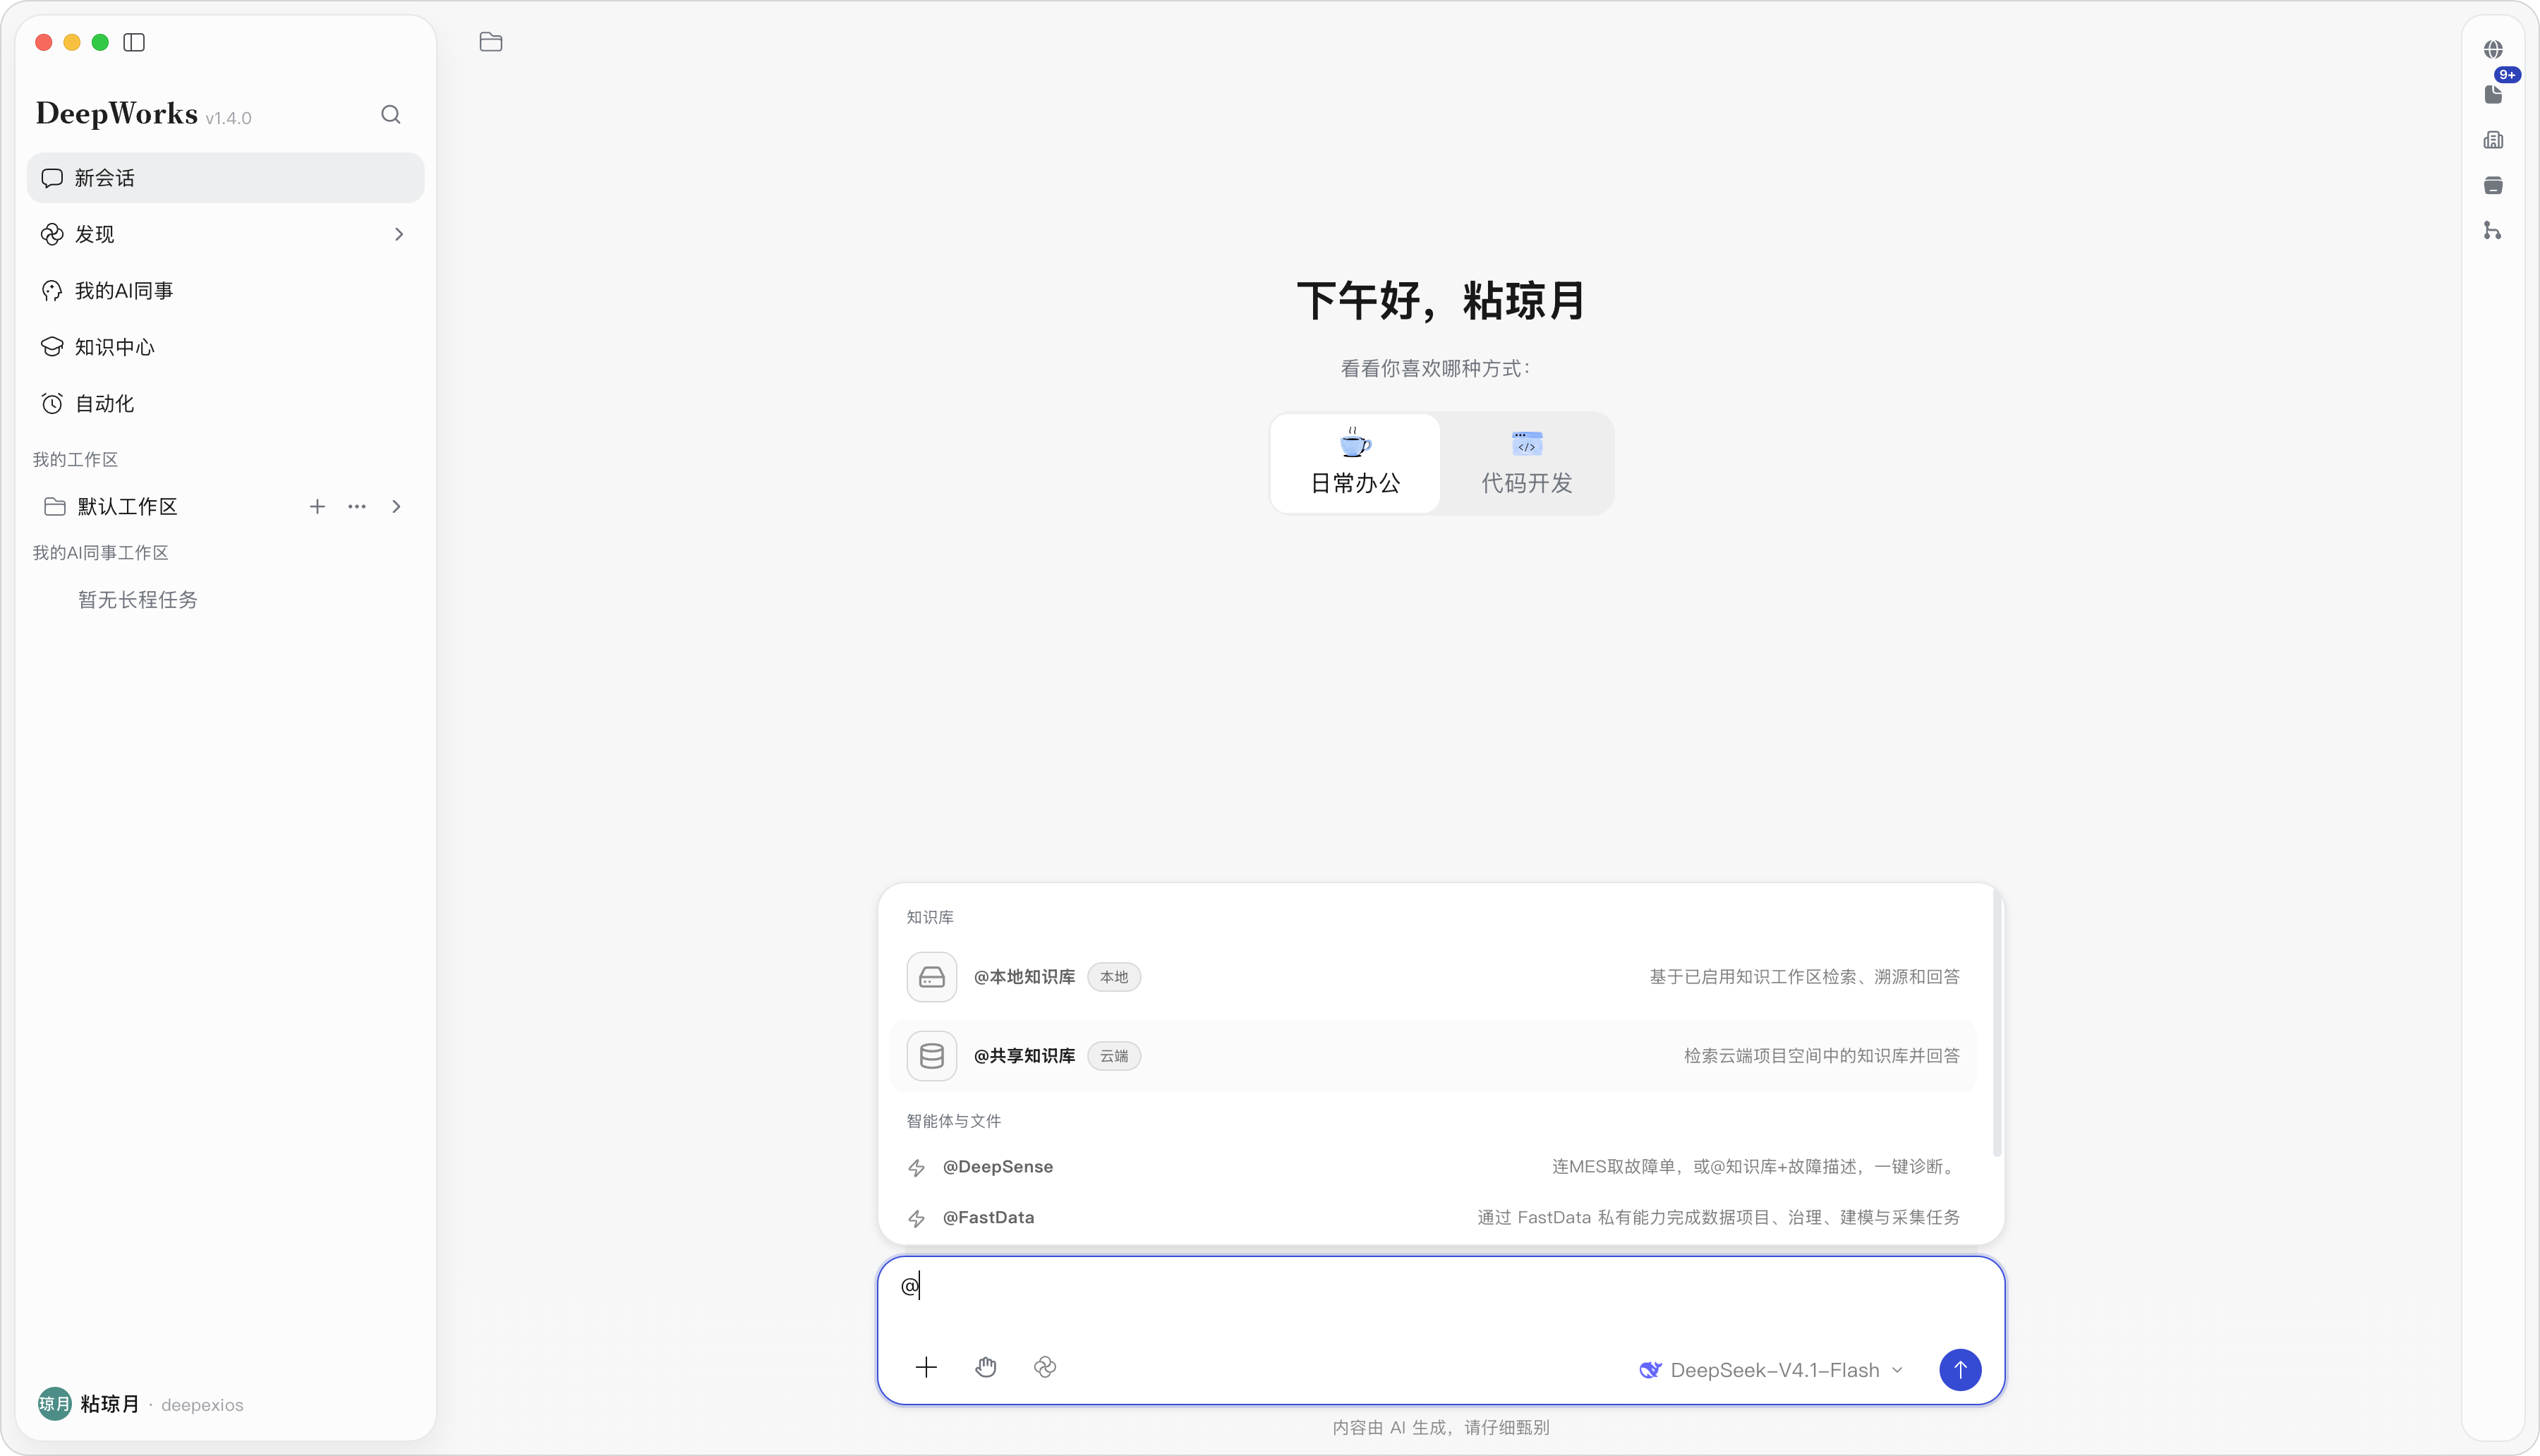
Shared Knowledge Base list
Shared Knowledge Base selected
Agent outputs task results
Appendix: Image-to-Section Mapping
| Image file | Section |
|---|---|
| /images/manuals/knowledge/shared/project-space-home-1.png | Project Space Home |
| /images/manuals/knowledge/shared/project-space-home-2.png | Project Space Home |
| /images/manuals/knowledge/shared/create-project-space-1.png | Create a Project Space |
| /images/manuals/knowledge/shared/project-space-info-1.png | Basic Information |
| /images/manuals/knowledge/shared/member-management-1.png | Member Management |
| /images/manuals/knowledge/shared/kb-management-1.png | Knowledge Base Management |
| /images/manuals/knowledge/shared/global-search-1.png | Global Search |
| /images/manuals/knowledge/shared/create-kb-1.png | Knowledge Base Creation |
| /images/manuals/knowledge/shared/create-kb-2.png | Knowledge Base Creation |
| /images/manuals/knowledge/shared/kb-home-1.png | Knowledge Base Home |
| /images/manuals/knowledge/shared/file-directory-1.png | File Directory |
| /images/manuals/knowledge/shared/file-directory-2.png | File Directory |
| /images/manuals/knowledge/shared/add-entry-1.png | Add Entry |
| /images/manuals/knowledge/shared/supported-formats-1.png | Supported Source Material Formats and Limits |
| /images/manuals/knowledge/shared/supported-formats-2.png | Supported Source Material Formats and Limits |
| /images/manuals/knowledge/shared/batch-operations-1.png | Multi-Select Mode and Batch Operations |
| /images/manuals/knowledge/shared/batch-operations-2.png | Multi-Select Mode and Batch Operations |
| /images/manuals/knowledge/shared/batch-operations-3.png | Multi-Select Mode and Batch Operations |
| /images/manuals/knowledge/shared/file-more-actions-1.png | More File Actions |
| /images/manuals/knowledge/shared/file-preview-1.png | File Preview and Parse Preview |
| /images/manuals/knowledge/shared/file-preview-2.png | File Preview and Parse Preview |
| /images/manuals/knowledge/shared/chunk-editing-1.png | Edit Chunks and Retrieval Participation |
| /images/manuals/knowledge/shared/chunk-editing-2.png | Edit Chunks and Retrieval Participation |
| /images/manuals/knowledge/shared/kb-wiki-1.png | Knowledge Base Wiki Knowledge |
| /images/manuals/knowledge/shared/wiki-index-1.png | Wiki Index |
| /images/manuals/knowledge/shared/wiki-page-detail-1.png | Wiki Page Details |
| /images/manuals/knowledge/shared/wiki-page-detail-2.png | Wiki Page Details |
| /images/manuals/knowledge/shared/edit-entry-1.png | Edit Entry |
| /images/manuals/knowledge/shared/edit-entry-content-1.png | Entry Body Editing |
| /images/manuals/knowledge/shared/insert-entry-1.png | Insert Entry |
| /images/manuals/knowledge/shared/insert-entry-2.png | Insert Entry |
| /images/manuals/knowledge/shared/version-history-1.png | Version History |
| /images/manuals/knowledge/shared/wiki-graph-1.png | Wiki Graph |
| /images/manuals/knowledge/shared/data-lineage-1.png | Data Lineage |
| /images/manuals/knowledge/shared/data-lineage-2.png | Data Lineage |
| /images/manuals/knowledge/shared/knowledge-graph-1.png | Knowledge Base Knowledge Graph |
| /images/manuals/knowledge/shared/knowledge-graph-2.png | Knowledge Base Knowledge Graph |
| /images/manuals/knowledge/shared/knowledge-graph-3.png | Knowledge Base Knowledge Graph |
| /images/manuals/knowledge/shared/kb-settings-info-1.png | Basic Information |
| /images/manuals/knowledge/shared/wiki-settings-1.png | Wiki Settings |
| /images/manuals/knowledge/shared/chunk-settings-1.png | Chunking Settings |
| /images/manuals/knowledge/shared/graph-settings-1.png | Knowledge Graph Settings |
| /images/manuals/knowledge/shared/graph-settings-2.png | Knowledge Graph Settings |
| /images/manuals/knowledge/shared/graph-settings-3.png | Knowledge Graph Settings |
| /images/manuals/knowledge/shared/retrieval-test-1.png | Retrieval Test |
| /images/manuals/knowledge/shared/retrieval-test-2.png | Retrieval Test |
| /images/manuals/knowledge/shared/retrieval-test-3.png | Retrieval Test |
| /images/manuals/knowledge/shared/chat-input-1.png | Conversation Input Area |
| /images/manuals/knowledge/shared/chat-input-2.png | Conversation Input Area |
| /images/manuals/knowledge/shared/chat-input-3.png | Conversation Input Area |
| /images/manuals/knowledge/shared/chat-input-4.png | Conversation Input Area |